User Manual
Page 4
... Chip Unit Precautions ...55 Replacing the Chip Unit and Refilling Ink 56 Print Head Maintenance...67 Checking for Clogged Print Head Nozzles 68 Cleaning the Print Head...69 Aligning the Print Head ...70 Performing Head Maintenance...71 Replacing the Waste Ink Bottle ...75 Replacing the Cutter...78 Moving......88 Forgot the Administrator Password 88 Red Light Shines Inside the Printer 88 Solving Printing Problems ...88 Nothing Prints ...88 Cannot Print Over a Network...89 Print Head Moves But Nothing Prints 89 Removing Jammed Media...90 Media Does Not Feed or Eject Correctly 91 Media Does...
... Chip Unit Precautions ...55 Replacing the Chip Unit and Refilling Ink 56 Print Head Maintenance...67 Checking for Clogged Print Head Nozzles 68 Cleaning the Print Head...69 Aligning the Print Head ...70 Performing Head Maintenance...71 Replacing the Waste Ink Bottle ...75 Replacing the Cutter...78 Moving......88 Forgot the Administrator Password 88 Red Light Shines Inside the Printer 88 Solving Printing Problems ...88 Nothing Prints ...88 Cannot Print Over a Network...89 Print Head Moves But Nothing Prints 89 Removing Jammed Media...90 Media Does Not Feed or Eject Correctly 91 Media Does...

User Manual
Page 10
7 Side cover 8 Waste ink bottle holder 9 Waste ink bottle 10 Ink splash guard 11 Waste ink tube 12 AC inlet 13 LAN port 14 Data light 15 Status light 16 USB port 17 Control panel 18 Alert light 19 Roll rest 20 Adapter guides 21 Roll lock lever 22 Adapter holder 23 Paper slot 24 Print head 25 Roll paper cover 26 Paper eject guide 10
7 Side cover 8 Waste ink bottle holder 9 Waste ink bottle 10 Ink splash guard 11 Waste ink tube 12 AC inlet 13 LAN port 14 Data light 15 Status light 16 USB port 17 Control panel 18 Alert light 19 Roll rest 20 Adapter guides 21 Roll lock lever 22 Adapter holder 23 Paper slot 24 Print head 25 Roll paper cover 26 Paper eject guide 10
User Manual
Page 16
... and humidity range for your product and your media. • Check to make sure you use your product or clog the print head nozzles. • Use the product in the print head nozzles drying out and clogging. • Make sure the product work space is turned on. 16 Failure to perform regular maintenance... in a sufficiently ventilated area. • Perform maintenance operations according to usage frequency or at the recommended intervals. Failure to observe this precaution could reduce print quality or damage the print head. • Do not bend or pull the waste ink tube.
... and humidity range for your product and your media. • Check to make sure you use your product or clog the print head nozzles. • Use the product in the print head nozzles drying out and clogging. • Make sure the product work space is turned on. 16 Failure to perform regular maintenance... in a sufficiently ventilated area. • Perform maintenance operations according to usage frequency or at the recommended intervals. Failure to observe this precaution could reduce print quality or damage the print head. • Do not bend or pull the waste ink tube.
User Manual
Page 17
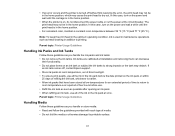
..., which may cause the print head to printing. Parent topic: Printer Usage Guidelines Handling Media Follow these guidelines as you handle the ink packs and ink tanks: • Do not remove the ink tanks. • If an error occurs and the printer is turned off , contact Epson support. • Store... ink packs at room temperature, out of direct sunlight. • To ensure print quality, use all of the ink in the home position. The print head may not be in addition to dry out. Parent topic: Printer...
..., which may cause the print head to printing. Parent topic: Printer Usage Guidelines Handling Media Follow these guidelines as you handle the ink packs and ink tanks: • Do not remove the ink tanks. • If an error occurs and the printer is turned off , contact Epson support. • Store... ink packs at room temperature, out of direct sunlight. • To ensure print quality, use all of the ink in the home position. The print head may not be in addition to dry out. Parent topic: Printer...
User Manual
Page 18
... by both edges, preferably while wearing cotton gloves. • Keep the media dry and avoid storage locations subject to automatically clean the print head and prevent the nozzles from causing creases in the media, which may leak out. If you may be used for more than two ...it to store unused media. • After printing, do not touch, rub, or scratch the printed surface to avoid removing the ink. • Dry printed media completely before storing the printer to prevent deterioration. • Do not touch the printable surface. Contact Epson support. • Even if the printer ...
... by both edges, preferably while wearing cotton gloves. • Keep the media dry and avoid storage locations subject to automatically clean the print head and prevent the nozzles from causing creases in the media, which may leak out. If you may be used for more than two ...it to store unused media. • After printing, do not touch, rub, or scratch the printed surface to avoid removing the ink. • Dry printed media completely before storing the printer to prevent deterioration. • Do not touch the printable surface. Contact Epson support. • Even if the printer ...
User Manual
Page 20
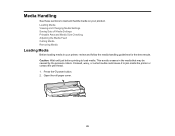
.... 20 Media Handling See these sections to load media. Creased, wavy, or curled media could cause it to jam inside the printer or contact the print head. 1. Loading Media Viewing and Changing Media Settings Saving Sets of Media Settings Printable Area and Media Size Checking Adjusting the Media Feed Cutting Media Removing...
.... 20 Media Handling See these sections to load media. Creased, wavy, or curled media could cause it to jam inside the printer or contact the print head. 1. Loading Media Viewing and Changing Media Settings Saving Sets of Media Settings Printable Area and Media Size Checking Adjusting the Media Feed Cutting Media Removing...
User Manual
Page 36
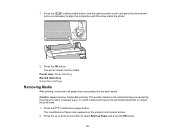
... cause it to select Remove Paper and press the OK button. 36 Press the cut position with the arrow inside the printer or contact the print head. 1. Press the load/remove paper button. The printer slowly cuts the media. 1. Parent topic: Media Handling Related references Setup Menu Settings Removing Media After...
... cause it to select Remove Paper and press the OK button. 36 Press the cut position with the arrow inside the printer or contact the print head. 1. Press the load/remove paper button. The printer slowly cuts the media. 1. Parent topic: Media Handling Related references Setup Menu Settings Removing Media After...
User Manual
Page 40
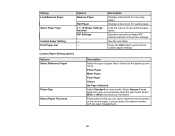
... instead of the printer settings. Lists the names of user-defined paper types. Select Narrow if head alignment does not completely align the print head. Press the OK button to 10 (Paper Settings Number) RIP Settings - - Prints patterns that is closest to determine the thickness of the current paper. Setting Load/Remove Paper Select...
... instead of the printer settings. Lists the names of user-defined paper types. Select Narrow if head alignment does not completely align the print head. Press the OK button to 10 (Paper Settings Number) RIP Settings - - Prints patterns that is closest to determine the thickness of the current paper. Setting Load/Remove Paper Select...
User Manual
Page 41
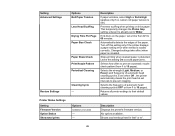
... checks, cleaning cycles, and other maintenance operations. Select High or Extra High if paper wrinkles during printing. Select On to resolve banding issues even after head cleaning and alignment. Select one of Media Settings Adjusting the Media Feed Maintenance Menu Settings The Maintenance menu... lets you choose an adjustment between the print head and thin or soft paper. Options Paper Feed Adjust Paper Suction Roll Paper Tension Remove Skew Setting Name Restore Settings Description...
... checks, cleaning cycles, and other maintenance operations. Select High or Extra High if paper wrinkles during printing. Select On to resolve banding issues even after head cleaning and alignment. Select one of Media Settings Adjusting the Media Feed Maintenance Menu Settings The Maintenance menu... lets you choose an adjustment between the print head and thin or soft paper. Options Paper Feed Adjust Paper Suction Roll Paper Tension Remove Skew Setting Name Restore Settings Description...
User Manual
Page 42
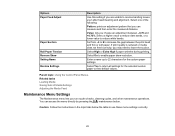
Replace Cutter: positions the cutter for Clogged Print Head Nozzles Cleaning the Print Head Aligning the Print Head Replacing the Cutter 42 Description Prints a nozzle check pattern that you can visually inspect and then run head cleaning if necessary. Lets you reset the waste ink counter if you clean all or ...nozzles are grainy or out of 0.039 inch (1 mm), from -0.12 to 0.12 inch (-3 to 3 mm). Positions the print head for cleaning using the head maintenance kit. Lets you replace the waste ink bottle before being prompted by a message on the nozzle check pattern. Select the...
Replace Cutter: positions the cutter for Clogged Print Head Nozzles Cleaning the Print Head Aligning the Print Head Replacing the Cutter 42 Description Prints a nozzle check pattern that you can visually inspect and then run head cleaning if necessary. Lets you reset the waste ink counter if you clean all or ...nozzles are grainy or out of 0.039 inch (1 mm), from -0.12 to 0.12 inch (-3 to 3 mm). Positions the print head for cleaning using the head maintenance kit. Lets you replace the waste ink bottle before being prompted by a message on the nozzle check pattern. Select the...
User Manual
Page 45
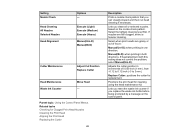
...paper setting error when media is loaded correctly. Even when Off , the printer automatically cleans the print head at set a time from 1 to prevent clogging. Selects the frequency of automatic head cleaning cycles (OFF or from 0.1 to Wider. Description If paper wrinkles, select High or Extra... Settings Restore Settings Printer Status Settings Setting Firmware Version Option Status Show total prints Options Roll Paper Tension Less Head Scuffing Drying Time Per Page Paper Size Check Paper Skew Check Print Nozzle Pattern Periodical Cleaning Cleaning Cycle - Turn off this setting On to ...
...paper setting error when media is loaded correctly. Even when Off , the printer automatically cleans the print head at set a time from 1 to prevent clogging. Selects the frequency of automatic head cleaning cycles (OFF or from 0.1 to Wider. Description If paper wrinkles, select High or Extra... Settings Restore Settings Printer Status Settings Setting Firmware Version Option Status Show total prints Options Roll Paper Tension Less Head Scuffing Drying Time Per Page Paper Size Check Paper Skew Check Print Nozzle Pattern Periodical Cleaning Cleaning Cycle - Turn off this setting On to ...
User Manual
Page 47
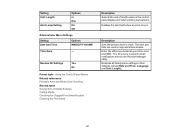
The time and date are used on the control panel display and when printing test patterns. Enter the difference between your time zone and GMT. Restores all Setup menu settings to their defaults (except Date and Time, Language, and ... the Control Panel Menus Related references Printable Area and Media Size Checking Related tasks Saving Sets of Media Settings Cutting Media Checking for Clogged Print Head Nozzles Cleaning the Print Head Description Selects the unit of length used in email notifications sent by the Remote Manager utility. Description Sets the printer's built-in On...
The time and date are used on the control panel display and when printing test patterns. Enter the difference between your time zone and GMT. Restores all Setup menu settings to their defaults (except Date and Time, Language, and ... the Control Panel Menus Related references Printable Area and Media Size Checking Related tasks Saving Sets of Media Settings Cutting Media Checking for Clogged Print Head Nozzles Cleaning the Print Head Description Selects the unit of length used in email notifications sent by the Remote Manager utility. Description Sets the printer's built-in On...
User Manual
Page 48
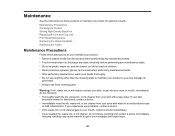
...; Do not use fresh cleaning pads. Maintenance Precautions Cleaning the Product Stirring High Density Black Ink Replacing the Ink and Chip Unit Print Head Maintenance Replacing the Waste Ink Bottle Replacing the Cutter Maintenance Precautions Follow these sections to maintain your printer for optimum results. Warning: ...waste ink, or ink cleaner from your skin with water to avoid bloodshot eyes or mild inflammation. Inducing vomiting may damage its print head. • Always use anything other than the cleaning pads to maintain your product or you may cause material to get into your...
...; Do not use fresh cleaning pads. Maintenance Precautions Cleaning the Product Stirring High Density Black Ink Replacing the Ink and Chip Unit Print Head Maintenance Replacing the Waste Ink Bottle Replacing the Cutter Maintenance Precautions Follow these sections to maintain your printer for optimum results. Warning: ...waste ink, or ink cleaner from your skin with water to avoid bloodshot eyes or mild inflammation. Inducing vomiting may damage its print head. • Always use anything other than the cleaning pads to maintain your product or you may cause material to get into your...

User Manual
Page 49
...: Do not use a hard brush, benzene, alcohol, or paint thinner to an industrial waste disposal company. Caution: If dust or other particles remain on Epson's support website. Dispose of the product. 4. Turn off the product and disconnect the power cable from the product. 2. When handing over the waste ink to...clean cloth to the industrial waste disposal company, make sure you notice it . 49 Caution: Waste ink is dirty on the inside the product, the print head nozzles may clog or the print head may be damaged. 1. To remove stubborn dirt, dampen the cloth with a clean dry cloth.
...: Do not use a hard brush, benzene, alcohol, or paint thinner to an industrial waste disposal company. Caution: If dust or other particles remain on Epson's support website. Dispose of the product. 4. Turn off the product and disconnect the power cable from the product. 2. When handing over the waste ink to...clean cloth to the industrial waste disposal company, make sure you notice it . 49 Caution: Waste ink is dirty on the inside the product, the print head nozzles may clog or the print head may be damaged. 1. To remove stubborn dirt, dampen the cloth with a clean dry cloth.
User Manual
Page 67
... Chip Unit Precautions Consumables and Replacement Parts Print Head Maintenance Print head maintenance ensures the best print quality. Checking for clogged nozzles before each print job or if you notice faint areas or gaps in the printed result. • Head Alignment: Align the print head if your printouts are grainy or out ...of time. Close the slider ink inlet cover. Inspect the printed check pattern and clean the print head if you notice faint or missing areas. • Head Cleaning: Clean the print head if you have not used the printer for an extended period of focus. ...
... Chip Unit Precautions Consumables and Replacement Parts Print Head Maintenance Print head maintenance ensures the best print quality. Checking for clogged nozzles before each print job or if you notice faint areas or gaps in the printed result. • Head Alignment: Align the print head if your printouts are grainy or out ...of time. Close the slider ink inlet cover. Inspect the printed check pattern and clean the print head if you notice faint or missing areas. • Head Cleaning: Clean the print head if you have not used the printer for an extended period of focus. ...

User Manual
Page 68
... from the product control panel, as described here. 1. Aligning the Print Head Performing Head Maintenance Parent topic: Maintenance Checking for Clogged Print Head Nozzles To maintain optimum print quality, perform a nozzle check before each print job. You see the Maintenance menu on the product control panel. ...press the OK button. If there are no gaps, the print head is faint, clean the print head. 68 You can continue printing. Check the printed pattern to automatically print a check pattern before printing. The product prints a nozzle check pattern. 5. If there are gaps or ...
... from the product control panel, as described here. 1. Aligning the Print Head Performing Head Maintenance Parent topic: Maintenance Checking for Clogged Print Head Nozzles To maintain optimum print quality, perform a nozzle check before each print job. You see the Maintenance menu on the product control panel. ...press the OK button. If there are no gaps, the print head is faint, clean the print head. 68 You can continue printing. Check the printed pattern to automatically print a check pattern before printing. The product prints a nozzle check pattern. 5. If there are gaps or ...

User Manual
Page 69
... and Cleaning Cycle settings in the Setup menu. Go to step 5. • Selected Nozzles: Select this option when you should clean the print head to clean. When you want to clear the clogged nozzles. Press the up or down arrow button to clean multiple nozzle rows, if necessary... Related references Setup Menu Settings Maintenance Menu Settings Related tasks Loading Media Viewing and Changing Media Settings Cleaning the Print Head Cleaning the Print Head If printouts are incorrect. Note: You can also set up or down arrow button to choose one of the following cleaning ...
... and Cleaning Cycle settings in the Setup menu. Go to step 5. • Selected Nozzles: Select this option when you should clean the print head to clean. When you want to clear the clogged nozzles. Press the up or down arrow button to clean multiple nozzle rows, if necessary... Related references Setup Menu Settings Maintenance Menu Settings Related tasks Loading Media Viewing and Changing Media Settings Cleaning the Print Head Cleaning the Print Head If printouts are incorrect. Note: You can also set up or down arrow button to choose one of the following cleaning ...
User Manual
Page 70
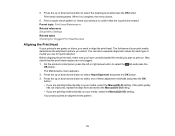
...menu appears. 2. Also check that the nozzles are not clogged. 1. Press the up or down arrow button to confirm that the print head nozzles are cleared. Press the up or down arrow button to select one of these adjustment methods and press the OK button: •... setting. • If you are grainy or blurry, you use for Clogged Print Head Nozzles Aligning the Print Head If your printouts are printing unidirectionally on your print media determines the alignment options you are printing bidirectionally on . The thickness of media you need to select the tab and press...
...menu appears. 2. Also check that the nozzles are not clogged. 1. Press the up or down arrow button to confirm that the print head nozzles are cleared. Press the up or down arrow button to select one of these adjustment methods and press the OK button: •... setting. • If you are grainy or blurry, you use for Clogged Print Head Nozzles Aligning the Print Head If your printouts are printing unidirectionally on your print media determines the alignment options you are printing bidirectionally on . The thickness of media you need to select the tab and press...
User Manual
Page 71
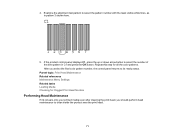
Repeat this step for Clogged Print Head Nozzles Performing Head Maintenance If ink smears onto your printed media even after cleaning the print head, you select the final color pattern number, the control panel returns to select the number of the best pattern in pattern 3 shown here. 5. ... visible white lines, as in C1 and press the OK button. Examine the alignment test pattern to clean inside the product near the print head. 71 4. Parent topic: Print Head Maintenance Related references Maintenance Menu Settings Related tasks Loading Media Checking for all the color patterns.
Repeat this step for Clogged Print Head Nozzles Performing Head Maintenance If ink smears onto your printed media even after cleaning the print head, you select the final color pattern number, the control panel returns to select the number of the best pattern in pattern 3 shown here. 5. ... visible white lines, as in C1 and press the OK button. Examine the alignment test pattern to clean inside the product near the print head. 71 4. Parent topic: Print Head Maintenance Related references Maintenance Menu Settings Related tasks Loading Media Checking for all the color patterns.
User Manual
Page 72
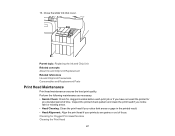
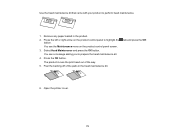
.... Peel the backing off of the way. 5. You see a message asking you to perform head maintenance. 1. The product moves the print head out of the pads in the product. 2. Use the head maintenance kit that came with your product to prepare the head maintenance kit. 4. Press the OK button. Remove any paper loaded in the...
.... Peel the backing off of the way. 5. You see a message asking you to perform head maintenance. 1. The product moves the print head out of the pads in the product. 2. Use the head maintenance kit that came with your product to prepare the head maintenance kit. 4. Press the OK button. Remove any paper loaded in the...


