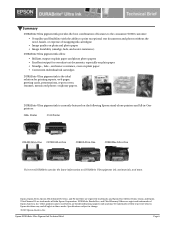
DuraBrite® Ultra Ink Technical Brief
Page 6
... product names used herein are for printing reports, web pages, greeting cards, presentations, report covers, resumes, menus and photos on glossy papers. Epson, Epson Stylus, Epson UltraChrome Hi-Gloss, and PictureMate are registered trademarks and Epson Exceed Your Vision, Claria, and Epson UltraChrome K3 are registered trademarks of Epson America, Inc. Epson disclaims any and all rights in -One...
... product names used herein are for printing reports, web pages, greeting cards, presentations, report covers, resumes, menus and photos on glossy papers. Epson, Epson Stylus, Epson UltraChrome Hi-Gloss, and PictureMate are registered trademarks and Epson Exceed Your Vision, Claria, and Epson UltraChrome K3 are registered trademarks of Epson America, Inc. Epson disclaims any and all rights in -One...

Basics
Page 2
... by any damages or problems arising from the use with Seiko Epson Corporation's operating and maintenance instructions. Trademarks Epson, Epson Stylus, and Print Image Matching are registered trademarks and Exceed Your Vision is a trademark, and Epson Connection, Epson Store, and SoundAdvice are for use of Seiko Epson Corporation. Memory Stick, Memory Stick Duo, Memory Stick PRO, and Memory...
... by any damages or problems arising from the use with Seiko Epson Corporation's operating and maintenance instructions. Trademarks Epson, Epson Stylus, and Print Image Matching are registered trademarks and Exceed Your Vision is a trademark, and Epson Connection, Epson Store, and SoundAdvice are for use of Seiko Epson Corporation. Memory Stick, Memory Stick Duo, Memory Stick PRO, and Memory...
Basics
Page 3
...9 Making Prints From Slides or Negatives 12 Restoring Color in Faded Photos, Slides, and Negatives 17 Printing From a Memory Card 18 Compatible Cards and Image Formats 19 Inserting the Card 20 Printing Selected Photos 21 Printing an Index Sheet to Select Photos 22 Printing All Photos... 25 Printing From a Digital Camera 26 Printing From Your Computer 28 Printing in Windows 28 Printing With Macintosh OS X 31 Using Special Papers 34 Scanning a Photo, Document, Film, or Slide 35 Maintaining Your Epson Stylus CX7800 38 Checking the Print Head Nozzles 38 Cleaning the Print Head ...
...9 Making Prints From Slides or Negatives 12 Restoring Color in Faded Photos, Slides, and Negatives 17 Printing From a Memory Card 18 Compatible Cards and Image Formats 19 Inserting the Card 20 Printing Selected Photos 21 Printing an Index Sheet to Select Photos 22 Printing All Photos... 25 Printing From a Digital Camera 26 Printing From Your Computer 28 Printing in Windows 28 Printing With Macintosh OS X 31 Using Special Papers 34 Scanning a Photo, Document, Film, or Slide 35 Maintaining Your Epson Stylus CX7800 38 Checking the Print Head Nozzles 38 Cleaning the Print Head ...

Basics
Page 5
... damage to your equipment. Note: Notes contain important information about your Epson Stylus CX7800. For additional instructions, see the on-screen User's Guide by selecting the icon for better copying, scanning, and printing. Introduction 5 Tip: Tips contain hints for it to avoid bodily ...Epson Stylus CX7800 can do most of these guidelines as described on the Start Here sheet, turn here to: ■ Load paper ■ Make a quick copy of a document or photo ■ Restore color from faded photos, slides, and negatives ■ Print photos stored on a memory card ■ Print...
... damage to your equipment. Note: Notes contain important information about your Epson Stylus CX7800. For additional instructions, see the on-screen User's Guide by selecting the icon for better copying, scanning, and printing. Introduction 5 Tip: Tips contain hints for it to avoid bodily ...Epson Stylus CX7800 can do most of these guidelines as described on the Start Here sheet, turn here to: ■ Load paper ■ Make a quick copy of a document or photo ■ Restore color from faded photos, slides, and negatives ■ Print photos stored on a memory card ■ Print...

Basics
Page 6
... plain paper or up , against the right edge guide. Loading Paper Follow the steps here to the left edge guide to load paper in your Epson Stylus CX7800. 1. Insert the paper, printable side up to 100 sheets of photo paper. (See the User's Guide for landscape...
... plain paper or up , against the right edge guide. Loading Paper Follow the steps here to the left edge guide to load paper in your Epson Stylus CX7800. 1. Insert the paper, printable side up to 100 sheets of photo paper. (See the User's Guide for landscape...
Basics
Page 10
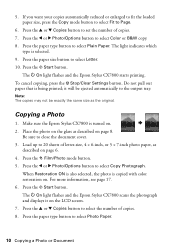
...information, see page 17. 6. Be sure to select Copy Photograph. When Restoration ON is also selected, the photo is being printed; The P On light flashes and the Epson Stylus CX7800 scans the photograph and displays it will be exactly the same size as described on the LCD screen. 7. Press the l... or r Photo/Options button to Page. 6. Do not pull out paper that is copied with color restoration on. Copying a Photo 1. Make sure the Epson Stylus CX7800 is selected. 9. Place the photo on the glass as the original. If you want your copies automatically reduced or ...
...information, see page 17. 6. Be sure to select Copy Photograph. When Restoration ON is also selected, the photo is being printed; The P On light flashes and the Epson Stylus CX7800 scans the photograph and displays it will be exactly the same size as described on the LCD screen. 7. Press the l... or r Photo/Options button to Page. 6. Do not pull out paper that is copied with color restoration on. Copying a Photo 1. Make sure the Epson Stylus CX7800 is selected. 9. Place the photo on the glass as the original. If you want your copies automatically reduced or ...
Basics
Page 11
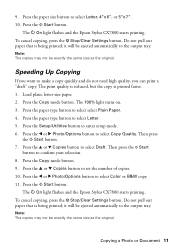
... copies may not be ejected automatically to enter setup mode. 6. Press the Copy mode button. Press the u or d Copies button to select Color or B&W copy. 11. it will be exactly the same size as the original. Press the Setup/Utilities button to the output tray. Do ...not pull out paper that is printed faster. 1. Speeding Up Copying If you can print a "draft" copy. To cancel copying, press the y Stop/Clear Settings button. The P On light flashes and the Epson Stylus CX7800 starts printing. Press the Copy mode button. 9. Press the u or d ...
... copies may not be ejected automatically to enter setup mode. 6. Press the Copy mode button. Press the u or d Copies button to select Color or B&W copy. 11. it will be exactly the same size as the original. Press the Setup/Utilities button to the output tray. Do ...not pull out paper that is printed faster. 1. Speeding Up Copying If you can print a "draft" copy. To cancel copying, press the y Stop/Clear Settings button. The P On light flashes and the Epson Stylus CX7800 starts printing. Press the Copy mode button. 9. Press the u or d ...

Basics
Page 12
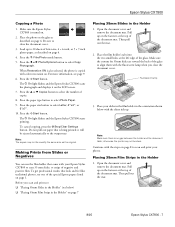
... cover and remove the document mat. Make sure the cutouts for 35mm slides are toward the back of the glass to align them with your Epson Stylus CX7800 to scan 35mm slides, or strips of the glass. Place the film holder's tabs into the two small holes at the top of the special... and feel like traditional photos, try one of the document mat. To get professional results that came with the fluorescent lamp when you scan and print see: ■ "Placing 35mm Slides in the Holder" (see below) ■ "Placing 35mm Film Strips in the Holder" on page 13 Placing 35mm Slides in...
... cover and remove the document mat. Make sure the cutouts for 35mm slides are toward the back of the glass to align them with your Epson Stylus CX7800 to scan 35mm slides, or strips of the glass. Place the film holder's tabs into the two small holes at the top of the special... and feel like traditional photos, try one of the document mat. To get professional results that came with the fluorescent lamp when you scan and print see: ■ "Placing 35mm Slides in the Holder" (see below) ■ "Placing 35mm Film Strips in the Holder" on page 13 Placing 35mm Slides in...
Basics
Page 18
...on copying memory card files between your Epson Stylus CX7800 and a computer or other device, see the User's Guide. 18 Printing From a Memory Card If your digital camera's memory card; just insert it knows which photos to print. Then, when you print color photos directly from your digital camera ...supports DPOF™ (Digital Print Order Format), you can pre-select the photos you 're ready to print and how many copies of each. Printing From a Memory Card The Epson Stylus CX7800 lets you insert ...
...on copying memory card files between your Epson Stylus CX7800 and a computer or other device, see the User's Guide. 18 Printing From a Memory Card If your digital camera's memory card; just insert it knows which photos to print. Then, when you print color photos directly from your digital camera ...supports DPOF™ (Digital Print Order Format), you can pre-select the photos you 're ready to print and how many copies of each. Printing From a Memory Card The Epson Stylus CX7800 lets you insert ...

Basics
Page 19
...Compatible Cards and Image Formats You can use the following types of cards with your Epson Stylus CX7800: Top slot Middle slot Bottom slot Slot Type of card Top slot SmartMedia™...Pro Duo™* MultiMediaCard SD™ Card miniSD™ Card* Bottom slot CompactFlash® Microdrive™ * Adapter required The Epson Stylus CX7800 supports image files that meet the following requirements: Media format File format Image size Number of files DCF version 1.0 or 2.0 ... pixels Up to 999 * DCF is the "Design rule for Camera File system" standard. Printing From a Memory Card 19
...Compatible Cards and Image Formats You can use the following types of cards with your Epson Stylus CX7800: Top slot Middle slot Bottom slot Slot Type of card Top slot SmartMedia™...Pro Duo™* MultiMediaCard SD™ Card miniSD™ Card* Bottom slot CompactFlash® Microdrive™ * Adapter required The Epson Stylus CX7800 supports image files that meet the following requirements: Media format File format Image size Number of files DCF version 1.0 or 2.0 ... pixels Up to 999 * DCF is the "Design rule for Camera File system" standard. Printing From a Memory Card 19
Basics
Page 20
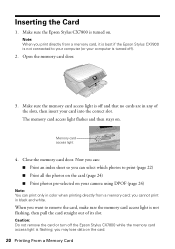
... connected to your computer (or your camera using DPOF (page 24) Note: You can : ■ Print an index sheet so you may lose data on . Note: When you cannot print in color when printing directly from a memory card, it is best if the Epson Stylus CX7800 is turned off). 2. you print directly from a memory card; Inserting the Card 1.
... connected to your computer (or your camera using DPOF (page 24) Note: You can : ■ Print an index sheet so you may lose data on . Note: When you cannot print in color when printing directly from a memory card, it is best if the Epson Stylus CX7800 is turned off). 2. you print directly from a memory card; Inserting the Card 1.

Basics
Page 21
... of copies. 7. Note: If your memory card: 1. Press the paper type button to select Plain Paper, Photo Paper, or Matte Paper (whichever you want to print from your camera supports DPOF, you can use it is turned off ). 2. Press the paper size button to select... these steps to select the photos you select Plain Paper, the photos print with a white border. Press the d or u Copies button to select a photo. 6. Make sure your computer is not already in the slot (see page 24. 5. Press the x Start button to your computer (or your Epson Stylus CX7800 is not connected to start...
... of copies. 7. Note: If your memory card: 1. Press the paper type button to select Plain Paper, Photo Paper, or Matte Paper (whichever you want to print from your camera supports DPOF, you can use it is turned off ). 2. Press the paper size button to select... these steps to select the photos you select Plain Paper, the photos print with a white border. Press the d or u Copies button to select a photo. 6. Make sure your computer is not already in the slot (see page 24. 5. Press the x Start button to your computer (or your Epson Stylus CX7800 is not connected to start...

Basics
Page 22
...your computer (or your Epson Stylus CX7800 is not already in the slot (see small "thumbnail" images of letter-size, plain paper. (Use only letter-size paper to print the index sheet.) Up to 30 images are printed on each page, so if there are printed first. Insert the memory... the most recent images are more sheets, press the y Stop/Clear Settings button. The P On light flashes, and the Epson Stylus CX7800 starts printing the index sheet(s). Printing an Index Sheet to Select Photos You can print an index sheet to print, the Epson Stylus CX7800 scans the sheet and automatically...
...your computer (or your Epson Stylus CX7800 is not already in the slot (see small "thumbnail" images of letter-size, plain paper. (Use only letter-size paper to print the index sheet.) Up to 30 images are printed on each page, so if there are printed first. Insert the memory... the most recent images are more sheets, press the y Stop/Clear Settings button. The P On light flashes, and the Epson Stylus CX7800 starts printing the index sheet(s). Printing an Index Sheet to Select Photos You can print an index sheet to print, the Epson Stylus CX7800 scans the sheet and automatically...
Basics
Page 26
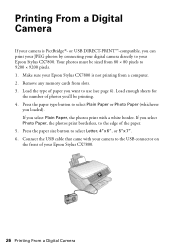
...of the paper. 5. Make sure your Epson Stylus CX7800. 26 Printing From a Digital Camera Load the type of paper you select Photo Paper, the photos print borderless, to use (see page 6). If you want to the edge of your Epson Stylus CX7800 is PictBridge®- Connect the USB cable... that came with a white border. Printing From a Digital Camera If your Epson Stylus CX7800. Remove any memory cards from a ...
...of the paper. 5. Make sure your Epson Stylus CX7800. 26 Printing From a Digital Camera Load the type of paper you select Photo Paper, the photos print borderless, to use (see page 6). If you want to the edge of your Epson Stylus CX7800 is PictBridge®- Connect the USB cable... that came with a white border. Printing From a Digital Camera If your Epson Stylus CX7800. Remove any memory cards from a ...

Basics
Page 31
..., follow the steps below to close the Page Setup window. 5. Make the following settings: Select Stylus CX7800 Select your Paper Size* Select your application. 3. Open the File menu and select Print. Open the photo or document in the Paper Size list for your paper size (US Letter,... 8 x 10, 5 x 7, or 4 x 6). 4. Load paper (see a window like this one: Select Stylus CX7800 Select Print Settings Printing From Your Computer 31 Borderless) option in your document or image orientation * For borderless printing, choose the (Sheet Feeder - Open the File menu and select Page Setup.
..., follow the steps below to close the Page Setup window. 5. Make the following settings: Select Stylus CX7800 Select your Paper Size* Select your application. 3. Open the File menu and select Print. Open the photo or document in the Paper Size list for your paper size (US Letter,... 8 x 10, 5 x 7, or 4 x 6). 4. Load paper (see a window like this one: Select Stylus CX7800 Select Print Settings Printing From Your Computer 31 Borderless) option in your document or image orientation * For borderless printing, choose the (Sheet Feeder - Open the File menu and select Page Setup.
Basics
Page 52
... described on its side, or turn it on page 50. Leaving cartridges uninstalled can dehydrate the print head and may prevent the Epson Stylus CX7800 from staining items that contains mercury. Adjust only those controls that there is needed to prevent the ink...component that the cartridge touches. if the product does not operate normally or exhibits a distinct change in your hand inside the Epson Stylus CX7800 or touch any cartridges during printing. ■ Install a new ink cartridge immediately after a thorough flushing, see a doctor immediately. 52 Notices Ink Cartridge ...
... described on its side, or turn it on page 50. Leaving cartridges uninstalled can dehydrate the print head and may prevent the Epson Stylus CX7800 from staining items that contains mercury. Adjust only those controls that there is needed to prevent the ink...component that the cartridge touches. if the product does not operate normally or exhibits a distinct change in your hand inside the Epson Stylus CX7800 or touch any cartridges during printing. ■ Install a new ink cartridge immediately after a thorough flushing, see a doctor immediately. 52 Notices Ink Cartridge ...
Product Information Guide
Page 2
Epson Stylus CX7800 8/05 Epson Stylus CX7800 Specifications Printing Printing method On-demand ink jet Nozzle configuration Black Color 90 nozzles 90 nozzles × 3 (cyan, magenta, yellow) Print direction Bidirectional with logic seeking Scanning Scanner type Flatbed color Photoelectric device CIS Effective pixels 10,200 ...connector Recommended cable length Based on Universal Serial Bus Specifications Revision 2.0, Universal Serial Bus Device Class Definition for Printing Devices Version 1.1 480 Mbps (High speed device) NRZI USB Series B Under 6.6 feet (2 meters) Electrical...
Epson Stylus CX7800 8/05 Epson Stylus CX7800 Specifications Printing Printing method On-demand ink jet Nozzle configuration Black Color 90 nozzles 90 nozzles × 3 (cyan, magenta, yellow) Print direction Bidirectional with logic seeking Scanning Scanner type Flatbed color Photoelectric device CIS Effective pixels 10,200 ...connector Recommended cable length Based on Universal Serial Bus Specifications Revision 2.0, Universal Serial Bus Device Class Definition for Printing Devices Version 1.1 480 Mbps (High speed device) NRZI USB Series B Under 6.6 feet (2 meters) Electrical...

Product Information Guide
Page 6
...beyond where it will be copied. The 100% light turns on page 6. The P On light flashes and the Epson Stylus CX7800 starts printing. Do not pull out paper that your prints in a photo album or plastic photo storage box in the upper left edges to avoid cropping 2. it will minimize...paper, as described on . 5. Press the x Start button. Press the paper type button to select Color or B&W copy. 8. Close the document cover gently so that is being printed; Epson Stylus CX7800 As with all of it stops and do not place heavy objects on the document cover, and do not...
...beyond where it will be copied. The 100% light turns on page 6. The P On light flashes and the Epson Stylus CX7800 starts printing. Do not pull out paper that your prints in a photo album or plastic photo storage box in the upper left edges to avoid cropping 2. it will minimize...paper, as described on . 5. Press the x Start button. Press the paper type button to select Color or B&W copy. 8. Close the document cover gently so that is being printed; Epson Stylus CX7800 As with all of it stops and do not place heavy objects on the document cover, and do not...
Product Information Guide
Page 7
...in the Holder" (see page 9. 6. Place the photo on . Press the u or d Copies button to align them with color restoration on the glass as the original. Press the paper type button to close the document cover. Place the film holder's tabs into... to select Copy Photograph. Continue with your photos. Then pull out the mat. 2. Epson Stylus CX7800 Copying a Photo 1. Make sure the Epson Stylus CX7800 is being printed; Press the l or r Photo/Options button to scan and print your Epson Stylus CX7800 to select Letter, 4"x 6", or 5"x7". 10. Note: The copies may not ...
...in the Holder" (see page 9. 6. Place the photo on . Press the u or d Copies button to align them with color restoration on the glass as the original. Press the paper type button to close the document cover. Place the film holder's tabs into... to select Copy Photograph. Continue with your photos. Then pull out the mat. 2. Epson Stylus CX7800 Copying a Photo 1. Make sure the Epson Stylus CX7800 is being printed; Press the l or r Photo/Options button to scan and print your Epson Stylus CX7800 to select Letter, 4"x 6", or 5"x7". 10. Note: The copies may not ...

Product Information Guide
Page 10
... P On light flashes, and the Epson Stylus CX7800 starts printing the index sheet(s). Selecting and Printing Photos on . Press the x Start button. This may lose data on the memory card, you want to be printed. 3. To cancel printing more than 30 photos on the card. Continue with the steps in color when printing directly from a memory card, it is...
... P On light flashes, and the Epson Stylus CX7800 starts printing the index sheet(s). Selecting and Printing Photos on . Press the x Start button. This may lose data on the memory card, you want to be printed. 3. To cancel printing more than 30 photos on the card. Continue with the steps in color when printing directly from a memory card, it is...


