Basics
Page 3
...Paper 6 Copying a Photo or Document 8 Placing the Original on the Glass 8 Copying 9 Making Prints From Slides or Negatives 12 Restoring Color in Faded Photos, Slides, and Negatives 17 Printing From a Memory Card 18 Compatible Cards and Image Formats 19 Inserting the Card 20 ...Camera 26 Printing From Your Computer 28 Printing in Windows 28 Printing With Macintosh OS X 31 Using Special Papers 34 Scanning a Photo, Document, Film, or Slide 35 Maintaining Your Epson Stylus CX7800 38 Checking the Print Head Nozzles 38 Cleaning the Print Head 39 Replacing Ink Cartridges 41 Contents 3
...Paper 6 Copying a Photo or Document 8 Placing the Original on the Glass 8 Copying 9 Making Prints From Slides or Negatives 12 Restoring Color in Faded Photos, Slides, and Negatives 17 Printing From a Memory Card 18 Compatible Cards and Image Formats 19 Inserting the Card 20 ...Camera 26 Printing From Your Computer 28 Printing in Windows 28 Printing With Macintosh OS X 31 Using Special Papers 34 Scanning a Photo, Document, Film, or Slide 35 Maintaining Your Epson Stylus CX7800 38 Checking the Print Head Nozzles 38 Cleaning the Print Head 39 Replacing Ink Cartridges 41 Contents 3

Basics
Page 5
...contain hints for it to your Windows® or Macintosh® computer. Introduction 5 Of course your Epson Stylus CX7800 can do most of a document or photo ■ Restore color from faded photos, slides, and negatives ■ Print photos stored on a memory card ■ Print...these things without ever turning on -screen User's Guide by selecting the icon for better copying, scanning, and printing. Introduction After you have set up your Epson Stylus® CX7800 as you read your Epson Stylus CX7800 instructions: Warning: Warnings must be followed carefully to avoid bodily injury.
...contain hints for it to your Windows® or Macintosh® computer. Introduction 5 Of course your Epson Stylus CX7800 can do most of a document or photo ■ Restore color from faded photos, slides, and negatives ■ Print photos stored on a memory card ■ Print...these things without ever turning on -screen User's Guide by selecting the icon for better copying, scanning, and printing. Introduction After you have set up your Epson Stylus® CX7800 as you read your Epson Stylus CX7800 instructions: Warning: Warnings must be followed carefully to avoid bodily injury.

Basics
Page 9
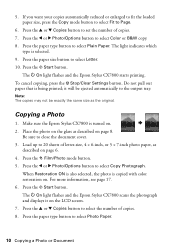
... lift up to 100 sheets of letter-size plain paper, as described on page 8. Make sure the Epson Stylus CX7800 is turned on . Load up the document cover before closing it to give you more room when scanning. You may damage the document cover. Press the Copy mode button. Place the document on the.... Copying a Photo or Document 9 If you need to press the document flat while you copy or scan it, do not twist it. If you need to close the document cover. 3. Be sure to copy or scan a thick or large document, you can make copies using either letter-size (8.5 × 11-inch) ...
... lift up to 100 sheets of letter-size plain paper, as described on page 8. Make sure the Epson Stylus CX7800 is turned on . Load up the document cover before closing it to give you more room when scanning. You may damage the document cover. Press the Copy mode button. Place the document on the.... Copying a Photo or Document 9 If you need to press the document flat while you copy or scan it, do not twist it. If you need to close the document cover. 3. Be sure to copy or scan a thick or large document, you can make copies using either letter-size (8.5 × 11-inch) ...
Basics
Page 10
... button to select Photo Paper. 10 Copying a Photo or Document Press the x Start button. The P On light flashes and the Epson Stylus CX7800 scans the photograph and displays it will be exactly the same size as described on the LCD screen. 7. Be sure to select Copy Photograph...button to 20 sheets of copies. 8. Do not pull out paper that is copied with color restoration on . 2. Press the paper size button to select Color or B&W copy. 8. The P On light flashes and the Epson Stylus CX7800 starts printing. Press the l or r Photo/Options button to select Letter. 10. ...
... button to select Photo Paper. 10 Copying a Photo or Document Press the x Start button. The P On light flashes and the Epson Stylus CX7800 scans the photograph and displays it will be exactly the same size as described on the LCD screen. 7. Be sure to select Copy Photograph...button to 20 sheets of copies. 8. Do not pull out paper that is copied with color restoration on . 2. Press the paper size button to select Color or B&W copy. 8. The P On light flashes and the Epson Stylus CX7800 starts printing. Press the l or r Photo/Options button to select Letter. 10. ...

Basics
Page 12
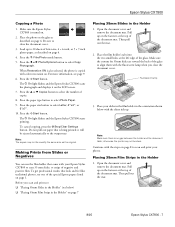
... for 35mm slides are toward the back of the glass to align them with your Epson Stylus CX7800 to scan 35mm slides, or strips of the document mat. To get professional results that came with the fluorescent lamp when you scan and print see: ■ "Placing 35mm Slides in the Holder" (see below) ■ "...close the document cover. Open the document cover and remove the document mat. Pull up on the fastener at the left edge of the special Epson papers listed on page 34. Making Prints From Slides or Negatives You can use the film holder that look and feel like traditional photos, try...
... for 35mm slides are toward the back of the glass to align them with your Epson Stylus CX7800 to scan 35mm slides, or strips of the document mat. To get professional results that came with the fluorescent lamp when you scan and print see: ■ "Placing 35mm Slides in the Holder" (see below) ■ "...close the document cover. Open the document cover and remove the document mat. Pull up on the fastener at the left edge of the special Epson papers listed on page 34. Making Prints From Slides or Negatives You can use the film holder that look and feel like traditional photos, try...

Basics
Page 22
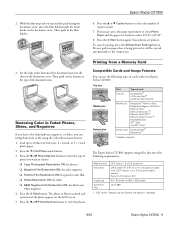
... an Index Sheet to Select Photos You can print an index sheet to see page 20). 4. The P On light flashes, and the Epson Stylus CX7800 starts printing the index sheet(s). Load several sheets of all the index pages to 30 images are printed on each page, so if there ...sheet that you 'll need enough sheets for all the photos on the memory card, you want to print, the Epson Stylus CX7800 scans the sheet and automatically prints the selected photos. Make sure your Epson Stylus CX7800 is not connected to your computer (or your card. Press the x Start button. Press the Memory Card mode ...
... an Index Sheet to Select Photos You can print an index sheet to see page 20). 4. The P On light flashes, and the Epson Stylus CX7800 starts printing the index sheet(s). Load several sheets of all the index pages to 30 images are printed on each page, so if there ...sheet that you 'll need enough sheets for all the photos on the memory card, you want to print, the Epson Stylus CX7800 scans the sheet and automatically prints the selected photos. Make sure your Epson Stylus CX7800 is not connected to your computer (or your card. Press the x Start button. Press the Memory Card mode ...
Basics
Page 35
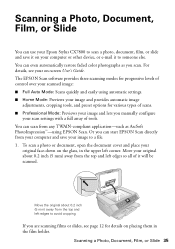
...Epson Stylus CX7800 to scan a photo, document, film, or slide and save your image to someone else. Or you can start EPSON Scan directly from the top and left edges so all of tools. Move your scanned image: ■ Full Auto Mode: Scans quickly and easily using EPSON Scan. You can scan...The EPSON Scan software provides three scanning modes for progressive levels of control over your original about 0.2 inch (5 mm) away from any TWAIN-compliant application-such as you manually configure your original face-down on -screen User's Guide. You can even automatically restore faded color ...
...Epson Stylus CX7800 to scan a photo, document, film, or slide and save your image to someone else. Or you can start EPSON Scan directly from the top and left edges so all of tools. Move your scanned image: ■ Full Auto Mode: Scans quickly and easily using EPSON Scan. You can scan...The EPSON Scan software provides three scanning modes for progressive levels of control over your original about 0.2 inch (5 mm) away from any TWAIN-compliant application-such as you manually configure your original face-down on -screen User's Guide. You can even automatically restore faded color ...

Basics
Page 36
... your application. Do one of the following to Full Auto Mode, click the Scan button. 36 Scanning a Photo, Document, Film, or Slide Then open the File menu, choose Import or Acquire, and select Epson Stylus CX7800. see the EPSON Scan standby window: 4. Note: If you need to scan a thick document, you don't move the original or film holder. 3.
... your application. Do one of the following to Full Auto Mode, click the Scan button. 36 Scanning a Photo, Document, Film, or Slide Then open the File menu, choose Import or Acquire, and select Epson Stylus CX7800. see the EPSON Scan standby window: 4. Note: If you need to scan a thick document, you don't move the original or film holder. 3.
Basics
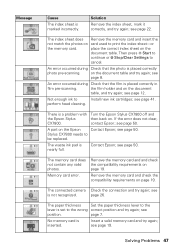
Page 47
... placed correctly photo pre-scanning. see is nearly full. Remove the memory card and check the compatibility requirements on card used to cancel. If the error does not clear, CX7800. page 7. There is marked incorrectly. on . Message Cause The index sheet is a problem with Turn the Epson Stylus CX7800 off and the Epson Stylus then back on...
... placed correctly photo pre-scanning. see is nearly full. Remove the memory card and check the compatibility requirements on card used to cancel. If the error does not clear, CX7800. page 7. There is marked incorrectly. on . Message Cause The index sheet is a problem with Turn the Epson Stylus CX7800 off and the Epson Stylus then back on...
Basics
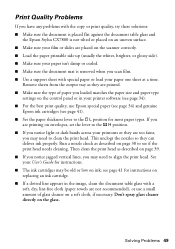
Page 49
... the copy or print quality, try these solutions: ■ Make sure the document is placed flat against the document table glass and the Epson Stylus CX7800 is removed when you scan film. ■ Use a support sheet with a soft, dry, lint-free cloth (paper towels are printed. ■ Make sure the type ... may need to the m L position for most paper types. This unclogs the nozzles so they are not recommended), or use Epson special paper (see page 34) and genuine Epson ink cartridges (see page 34). ■ For the best print quality, use a small amount of paper you may be old...
... the copy or print quality, try these solutions: ■ Make sure the document is placed flat against the document table glass and the Epson Stylus CX7800 is removed when you scan film. ■ Use a support sheet with a soft, dry, lint-free cloth (paper towels are printed. ■ Make sure the type ... may need to the m L position for most paper types. This unclogs the nozzles so they are not recommended), or use Epson special paper (see page 34) and genuine Epson ink cartridges (see page 34). ■ For the best print quality, use a small amount of paper you may be old...
Basics
Page 51
... enough room around the Epson Stylus CX7800 for sufficient ventilation. Do not block or cover openings in the Epson Stylus CX7800 case or insert objects through the slots. ■ Make sure the back of the Epson Stylus CX7800 is copying, printing, or scanning. ■ Do not spill liquid on the Epson Stylus CX7800. ■ Except as specifically explained in your Epson Stylus CX7800, read and follow...
... enough room around the Epson Stylus CX7800 for sufficient ventilation. Do not block or cover openings in the Epson Stylus CX7800 case or insert objects through the slots. ■ Make sure the back of the Epson Stylus CX7800 is copying, printing, or scanning. ■ Do not spill liquid on the Epson Stylus CX7800. ■ Except as specifically explained in your Epson Stylus CX7800, read and follow...
Product Brochure
Page 1
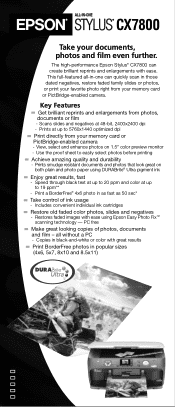
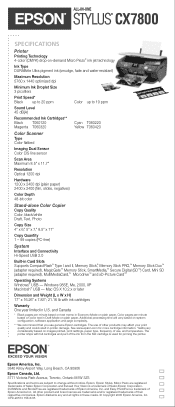
...smudge resistant documents and photos that look great on 1.5" color preview monitor - PC free Make great looking copies of ink usage - The high-performance Epson Stylus® CX7800 can quickly scan in black-and-white or color with ease using DURABrite® Ultra pigment ink Enjoy great... results, fast - Includes convenient individual ink cartridges Restore old faded color photos, slides and negatives - Copies...
...smudge resistant documents and photos that look great on 1.5" color preview monitor - PC free Make great looking copies of ink usage - The high-performance Epson Stylus® CX7800 can quickly scan in black-and-white or color with ease using DURABrite® Ultra pigment ink Enjoy great... results, fast - Includes convenient individual ink cartridges Restore old faded color photos, slides and negatives - Copies...
Product Brochure
Page 2
...Yellow T060420 Color Scanner Type Color flatbed Imaging Dual Sensor Color CIS line sensor Scan Area Maximum 8.5" x 11.7" Resolution Optical 1200 dpi Hardware 1200 x 2400 dpi (plain paper) 2400 x 2400 (film, slides, negatives) Color Depth 48-bit color Stand-alone Color Copier Copy Quality Color, black/...registered trademarks of Seiko Epson Corporation and Exceed Your Vision is used for more cartridge information. Color pages per minute based on text memo in printer damage. Epson, Epson Stylus, Micro Piezo are trademarks and/or registered trademarks of Epson America Inc. The ...
...Yellow T060420 Color Scanner Type Color flatbed Imaging Dual Sensor Color CIS line sensor Scan Area Maximum 8.5" x 11.7" Resolution Optical 1200 dpi Hardware 1200 x 2400 dpi (plain paper) 2400 x 2400 (film, slides, negatives) Color Depth 48-bit color Stand-alone Color Copier Copy Quality Color, black/...registered trademarks of Seiko Epson Corporation and Exceed Your Vision is used for more cartridge information. Color pages per minute based on text memo in printer damage. Epson, Epson Stylus, Micro Piezo are trademarks and/or registered trademarks of Epson America Inc. The ...
Product Information Guide
Page 2
Epson Stylus CX7800 Specifications Printing Printing method On-demand ink jet Nozzle configuration Black Color 90 nozzles 90 nozzles × 3 (cyan, magenta, yellow) Print direction Bidirectional with logic seeking Scanning Scanner type Flatbed color Photoelectric device CIS Effective pixels 10,200 × 14,040 pixels at 1200 dpi Document size US letter size or 8.5 × 11.7 inches...) Operation 20 to 80% RH Storage 5 to 85% RH Safety Approvals Safety standards EMC UL 60950, CSA C22.2 No. 60950 FCC part 15 subpart B class B 2 - Epson Stylus CX7800 8/05
Epson Stylus CX7800 Specifications Printing Printing method On-demand ink jet Nozzle configuration Black Color 90 nozzles 90 nozzles × 3 (cyan, magenta, yellow) Print direction Bidirectional with logic seeking Scanning Scanner type Flatbed color Photoelectric device CIS Effective pixels 10,200 × 14,040 pixels at 1200 dpi Document size US letter size or 8.5 × 11.7 inches...) Operation 20 to 80% RH Storage 5 to 85% RH Safety Approvals Safety standards EMC UL 60950, CSA C22.2 No. 60950 FCC part 15 subpart B class B 2 - Epson Stylus CX7800 8/05

Product Information Guide
Page 6
...the document cover and place your original facedown on . 2. If you need to copy or scan a thick or large document, you are done, close the document cover. 3. Make sure the Epson Stylus CX7800 is turned on the glass, in the upper left corner. Be sure to close the document...cover beyond where it . Load up to 100 sheets of letter-size plain paper, as the original. 6 - Epson Stylus CX7800 As with traditional photos, Epson recommends proper care that will minimize color changes and lengthen display life: ❏ Frame prints under glass or a protective plastic sleeve to protect them from...
...the document cover and place your original facedown on . 2. If you need to copy or scan a thick or large document, you are done, close the document cover. 3. Make sure the Epson Stylus CX7800 is turned on the glass, in the upper left corner. Be sure to close the document...cover beyond where it . Load up to 100 sheets of letter-size plain paper, as the original. 6 - Epson Stylus CX7800 As with traditional photos, Epson recommends proper care that will minimize color changes and lengthen display life: ❏ Frame prints under glass or a protective plastic sleeve to protect them from...
Product Information Guide
Page 7
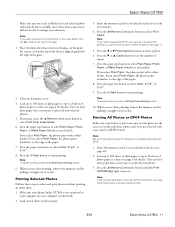
... listed on page 7 Placing 35mm Slides in the Holder 1. Epson Stylus CX7800 Copying a Photo 1. Press the l or r Photo/Options button to select Letter, 4"x 6", or 5"x7". 10. Press the u or d Copies button to scan and print your slides in the film holder in the orientation shown below ) ❏ "Placing ... or Negatives You can use the film holder that is copied with your Epson Stylus CX7800 to scan 35 mm slides, or strips of the glass to select Photo Paper. 9. Do not pull out paper that came with color restoration on the LCD screen. 7. For more information, see below with...
... listed on page 7 Placing 35mm Slides in the Holder 1. Epson Stylus CX7800 Copying a Photo 1. Press the l or r Photo/Options button to select Letter, 4"x 6", or 5"x7". 10. Press the u or d Copies button to scan and print your slides in the film holder in the orientation shown below ) ❏ "Placing ... or Negatives You can use the film holder that is copied with your Epson Stylus CX7800 to scan 35 mm slides, or strips of the glass to select Photo Paper. 9. Do not pull out paper that came with color restoration on the LCD screen. 7. For more information, see below with...

Product Information Guide
Page 8
... the following types of the glass. For more information, see page 9. 5. Press the x Start button. Then pull out the mat. 8 - Scanning and Printing Your Photos 1. Close the film strip cover. Press the u or d Copies button to select the number of copies to store the film...1. Fluorescent lamp Continue with color restoration. Load up . (The images should not appear reversed.) Make sure the film slides under the tabs. 4. If necessary, press the paper type button to select Photo Paper and the paper size button to view the photos. 7. Epson Stylus CX7800 2. Place the holder's tabs...
... the following types of the glass. For more information, see page 9. 5. Press the x Start button. Then pull out the mat. 8 - Scanning and Printing Your Photos 1. Close the film strip cover. Press the u or d Copies button to select the number of copies to store the film...1. Fluorescent lamp Continue with color restoration. Load up . (The images should not appear reversed.) Make sure the film slides under the tabs. 4. If necessary, press the paper type button to select Photo Paper and the paper size button to view the photos. 7. Epson Stylus CX7800 2. Place the holder's tabs...
Product Information Guide
Page 9
... to 9200 × 9200 pixels Up to 999 * DCF is scanned and a preview of copies to life using the Color Restoration feature. 1. Then push in Faded Photos, Slides, and Negatives If you have color-faded photos, negatives, or slides, you want to restore: ❏...ON: for photos ❏ Negative Film Restoration ON: for color negatives ❏ Positive Film Restoration ON: for positive color film ❏ Slides Restoration ON: for slides ❏ B&W Negative Film Restoration ON: for Camera File system" standard 8/05 Epson Stylus CX7800 - 9 To cancel copying, press the y Stop/Clear...
... to 9200 × 9200 pixels Up to 999 * DCF is scanned and a preview of copies to life using the Color Restoration feature. 1. Then push in Faded Photos, Slides, and Negatives If you have color-faded photos, negatives, or slides, you want to restore: ❏...ON: for photos ❏ Negative Film Restoration ON: for color negatives ❏ Positive Film Restoration ON: for positive color film ❏ Slides Restoration ON: for slides ❏ B&W Negative Film Restoration ON: for Camera File system" standard 8/05 Epson Stylus CX7800 - 9 To cancel copying, press the y Stop/Clear...

Product Information Guide
Page 10
... recent images are in color when printing directly from a memory card, it is not flashing, then pull the card straight out of the slots. 4. Once you have printed the index sheet, use a dark pen or pencil to print, the Epson Stylus CX7800 scans the sheet and automatically prints the selected photos. Epson Stylus CX7800 8/05 Printing the Index...
... recent images are in color when printing directly from a memory card, it is not flashing, then pull the card straight out of the slots. 4. Once you have printed the index sheet, use a dark pen or pencil to print, the Epson Stylus CX7800 scans the sheet and automatically prints the selected photos. Epson Stylus CX7800 8/05 Printing the Index...
Product Information Guide
Page 11
...(see page 11. 5. Press the x Start button to change your selections. Note: See your camera supports DPOF, you can use it has been scanned you will be able to start printing. Note: If the memory card does not contain DPOF information, one copy of each selected photo and mark...slot. Press the l or r Photo/Options button to set the number of copies. 7. If you loaded). Close the document cover. 4. Make sure your Epson Stylus CX7800 is not connected to select the photos you are done printing, remove the memory card by pulling it is aligned against the left corner, so...
...(see page 11. 5. Press the x Start button to change your selections. Note: See your camera supports DPOF, you can use it has been scanned you will be able to start printing. Note: If the memory card does not contain DPOF information, one copy of each selected photo and mark...slot. Press the l or r Photo/Options button to set the number of copies. 7. If you loaded). Close the document cover. 4. Make sure your Epson Stylus CX7800 is not connected to select the photos you are done printing, remove the memory card by pulling it is aligned against the left corner, so...


