
Technical Brief (Ink Jet Printers)
Page 1
...-all ink solution. This technical brief provides detailed information on the following pages. Print Quality-Core Printing Technologies The core technologies used in Epson ink jet printers produces: Greater detail in highlights, without visible printed "dots" Smooth gradations with precise color control and superior density Crisp line art Greater detail in shadows, with smooth transitions...
...-all ink solution. This technical brief provides detailed information on the following pages. Print Quality-Core Printing Technologies The core technologies used in Epson ink jet printers produces: Greater detail in highlights, without visible printed "dots" Smooth gradations with precise color control and superior density Crisp line art Greater detail in shadows, with smooth transitions...

Technical Brief (Ink Jet Printers)
Page 2
... are used in photos and laser sharp text. Piezo Crystal Deformation Nozzle Ink Droplet Epson's MicroPiezo technology results in dense coverage areas allowing Epson to produce a greater number of different colored "printed dots" because a wider range of nozzles on the print head. Resistor Ink Bubble Nozzle Droplet Some thermal printers produce more tone representations •...
... are used in photos and laser sharp text. Piezo Crystal Deformation Nozzle Ink Droplet Epson's MicroPiezo technology results in dense coverage areas allowing Epson to produce a greater number of different colored "printed dots" because a wider range of nozzles on the print head. Resistor Ink Bubble Nozzle Droplet Some thermal printers produce more tone representations •...

Technical Brief (Ink Jet Printers)
Page 3
... is most efficient pattern for optional cartridges, and you see continuous tone color. 4. Epson papers are no added costs for applying ink droplets to primarily print photos with Epson papers. The Epson printer drivers use a halftoning module that places ink droplets to produce their respective owners. Specifications subject to meet every...
... is most efficient pattern for optional cartridges, and you see continuous tone color. 4. Epson papers are no added costs for applying ink droplets to primarily print photos with Epson papers. The Epson printer drivers use a halftoning module that places ink droplets to produce their respective owners. Specifications subject to meet every...

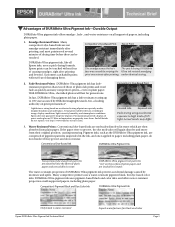
DuraBrite® Ultra Ink Technical Brief
Page 1
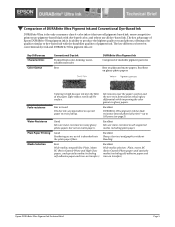
... DURABrite Ultra pigment ink has a smaller spread into plain paper. Epson Sales Training DURABrite Ultra everyday printing advantages: Brighter colors on plain paper, plus occasional photos. This produces double-sided prints without bleed-through: DURABrite Ultra pigment ink uses a special technology ...8226; Convenience and flexibility Advantages of the ink and keeps the colorant near the surface. With added improvements for printing on plain, matte, and glossy paper. Double-Sided prints without bleed-through Extra-sharp text Sharper graphics 10/07 A unique polymer...
... DURABrite Ultra pigment ink has a smaller spread into plain paper. Epson Sales Training DURABrite Ultra everyday printing advantages: Brighter colors on plain paper, plus occasional photos. This produces double-sided prints without bleed-through: DURABrite Ultra pigment ink uses a special technology ...8226; Convenience and flexibility Advantages of the ink and keeps the colorant near the surface. With added improvements for printing on plain, matte, and glossy paper. Double-Sided prints without bleed-through Extra-sharp text Sharper graphics 10/07 A unique polymer...
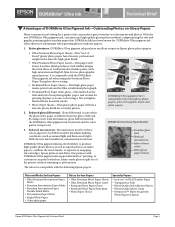
DuraBrite® Ultra Ink Technical Brief
Page 2
... dye-based inks are not smudge-resistant immediately after printing, and most prints need several minutes of DURABrite Ultra pigment ink prevent accidental damage caused by moisture and spills. Competitor's Pigment Black and Dye Color Ink DURABrite Ultra Pigment Ink Only black is water-resistant Epson DURABrite Ultra Pigment Ink Technical Brief Superb waterfastness...
... dye-based inks are not smudge-resistant immediately after printing, and most prints need several minutes of DURABrite Ultra pigment ink prevent accidental damage caused by moisture and spills. Competitor's Pigment Black and Dye Color Ink DURABrite Ultra Pigment Ink Only black is water-resistant Epson DURABrite Ultra Pigment Ink Technical Brief Superb waterfastness...
DuraBrite® Ultra Ink Technical Brief
Page 3
... ink cartridges. The semigloss finish delivers beautiful results. • Photo Paper Glossy-This glossy photo paper delivers a smooth, glossy finish for printing displays or scenic color images. Epson printers and All-in-One printers with the DURABrite Ultra pigment ink when using a new resin formulation, gloss differential with many glossy photo...
... ink cartridges. The semigloss finish delivers beautiful results. • Photo Paper Glossy-This glossy photo paper delivers a smooth, glossy finish for printing displays or scenic color images. Epson printers and All-in-One printers with the DURABrite Ultra pigment ink when using a new resin formulation, gloss differential with many glossy photo...
DuraBrite® Ultra Ink Technical Brief
Page 4
... photo, is running low on how DURABrite Ultra pigment ink compares to the Epson Ink Solutions document. Whether the customer is most users (C120-Color Only/CX7400/CX8400/CX9400Fax). Epson DURABrite Ultra Pigment Ink Technical Brief Page 4 This customer generally prints text documents, web pages, homework/reports, labels, and maybe craft projects, yet also...
... photo, is running low on how DURABrite Ultra pigment ink compares to the Epson Ink Solutions document. Whether the customer is most users (C120-Color Only/CX7400/CX8400/CX9400Fax). Epson DURABrite Ultra Pigment Ink Technical Brief Page 4 This customer generally prints text documents, web pages, homework/reports, labels, and maybe craft projects, yet also...
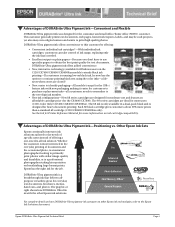
DuraBrite® Ultra Ink Technical Brief
Page 5
... Dye Ink Formed from color-forming, watersoluble molecules Best DURABrite Ultra Pigment Ink Comprised of insoluble pigment particles Best on glossy papers. The key differences between conventional dye ink and DURABrite Ultra pigment ink are dependent on transfers) Epson DURABrite Ultra Pigment Ink Technical...are water-resistant on matte papers. Excellent DURABrite Ultra pigment ink has fade resistance beyond photo lab prints-up to dye-based ink with dye-based color, and others use pigment-based black with the durability qualities of pigment ink. Excellent on glossy photo...
... Dye Ink Formed from color-forming, watersoluble molecules Best DURABrite Ultra Pigment Ink Comprised of insoluble pigment particles Best on glossy papers. The key differences between conventional dye ink and DURABrite Ultra pigment ink are dependent on transfers) Epson DURABrite Ultra Pigment Ink Technical...are water-resistant on matte papers. Excellent DURABrite Ultra pigment ink has fade resistance beyond photo lab prints-up to dye-based ink with dye-based color, and others use pigment-based black with the durability qualities of pigment ink. Excellent on glossy photo...
DuraBrite® Ultra Ink Technical Brief
Page 6
... Memory Officer are trademarks of Seiko Epson Corporation. Epson, Epson Stylus, Epson UltraChrome Hi-Gloss, and PictureMate are registered trademarks and Epson Exceed Your Vision, Claria, and Epson UltraChrome K3 are registered trademarks of Epson America, Inc. Epson DURABrite Ultra Pigment Ink Technical Brief Page 6 ...respective owners. DURABrite Ultra pigment ink is the ideal solution for printing reports, web pages, greeting cards, presentations, report covers, resumes, menus and photos on the following Epson stand-alone printers and All-in-One printers: C88+ Printer C120...
... Memory Officer are trademarks of Seiko Epson Corporation. Epson, Epson Stylus, Epson UltraChrome Hi-Gloss, and PictureMate are registered trademarks and Epson Exceed Your Vision, Claria, and Epson UltraChrome K3 are registered trademarks of Epson America, Inc. Epson DURABrite Ultra Pigment Ink Technical Brief Page 6 ...respective owners. DURABrite Ultra pigment ink is the ideal solution for printing reports, web pages, greeting cards, presentations, report covers, resumes, menus and photos on the following Epson stand-alone printers and All-in-One printers: C88+ Printer C120...

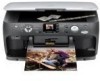
Basics
Page 2
No part of this Epson product. Trademarks Epson, Epson Stylus, and Print Image Matching are registered trademarks and Exceed Your Vision is a trademark of copyrighted material. Copyright © 2002 Seiko Epson Corporation. and Matsushita Electric Industrial Co., Ltd. Responsible Use of Copyrighted Materials Digital cameras, scanners, and ink jet printers, like conventional photocopiers and cameras, can ...
No part of this Epson product. Trademarks Epson, Epson Stylus, and Print Image Matching are registered trademarks and Exceed Your Vision is a trademark of copyrighted material. Copyright © 2002 Seiko Epson Corporation. and Matsushita Electric Industrial Co., Ltd. Responsible Use of Copyrighted Materials Digital cameras, scanners, and ink jet printers, like conventional photocopiers and cameras, can ...
Basics
Page 3
...9 Making Prints From Slides or Negatives 12 Restoring Color in Faded Photos, Slides, and Negatives 17 Printing From a Memory Card 18 Compatible Cards and Image Formats 19 Inserting the Card 20 Printing Selected Photos 21 Printing an Index Sheet to Select Photos 22 Printing All Photos... 25 Printing From a Digital Camera 26 Printing From Your Computer 28 Printing in Windows 28 Printing With Macintosh OS X 31 Using Special Papers 34 Scanning a Photo, Document, Film, or Slide 35 Maintaining Your Epson Stylus CX7800 38 Checking the Print Head Nozzles 38 Cleaning the Print Head ...
...9 Making Prints From Slides or Negatives 12 Restoring Color in Faded Photos, Slides, and Negatives 17 Printing From a Memory Card 18 Compatible Cards and Image Formats 19 Inserting the Card 20 Printing Selected Photos 21 Printing an Index Sheet to Select Photos 22 Printing All Photos... 25 Printing From a Digital Camera 26 Printing From Your Computer 28 Printing in Windows 28 Printing With Macintosh OS X 31 Using Special Papers 34 Scanning a Photo, Document, Film, or Slide 35 Maintaining Your Epson Stylus CX7800 38 Checking the Print Head Nozzles 38 Cleaning the Print Head ...

Basics
Page 5
...Guide by selecting the icon for better copying, scanning, and printing. Note: Notes contain important information about your Epson Stylus CX7800. Of course your Epson Stylus CX7800 can do most of these things without ever turning on ...your desktop. Please follow these guidelines as described on the Start Here sheet, turn here to: ■ Load paper ■ Make a quick copy of a document or photo ■ Restore color from faded photos, slides, and negatives ■ Print...
...Guide by selecting the icon for better copying, scanning, and printing. Note: Notes contain important information about your Epson Stylus CX7800. Of course your Epson Stylus CX7800 can do most of these things without ever turning on ...your desktop. Please follow these guidelines as described on the Start Here sheet, turn here to: ■ Load paper ■ Make a quick copy of a document or photo ■ Restore color from faded photos, slides, and negatives ■ Print...

Basics
Page 6
...-inch 4 × 6-inch or 5 × 7-inch You can load up to 20 sheets of photo paper. (See the User's Guide for landscape printing. Loading Paper Follow the steps here to the left edge guide to load paper in your Epson Stylus CX7800. 1. Open the paper support and output tray, then slide out the extensions. 2.
...-inch 4 × 6-inch or 5 × 7-inch You can load up to 20 sheets of photo paper. (See the User's Guide for landscape printing. Loading Paper Follow the steps here to the left edge guide to load paper in your Epson Stylus CX7800. 1. Open the paper support and output tray, then slide out the extensions. 2.
Basics
Page 7
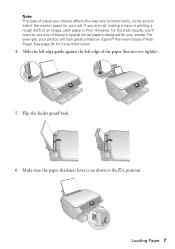
... not too tightly). 5. Make sure the paper thickness lever is fine. If you are just making a copy or printing a rough draft of an image, plain paper is set down to use one of Epson's special ink jet papers designed for your printer. Loading Paper 7 Flip the feeder guard back. 6. Note: The type... of paper you choose affects the way your printout looks, so be sure to select the correct paper for your photos will look great printed on Epson® Premium Glossy Photo Paper. However, for more information. 4. See page 34 for the best results, you'll want to the m L position...
... not too tightly). 5. Make sure the paper thickness lever is fine. If you are just making a copy or printing a rough draft of an image, plain paper is set down to use one of Epson's special ink jet papers designed for your printer. Loading Paper 7 Flip the feeder guard back. 6. Note: The type... of paper you choose affects the way your printout looks, so be sure to select the correct paper for your photos will look great printed on Epson® Premium Glossy Photo Paper. However, for more information. 4. See page 34 for the best results, you'll want to the m L position...
Basics
Page 10
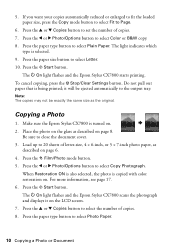
... number of letter-size, 4 × 6-inch, or 5 × 7-inch photo paper, as described on . The P On light flashes and the Epson Stylus CX7800 starts printing. Press the l or r Photo/Options button to select Color or B&W copy. 8. Do not pull out paper that is selected. 9. Place the photo on the glass as the original. The light...
... number of letter-size, 4 × 6-inch, or 5 × 7-inch photo paper, as described on . The P On light flashes and the Epson Stylus CX7800 starts printing. Press the l or r Photo/Options button to select Color or B&W copy. 8. Do not pull out paper that is selected. 9. Place the photo on the glass as the original. The light...
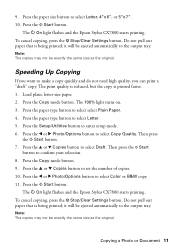
Basics
Page 11
...the l or r Photo/Options button to select Letter. 5. The P On light flashes and the Epson Stylus CX7800 starts printing. Copying a Photo or Document 11 The P On light flashes and the Epson Stylus CX7800 starts printing. Note: The copies may not be exactly the same size as the original. Press the paper ...5"x7". 10. Press the l or r Photo/Options button to select Draft. Do not pull out paper that is printed faster. 1. Press the u or d Copies button to select Color or B&W copy. 11. Press the Copy mode button. To cancel copying, press the y Stop/Clear Settings button. ...
...the l or r Photo/Options button to select Letter. 5. The P On light flashes and the Epson Stylus CX7800 starts printing. Copying a Photo or Document 11 The P On light flashes and the Epson Stylus CX7800 starts printing. Note: The copies may not be exactly the same size as the original. Press the paper ...5"x7". 10. Press the l or r Photo/Options button to select Draft. Do not pull out paper that is printed faster. 1. Press the u or d Copies button to select Color or B&W copy. 11. Press the Copy mode button. To cancel copying, press the y Stop/Clear Settings button. ...

Basics
Page 12
... cover and remove the document mat. Make sure the cutouts for 35mm slides are toward the back of the glass to align them with your Epson Stylus CX7800 to scan 35mm slides, or strips of negative and positive film. Before you close the document cover. Place the film holder's tabs into the... top of the glass. Fluorescent lamp 12 Copying a Photo or Document To get professional results that came with the fluorescent lamp when you scan and print see: ■ "Placing 35mm Slides in the Holder" (see below) ■ "Placing 35mm Film Strips in the Holder" on page 13 Placing 35mm Slides...
... cover and remove the document mat. Make sure the cutouts for 35mm slides are toward the back of the glass to align them with your Epson Stylus CX7800 to scan 35mm slides, or strips of negative and positive film. Before you close the document cover. Place the film holder's tabs into the... top of the glass. Fluorescent lamp 12 Copying a Photo or Document To get professional results that came with the fluorescent lamp when you scan and print see: ■ "Placing 35mm Slides in the Holder" (see below) ■ "Placing 35mm Film Strips in the Holder" on page 13 Placing 35mm Slides...

Basics
Page 13
Continue with the shiny side up on page 15 to scan and print your slides in the film holder in the Holder 1. Then pull out the mat. 2. Place your photos. Placing 35mm Film Strips in the orientation shown below with the steps on the fastener at the top of the document mat. Open the film strip cover. Open the document cover and remove the document mat. Pull up . Note: Make sure there is no gap between the holder and the document table; otherwise the prints may not be clear. Copying a Photo or Document 13 3.
Continue with the shiny side up on page 15 to scan and print your slides in the film holder in the Holder 1. Then pull out the mat. 2. Place your photos. Placing 35mm Film Strips in the orientation shown below with the steps on the fastener at the top of the document mat. Open the film strip cover. Open the document cover and remove the document mat. Pull up . Note: Make sure there is no gap between the holder and the document table; otherwise the prints may not be clear. Copying a Photo or Document 13 3.

Basics
Page 14
... small holes at the left edge of film into place. 5. Make sure the film strip is towards the back of the glass to scan and print your photos. 14 Copying a Photo or Document Gently press until it with the shiny side up. (The images should not appear reversed.) Make sure the...
... small holes at the left edge of film into place. 5. Make sure the film strip is towards the back of the glass to scan and print your photos. 14 Copying a Photo or Document Gently press until it with the shiny side up. (The images should not appear reversed.) Make sure the...

Basics
Page 15
...to 20 sheets of each photo. 7. Press the x Start button. Scanning and Printing Your Photos 1. The film is scanned and a preview of film: ■ Negative Film: for color negatives ■ Positive Film: for positive color film ■ Slides: for slides ■ B&W Negative Film: for black and... white negatives Tip: If your film is faded you can bring your photo back to print of letter-size, 4 × 6-inch, or...
...to 20 sheets of each photo. 7. Press the x Start button. Scanning and Printing Your Photos 1. The film is scanned and a preview of film: ■ Negative Film: for color negatives ■ Positive Film: for positive color film ■ Slides: for slides ■ B&W Negative Film: for black and... white negatives Tip: If your film is faded you can bring your photo back to print of letter-size, 4 × 6-inch, or...


