
Basics
Page 23
... orientation For borderless printing, choose a Sheet Feeder - w Check ink cartridge status Pause or resume printing Cancel printing Printing With a Macintosh 1. Load paper (see page 6). 2. Click OK to save your paper size (US Letter, 8 x 10 in, 4 x 6 in, or 5 x 7 in). 4. Make the following settings: Select Stylus CX7000F Select your Paper Size Select your print job. Open...
... orientation For borderless printing, choose a Sheet Feeder - w Check ink cartridge status Pause or resume printing Cancel printing Printing With a Macintosh 1. Load paper (see page 6). 2. Click OK to save your paper size (US Letter, 8 x 10 in, 4 x 6 in, or 5 x 7 in). 4. Make the following settings: Select Stylus CX7000F Select your Paper Size Select your print job. Open...

Basics
Page 44
...see below to display this option: 3.Nozzle Check 44 Maintaining Your CX7000F Series Follow the steps below ) ■ "Cleaning the Print Head" on page 45 ■ "Checking the Ink Status" on page 46 ■ "Replacing Ink Cartridges" on page 47 Checking the Print Head Nozzles If your printouts ...of the ink cartridges. You see this display: 1.Load/Eject 4. Press the P On button to turn on the numeric keypad, to check the print head nozzles using the control panel. 1. Press the Setup button. Press the u or d button, or press the 3 key on the Epson Stylus CX7000F Series all-...
...see below to display this option: 3.Nozzle Check 44 Maintaining Your CX7000F Series Follow the steps below ) ■ "Cleaning the Print Head" on page 45 ■ "Checking the Ink Status" on page 46 ■ "Replacing Ink Cartridges" on page 47 Checking the Print Head Nozzles If your printouts ...of the ink cartridges. You see this display: 1.Load/Eject 4. Press the P On button to turn on the numeric keypad, to check the print head nozzles using the control panel. 1. Press the Setup button. Press the u or d button, or press the 3 key on the Epson Stylus CX7000F Series all-...

Basics
Page 52
...] ink cartridge -> Press the OK button to begin ink cartridge cartridges. instructions. No [Cyan, Magenta, Yellow, Black] ink cartridge -> Press the OK button to install a new ink cartridge. See these sections: ■ "Error Messages" (below) ■ "Problems and Solutions" on page 54 ■ "Where To Get Help" on your Epson Stylus CX7000F Series all-in the sheet feeder and press the x Start Color...
...] ink cartridge -> Press the OK button to begin ink cartridge cartridges. instructions. No [Cyan, Magenta, Yellow, Black] ink cartridge -> Press the OK button to install a new ink cartridge. See these sections: ■ "Error Messages" (below) ■ "Problems and Solutions" on page 54 ■ "Where To Get Help" on your Epson Stylus CX7000F Series all-in the sheet feeder and press the x Start Color...

Product Information Guide
Page 2
... quality. Load envelopes flap edge left margin is 0.12" (3 mm). Epson Stylus CX7000F Series Specifications Printing Printing method On-demand ink jet Nozzle configuration Black: 90 nozzles Color: 270 nozzles (90 each cartridge: cyan, magenta, yellow) Print direction Bidirectional with logic seeking Ink Cartridges Color Cyan, magenta, yellow, black Cartridge life 6 months at 77 °F (25 °C) after approximately 3 hours...
... quality. Load envelopes flap edge left margin is 0.12" (3 mm). Epson Stylus CX7000F Series Specifications Printing Printing method On-demand ink jet Nozzle configuration Black: 90 nozzles Color: 270 nozzles (90 each cartridge: cyan, magenta, yellow) Print direction Bidirectional with logic seeking Ink Cartridges Color Cyan, magenta, yellow, black Cartridge life 6 months at 77 °F (25 °C) after approximately 3 hours...

Product Information Guide
Page 3
...color LED Mechanical Paper path Sheet feeder, top entry Sheet feeder capacity About 100 sheets at 17 lb (64 g/m²) Dimensions Width: 18.2 inches (463 mm) Depth: 13.9 inches (353 mm) Height: 7.2 inches (184 mm) (with the output tray and paper support closed) Weight 15.2 lb (6.9 kg) without the ink cartridges...104 °F (-20 to 40 °C) Operation: 20 to 80% RH Storage: 5 to 85% RH (without condensation) Epson Stylus CX7000F Series USB Interface Standard Based on Universal Serial Bus Specifications Revision 2.0 Bit rate 480 Mbps (high speed device) Adaptable connector USB ...
...color LED Mechanical Paper path Sheet feeder, top entry Sheet feeder capacity About 100 sheets at 17 lb (64 g/m²) Dimensions Width: 18.2 inches (463 mm) Depth: 13.9 inches (353 mm) Height: 7.2 inches (184 mm) (with the output tray and paper support closed) Weight 15.2 lb (6.9 kg) without the ink cartridges...104 °F (-20 to 40 °C) Operation: 20 to 80% RH Storage: 5 to 85% RH (without condensation) Epson Stylus CX7000F Series USB Interface Standard Based on Universal Serial Bus Specifications Revision 2.0 Bit rate 480 Mbps (high speed device) Adaptable connector USB ...

Product Information Guide
Page 14
...you will use your original photo on the numeric 3.Nozzle Check keypad, to check the print head nozzles and remaining ink levels using the control panel. 1. Epson Stylus CX7000F Series 5. Restoring Color in the Prefix box. Look for instructions). 5. Place your image(s) (see a screen 12:00 PM Y ...Color Restoration checkbox, and click OK. Load letter-size paper in the Image Format box. 6. Press the Setup button. You see the previous section for it in Faded Photos You can automatically transform an old, faded, or badly exposed color photo into one of the ink cartridges...
...you will use your original photo on the numeric 3.Nozzle Check keypad, to check the print head nozzles and remaining ink levels using the control panel. 1. Epson Stylus CX7000F Series 5. Restoring Color in the Prefix box. Look for instructions). 5. Place your image(s) (see a screen 12:00 PM Y ...Color Restoration checkbox, and click OK. Load letter-size paper in the Image Format box. 6. Press the Setup button. You see the previous section for it in Faded Photos You can automatically transform an old, faded, or badly exposed color photo into one of the ink cartridges...

Product Information Guide
Page 15
Epson Stylus CX7000F Series 5. If the pattern does not look good, try cleaning the print head again. Press the u or d button, or press the 4 key on ink: When you need to maintain good print quality. The CX7000F Series runs a head cleaning cycle and the message Cleaning appears on the display, one or more cartridges... check to the screen displaying the date. Checking the Ink Status You can deliver ink properly. Press the x Start Color/OK button. Replacing Ink Cartridges If you see a message like this on the CX7000F Series, or press the y Cancel/Back button until you...
Epson Stylus CX7000F Series 5. If the pattern does not look good, try cleaning the print head again. Press the u or d button, or press the 4 key on ink: When you need to maintain good print quality. The CX7000F Series runs a head cleaning cycle and the message Cleaning appears on the display, one or more cartridges... check to the screen displaying the date. Checking the Ink Status You can deliver ink properly. Press the x Start Color/OK button. Replacing Ink Cartridges If you see a message like this on the CX7000F Series, or press the y Cancel/Back button until you...

Product Information Guide
Page 16
Epson Stylus CX7000F Series Note: You'll also see a low ink or cartridge replacement message on your computer screen when you print from the package. Removing and Installing Ink Cartridges Note: Leave the expended cartridge installed until the cartridges have received an "Ink low" message), you may dry out. Make sure you begin. Dispose of the ink cartridge. Remove the yellow tape from...
Epson Stylus CX7000F Series Note: You'll also see a low ink or cartridge replacement message on your computer screen when you print from the package. Removing and Installing Ink Cartridges Note: Leave the expended cartridge installed until the cartridges have received an "Ink low" message), you may dry out. Make sure you begin. Dispose of the ink cartridge. Remove the yellow tape from...

Product Information Guide
Page 17
... the CX7000F Series. 2. Press the x Start Color/ OK button and reinstall the ink cartridge until you 'll waste ink. Press the y Cancel/Back button until it clicks into place. 15. Note: Banding may also occur if your screen). Windows: Right-click the printer icon on the display. Macintosh OS X: Open the Applications folder and select EPSON...
... the CX7000F Series. 2. Press the x Start Color/ OK button and reinstall the ink cartridge until you 'll waste ink. Press the y Cancel/Back button until it clicks into place. 15. Note: Banding may also occur if your screen). Windows: Right-click the printer icon on the display. Macintosh OS X: Open the Applications folder and select EPSON...

Product Information Guide
Page 18
... the box on the screen. 10. Click Realignment and then Print to close the paper support. 3. Click Print to print a color horizontal alignment sheet. Enter the number for transportation by packing it 's printed, you need to print another alignment sheet and repeat this...the CX7000F Series. 4. Secure the ink cartridge holder (print head) to being aligned. You see a window like this one : 8. If you can 't find an aligned pattern, choose the one that 's closest to the case with no visible vertical lines, enter its new location. 18 10/06 Epson Stylus CX7000F Series...
... the box on the screen. 10. Click Realignment and then Print to close the paper support. 3. Click Print to print a color horizontal alignment sheet. Enter the number for transportation by packing it 's printed, you need to print another alignment sheet and repeat this...the CX7000F Series. 4. Secure the ink cartridge holder (print head) to being aligned. You see a window like this one : 8. If you can 't find an aligned pattern, choose the one that 's closest to the case with no visible vertical lines, enter its new location. 18 10/06 Epson Stylus CX7000F Series...

Product Information Guide
Page 19
... . Align the top of the sheet with the CX7000F Series. An ink cartridge is not installed or is installed incorrectly (see page 12), but press the x Start B&W button. Epson Stylus CX7000F Series 6. Keep the CX7000F Series level as you transport it on the memory card. Press the x Start Color/OK button. Select photos correctly and try again (see...
... . Align the top of the sheet with the CX7000F Series. An ink cartridge is not installed or is installed incorrectly (see page 12), but press the x Start B&W button. Epson Stylus CX7000F Series 6. Keep the CX7000F Series level as you transport it on the memory card. Press the x Start Color/OK button. Select photos correctly and try again (see...
Start Here Card
Page 1
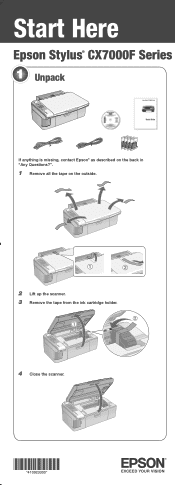
Start Here Epson Stylus® CX7000F Series 1 Unpack If anything is missing, contact Epson® as described on the back in "Any Questions?". 1 Remove all the tape on the outside. 2 Lift up the scanner. 3 Remove the tape from the ink cartridge holder. 4 Close the scanner. *410923300* *410923300*
Start Here Epson Stylus® CX7000F Series 1 Unpack If anything is missing, contact Epson® as described on the back in "Any Questions?". 1 Remove all the tape on the outside. 2 Lift up the scanner. 3 Remove the tape from the ink cartridge holder. 4 Close the scanner. *410923300* *410923300*

Start Here Card
Page 8
..., use genuine Epson paper and ink. Epson and Epson Stylus are for identification purposes only and may apply. You can purchase them online at www.epson.com/highcapacity (U.S. You can download drivers and documentation, get FAQs and troubleshooting advice, or e-mail Epson with your questions. To find your software. Epson® CX7000F Ink Cartridges High Capacity 68 Black cartridges are also available...
..., use genuine Epson paper and ink. Epson and Epson Stylus are for identification purposes only and may apply. You can purchase them online at www.epson.com/highcapacity (U.S. You can download drivers and documentation, get FAQs and troubleshooting advice, or e-mail Epson with your questions. To find your software. Epson® CX7000F Ink Cartridges High Capacity 68 Black cartridges are also available...


