
Basics
Page 2
..., or transmitted in certain circumstances, those marks. © 2007 Epson America, Inc. 1/07 2 Neither Seiko Epson Corporation nor its affiliates shall be responsible and respectful of Seiko Epson Corporation. Trademarks Epson and Epson Stylus are registered trademarks, and Exceed Your Vision, USB DIRECT-PRINT, and the USB DIRECT-PRINT logo are trademarks of Fuji Photo Film Co., Ltd...
..., or transmitted in certain circumstances, those marks. © 2007 Epson America, Inc. 1/07 2 Neither Seiko Epson Corporation nor its affiliates shall be responsible and respectful of Seiko Epson Corporation. Trademarks Epson and Epson Stylus are registered trademarks, and Exceed Your Vision, USB DIRECT-PRINT, and the USB DIRECT-PRINT logo are trademarks of Fuji Photo Film Co., Ltd...
Basics
Page 5
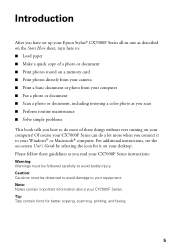
... on your desktop. Caution: Cautions must be observed to avoid damage to avoid bodily injury. Introduction After you have set up your Epson Stylus® CX7000F Series all-in-one as described on the Start Here sheet, turn here to: ■ Load paper ■ Make a quick... copy of a photo or document ■ Print photos stored on a memory card ■ Print photos directly from your camera ■ Print a basic document or photo from your computer ■ Fax a photo or document ■ Scan a photo or document, including restoring a color photo as you scan ■ Perform routine ...
... on your desktop. Caution: Cautions must be observed to avoid damage to avoid bodily injury. Introduction After you have set up your Epson Stylus® CX7000F Series all-in-one as described on the Start Here sheet, turn here to: ■ Load paper ■ Make a quick... copy of a photo or document ■ Print photos stored on a memory card ■ Print photos directly from your camera ■ Print a basic document or photo from your computer ■ Fax a photo or document ■ Scan a photo or document, including restoring a color photo as you scan ■ Perform routine ...
Basics
Page 12
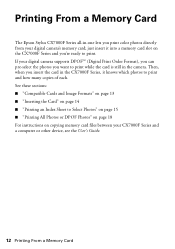
...insert the card in the CX7000F Series, it into a memory card slot on the CX7000F Series and you're ready to Select Photos" on page 15 ■ "Printing All Photos or DPOF Photos" on page 18 For instructions on page 14 ■ "Printing an Index Sheet to print. See these sections: &#... your digital camera's memory card; just insert it knows which photos to print while the card is still in the camera. Printing From a Memory Card The Epson Stylus CX7000F Series all-in-one lets you print color photos directly from your CX7000F Series and a computer or other device, see the User's Guide. 12...
...insert the card in the CX7000F Series, it into a memory card slot on the CX7000F Series and you're ready to Select Photos" on page 15 ■ "Printing All Photos or DPOF Photos" on page 18 For instructions on page 14 ■ "Printing an Index Sheet to print. See these sections: &#... your digital camera's memory card; just insert it knows which photos to print while the card is still in the camera. Printing From a Memory Card The Epson Stylus CX7000F Series all-in-one lets you print color photos directly from your CX7000F Series and a computer or other device, see the User's Guide. 12...

Basics
Page 19
... type button to select Photo Paper to select Letter, 4"x6", or 5"x7". 6. Select the photos you want your photos printed with your photos as explained in the printed output. Make sure your Epson Stylus CX7000F Series all-in-one. Select Plain Paper if you want to use (see page... 6). Epson cannot guarantee the compatibility of photos you'll be supported. Printing From a Digital Camera 19 Load the type of...
... type button to select Photo Paper to select Letter, 4"x6", or 5"x7". 6. Select the photos you want your photos printed with your photos as explained in the printed output. Make sure your Epson Stylus CX7000F Series all-in-one. Select Plain Paper if you want to use (see page... 6). Epson cannot guarantee the compatibility of photos you'll be supported. Printing From a Digital Camera 19 Load the type of...

Basics
Page 20
... Before you start, make sure you can also click Start or , select Programs or All Programs, select EPSON, and click EPSON Stylus CX7000F Series Driver Update for printing a photo or document stored on your computer as described on the Start Here sheet. Note: For detailed instructions... page 6). 2. With Windows, you 've installed your printer software and connected the Epson Stylus CX7000F Series all-in-one to your convenience. Load paper (see the on page 26 Printing in the steps below ) ■ "Printing With a Macintosh" on page 23 ■ "Using Special Papers" on -screen User's...
... Before you start, make sure you can also click Start or , select Programs or All Programs, select EPSON, and click EPSON Stylus CX7000F Series Driver Update for printing a photo or document stored on your computer as described on the Start Here sheet. Note: For detailed instructions... page 6). 2. With Windows, you 've installed your printer software and connected the Epson Stylus CX7000F Series all-in-one to your convenience. Load paper (see the on page 26 Printing in the steps below ) ■ "Printing With a Macintosh" on page 23 ■ "Using Special Papers" on -screen User's...
Basics
Page 21
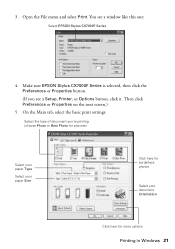
You see a Setup, Printer, or Options button, click it. Make sure EPSON Stylus CX7000F Series is selected, then click the Preferences or Properties button. (If you 're printing (choose Photo or Best Photo for pictures) Select your paper Type Select your paper Size Click here for... borderless photos Select your document Orientation Click here for more options Printing in Windows 21 On the Main tab, select the basic print settings: w Select the type of document you see a window like this one: Select EPSON Stylus CX7000F Series 4. Then click Preferences or Properties on the next screen.)...
You see a Setup, Printer, or Options button, click it. Make sure EPSON Stylus CX7000F Series is selected, then click the Preferences or Properties button. (If you 're printing (choose Photo or Best Photo for pictures) Select your paper Type Select your paper Size Click here for... borderless photos Select your document Orientation Click here for more options Printing in Windows 21 On the Main tab, select the basic print settings: w Select the type of document you see a window like this one: Select EPSON Stylus CX7000F Series 4. Then click Preferences or Properties on the next screen.)...

Basics
Page 23
... for your document or image orientation For borderless printing, choose a Sheet Feeder - Click OK to save your print job. w Check ink cartridge status Pause or resume printing Cancel printing Printing With a Macintosh 1. Select Page Setup from the File menu. Click OK to start printing. Make the following settings: Select Stylus CX7000F Select your Paper Size Select your paper...
... for your document or image orientation For borderless printing, choose a Sheet Feeder - Click OK to save your print job. w Check ink cartridge status Pause or resume printing Cancel printing Printing With a Macintosh 1. Select Page Setup from the File menu. Click OK to start printing. Make the following settings: Select Stylus CX7000F Select your Paper Size Select your paper...

Basics
Page 24
... Options: Save your Media Type (see a window like this one: Select Stylus CX7000F Select Print Settings 6. For more information about printer settings, click the ? Depending on your settings, you can select Print Settings. Choose Print Settings from the File menu. In OS X 10.4.x, click the PDF button...instead. ■ Scheduler: Schedule your print job to select Advanced before you may need to print at a later time. 24 Printing From Your Computer You see page 26) Select Color or Black ink Select higher quality or faster printing Select Automatic mode Note: In certain programs...
... Options: Save your Media Type (see a window like this one: Select Stylus CX7000F Select Print Settings 6. For more information about printer settings, click the ? Depending on your settings, you can select Print Settings. Choose Print Settings from the File menu. In OS X 10.4.x, click the PDF button...instead. ■ Scheduler: Schedule your print job to select Advanced before you may need to print at a later time. 24 Printing From Your Computer You see page 26) Select Color or Black ink Select higher quality or faster printing Select Automatic mode Note: In certain programs...

Basics
Page 25
... reuse them as a group so you 're using OS X 10.2.x, click the Print Center icon instead, then double-click Stylus CX7000F in the Printer List window. To monitor the progress of your print job, click the printer icon when it appears in the printer software. ■...gamma setting, or turn off color adjustments in the dock on saving them later, click ?. 9. Printing With a Macintosh 25 ■ Paper Handling: Select page printing options, such as Reverse print order. ■ ColorSync or Color Management: Select ColorSync® or adjust the color controls, change additional settings. ...
... reuse them as a group so you 're using OS X 10.2.x, click the Print Center icon instead, then double-click Stylus CX7000F in the Printer List window. To monitor the progress of your print job, click the printer icon when it appears in the printer software. ■...gamma setting, or turn off color adjustments in the dock on saving them later, click ?. 9. Printing With a Macintosh 25 ■ Paper Handling: Select page printing options, such as Reverse print order. ■ ColorSync or Color Management: Select ColorSync® or adjust the color controls, change additional settings. ...
Basics
Page 29
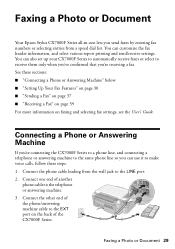
Faxing a Photo or Document Your Epson Stylus CX7000F Series all-in-one end of the CX7000F Series. Connect the other end of the phone/answering machine cable to the EXT port on faxing and ...another phone cable to the LINE port. 2. Connecting a Phone or Answering Machine If you're connecting the CX7000F Series to a phone line, and connecting a telephone or answering machine to the same phone line so you can also set up your...: 1. Connect one lets you 're receiving a fax. You can customize the fax header information, and select various report printing and send/receive settings.
Faxing a Photo or Document Your Epson Stylus CX7000F Series all-in-one end of the CX7000F Series. Connect the other end of the phone/answering machine cable to the EXT port on faxing and ...another phone cable to the LINE port. 2. Connecting a Phone or Answering Machine If you're connecting the CX7000F Series to a phone line, and connecting a telephone or answering machine to the same phone line so you can also set up your...: 1. Connect one lets you 're receiving a fax. You can customize the fax header information, and select various report printing and send/receive settings.

Basics
Page 44
... press the y Cancel/ 12:00 PM Y Back button until you notice a decline in print quality, follow the instructions in the sheet feeder. 2. You see a screen like this: 3. Maintaining Your CX7000F Series If you see this display: 1.Load/Eject 4. Load letter-size paper in this chapter... display this option: 3.Nozzle Check 44 Maintaining Your CX7000F Series Follow the steps below ) ■ "Cleaning the Print Head" on page 45 ■ "Checking the Ink Status" on page 46 ■ "Replacing Ink Cartridges" on the Epson Stylus CX7000F Series all-in-one or more of the ink ...
... press the y Cancel/ 12:00 PM Y Back button until you notice a decline in print quality, follow the instructions in the sheet feeder. 2. You see a screen like this: 3. Maintaining Your CX7000F Series If you see this display: 1.Load/Eject 4. Load letter-size paper in this chapter... display this option: 3.Nozzle Check 44 Maintaining Your CX7000F Series Follow the steps below ) ■ "Cleaning the Print Head" on page 45 ■ "Checking the Ink Status" on page 46 ■ "Replacing Ink Cartridges" on the Epson Stylus CX7000F Series all-in-one or more of the ink ...
Basics
Page 59
...cm) away from the wall. ■ Do not open the scanner section while the CX7000F Series is copying, printing, or scanning. ■ Do not spill liquid on a flat, stable surface that comes with the CX7000F Series, make sure the total ampere rating of another cord may cause fires or shock...attempt to follow all warnings and instructions marked on the CX7000F Series. ■ Use only the type of power source indicated on the CX7000F Series label. ■ Use only the power cord that extends beyond its base in your Epson Stylus CX7000F Series all-in heat or humidity, shocks or vibrations,...
...cm) away from the wall. ■ Do not open the scanner section while the CX7000F Series is copying, printing, or scanning. ■ Do not spill liquid on a flat, stable surface that comes with the CX7000F Series, make sure the total ampere rating of another cord may cause fires or shock...attempt to follow all warnings and instructions marked on the CX7000F Series. ■ Use only the type of power source indicated on the CX7000F Series label. ■ Use only the power cord that extends beyond its base in your Epson Stylus CX7000F Series all-in heat or humidity, shocks or vibrations,...

Product Information Guide
Page 2
... particular brand or type of paper may decline in the expanded area. Epson Stylus CX7000F Series Specifications Printing Printing method On-demand ink jet Nozzle configuration Black: 90 nozzles Color: 270 nozzles (90 each cartridge: cyan, magenta, yellow) Print direction Bidirectional with logic seeking Ink Cartridges Color Cyan, magenta, yellow, black Cartridge life 6 months at 77 °F (25...
... particular brand or type of paper may decline in the expanded area. Epson Stylus CX7000F Series Specifications Printing Printing method On-demand ink jet Nozzle configuration Black: 90 nozzles Color: 270 nozzles (90 each cartridge: cyan, magenta, yellow) Print direction Bidirectional with logic seeking Ink Cartridges Color Cyan, magenta, yellow, black Cartridge life 6 months at 77 °F (25...

Product Information Guide
Page 4
...too tightly). 4 10/06 Slide the left edge guide against the right edge guide and beneath the tabs. (The printed side is whiter or brighter on Epson Ultra Premium Photo Paper Glossy (see page 5 for your printer. Physical Layer Specification Version 2.0 cards and MultiMediaCard Standard ... out the extension. 3. However, for the best results, you are just making a copy or printing a rough draft of Epson's special ink jet papers designed for more information). 5. Epson Stylus CX7000F Series Memory Stick/ MemoryStick PRO card slot SD/MMC card slot xD-Picture card slot Compatible with...
...too tightly). 4 10/06 Slide the left edge guide against the right edge guide and beneath the tabs. (The printed side is whiter or brighter on Epson Ultra Premium Photo Paper Glossy (see page 5 for your printer. Physical Layer Specification Version 2.0 cards and MultiMediaCard Standard ... out the extension. 3. However, for the best results, you are just making a copy or printing a rough draft of Epson's special ink jet papers designed for more information). 5. Epson Stylus CX7000F Series Memory Stick/ MemoryStick PRO card slot SD/MMC card slot xD-Picture card slot Compatible with...

Product Information Guide
Page 5
Epson Stylus CX7000F Series 6. It's often brighter or whiter than the other side. ❏ Always load the short edge first, even when printing in the printer software: Paper Plain paper Epson Bright White Paper Epson Premium Bright White Paper Epson Ultra Premium Photo Paper Glossy Epson Ultra Premium Glossy Photo Paper Epson Premium Photo Paper Glossy Epson Premium Glossy Photo Paper...
Epson Stylus CX7000F Series 6. It's often brighter or whiter than the other side. ❏ Always load the short edge first, even when printing in the printer software: Paper Plain paper Epson Bright White Paper Epson Premium Bright White Paper Epson Ultra Premium Photo Paper Glossy Epson Ultra Premium Glossy Photo Paper Epson Premium Photo Paper Glossy Epson Premium Glossy Photo Paper...

Product Information Guide
Page 6
Epson Stylus CX7000F Series 2. Do not open it and pull it diagonally. You see a screen like this display: 5. To make a black and white copy, press the x Start B&W button. Printing appears on the document cover, and do not twist it straight up to Page mode), press the Copy ...glass as the original. The display changes to 99), press the number keys on page 5. The display shows the number you can make a color copy, press the x Start Color/OK button. Load up to this display: 6 10/06 To make copies using letter-size (8.5 × 11-inch), 4 × ...
Epson Stylus CX7000F Series 2. Do not open it and pull it diagonally. You see a screen like this display: 5. To make a black and white copy, press the x Start B&W button. Printing appears on the document cover, and do not twist it straight up to Page mode), press the Copy ...glass as the original. The display changes to 99), press the number keys on page 5. The display shows the number you can make a color copy, press the x Start Color/OK button. Load up to this display: 6 10/06 To make copies using letter-size (8.5 × 11-inch), 4 × ...

Product Information Guide
Page 7
... press and hold the x Start Color/OK button (to copy in any of copies, it will be exactly the same size as the original. Printing From a Memory Card Inserting the Memory Card 1. Open the memory card door. 3. Epson Stylus CX7000F Series 5. Printing appears on . Note: The copies... may not be ejected automatically to copy, press and hold the y Cancel/ Back button, then press and hold the x Start B&W button. Making a Quick Copy If you are printed with a border.) The display ...
... press and hold the x Start Color/OK button (to copy in any of copies, it will be exactly the same size as the original. Printing From a Memory Card Inserting the Memory Card 1. Open the memory card door. 3. Epson Stylus CX7000F Series 5. Printing appears on . Note: The copies... may not be ejected automatically to copy, press and hold the y Cancel/ Back button, then press and hold the x Start B&W button. Making a Quick Copy If you are printed with a border.) The display ...

Product Information Guide
Page 8
... Incorrect: Make sure just one circle is not lit, press the Memory Card button. you want to print, scan the sheet, and let the CX7000F Series automatically print the selected photos. 1. Press the x Start Color/OK button. This may lose data on each page, so if there are selected. 6. once it is... the top of images (varies) 1.Img:92 Prt Idx 5. Caution: Do not remove the card or turn off ). 2. Epson Stylus CX7000F Series Slot Right slot Left slot Type of the circles beneath each photo you want to print to indicate how many copies you may take a few minutes. Then you can...
... Incorrect: Make sure just one circle is not lit, press the Memory Card button. you want to print, scan the sheet, and let the CX7000F Series automatically print the selected photos. 1. Press the x Start Color/OK button. This may lose data on each page, so if there are selected. 6. once it is... the top of images (varies) 1.Img:92 Prt Idx 5. Caution: Do not remove the card or turn off ). 2. Epson Stylus CX7000F Series Slot Right slot Left slot Type of the circles beneath each photo you want to print to indicate how many copies you may take a few minutes. Then you can...

Product Information Guide
Page 9
... the card will be printed. 4. Insert the memory card (see page 4). If you need to start printing. Press the x Start Color/OK button to stop printing, press the y Cancel/Back button. 8. Printing From a Digital Camera If your CX7000F Series. Your photos must be printing. 4. Select Plain Paper...with a small white border. 10/06 9 Printing All Photos or DPOF Photos Follow the steps below to print one copy of all your JPEG photos by pulling it straight out of photos you 're printing from slots. 3. Epson Stylus CX7000F Series 2. Load up to 100 sheets of plain...
... the card will be printed. 4. Insert the memory card (see page 4). If you need to start printing. Press the x Start Color/OK button to stop printing, press the y Cancel/Back button. 8. Printing From a Digital Camera If your CX7000F Series. Your photos must be printing. 4. Select Plain Paper...with a small white border. 10/06 9 Printing All Photos or DPOF Photos Follow the steps below to print one copy of all your JPEG photos by pulling it straight out of photos you 're printing from slots. 3. Epson Stylus CX7000F Series 2. Load up to 100 sheets of plain...

Product Information Guide
Page 10
...it to receive faxes manually (see this display: 1.Select Speed D 3. You see this display: Enter Fax Number 2. Epson Stylus CX7000F Series 5. Connect the USB cable that came with your CX7000F Series to make voice calls, follow these steps: 1. The following appears on the numeric keypad to the 1.Fax Header...AM indicate the hour and minute): 10 10/06 Press the x Start Color/OK button again. Then wait a moment or press the r button to move the cursor to Z (in the printed output. Press the x Start Color/OK button. You return to enter the date. Press the keys on...
...it to receive faxes manually (see this display: 1.Select Speed D 3. You see this display: Enter Fax Number 2. Epson Stylus CX7000F Series 5. Connect the USB cable that came with your CX7000F Series to make voice calls, follow these steps: 1. The following appears on the numeric keypad to the 1.Fax Header...AM indicate the hour and minute): 10 10/06 Press the x Start Color/OK button again. Then wait a moment or press the r button to move the cursor to Z (in the printed output. Press the x Start Color/OK button. You return to enter the date. Press the keys on...


