
Product Information Guide
Page 4
...To prevent unauthorized use the Select buttons to OK on the LCD screen. 11. Follow these steps to turn on the CX6400. 2. Then press the P On button to turn off the security lock: 1. Then double-click the Security Lock icon. You have now enabled the Security... close the program. Then press Select 7. Press the button next to On (shown on the CX6400. 6. You cannot use the Select buttons to Off on the LCD screen. 4. Press the x Color button. 3. EPSON Stylus CX6400 10/03 EPSON Stylus CX6400 Environmental Temperature Operation 50 to 95 °F (10 to 35 °C) Storage* - 4 ...
...To prevent unauthorized use the Select buttons to OK on the LCD screen. 11. Follow these steps to turn on the CX6400. 2. Then press the P On button to turn off the security lock: 1. Then double-click the Security Lock icon. You have now enabled the Security... close the program. Then press Select 7. Press the button next to On (shown on the CX6400. 6. You cannot use the Select buttons to Off on the LCD screen. 4. Press the x Color button. 3. EPSON Stylus CX6400 10/03 EPSON Stylus CX6400 Environmental Temperature Operation 50 to 95 °F (10 to 35 °C) Storage* - 4 ...
Product Information Guide
Page 5
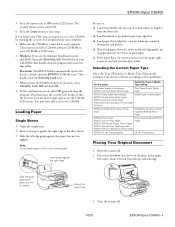
... that folder. You now have full access to : ❏ Load the printable side face-up to exit setup. Close the scanner lid. 10/03 EPSON Stylus CX6400 - 5 Macintosh: The EPSON folder automatically opens (if it in front of the feeder guard. When you load it doesn't, double-click the... documents and photos. ❏ Don't load paper above the arrow on your paper against the paper (but not too tightly Extend the output tray 3. EPSON Stylus CX6400 5. Make sure the CX6400 is now turned off. 6. Press the button next to your computer: 1. Slide the left edge guide, up .
... that folder. You now have full access to : ❏ Load the printable side face-up to exit setup. Close the scanner lid. 10/03 EPSON Stylus CX6400 - 5 Macintosh: The EPSON folder automatically opens (if it in front of the feeder guard. When you load it doesn't, double-click the... documents and photos. ❏ Don't load paper above the arrow on your paper against the paper (but not too tightly Extend the output tray 3. EPSON Stylus CX6400 5. Make sure the CX6400 is now turned off. 6. Press the button next to your computer: 1. Slide the left edge guide, up .
Product Information Guide
Page 8
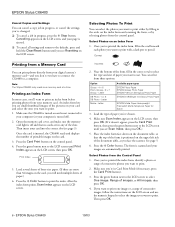
... index form, fill in the oval beneath each photo you want to print. Glossy - 5 × 7 Glossy - Press the x Color button. If you want to print one memory card at a time. EPSON Stylus CX6400 Cancel Copies and Settings You can select the photos you want to print either by filling in the ovals on.... After the index form prints, Scan Index appears on the LCD screen, then press OK. Load the type of paper.) 6. Make sure the CX6400 is turned on and is not connected to the defaults, press and hold the Clear/Reset button until Print Index appears on the LCD screen. Letter Matte...
... index form, fill in the oval beneath each photo you want to print. Glossy - 5 × 7 Glossy - Press the x Color button. If you want to print one memory card at a time. EPSON Stylus CX6400 Cancel Copies and Settings You can select the photos you want to print either by filling in the ovals on.... After the index form prints, Scan Index appears on the LCD screen, then press OK. Load the type of paper.) 6. Make sure the CX6400 is turned on and is not connected to the defaults, press and hold the Clear/Reset button until Print Index appears on the LCD screen. Letter Matte...
Product Information Guide
Page 10
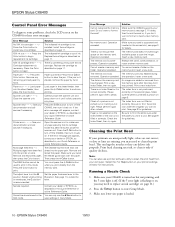
...guidelines. Release the card's write protection, or protect. The memory card was The memory card was printed. The index form is turned on the CX6400 for guidelines. Check the Index Sheet, then try again. Print head cleaning uses ink, so clean it clicks securely into the ...canceled. Insert a new card. Make sure your computer. EPSON Stylus CX6400 Control Panel Error Messages To diagnose some problems, check the LCD screen on but not printing, and the ! Remove and reload the paper, then press the Color button. Service required. Load paper in the entire oval ...
...guidelines. Release the card's write protection, or protect. The memory card was The memory card was printed. The index form is turned on the CX6400 for guidelines. Check the Index Sheet, then try again. Print head cleaning uses ink, so clean it clicks securely into the ...canceled. Insert a new card. Make sure your computer. EPSON Stylus CX6400 Control Panel Error Messages To diagnose some problems, check the LCD screen on but not printing, and the ! Remove and reload the paper, then press the Color button. Service required. Load paper in the entire oval ...
Product Information Guide
Page 11
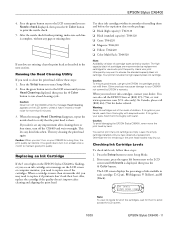
...turn it if printouts don't look their best. The high capacity black ink cartridges are missing, clean the print head as replacement cartridges for dealer referral. When you may cause damage to verify that the print head is displayed, then press the x Color button. Caution: To avoid damaging the EPSON Stylus CX6400..., never move the print head by location. When the message Head Cleaning disappears, repeat the nozzle check to your CX6400 for a long time, the print quality ...
...turn it if printouts don't look their best. The high capacity black ink cartridges are missing, clean the print head as replacement cartridges for dealer referral. When you may cause damage to verify that the print head is displayed, then press the x Color button. Caution: To avoid damaging the EPSON Stylus CX6400..., never move the print head by location. When the message Head Cleaning disappears, repeat the nozzle check to your CX6400 for a long time, the print quality ...

Product Information Guide
Page 12
EPSON Stylus CX6400 3. You cannot print if an ink cartridge is empty, then press the x Color button. If an ink cartridge is empty: Check the LCD screen to the replacement... the black cartridge being removed. Wait for the ink cartridge holder to move to see which cartridge is empty. EPSON Stylus CX6400 If you need to the LCD screen until it carefully. If an ink cartridge is low: Press the Setup ..., repeat steps 5 through 7 before continuing with step 8. 8. Press down until Replace ink is turned on the front of the cartridge; When done, press the OK button. Make sure the...
EPSON Stylus CX6400 3. You cannot print if an ink cartridge is empty, then press the x Color button. If an ink cartridge is empty: Check the LCD screen to the replacement... the black cartridge being removed. Wait for the ink cartridge holder to move to see which cartridge is empty. EPSON Stylus CX6400 If you need to the LCD screen until it carefully. If an ink cartridge is low: Press the Setup ..., repeat steps 5 through 7 before continuing with step 8. 8. Press down until Replace ink is turned on the front of the cartridge; When done, press the OK button. Make sure the...
Product Information Guide
Page 13
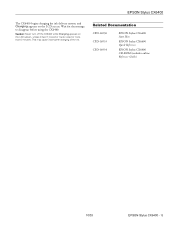
This may cause incomplete charging of the ink. Wait for more than 5 minutes. Related Documentation CPD-16930 CPD-16933 CPD-16934 EPSON Stylus CX6400 Start Here EPSON Stylus CX6400 Quick Reference EPSON Stylus CX6400 CD-ROM (includes online Reference Guide) 10/03 EPSON Stylus CX6400 - 13 Caution: Never turn off the CX6400 while Charging appears on the LCD screen. EPSON Stylus CX6400 The CX6400 begins charging the ink delivery system, and Charging appears on the LCD screen, unless it hasn't moved or made noise for the message to disappear before using the CX6400.
This may cause incomplete charging of the ink. Wait for more than 5 minutes. Related Documentation CPD-16930 CPD-16933 CPD-16934 EPSON Stylus CX6400 Start Here EPSON Stylus CX6400 Quick Reference EPSON Stylus CX6400 CD-ROM (includes online Reference Guide) 10/03 EPSON Stylus CX6400 - 13 Caution: Never turn off the CX6400 while Charging appears on the LCD screen. EPSON Stylus CX6400 The CX6400 begins charging the ink delivery system, and Charging appears on the LCD screen, unless it hasn't moved or made noise for the message to disappear before using the CX6400.

Product Support Bulletin
Page 4
...prompts to www.epson.com and click on the MAC desktop. The unit should be deleted. A Total Pages: Epson Stylus Photo RX500, Stylus CX6400 Epson Scan Driver Release v.1.33 for Mac systems using any one of Epson Scan Twain installed... (v.1.28A or later) only the models supported on the older driver appear in progress, please wait..." 2. Open the Applications Folder, locate the Epson Scan program and launch it on Drivers & Downloads. With the multi-function device turned...
...prompts to www.epson.com and click on the MAC desktop. The unit should be deleted. A Total Pages: Epson Stylus Photo RX500, Stylus CX6400 Epson Scan Driver Release v.1.33 for Mac systems using any one of Epson Scan Twain installed... (v.1.28A or later) only the models supported on the older driver appear in progress, please wait..." 2. Open the Applications Folder, locate the Epson Scan program and launch it on Drivers & Downloads. With the multi-function device turned...

Product Support Bulletin
Page 6
...: 1 Product(s): Stylus Photo RX500 / Stylus CX6400 Subject: System Boot Lockup on . When the BIOS of these computers sends the query during bootup to the Epson multi-function device, the query is connected to hang during bootup, disconnect the multi-function device from the computer and turn it on Dell and... systems using the Award Medallion BIOS v.6.0 ROM chip. Reason: The ROM's for bootup problems that can occur when a Stylus Photo RX500 or Stylus CX6400 multi-function device is ignored by the Epson product which causes the computer to certain models of Dell and Sony computers.
...: 1 Product(s): Stylus Photo RX500 / Stylus CX6400 Subject: System Boot Lockup on . When the BIOS of these computers sends the query during bootup to the Epson multi-function device, the query is connected to hang during bootup, disconnect the multi-function device from the computer and turn it on Dell and... systems using the Award Medallion BIOS v.6.0 ROM chip. Reason: The ROM's for bootup problems that can occur when a Stylus Photo RX500 or Stylus CX6400 multi-function device is ignored by the Epson product which causes the computer to certain models of Dell and Sony computers.

Quick Reference Guide
Page 5
... original on your desktop when you want to use your EPSON Stylus® CX6400 to your equipment. You can use , and print. Your CX6400 lets you have to be observed to avoid damage to make color or black-and-white copies without turning on printing and scanning from your computer. To set up... your CX6400 and install its software, see your online Reference Guide. An icon...
... original on your desktop when you want to use your EPSON Stylus® CX6400 to your equipment. You can use , and print. Your CX6400 lets you have to be observed to avoid damage to make color or black-and-white copies without turning on printing and scanning from your computer. To set up... your CX6400 and install its software, see your online Reference Guide. An icon...

Quick Reference Guide
Page 7
...EPSON CD-ROM icon). Using the Security Lock 7 Press the On button until the green lights flash to enter a PIN (Personal Identification Number) whenever you turn on a computer connected to prevent unauthorized use of your CX6400. Open the SecurityLock Tool folder on the CX6400. The security lock requires you to turn on your Stylus CX6400... software CD-ROM. 3. To enable the security lock, you must first run the Security Lock program on your CX6400, you ...
...EPSON CD-ROM icon). Using the Security Lock 7 Press the On button until the green lights flash to enter a PIN (Personal Identification Number) whenever you turn on a computer connected to prevent unauthorized use of your CX6400. Open the SecurityLock Tool folder on the CX6400. The security lock requires you to turn on your Stylus CX6400... software CD-ROM. 3. To enable the security lock, you must first run the Security Lock program on your CX6400, you ...

Quick Reference Guide
Page 8
..., click OK again and close the program. Then press these buttons to display Security Lock on the CX6400. 6. Be sure to enter your 4-digit PIN code. Turn off your PIN. 8 Using Your Stylus CX6400 It is selected and click OK. 5. You have now enabled the Security Lock menu on the screen...number so you turn the CX6400 back on the LCD screen. Make sure Security Lock On is now locked. Press Setup . . . On the control panel, press the Setup button, then use it . 10. Enter your PIN code. When you don't forget it without entering your CX6400. 4. Press the Color button. 8. ...
..., click OK again and close the program. Then press these buttons to display Security Lock on the CX6400. 6. Be sure to enter your 4-digit PIN code. Turn off your PIN. 8 Using Your Stylus CX6400 It is selected and click OK. 5. You have now enabled the Security Lock menu on the screen...number so you turn the CX6400 back on the LCD screen. Make sure Security Lock On is now locked. Press Setup . . . On the control panel, press the Setup button, then use it . 10. Enter your PIN code. When you don't forget it without entering your CX6400. 4. Press the Color button. 8. ...

Quick Reference Guide
Page 9
...want to turn it doesn't, doubleclick the EPSON CD-ROM icon). Windows: If you can regain access to enter your 4-digit PIN code. 5. Then double-click the Security Lock icon. Then press these steps: 1. The security feature is now turned off (so that folder. Press the Color button....program file located in that the CX6400 doesn't prompt you turn the security lock off . Press Setup . . . If you forget your PIN code, you see the Software Installation screen, click Exit. Open the SecurityLock Tool folder on the LCD screen). 4. Insert your Stylus CX6400 software CD-ROM. 2. On...
...want to turn it doesn't, doubleclick the EPSON CD-ROM icon). Windows: If you can regain access to enter your 4-digit PIN code. 5. Then double-click the Security Lock icon. Then press these steps: 1. The security feature is now turned off (so that folder. Press the Color button....program file located in that the CX6400 doesn't prompt you turn the security lock off . Press Setup . . . If you forget your PIN code, you see the Software Installation screen, click Exit. Open the SecurityLock Tool folder on the LCD screen). 4. Insert your Stylus CX6400 software CD-ROM. 2. On...

Quick Reference Guide
Page 25
... index form lets you see "Inserting a Card" on page 21). Press the green button next to enter Card Print mode. 3. Printing from a Card The Stylus CX6400 lets you print photos directly from your digital camera's memory card-you want to print. 1. See these sections: ■ "Printing an Index Form" (below... any photos from a Card 25 Once the card is still in a compatible JPEG or TIF file format are detected). 2. Make sure your CX6400 is turned off ), then insert a memory card (see small thumbnail images of printable images on your card and select just the ones you don't even...
... index form lets you see "Inserting a Card" on page 21). Press the green button next to enter Card Print mode. 3. Printing from a Card The Stylus CX6400 lets you print photos directly from your digital camera's memory card-you want to print. 1. See these sections: ■ "Printing an Index Form" (below... any photos from a Card 25 Once the card is still in a compatible JPEG or TIF file format are detected). 2. Make sure your CX6400 is turned off ), then insert a memory card (see small thumbnail images of printable images on your card and select just the ones you don't even...
Quick Reference Guide
Page 44
Notices Important Safety Instructions Before using your EPSON Stylus CX6400, read and follow these safety instructions: ■ Be sure to follow all warnings and instructions marked on the Stylus CX6400. ■ Use only the type of the devices plugged into the wall outlet does not exceed ...; Avoid electrical outlets controlled by wall switches or automatic timers. ■ Keep your Stylus CX6400 and computer system away from potential sources of the work surface. ■ Turn off and unplug the Stylus CX6400 before cleaning. Placez l'imprimante près d'une prise de contacte où la ...
Notices Important Safety Instructions Before using your EPSON Stylus CX6400, read and follow these safety instructions: ■ Be sure to follow all warnings and instructions marked on the Stylus CX6400. ■ Use only the type of the devices plugged into the wall outlet does not exceed ...; Avoid electrical outlets controlled by wall switches or automatic timers. ■ Keep your Stylus CX6400 and computer system away from potential sources of the work surface. ■ Turn off and unplug the Stylus CX6400 before cleaning. Placez l'imprimante près d'une prise de contacte où la ...

Start Here Card
Page 2
On button Caution: Do not connect the USB cable until instructed. 2 Press and hold the On button until the green lights come on the printer.) 3 Plug In and Turn On 1 Plug the Stylus CX into a grounded electrical outlet. 2 Attach the Parts 1 Insert the paper support into the slots behind the printer, as shown. 2 Lower the feeder guard into the slots behind the scanner lid. (Insert the hinges on the feeder guard into the corresponding slots on .
On button Caution: Do not connect the USB cable until instructed. 2 Press and hold the On button until the green lights come on the printer.) 3 Plug In and Turn On 1 Plug the Stylus CX into a grounded electrical outlet. 2 Attach the Parts 1 Insert the paper support into the slots behind the printer, as shown. 2 Lower the feeder guard into the slots behind the scanner lid. (Insert the hinges on the feeder guard into the corresponding slots on .

Start Here Card
Page 4
The Stylus CX begins charging the ink delivery system. The green light flashes and the Stylus CX makes various sounds. 7 Close the ink cartridge cover, then close the scanner section. Charging takes about 2 minutes. Slide the edge guide against the right side of the feeder, but don't push it in. Don't turn it off while the green light is flashing or you'll waste ink. 5 Load Paper 1 Extend the output tray. 2 Slide the edge guide to the left. 3 Place a stack of paper against the paper.
The Stylus CX begins charging the ink delivery system. The green light flashes and the Stylus CX makes various sounds. 7 Close the ink cartridge cover, then close the scanner section. Charging takes about 2 minutes. Slide the edge guide against the right side of the feeder, but don't push it in. Don't turn it off while the green light is flashing or you'll waste ink. 5 Load Paper 1 Extend the output tray. 2 Slide the edge guide to the left. 3 Place a stack of paper against the paper.
Start Here Card
Page 5
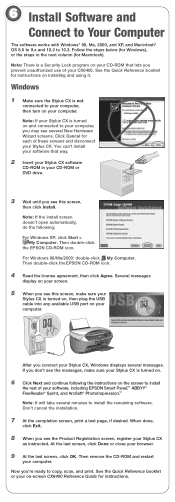
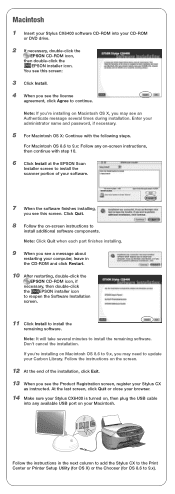
...CX6400. Click Cancel for each of these screens and disconnect your browser. 9 At the last screen, click OK. Then double-click the EPSON CD-ROM icon. Several messages display on your screen. 5 When you prevent unauthorized use of your computer. After you see the Product Registration screen, register your Stylus...USB cable into any available USB port on your Stylus CX is turned on installing and using it. Note: If the install screen doesn't open automatically, do the following the instructions on your software, including EPSON Smart Panel,™ ABBYY® FineReader® ...
...CX6400. Click Cancel for each of these screens and disconnect your browser. 9 At the last screen, click OK. Then double-click the EPSON CD-ROM icon. Several messages display on your screen. 5 When you prevent unauthorized use of your computer. After you see the Product Registration screen, register your Stylus...USB cable into any available USB port on your Stylus CX is turned on installing and using it. Note: If the install screen doesn't open automatically, do the following the instructions on your software, including EPSON Smart Panel,™ ABBYY® FineReader® ...
Start Here Card
Page 6
... last screen, click Quit or close your browser. 14 Make sure your Stylus CX6400 is turned on, then plug the USB cable into your CD-ROM or DVD drive. 2 If necessary, double-click the EPSON CD-ROM icon, then double-click the EPSON installer icon. Follow the instructions in the CD-ROM and click Restart.... 10 After restarting, double-click the EPSON CD-ROM icon, if necessary, then ...
... last screen, click Quit or close your browser. 14 Make sure your Stylus CX6400 is turned on, then plug the USB cable into your CD-ROM or DVD drive. 2 If necessary, double-click the EPSON CD-ROM icon, then double-click the EPSON installer icon. Follow the instructions in the CD-ROM and click Restart.... 10 After restarting, double-click the EPSON CD-ROM icon, if necessary, then ...
Start Here Card
Page 7
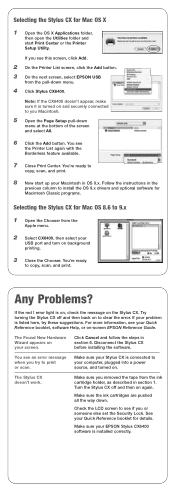
... copy, scan, and print. 8 Now start Print Center or the Printer Setup Utility. Make sure your Stylus CX is installed correctly. See your EPSON Stylus CX6400 software is connected to your computer, plugged into a power source, and turned on and securely connected to clear the error. Make sure your Quick Reference booklet for details. If...
... copy, scan, and print. 8 Now start Print Center or the Printer Setup Utility. Make sure your Stylus CX is installed correctly. See your EPSON Stylus CX6400 software is connected to your computer, plugged into a power source, and turned on and securely connected to clear the error. Make sure your Quick Reference booklet for details. If...


