
Technical Brief (Ink Jet Printers)
Page 2
.... Resistor Ink Bubble Nozzle Droplet Some thermal printers produce more color combinations and smoother color gradations. Also, Epson's variable ink droplet sizes and high resolutions combine to produce a greater number of different colored "printed dots" because a wider range of tiny droplets can produce ...; Different ink droplet sizes can be combined to increase the number of Print Resolution and Small, Variable-Size Ink Droplets 3. Epson MicroPiezo Technology: Epson Micro Piezo print heads use Variable Size Droplet Technology, where the printers can be combined to achieve...
.... Resistor Ink Bubble Nozzle Droplet Some thermal printers produce more color combinations and smoother color gradations. Also, Epson's variable ink droplet sizes and high resolutions combine to produce a greater number of different colored "printed dots" because a wider range of tiny droplets can produce ...; Different ink droplet sizes can be combined to increase the number of Print Resolution and Small, Variable-Size Ink Droplets 3. Epson MicroPiezo Technology: Epson Micro Piezo print heads use Variable Size Droplet Technology, where the printers can be combined to achieve...
Product Information Guide
Page 10
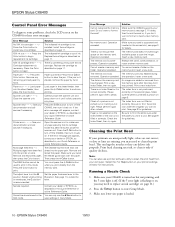
... the entire oval under the image(s) you want to clean the print head. EPSON Stylus CX6400 Control Panel Error Messages To diagnose some problems, check the LCD screen on the CX6400 for these error messages: Error Message No XXX ink cartridge - - - > Press the Color button to print in this mode. The B&W button cannot be stored saved in the...
... the entire oval under the image(s) you want to clean the print head. EPSON Stylus CX6400 Control Panel Error Messages To diagnose some problems, check the LCD screen on the CX6400 for these error messages: Error Message No XXX ink cartridge - - - > Press the Color button to print in this mode. The B&W button cannot be stored saved in the...
Product Information Guide
Page 11
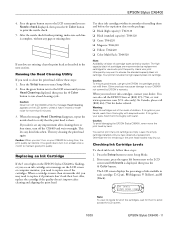
... Head Cleaning displayed, then press the x Color button to replace one of children. EPSON Stylus CX6400 4. In Canada, please call the EPSON Store at least once a month to the LCD screen until Ink levels is complete, without any gaps or missing dots: If any dried ink soften. Caution: To avoid damaging the EPSON Stylus CX6400, never move the print head by EPSON...
... Head Cleaning displayed, then press the x Color button to replace one of children. EPSON Stylus CX6400 4. In Canada, please call the EPSON Store at least once a month to the LCD screen until Ink levels is complete, without any gaps or missing dots: If any dried ink soften. Caution: To avoid damaging the EPSON Stylus CX6400, never move the print head by EPSON...
Quick Reference Guide
Page 3
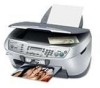
Contents Using Your Stylus CX6400 5 EPSON Stylus CX6400 Parts 6 Using the Security Lock 7 Loading Paper 11 Loading Single Sheets 11 Using Special Papers 12 Copying 14 Copying Without a Computer 14 Changing Copy Settings 15 Using Memory Cards 20 Compatible Memory Cards 20 Inserting a Card 21 Using Your CX6400 as a Card Reader 22 Printing from a Card 25 Printing an Index...
Contents Using Your Stylus CX6400 5 EPSON Stylus CX6400 Parts 6 Using the Security Lock 7 Loading Paper 11 Loading Single Sheets 11 Using Special Papers 12 Copying 14 Copying Without a Computer 14 Changing Copy Settings 15 Using Memory Cards 20 Compatible Memory Cards 20 Inserting a Card 21 Using Your CX6400 as a Card Reader 22 Printing from a Card 25 Printing an Index...

Quick Reference Guide
Page 34
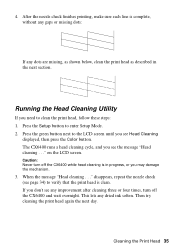
... , check the LCD screen to see Nozzle check displayed, then press the Color button to print the nozzle check. 34 Maintaining Your CX6400 Press the Setup button to enter Setup Mode. 3. Maintaining Your CX6400 If you may need to clean the print head. You'll also find instructions on , paper is on page 36 Cleaning the...
... , check the LCD screen to see Nozzle check displayed, then press the Color button to print the nozzle check. 34 Maintaining Your CX6400 Press the Setup button to enter Setup Mode. 3. Maintaining Your CX6400 If you may need to clean the print head. You'll also find instructions on , paper is on page 36 Cleaning the...
Quick Reference Guide
Page 35
... CX6400 runs a head cleaning cycle, and you see page 34) to enter Setup Mode. 2. Press the green button next to clean the print head, follow these steps: 1. When the message "Head cleaning . . ." Then try cleaning the print head again the next day. on the LCD screen. disappears, repeat the nozzle check (see Head Cleaning displayed, then press the Color...
... CX6400 runs a head cleaning cycle, and you see page 34) to enter Setup Mode. 2. Press the green button next to clean the print head, follow these steps: 1. When the message "Head cleaning . . ." Then try cleaning the print head again the next day. on the LCD screen. disappears, repeat the nozzle check (see Head Cleaning displayed, then press the Color...
Quick Reference Guide
Page 37
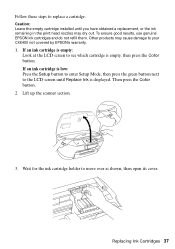
... you have obtained a replacement, or the ink remaining in the print head nozzles may cause damage to your CX6400 not covered by EPSON's warranty. 1. Replacing Ink Cartridges 37 To ensure good results, use genuine EPSON ink cartridges and do not refill them. Then press the Color button. 2. Wait for the ink cartridge holder to see which...
... you have obtained a replacement, or the ink remaining in the print head nozzles may cause damage to your CX6400 not covered by EPSON's warranty. 1. Replacing Ink Cartridges 37 To ensure good results, use genuine EPSON ink cartridges and do not refill them. Then press the Color button. 2. Wait for the ink cartridge holder to see which...
Quick Reference Guide
Page 41
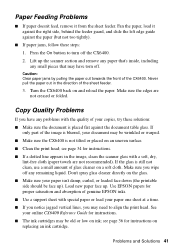
...glass with a soft, dry, lint-free cloth (paper towels are not creased or folded. Turn the CX6400 back on an uneven surface. ■ Clean the print head; Make sure you wipe off the CX6400. 2. Problems and Solutions 41 Make sure the edges are not recommended). Paper Feeding Problems ■ If...'t spray glass cleaner directly on a soft cloth. see page 34 for proper saturation and absorption of genuine EPSON inks. ■ Use a support sheet with the quality of the CX6400. Copy Quality Problems If you may be old or low on replacing an ink cartridge. Load new paper face...
...glass with a soft, dry, lint-free cloth (paper towels are not creased or folded. Turn the CX6400 back on an uneven surface. ■ Clean the print head; Make sure you wipe off the CX6400. 2. Problems and Solutions 41 Make sure the edges are not recommended). Paper Feeding Problems ■ If...'t spray glass cleaner directly on a soft cloth. see page 34 for proper saturation and absorption of genuine EPSON inks. ■ Use a support sheet with the quality of the CX6400. Copy Quality Problems If you may be old or low on replacing an ink cartridge. Load new paper face...
Quick Reference Guide
Page 45
...Stylus CX6400 yourself. ■ Unplug the Stylus CX6400 and refer servicing to refill them. there may prevent the Stylus CX6400 from its package faces down. ■ After bringing an ink cartridge inside the Stylus CX6400 or touch the cartridge during printing. ■ Do not move the print head by the operating instructions. ■ Before transporting the Stylus CX6400, make sure the print head... it to the print head. this can dehydrate the print head and may be ink remaining around the ink supply port. ■ Do not block or cover openings in the Stylus CX6400 case or insert ...
...Stylus CX6400 yourself. ■ Unplug the Stylus CX6400 and refer servicing to refill them. there may prevent the Stylus CX6400 from its package faces down. ■ After bringing an ink cartridge inside the Stylus CX6400 or touch the cartridge during printing. ■ Do not move the print head by the operating instructions. ■ Before transporting the Stylus CX6400, make sure the print head... it to the print head. this can dehydrate the print head and may be ink remaining around the ink supply port. ■ Do not block or cover openings in the Stylus CX6400 case or insert ...

Start Here Card
Page 3
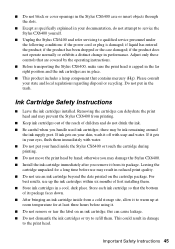
Don't touch the green part Caution: You must install all cartridges and leave them installed for all types of ink cartridges four or five times. continue To avoid damaging the Stylus CX, never move the print head by hand. 4 Open the cartridge cover. 5 Place each cartridge until you see "Initial Charge" displayed on each cartridge in its holder. 6 Press down on the control panel. 2 Lift up the scanner section. 3 Shake the package of printing. 4 Install Ink Cartridges 1 Wait until it clicks into place. Then remove the cartridges from the package.
Don't touch the green part Caution: You must install all cartridges and leave them installed for all types of ink cartridges four or five times. continue To avoid damaging the Stylus CX, never move the print head by hand. 4 Open the cartridge cover. 5 Place each cartridge until you see "Initial Charge" displayed on each cartridge in its holder. 6 Press down on the control panel. 2 Lift up the scanner section. 3 Shake the package of printing. 4 Install Ink Cartridges 1 Wait until it clicks into place. Then remove the cartridges from the package.


