

Product Information Guide
Page 15
... Note: If you need to move to add another speed dial entry, repeat steps 6 through page 20. 4. You see page 17 through 10. You see the first speed dial entry number and name displayed. 3. Press the OK button again. up and you can create a speed ... request retransmission of rings that is displayed. When you use Error Correction Mode to delete the character and re-enter it. On (default) Off 6.Header & Time 7.Setup 5.Rings to Answer Indicates the number of fax data that must occur before the Epson Stylus CX5800F automatically receives a fax. 4 (default) 1, 2, 3, 5, 6, 7, 8, or...
... Note: If you need to move to add another speed dial entry, repeat steps 6 through page 20. 4. You see page 17 through 10. You see the first speed dial entry number and name displayed. 3. Press the OK button again. up and you can create a speed ... request retransmission of rings that is displayed. When you use Error Correction Mode to delete the character and re-enter it. On (default) Off 6.Header & Time 7.Setup 5.Rings to Answer Indicates the number of fax data that must occur before the Epson Stylus CX5800F automatically receives a fax. 4 (default) 1, 2, 3, 5, 6, 7, 8, or...
Product Information Guide
Page 20
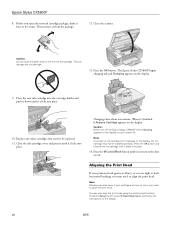
...the new ink cartridge package, shake it clicks into place. 14. Note: Banding may not be replaced. 11. Epson Stylus CX5800F 8. Then remove it clicks into place. Press the y Cancel/Back button until it 's finished, 5.Replace Cartridge appears...the cartridge. Close the ink cartridge cover and press it until it from the package. 12. Start Color OK 10. Place the new ink cartridge into the cartridge holder and push it down until it four or ...look grainy or blurry, or you see an ink cartridge error message on the display. 20 8/05 Charging takes about one minute.
...the new ink cartridge package, shake it clicks into place. 14. Note: Banding may not be replaced. 11. Epson Stylus CX5800F 8. Then remove it clicks into place. Press the y Cancel/Back button until it 's finished, 5.Replace Cartridge appears...the cartridge. Close the ink cartridge cover and press it until it from the package. 12. Start Color OK 10. Place the new ink cartridge into the cartridge holder and push it down until it four or ...look grainy or blurry, or you see an ink cartridge error message on the display. 20 8/05 Charging takes about one minute.
Product Information Guide
Page 22
...(see page 8), or place the correct index sheet on envelopes, press x Start Color or x Start B&W to continue. Ink is installed. See page 19 for instructions on paper sheets, press x Start Color or x Start B&W to continue. Replace the card or index sheet and try again... cartridge error -> Cartridge replacement is misaligned, align the print head (see page 10). No memory card No photos on envelopes, set to the ^ H position. Remove the incompatible memory card. Correct the sheet placement and try again. Memory card data does not match index sheet. Epson Stylus CX5800F 5....
...(see page 8), or place the correct index sheet on envelopes, press x Start Color or x Start B&W to continue. Ink is installed. See page 19 for instructions on paper sheets, press x Start Color or x Start B&W to continue. Replace the card or index sheet and try again... cartridge error -> Cartridge replacement is misaligned, align the print head (see page 10). No memory card No photos on envelopes, set to the ^ H position. Remove the incompatible memory card. Correct the sheet placement and try again. Memory card data does not match index sheet. Epson Stylus CX5800F 5....


