Product Information Guide
Page 3
Epson Stylus CX4200 Series/Epson Stylus CX4800 Series Scanning Scanner type Photoelectric device Effective pixels Document size Scanning resolution Output resolution Scanning speed Image data Interface Light source Flatbed color CIS 10,200 × 14,040 pixels at 1200 dpi 216 × 297 mm (8.5 × 11.7 inches) A4 or US letter size 1200 dpi (main scan) 2400 dpi with Micro Step...
Epson Stylus CX4200 Series/Epson Stylus CX4800 Series Scanning Scanner type Photoelectric device Effective pixels Document size Scanning resolution Output resolution Scanning speed Image data Interface Light source Flatbed color CIS 10,200 × 14,040 pixels at 1200 dpi 216 × 297 mm (8.5 × 11.7 inches) A4 or US letter size 1200 dpi (main scan) 2400 dpi with Micro Step...
Product Information Guide
Page 7
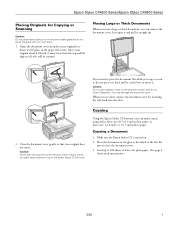
... glass with too much force. 1. Copying a Document 1. Be sure to move . Epson Stylus CX4200 Series/Epson Stylus CX4800 Series Placing Originals for Copying or Scanning Caution: Do not place heavy objects on top of the Epson Stylus CX all of it will be careful not to close the document cover. 3. Just...cover and place your original does not move it diagonally. Load up . If you can remove the document cover. Copying Using the Epson Stylus CX buttons, you need instructions.) 5/05 7 Caution: Do not use excessive force on the glass as described to press the document ...
... glass with too much force. 1. Copying a Document 1. Be sure to move . Epson Stylus CX4200 Series/Epson Stylus CX4800 Series Placing Originals for Copying or Scanning Caution: Do not place heavy objects on top of the Epson Stylus CX all of it will be careful not to close the document cover. 3. Just...cover and place your original does not move it diagonally. Load up . If you can remove the document cover. Copying Using the Epson Stylus CX buttons, you need instructions.) 5/05 7 Caution: Do not use excessive force on the glass as described to press the document ...
Product Information Guide
Page 10
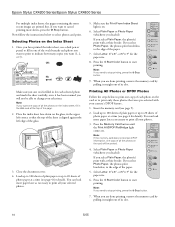
.... Note: If you are done printing, remove the memory card by pulling it has been scanned you select Plain Paper, the photo(s) print with a white border. When you need to 20...Now follow the instructions below to print one copy of the paper. 5. If you loaded). Press the x Start Color button to print only those photos that the top of the glass. 3. Insert the memory card (see page ..., 4"x 6", or 5"x 7" for the paper size. 6. Epson Stylus CX4200 Series/Epson Stylus CX4800 Series For multiple index sheets, the pages containing the most recent images are printed first.
.... Note: If you are done printing, remove the memory card by pulling it has been scanned you select Plain Paper, the photo(s) print with a white border. When you need to 20...Now follow the instructions below to print one copy of the paper. 5. If you loaded). Press the x Start Color button to print only those photos that the top of the glass. 3. Insert the memory card (see page ..., 4"x 6", or 5"x 7" for the paper size. 6. Epson Stylus CX4200 Series/Epson Stylus CX4800 Series For multiple index sheets, the pages containing the most recent images are printed first.
Product Information Guide
Page 11
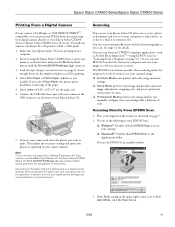
... EPSON Scan: ❏ Windows®: Double-click the EPSON Scan icon on your desktop. ❏ Macintosh®: Double-click EPSON Scan in the upper right corner is not supported, a flashing P appears in your camera manual. You can even automatically restore faded color ...or 5"x 7" for various types of the paper. 5. The EPSON Scan software provides three scanning modes for progressive levels of paper you want to use your Epson Stylus CX all -in the printed output. Epson Stylus CX4200 Series/Epson Stylus CX4800 Series Printing From a Digital Camera If your camera is not printing...
... EPSON Scan: ❏ Windows®: Double-click the EPSON Scan icon on your desktop. ❏ Macintosh®: Double-click EPSON Scan in the upper right corner is not supported, a flashing P appears in your camera manual. You can even automatically restore faded color ...or 5"x 7" for various types of the paper. 5. The EPSON Scan software provides three scanning modes for progressive levels of paper you want to use your Epson Stylus CX all -in the printed output. Epson Stylus CX4200 Series/Epson Stylus CX4800 Series Printing From a Digital Camera If your camera is not printing...
Product Information Guide
Page 12
Epson Stylus CX4200 Series/Epson Stylus CX4800 Series Note: If you want to save your scanned file and type a name for it and select your Epson Stylus CX there first. 4. Select a file format in the upper right corner. (For details on using the Mode selector in the .... Then click the Camera/ Scanner icon. Start EPSON Scan. Continue with true-to-life color and sharpness as you scan. 1. Click the Preview button to the Adjustments area and click the Color Restoration checkbox. 12 5/05 Scanning From a Program 1. Place your Epson Stylus CX all-in the Prefix box. Select your ...
Epson Stylus CX4200 Series/Epson Stylus CX4800 Series Note: If you want to save your scanned file and type a name for it and select your Epson Stylus CX there first. 4. Select a file format in the upper right corner. (For details on using the Mode selector in the .... Then click the Camera/ Scanner icon. Start EPSON Scan. Continue with true-to-life color and sharpness as you scan. 1. Click the Preview button to the Adjustments area and click the Color Restoration checkbox. 12 5/05 Scanning From a Program 1. Place your Epson Stylus CX all-in the Prefix box. Select your ...
Product Information Guide
Page 13
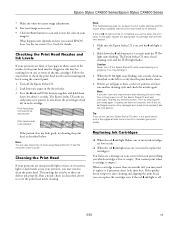
... -screen User's Guide for details. Press the B ink and P On buttons together and hold them , some of ink left ) to scan and restore the color in the sheet feeder. 3. see the next section. 1. Hold down for 3 seconds until the P On light starts flashing. If there...ink button for about 3 seconds. Replacing Ink Cartridges ❏ When the red B ink light flashes, one of the ink cartridges. Epson Stylus CX4200 Series/Epson Stylus CX4800 Series 7. Size your printout, you notice light or dark bands across your image as described below to be cleaned yet: Print head ...
... -screen User's Guide for details. Press the B ink and P On buttons together and hold them , some of ink left ) to scan and restore the color in the sheet feeder. 3. see the next section. 1. Hold down for 3 seconds until the P On light starts flashing. If there...ink button for about 3 seconds. Replacing Ink Cartridges ❏ When the red B ink light flashes, one of the ink cartridges. Epson Stylus CX4200 Series/Epson Stylus CX4800 Series 7. Size your printout, you notice light or dark bands across your image as described below to be cleaned yet: Print head ...
Quick Reference Guide
Page 1
Epson Stylus® CX4200 Series/CX4800 Series Quick Guide Basic Copying, Printing, and Scanning Maintaining Your Epson Stylus CX All-in-One Solving Problems
Epson Stylus® CX4200 Series/CX4800 Series Quick Guide Basic Copying, Printing, and Scanning Maintaining Your Epson Stylus CX All-in-One Solving Problems
Quick Reference Guide
Page 2
...Loading Paper 4 Copying a Photo or Document 6 Placing the Original on the Glass 6 Copying 8 Printing From a Memory Card (Epson Stylus CX4800 Series Only 11 Compatible Cards and Image Formats 12 Inserting the Card 13 Printing an Index Sheet to Select Photos 14 Printing All Photos... From Your Computer 19 Printing in Windows 19 Printing With Macintosh OS X 22 Using Special Papers 25 Scanning a Photo or Document 26 Basic Scanning 26 Restoring Color in Faded Photos 28 Maintaining Your Epson Stylus CX All-in-One 29 Checking the Print Head Nozzles and Ink 29 Cleaning the Print Head 30...
...Loading Paper 4 Copying a Photo or Document 6 Placing the Original on the Glass 6 Copying 8 Printing From a Memory Card (Epson Stylus CX4800 Series Only 11 Compatible Cards and Image Formats 12 Inserting the Card 13 Printing an Index Sheet to Select Photos 14 Printing All Photos... From Your Computer 19 Printing in Windows 19 Printing With Macintosh OS X 22 Using Special Papers 25 Scanning a Photo or Document 26 Basic Scanning 26 Restoring Color in Faded Photos 28 Maintaining Your Epson Stylus CX All-in-One 29 Checking the Print Head Nozzles and Ink 29 Cleaning the Print Head 30...
Quick Reference Guide
Page 3
... ■ Print photos stored on a memory card (Epson Stylus CX4800 Series only) ■ Print photos directly from your camera (both the Epson Stylus CX4200 Series and Epson Stylus CX4800 Series) ■ Get the basic steps for printing from your computer ■ Start scanning a document or photo, including restoring a color photo as you scan ■ Perform routine maintenance ■ Solve simple problems...
... ■ Print photos stored on a memory card (Epson Stylus CX4800 Series only) ■ Print photos directly from your camera (both the Epson Stylus CX4200 Series and Epson Stylus CX4800 Series) ■ Get the basic steps for printing from your computer ■ Start scanning a document or photo, including restoring a color photo as you scan ■ Perform routine maintenance ■ Solve simple problems...
Quick Reference Guide
Page 14
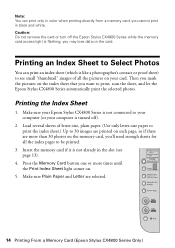
...Sheet light comes on. 5. Caution: Do not remove the card or turn off the Epson Stylus CX4800 Series while the memory card access light is turned off ). 2. Printing the Index Sheet 1. Make sure your Epson Stylus CX4800 Series is not connected to your computer (or your card. Press the Memory Card ...button one or more than 30 photos on the memory card, you cannot print in color when printing directly from a memory card; you want to print, scan the sheet, and let the Epson Stylus CX4800 Series automatically print the selected photos. Note: You can print an index sheet (which is...
...Sheet light comes on. 5. Caution: Do not remove the card or turn off the Epson Stylus CX4800 Series while the memory card access light is turned off ). 2. Printing the Index Sheet 1. Make sure your Epson Stylus CX4800 Series is not connected to your computer (or your card. Press the Memory Card ...button one or more than 30 photos on the memory card, you cannot print in color when printing directly from a memory card; you want to print, scan the sheet, and let the Epson Stylus CX4800 Series automatically print the selected photos. Note: You can print an index sheet (which is...
Quick Reference Guide
Page 15
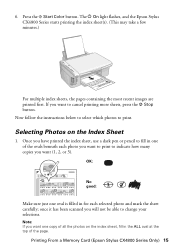
..., use a dark pen or pencil to fill in one of the ovals beneath each selected photo and mark the sheet carefully; once it has been scanned you want one oval is filled in the ALL oval at the top of all the photos on the Index Sheet 1. If you want to... 3). OK: No good: Make sure just one copy of the page. Printing From a Memory Card (Epson Stylus CX4800 Series Only) 15 Now follow the instructions below to select which photos to change your selections. Press the x Start Color button. Selecting Photos on the index sheet, fill in for each photo you want to print...
..., use a dark pen or pencil to fill in one of the ovals beneath each selected photo and mark the sheet carefully; once it has been scanned you want one oval is filled in the ALL oval at the top of all the photos on the Index Sheet 1. If you want to... 3). OK: No good: Make sure just one copy of the page. Printing From a Memory Card (Epson Stylus CX4800 Series Only) 15 Now follow the instructions below to select which photos to change your selections. Press the x Start Color button. Selecting Photos on the index sheet, fill in for each photo you want to print...
Quick Reference Guide
Page 26
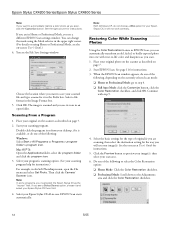
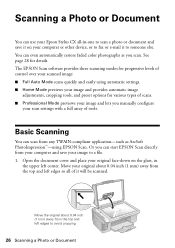
... or document and save your image and lets you can even automatically restore faded color photographs as ArcSoft PhotoImpression™-using automatic settings. ■ Home Mode previews your Epson Stylus CX all of tools. You can start EPSON Scan directly from the top and left edges so all -in the upper left edges to someone...
... or document and save your image and lets you can even automatically restore faded color photographs as ArcSoft PhotoImpression™-using automatic settings. ■ Home Mode previews your Epson Stylus CX all of tools. You can start EPSON Scan directly from the top and left edges so all -in the upper left edges to someone...
Quick Reference Guide
Page 27
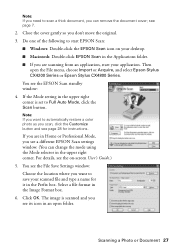
...window: Choose the location where you want to automatically restore a color photo as you see a different EPSON Scan settings window. (You can remove the document cover; If the Mode setting in the upper right corner is scanned and you can change the mode using the Mode selector in ...an open the File menu, choose Import or Acquire, and select Epson Stylus CX4200 Series or Epson Stylus CX4800 Series. Select a file format in the Prefix box. The image is set to save your desktop. ■ Macintosh: Double-click EPSON Scan in the Applications folder. ■ If you are in Home ...
...window: Choose the location where you want to automatically restore a color photo as you see a different EPSON Scan settings window. (You can remove the document cover; If the Mode setting in the upper right corner is scanned and you can change the mode using the Mode selector in ...an open the File menu, choose Import or Acquire, and select Epson Stylus CX4200 Series or Epson Stylus CX4800 Series. Select a file format in the Prefix box. The image is set to save your desktop. ■ Macintosh: Double-click EPSON Scan in the Applications folder. ■ If you are in Home ...
Quick Reference Guide
Page 41
... is at least 3.9 inches (10 cm) away from the wall. ■ Do not open the scanner section while the Epson Stylus CX is copying, printing, or scanning. ■ Do not spill liquid on the Epson Stylus CX. ■ Except as specifically explained in -one, read and follow these safety instructions: ■ Be sure to follow...
... is at least 3.9 inches (10 cm) away from the wall. ■ Do not open the scanner section while the Epson Stylus CX is copying, printing, or scanning. ■ Do not spill liquid on the Epson Stylus CX. ■ Except as specifically explained in -one, read and follow these safety instructions: ■ Be sure to follow...


