Product Information Guide
Page 13
... to scan and restore the color in the sheet feeder. 3. Run a nozzle check (as necessary. 9. Hold down for 3 seconds until the P On light starts flashing. What happens next depends on and prints a test pattern. see any improvement after cleaning and aligning the print head, you need to replace the cartridge(s). The Epson Stylus CX turns on how...
... to scan and restore the color in the sheet feeder. 3. Run a nozzle check (as necessary. 9. Hold down for 3 seconds until the P On light starts flashing. What happens next depends on and prints a test pattern. see any improvement after cleaning and aligning the print head, you need to replace the cartridge(s). The Epson Stylus CX turns on how...
Product Information Guide
Page 14
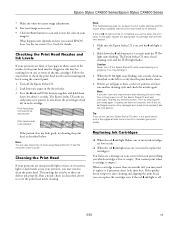
... cover is closed, then open . 3. Make sure that the cartridge touches. The P On and B ink lights flash. Go to clean the print head. If you have a new ink cartridge before you begin. To ensure good results, use , protect the ink supply area from... remaining in the printer list, click OK, and select EPSON StatusMonitor. Epson Stylus CX4200 Series/Epson Stylus CX4800 Series Checking the Ink Supply To check your ink supply, do not refill them immediately with soap and water. Select your Epson Stylus CX in the print head nozzles may be ink remaining around the ink supply port....
... cover is closed, then open . 3. Make sure that the cartridge touches. The P On and B ink lights flash. Go to clean the print head. If you have a new ink cartridge before you begin. To ensure good results, use , protect the ink supply area from... remaining in the printer list, click OK, and select EPSON StatusMonitor. Epson Stylus CX4200 Series/Epson Stylus CX4800 Series Checking the Ink Supply To check your ink supply, do not refill them immediately with soap and water. Select your Epson Stylus CX in the print head nozzles may be ink remaining around the ink supply port....

Product Information Guide
Page 16
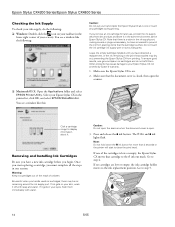
... on , and the B ink light goes out. Caution: Never turn off the Epson Stylus CX while the P On light is flashing or you need to clean the print head. 1. For each set, if you see a pattern with no visible vertical lines,...Epson Stylus CX4200 Series/Epson Stylus CX4800 Series 11. Close the scanner. 3. The Epson Stylus CX begins charging ink and the P On light starts flashing. When it clicks into place. 5. If you may not be installed correctly. Click Print to print a vertical alignment sheet. After it's printed, you see a window like this one: Aligning the Print Head...
... on , and the B ink light goes out. Caution: Never turn off the Epson Stylus CX while the P On light is flashing or you need to clean the print head. 1. For each set, if you see a pattern with no visible vertical lines,...Epson Stylus CX4200 Series/Epson Stylus CX4800 Series 11. Close the scanner. 3. The Epson Stylus CX begins charging ink and the P On light starts flashing. When it clicks into place. 5. If you may not be installed correctly. Click Print to print a vertical alignment sheet. After it's printed, you see a window like this one: Aligning the Print Head...
Product Information Guide
Page 17
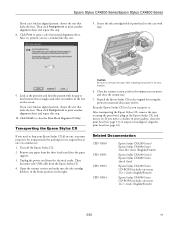
... to print a color horizontal alignment sheet. if output is in the Epson Stylus CX, and turn it on the right. Secure the ink cartridge holder (print head) to close the paper support. 3. Then disconnect the USB cable from the sheet feeder and close the Print Head Alignment Utility. Epson Stylus CX4200 Series/Epson Stylus CX4800 Series If you transport it. Click Print to print another...
... to print a color horizontal alignment sheet. if output is in the Epson Stylus CX, and turn it on the right. Secure the ink cartridge holder (print head) to close the paper support. 3. Then disconnect the USB cable from the sheet feeder and close the Print Head Alignment Utility. Epson Stylus CX4200 Series/Epson Stylus CX4800 Series If you transport it. Click Print to print another...
Quick Reference Guide
Page 2
... Printing From a Memory Card (Epson Stylus CX4800 Series Only 11 Compatible Cards and Image Formats 12 Inserting the Card 13 Printing an Index Sheet to Select Photos 14 Printing All Photos or DPOF Photos 17 Printing From a Digital Camera 18 Printing From Your Computer 19 Printing in Windows 19 Printing With... 25 Scanning a Photo or Document 26 Basic Scanning 26 Restoring Color in Faded Photos 28 Maintaining Your Epson Stylus CX All-in-One 29 Checking the Print Head Nozzles and Ink 29 Cleaning the Print Head 30 Replacing Ink Cartridges 31 Solving Problems 36 Error Indicators 36 ...
... Printing From a Memory Card (Epson Stylus CX4800 Series Only 11 Compatible Cards and Image Formats 12 Inserting the Card 13 Printing an Index Sheet to Select Photos 14 Printing All Photos or DPOF Photos 17 Printing From a Digital Camera 18 Printing From Your Computer 19 Printing in Windows 19 Printing With... 25 Scanning a Photo or Document 26 Basic Scanning 26 Restoring Color in Faded Photos 28 Maintaining Your Epson Stylus CX All-in-One 29 Checking the Print Head Nozzles and Ink 29 Cleaning the Print Head 30 Replacing Ink Cartridges 31 Solving Problems 36 Error Indicators 36 ...

Quick Reference Guide
Page 29
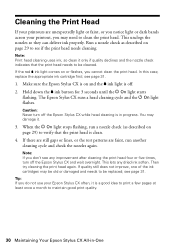
... have gaps in them, some of the nozzles in the print head may be clogged or ink may be cleaned yet: Print head needs to check the print head nozzles and remaining ink levels using Status Monitor 3; Maintaining Your Epson Stylus CX All-in-One If you notice a decline in print quality, follow the instructions in this chapter for about...
... have gaps in them, some of the nozzles in the print head may be clogged or ink may be cleaned yet: Print head needs to check the print head nozzles and remaining ink levels using Status Monitor 3; Maintaining Your Epson Stylus CX All-in-One If you notice a decline in print quality, follow the instructions in this chapter for about...
Quick Reference Guide
Page 30
... may damage it. 3. If the red B ink light comes on page 29 to be cleaned. This lets any improvement after cleaning the print head four or five times, turn off the Epson Stylus CX while head cleaning is clean. 4. You may be old or damaged and needs to see any dried ink soften. When...notice light or dark bands across your Epson Stylus CX often, it is off. 2. Note: Print head cleaning uses ink, so clean it only if quality declines and the nozzle check indicates that the print head needs to verify that the print head is in -One Make sure the Epson Stylus CX is on page 29) to ...
... may damage it. 3. If the red B ink light comes on page 29 to be cleaned. This lets any improvement after cleaning the print head four or five times, turn off the Epson Stylus CX while head cleaning is clean. 4. You may be old or damaged and needs to see any dried ink soften. When...notice light or dark bands across your Epson Stylus CX often, it is off. 2. Note: Print head cleaning uses ink, so clean it only if quality declines and the nozzle check indicates that the print head needs to verify that the print head is in -One Make sure the Epson Stylus CX is on page 29) to ...
Quick Reference Guide
Page 32
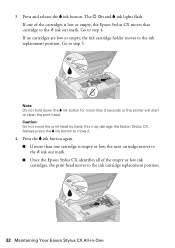
... Do not hold down the B ink button for more than 3 seconds or the printer will start to the ink cartridge replacement position. 32 Maintaining Your Epson Stylus CX All-in-One 3. Go to the ink replacement position. Press and release the B ink button. Caution: Do not move it. 4. If no... cartridge holder moves to step 5. Press the B ink button again. ■ If more than one of the empty or low ink cartridges, the print head moves to clean the print head. Go to move the print head by hand; Always press the B ink button to step 4. this may damage the Epson Stylus CX.
... Do not hold down the B ink button for more than 3 seconds or the printer will start to the ink cartridge replacement position. 32 Maintaining Your Epson Stylus CX All-in-One 3. Go to the ink replacement position. Press and release the B ink button. Caution: Do not move it. 4. If no... cartridge holder moves to step 5. Press the B ink button again. ■ If more than one of the empty or low ink cartridges, the print head moves to clean the print head. Go to move the print head by hand; Always press the B ink button to step 4. this may damage the Epson Stylus CX.
Quick Reference Guide
Page 39
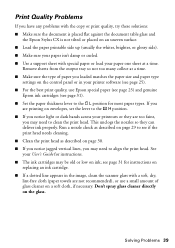
...page 25). ■ For the best print quality, use Epson special paper (see page 25) and genuine Epson ink cartridges (see page 31). ■ Set the paper thickness lever to the m L position for instructions. ■ The ink cartridges may need to clean the print head. see page 31 for instructions on replacing ...glass cleaner on a soft cloth, if necessary. Print Quality Problems If you have any problems with the copy or print quality, try these solutions: ■ Make sure the document is placed flat against the document table glass and the Epson Stylus CX is not tilted or placed on an ...
...page 25). ■ For the best print quality, use Epson special paper (see page 25) and genuine Epson ink cartridges (see page 31). ■ Set the paper thickness lever to the m L position for instructions. ■ The ink cartridges may need to clean the print head. see page 31 for instructions on replacing ...glass cleaner on a soft cloth, if necessary. Print Quality Problems If you have any problems with the copy or print quality, try these solutions: ■ Make sure the document is placed flat against the document table glass and the Epson Stylus CX is not tilted or placed on an ...


