Technical Reference Guide
Page 16
... this product can be set with commands (ESC/Label) from a .NET environment application. • Epson Inkjet Label Printer SDK (a Windows printer driver is available. • For the label printing applications listed below, we provide dedicated drivers for the TM-C7500/ TM-C7500G series. Can be directly controlled with the operation panel and LCD display. Direct network...
... this product can be set with commands (ESC/Label) from a .NET environment application. • Epson Inkjet Label Printer SDK (a Windows printer driver is available. • For the label printing applications listed below, we provide dedicated drivers for the TM-C7500/ TM-C7500G series. Can be directly controlled with the operation panel and LCD display. Direct network...

Technical Reference Guide
Page 77
... Windows 7: Click [View devices and printers] of [Control Panel] on [Start] menu. For Windows Vista: Click [Printers] of the [EPSON TM-C7500]. 3 The Properties screen is displayed. Registered name of this product to display in the case of [Control Panel] on [Start] menu. For Windows... menu, and click [Printers and Faxes]. For Windows Server 2003 R2: Click [Printers and Faxes] on [Start] menu. 2 Right-click [EPSON TM-C7500], and click [Printer properties]. Click [Print Test Page]. 77 Chapter 2 Setup Test Printing If the printer...
... Windows 7: Click [View devices and printers] of [Control Panel] on [Start] menu. For Windows Vista: Click [Printers] of the [EPSON TM-C7500]. 3 The Properties screen is displayed. Registered name of this product to display in the case of [Control Panel] on [Start] menu. For Windows... menu, and click [Printers and Faxes]. For Windows Server 2003 R2: Click [Printers and Faxes] on [Start] menu. 2 Right-click [EPSON TM-C7500], and click [Printer properties]. Click [Print Test Page]. 77 Chapter 2 Setup Test Printing If the printer...

Technical Reference Guide
Page 78
... Server 2003 R2: Click [Printers and Faxes] on [Start] menu. For Windows Vista: Click [Printers] of the [EPSON TM-C7500]. 78 Registered name of this product to Display the Printer Driver 1 Open the [Devices and Printers]. For Windows 8: Select [Control Panel] of Sidebar [Settings] on [Desktop], and click...
... Server 2003 R2: Click [Printers and Faxes] on [Start] menu. For Windows Vista: Click [Printers] of the [EPSON TM-C7500]. 78 Registered name of this product to Display the Printer Driver 1 Open the [Devices and Printers]. For Windows 8: Select [Control Panel] of Sidebar [Settings] on [Desktop], and click...
Technical Reference Guide
Page 87
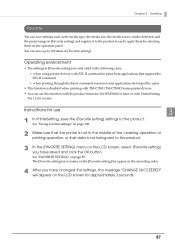
...85. Operating environment • The settings in [Favorite setting] are only valid in the following cases: when using printer drivers with ZPL II command to print from applications that data is disabled when printing with PrinterSetting Ver.1.2.0.0 or later. See "FAVORITE SETTING"... on the LCD screen for use this function with the product firmware Ver.WAI30000 or later or with TM-C7500/TM-C7500G Series printer drivers. • You can use 3 1 In PrinterSetting, save the [Favorite setting] settings to easily apply them by users &#...
...85. Operating environment • The settings in [Favorite setting] are only valid in the following cases: when using printer drivers with ZPL II command to print from applications that data is disabled when printing with PrinterSetting Ver.1.2.0.0 or later. See "FAVORITE SETTING"... on the LCD screen for use this function with the product firmware Ver.WAI30000 or later or with TM-C7500/TM-C7500G Series printer drivers. • You can use 3 1 In PrinterSetting, save the [Favorite setting] settings to easily apply them by users &#...
Technical Reference Guide
Page 141
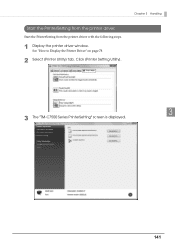
See "How to Display the Printer Driver" on page 78 2 Select [Printer Utility] tab. Chapter 3 Handling Start the PrinterSetting from the printer driver with the following steps. 1 Display the printer driver window. Click [Printer Setting Utility]. 3 The "TM-C7500 Series PrinterSetting" screen is displayed. 3 141 Start the PrinterSetting from the printer driver.
See "How to Display the Printer Driver" on page 78 2 Select [Printer Utility] tab. Chapter 3 Handling Start the PrinterSetting from the printer driver with the following steps. 1 Display the printer driver window. Click [Printer Setting Utility]. 3 The "TM-C7500 Series PrinterSetting" screen is displayed. 3 141 Start the PrinterSetting from the printer driver.
Technical Reference Guide
Page 180
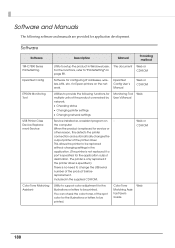
EpsonNet Config User's Manual Web or CD-ROM EPSON Monitoring Tool Utilities to provide the following software and manuals are provided for application development. The printer is only replaced if the printer driver is specified.) There is no need to change the USB serial number... application. (The printer is not replaced if a port is specified for the application output destination. Software Software Description Manual Providing method TM-C7500 Series PrinterSetting Utility to setup the product in the supplied CD-ROM. for configuring IP addresses, wireless LAN, etc....
EpsonNet Config User's Manual Web or CD-ROM EPSON Monitoring Tool Utilities to provide the following software and manuals are provided for application development. The printer is only replaced if the printer driver is specified.) There is no need to change the USB serial number... application. (The printer is not replaced if a port is specified for the application output destination. Software Software Description Manual Providing method TM-C7500 Series PrinterSetting Utility to setup the product in the supplied CD-ROM. for configuring IP addresses, wireless LAN, etc....
Technical Reference Guide
Page 183
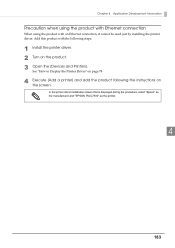
... screen that is displayed during the procedure, select "Epson" as the manufacturer and "EPSON TM-C7500" as the printer. 4 183 See "How to Display the Printer Driver" on page 78 4 Execute [Add a printer] and add the product following steps. 1 Install the printer driver. 2 Turn on the screen. Add this product with an Ethernet connection, it...
... screen that is displayed during the procedure, select "Epson" as the manufacturer and "EPSON TM-C7500" as the printer. 4 183 See "How to Display the Printer Driver" on page 78 4 Execute [Add a printer] and add the product following steps. 1 Install the printer driver. 2 Turn on the screen. Add this product with an Ethernet connection, it...
Technical Reference Guide
Page 220
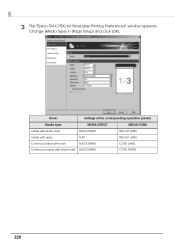
Change [Media type] in [Page Setup] and click [OK]. PAPER 220 3 The "Epson TM-C7500 for NiceLabel Printing Preferences" window appears. Driver Settings of the corresponding operation panels Media type MEDIA DETECT MEDIA FORM Labels with black mark BLACK MARK DIE-CUT LABEL Labels with gaps GAP DIE-CUT LABEL Continuous label with black mark BLACK MARK CONT. LABEL Continuous paper with mark BLACK MARK CONT.
Change [Media type] in [Page Setup] and click [OK]. PAPER 220 3 The "Epson TM-C7500 for NiceLabel Printing Preferences" window appears. Driver Settings of the corresponding operation panels Media type MEDIA DETECT MEDIA FORM Labels with black mark BLACK MARK DIE-CUT LABEL Labels with gaps GAP DIE-CUT LABEL Continuous label with black mark BLACK MARK CONT. LABEL Continuous paper with mark BLACK MARK CONT.
Technical Reference Guide
Page 221
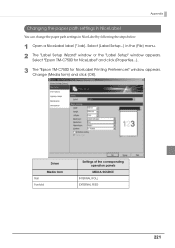
Select [Label Setup...] in NiceLabel by following the steps below. 1 Open a NiceLabel label (*.lab). Select "Epson TM-C7500 for NiceLabel" and click [Properties...]. 3 The "Epson TM-C7500 for NiceLabel Printing Preferences" window appears. Driver Media form Roll Fanfold Settings of the corresponding operation panels MEDIA SOURCE INTERNAL ROLL EXTERNAL FEED 221 Change [Media form] and click [OK]. Appendix Changing the paper path settings in NiceLabel You can change the paper path settings in the [File] menu. 2 The "Label Setup Wizard" window or the "Label Setup" window appears.
Select [Label Setup...] in NiceLabel by following the steps below. 1 Open a NiceLabel label (*.lab). Select "Epson TM-C7500 for NiceLabel" and click [Properties...]. 3 The "Epson TM-C7500 for NiceLabel Printing Preferences" window appears. Driver Media form Roll Fanfold Settings of the corresponding operation panels MEDIA SOURCE INTERNAL ROLL EXTERNAL FEED 221 Change [Media form] and click [OK]. Appendix Changing the paper path settings in NiceLabel You can change the paper path settings in the [File] menu. 2 The "Label Setup Wizard" window or the "Label Setup" window appears.

Technical Reference Guide
Page 223
Click [Settings...]. 3 The "Printer settings - Appendix Changing the paper path settings in CODESOFT You can change the paper path settings in the [File] menu. 2 The "Label/Page Setup" window appears. Change [Media source] and click [OK]. Driver Media source Internal roll External feed slot Settings of the corresponding operation panels MEDIA SOURCE INTERNAL ROLL BLACK MARK 223 Select [Label/Page Setup...] in CODESOFT by following the steps below. 1 Open a label file (*.lab). EPSON TM-C7500" window appears.
Click [Settings...]. 3 The "Printer settings - Appendix Changing the paper path settings in CODESOFT You can change the paper path settings in the [File] menu. 2 The "Label/Page Setup" window appears. Change [Media source] and click [OK]. Driver Media source Internal roll External feed slot Settings of the corresponding operation panels MEDIA SOURCE INTERNAL ROLL BLACK MARK 223 Select [Label/Page Setup...] in CODESOFT by following the steps below. 1 Open a label file (*.lab). EPSON TM-C7500" window appears.


