Product Brochure
Page 2
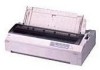
... characters (Draft 10 cpi, 14 dots/character) Reliability/Life Expectancy Total print volume 6.5 million lines (except print head) MTBF 10,000 POH @ 25%, 35% coverage Print head 200 million characters @ 14 dots per character Product/Accessory Part Numbers FX-880 Printer C229001 Additional Pull Tractor Unit C800201 Cut sheet feeders High-capacity/envelope C806381 Single bin C806371 Interfaces - EPSON and EPSON ESC/P are subject to 4.1" 8.5" Input Buffer 32KB or 0KB Interface (Standard) Bidirectional parallel interface (IEEE-1284 nibble mode supported); CPD...
... characters (Draft 10 cpi, 14 dots/character) Reliability/Life Expectancy Total print volume 6.5 million lines (except print head) MTBF 10,000 POH @ 25%, 35% coverage Print head 200 million characters @ 14 dots per character Product/Accessory Part Numbers FX-880 Printer C229001 Additional Pull Tractor Unit C800201 Cut sheet feeders High-capacity/envelope C806381 Single bin C806371 Interfaces - EPSON and EPSON ESC/P are subject to 4.1" 8.5" Input Buffer 32KB or 0KB Interface (Standard) Bidirectional parallel interface (IEEE-1284 nibble mode supported); CPD...
Product Information Guide
Page 2
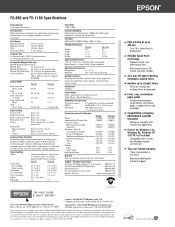
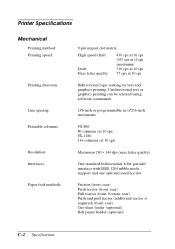
... serial interface Coax interface Twinax interface Type B bidirectional parallel Multi-protocol Ethernet print server Model Number C823051 C823071 C823141 C823151 C823452 C823572 Printer Specifications Mechanical Printing method: 9-pin impact dot matrix Printing speed: High speed draft: 410 cps at 10 cpi (max. 455 cps at 12 cpi) Draft: 310 cps at 10 cpi Near letter quality: 77 cps at 10 cpi Printing direction: Bidirectional logic seeking for FX-1180) Allows you to load single sheets and carbonless singlesheet multi-part forms...
... serial interface Coax interface Twinax interface Type B bidirectional parallel Multi-protocol Ethernet print server Model Number C823051 C823071 C823141 C823151 C823452 C823572 Printer Specifications Mechanical Printing method: 9-pin impact dot matrix Printing speed: High speed draft: 410 cps at 10 cpi (max. 455 cps at 12 cpi) Draft: 310 cps at 10 cpi Near letter quality: 77 cps at 10 cpi Printing direction: Bidirectional logic seeking for FX-1180) Allows you to load single sheets and carbonless singlesheet multi-part forms...
Product Information Guide
Page 6
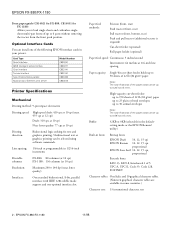
... micro adjust mode. t Flashes when paper has not been fully ejected or a paper jam has occurred. The paper feeds to the standby position. Pause f Paper Out f The print head is set to eject the paper; the printer resumes printing automatically once the print head cools. If the error recurs, contact your paper, or select a different paper source with the button protectors. EPSON FX-880/FX-1180 LF/FF Button t Feeds paper line by line. Load/Eject Button t Loads a single sheet of paper is not loaded correctly in the selected paper source. Paper...
... micro adjust mode. t Flashes when paper has not been fully ejected or a paper jam has occurred. The paper feeds to the standby position. Pause f Paper Out f The print head is set to eject the paper; the printer resumes printing automatically once the print head cools. If the error recurs, contact your paper, or select a different paper source with the button protectors. EPSON FX-880/FX-1180 LF/FF Button t Feeds paper line by line. Load/Eject Button t Loads a single sheet of paper is not loaded correctly in the selected paper source. Paper...
Product Information Guide
Page 7
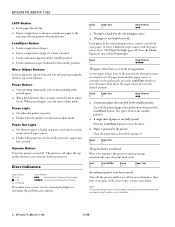
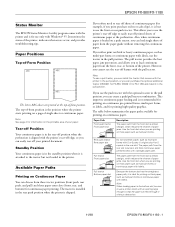
... of your printed document. The paper path from three tractor positions (front push, rear push, and pull) and three paper entry slots (front, rear, and bottom) for printing high-quality graphics. The top-of-form position is loaded on a page of the printer. Note: To use only with Windows® 95. The paper path from the front, rear, or bottom of single-sheet or continuous paper. EPSON FX-880/FX-1180 Status Monitor The EPSON Status Monitor 2 utility program...
... of your printed document. The paper path from three tractor positions (front push, rear push, and pull) and three paper entry slots (front, rear, and bottom) for printing high-quality graphics. The top-of-form position is loaded on a page of the printer. Note: To use only with Windows® 95. The paper path from the front, rear, or bottom of single-sheet or continuous paper. EPSON FX-880/FX-1180 Status Monitor The EPSON Status Monitor 2 utility program...
Product Information Guide
Page 10
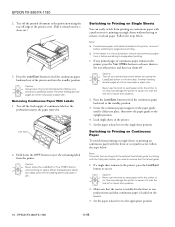
... the tractor is installed in the printer, remove it before switching to single-sheet printing. 1. Set the paper release lever to feed the continuous paper backward out of -form position. 2. Switching to Printing on Continuous Paper To switch from printing on single sheets to lose the tear-off the fresh supply of continuous paper remain in the printer, press the Load/Eject button to eject paper while the printer is on; this may cause a paper jam. EPSON FX-880/FX-1180 2. Tear off...
... the tractor is installed in the printer, remove it before switching to single-sheet printing. 1. Set the paper release lever to feed the continuous paper backward out of -form position. 2. Switching to Printing on Continuous Paper To switch from printing on single sheets to lose the tear-off the fresh supply of continuous paper remain in the printer, press the Load/Eject button to eject paper while the printer is on; this may cause a paper jam. EPSON FX-880/FX-1180 2. Tear off...
Product Information Guide
Page 11
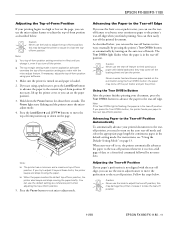
... or rear push tractor, you can use the knob to adjust the tear-off feature to the Tear-off position. 11/98 EPSON FX-880/FX-1180 - 11 Never reverse feed continuous paper loaded on the auto tear-off mode and select the appropriate page length for about three seconds. Using the Tear Off/Bin Button After the printer finishes printing your software. 1. For instructions, see the paper position. 3. Caution: Never use the micro adjust feature to the tear-off position. Press the Load...
... or rear push tractor, you can use the knob to adjust the tear-off feature to the Tear-off position. 11/98 EPSON FX-880/FX-1180 - 11 Never reverse feed continuous paper loaded on the auto tear-off mode and select the appropriate page length for about three seconds. Using the Tear Off/Bin Button After the printer finishes printing your software. 1. For instructions, see the paper position. 3. Caution: Never use the micro adjust feature to the tear-off position. Press the Load...
Product Information Guide
Page 12
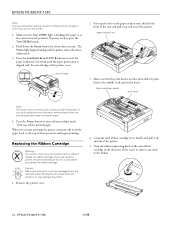
... the paper. 4. Remove the printer cover. 4. then slide the print head to the middle of the printer by its handle and pull it up and out of the printer. 5. Press the Pause button to install or replace the ribbon cartridge. Grasp the used the printer, the print head may need to move the print head by hand to turn off the printer. 1. EPSON FX-880/FX-1180 11/98 The Pause light begins flashing and the printer enters the micro adjust mode...
... the paper. 4. Remove the printer cover. 4. then slide the print head to the middle of the printer by its handle and pull it up and out of the printer. 5. Press the Pause button to install or replace the ribbon cartridge. Grasp the used the printer, the print head may need to move the print head by hand to turn off the printer. 1. EPSON FX-880/FX-1180 11/98 The Pause light begins flashing and the printer enters the micro adjust mode...
Product Information Guide
Page 14
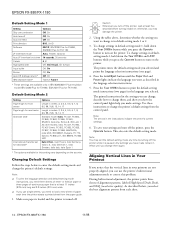
...High Speed Draft, Draft, and NLQ (near letter quality). The printed instructions list the settings you can use single sheets, you change the printer's default settings from the paper guide. 1. This also exits the default-setting mode. During bidirectional adjustment, the printer prints three sheets of letter- As described below to enter the default-setting mode and change settings in default-setting mode 1 or 2. 3. EPSON FX-880/FX-1180 Default-Setting Mode 1 Setting Options Skip over perforation Off, On Auto tear-off the printer, press the Operate button. or A4-size...
...High Speed Draft, Draft, and NLQ (near letter quality). The printed instructions list the settings you can use single sheets, you change the printer's default settings from the paper guide. 1. This also exits the default-setting mode. During bidirectional adjustment, the printer prints three sheets of letter- As described below to enter the default-setting mode and change settings in default-setting mode 1 or 2. 3. EPSON FX-880/FX-1180 Default-Setting Mode 1 Setting Options Skip over perforation Off, On Auto tear-off the printer, press the Operate button. or A4-size...
Product Information Guide
Page 15
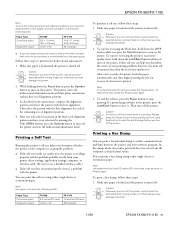
... Tear Off/Bin button, press the Operate button to turn off . otherwise you select the best pattern in the final set of alignment patterns. 3. Note: To temporarily stop printing. Printing a Hex Dump You can print a hex dump using either single sheets or continuous paper. Note: Use paper that is printed. or A4-size paper. As described in the printer, press the Load/Eject button to isolate communication problems between the printer and your printing problem; After you may damage the printer. 2. Either self test...
... Tear Off/Bin button, press the Operate button to turn off . otherwise you select the best pattern in the final set of alignment patterns. 3. Note: To temporarily stop printing. Printing a Hex Dump You can print a hex dump using either single sheets or continuous paper. Note: Use paper that is printed. or A4-size paper. As described in the printer, press the Load/Eject button to isolate communication problems between the printer and your printing problem; After you may damage the printer. 2. Either self test...
User Manual
Page 38
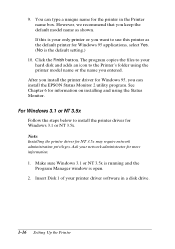
... you keep the default model name as the default printer for Windows 95, you install the printer driver for Windows 95 applications, select Yes. (No is the default setting.) 10. You can install the EPSON Status Monitor 2 utility program. The program copies the files to your printer driver software in the Printer name box. 9. See Chapter 6 for NT 3.5x may require network administration privileges. Note: Installing the printer driver for information on installing and using the printer model name...
... you keep the default model name as the default printer for Windows 95, you install the printer driver for Windows 95 applications, select Yes. (No is the default setting.) 10. You can install the EPSON Status Monitor 2 utility program. The program copies the files to your printer driver software in the Printer name box. 9. See Chapter 6 for NT 3.5x may require network administration privileges. Note: Installing the printer driver for information on installing and using the printer model name...
User Manual
Page 45
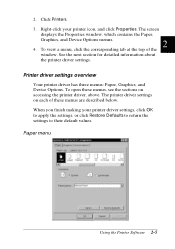
... of the window. Printer driver settings overview Your printer driver has three menus: Paper, Graphics, and Device Options. When you finish making your printer icon, and click Properties. The screen displays the Properties window, which contains the Paper, Graphics, and Device Options menus. 2 4. Paper menu Using the Printer Software 2-5 Right-click your printer driver settings, click OK to apply the settings, or click Restore Defaults to return the settings to their default values. To...
... of the window. Printer driver settings overview Your printer driver has three menus: Paper, Graphics, and Device Options. When you finish making your printer icon, and click Properties. The screen displays the Properties window, which contains the Paper, Graphics, and Device Options menus. 2 4. Paper menu Using the Printer Software 2-5 Right-click your printer driver settings, click OK to apply the settings, or click Restore Defaults to return the settings to their default values. To...
User Manual
Page 99
... the printer or cause it to the tear-off position; Note: Your tear-off position setting remains in the default setting mode. Follow the steps below. Adjusting the tear-off position If your printed documents to the tear-off position, turn off mode and select the appropriate page length for continuous paper in effect until you change it receives a full page of data or a form feed command followed by no more data. c Caution: Never use the micro adjust feature...
... the printer or cause it to the tear-off position; Note: Your tear-off position setting remains in the default setting mode. Follow the steps below. Adjusting the tear-off position If your printed documents to the tear-off position, turn off mode and select the appropriate page length for continuous paper in effect until you change it receives a full page of data or a form feed command followed by no more data. c Caution: Never use the micro adjust feature...
User Manual
Page 120
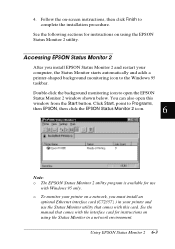
4. Accessing EPSON Status Monitor 2 After you must install an optional Ethernet interface card (C72357] ) in a network environment. You can also open the EPSON Status Monitor 2 window shown below. Click Start, point to the Windows 95 taskbar. Using EPSON Status Monitor 2 6-3 o To monitor your printer on a network, you install EPSON Status Monitor 2 and restart your printer and use the Status Monitor utility that comes with the interface card for instructions on using the Status Monitor in your computer, the Status Monitor starts...
4. Accessing EPSON Status Monitor 2 After you must install an optional Ethernet interface card (C72357] ) in a network environment. You can also open the EPSON Status Monitor 2 window shown below. Click Start, point to the Windows 95 taskbar. Using EPSON Status Monitor 2 6-3 o To monitor your printer on a network, you install EPSON Status Monitor 2 and restart your printer and use the Status Monitor utility that comes with the interface card for instructions on using the Status Monitor in your computer, the Status Monitor starts...
User Manual
Page 136
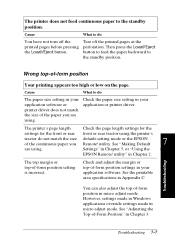
... -form position settings in Chapter 3. utility. Troubleshooting You can also adjust the top-of the paper you Remote! utility" in micro adjust mode. Settings" in micro adjust mode. However, settings made in Windows applications override settings made in Chapter 5, or "Using the EPSON Remote! See the printable area specifications in your application software or printer driver does not match the size of -form position in Chapter 2. Then press the Load/Eject button to feed the paper backward to the standby position. See "Making Default...
... -form position settings in Chapter 3. utility. Troubleshooting You can also adjust the top-of the paper you Remote! utility" in micro adjust mode. Settings" in micro adjust mode. However, settings made in Windows applications override settings made in Chapter 5, or "Using the EPSON Remote! See the printable area specifications in your application software or printer driver does not match the size of -form position in Chapter 2. Then press the Load/Eject button to feed the paper backward to the standby position. See "Making Default...
User Manual
Page 138
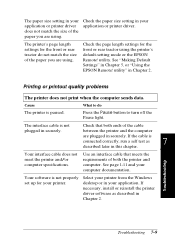
... a self test as described in Chapter 2. If the cable is not plugged in your printer. Troubleshooting Your interface cable does not meet the printer and/or computer specifications. Select your application or printer driver. Check the paper size setting in Chapter 2. utility" in your printer from the Windows desktop or in securely. Cause The printer is not properly set up for the front or rear tractor using the printer's default-setting mode or the EPSON Remote! What to turn off...
... a self test as described in Chapter 2. If the cable is not plugged in your printer. Troubleshooting Your interface cable does not meet the printer and/or computer specifications. Select your application or printer driver. Check the paper size setting in Chapter 2. utility" in your printer from the Windows desktop or in securely. Cause The printer is not properly set up for the front or rear tractor using the printer's default-setting mode or the EPSON Remote! What to turn off...
User Manual
Page 140
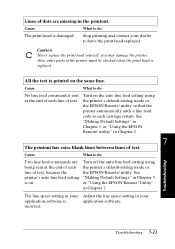
... 2. The line space setting in your Adjust the line space setting in the printout. utility. or "Using the EPSON Remote! Troubleshooting 7-11 incorrect. Cause What to have the print head replaced. Lines of dots are Turn off the auto line feed setting using the printer's default-setting mode or the EPSON Remote! Utility" in Chapter 2. 7 The printout has extra blank lines between lines of text. Cause What to do No line feed command is replaced. See printer's auto line feed setting "Making Default Settings" in Chapter 5, or "Using the EPSON Remote! Turn on...
... 2. The line space setting in your Adjust the line space setting in the printout. utility. or "Using the EPSON Remote! Troubleshooting 7-11 incorrect. Cause What to have the print head replaced. Lines of dots are Turn off the auto line feed setting using the printer's default-setting mode or the EPSON Remote! Utility" in Chapter 2. 7 The printout has extra blank lines between lines of text. Cause What to do No line feed command is replaced. See printer's auto line feed setting "Making Default Settings" in Chapter 5, or "Using the EPSON Remote! Turn on...
User Manual
Page 179
... letter quality) One standard bidirectional, 8-bit, parallel interface with IEEE 1284 nibble mode support and one optional interface slot Friction (front, rear) Push tractor (front, rear) Pull tractor (front, bottom, rear) Push and pull tractor (additional tractor is required) (front, rear) Cut-sheet feeder (optional) Roll paper holder (optional) C-2 Specifications Unidirectional text or graphics printing can be selected using software commands. 1/6-inch or programmable in 1/216-inch increments FX-880: 80 columns (at 10 cpi) FX-1180: 136 columns (at 10 cpi Bidirectional...
... letter quality) One standard bidirectional, 8-bit, parallel interface with IEEE 1284 nibble mode support and one optional interface slot Friction (front, rear) Push tractor (front, rear) Pull tractor (front, bottom, rear) Push and pull tractor (additional tractor is required) (front, rear) Cut-sheet feeder (optional) Roll paper holder (optional) C-2 Specifications Unidirectional text or graphics printing can be selected using software commands. 1/6-inch or programmable in 1/216-inch increments FX-880: 80 columns (at 10 cpi) FX-1180: 136 columns (at 10 cpi Bidirectional...
User Manual
Page 213
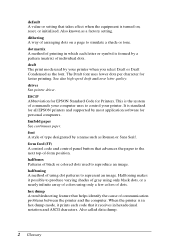
.... dot matrix A method of printing in hexadecimal notation and ASCII characters. driver See printer driver. ESC/P Abbreviation for EPSON Standard Code for personal computers. It is standard for all EPSON printers and supported by a name such as a factory setting. form feed (FF) A control code and control panel button that advances the paper to simulate a shade or tone. Also called data dump. 2 Glossary The Draft font uses fewer dots per character for faster printing. When the printer is in hex dump mode, it prints each...
.... dot matrix A method of printing in hexadecimal notation and ASCII characters. driver See printer driver. ESC/P Abbreviation for EPSON Standard Code for personal computers. It is standard for all EPSON printers and supported by a name such as a factory setting. form feed (FF) A control code and control panel button that advances the paper to simulate a shade or tone. Also called data dump. 2 Glossary The Draft font uses fewer dots per character for faster printing. When the printer is in hex dump mode, it prints each...
User Manual
Page 214
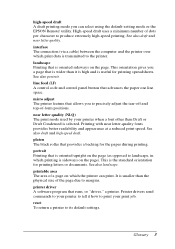
... than the physical size of dots per character to produce extremely high-speed printing. high-speed draft A draft printing mode you to precisely adjust the tear-off and top-of-form positions. interface The connection (via a cable) between the computer and the printer over which printing is transmitted to the printer. line feed (LF) A control code and control panel button that runs, or "drives," a printer. near letter quality (NLQ) The print mode used by your print job. platen The black roller that is oriented...
... than the physical size of dots per character to produce extremely high-speed printing. high-speed draft A draft printing mode you to precisely adjust the tear-off and top-of-form positions. interface The connection (via a cable) between the computer and the printer over which printing is transmitted to the printer. line feed (LF) A control code and control panel button that runs, or "drives," a printer. near letter quality (NLQ) The print mode used by your print job. platen The black roller that is oriented...

User Manual
Page 218
... forms, 3-4, A-18 O Operate button, inside front cover Options, 7 additional tractor unit, A-3 cut-sheet feeders, A-2, A-4 front sheet or front paper guide, A-3, A-15 interface cards, A-25 interface cover, inside front cover Plug-and-play, 1-14 Plugging in single-bin cut -sheet feeder, A-10, in paper guide, 4-4 in the printer, 1-10 Power cord, 1-2, Power supply problems, 7-3 Print head caution symbol, 9 overheated, 1-7, 7-2 IN-3 See continuous paper with labels loading or feeding problems, 7-2, 7-4 multi-part forms, 3-4, A-18 single sheets. See single-sheet specifications, C-5 Paper guide...
... forms, 3-4, A-18 O Operate button, inside front cover Options, 7 additional tractor unit, A-3 cut-sheet feeders, A-2, A-4 front sheet or front paper guide, A-3, A-15 interface cards, A-25 interface cover, inside front cover Plug-and-play, 1-14 Plugging in single-bin cut -sheet feeder, A-10, in paper guide, 4-4 in the printer, 1-10 Power cord, 1-2, Power supply problems, 7-3 Print head caution symbol, 9 overheated, 1-7, 7-2 IN-3 See continuous paper with labels loading or feeding problems, 7-2, 7-4 multi-part forms, 3-4, A-18 single sheets. See single-sheet specifications, C-5 Paper guide...


