Technical Brief (Impact Printers)
Page 4
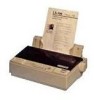
... on the control panel. EPSON impact printers offers these types of the Windows fonts resident on a printer. Technical Brief-Multimedia projectors Page 4 L LL Functionality-SmartPark™ settings EPSON SmartPark settings, which make the printers compatible with virtually any Windows... button on most EPSON impact printers offer EPSON Type B interface slots that are the property of -form position. L For optional connectivity, most EPSON impact printers. EPSON Sales Training EPSON is automatically retracted to precisely line-up documents, include automatic tear-off , or when...
... on the control panel. EPSON impact printers offers these types of the Windows fonts resident on a printer. Technical Brief-Multimedia projectors Page 4 L LL Functionality-SmartPark™ settings EPSON SmartPark settings, which make the printers compatible with virtually any Windows... button on most EPSON impact printers offer EPSON Type B interface slots that are the property of -form position. L For optional connectivity, most EPSON impact printers. EPSON Sales Training EPSON is automatically retracted to precisely line-up documents, include automatic tear-off , or when...

Technical Brief (Impact Printers)
Page 5
... Monitor provides Windows 95/98 users with automatic error messaging for direct printer to each printer L EPSON Remote! Utility EPSON Remote! This utility program provides printer status, error conditions, and trouble shooting instructions to easily change the printer's default settings. is a registered trademark of Seiko Epson Corporation. 1/00 Other trademarks are the property of their respective owners. Technical...
... Monitor provides Windows 95/98 users with automatic error messaging for direct printer to each printer L EPSON Remote! Utility EPSON Remote! This utility program provides printer status, error conditions, and trouble shooting instructions to easily change the printer's default settings. is a registered trademark of Seiko Epson Corporation. 1/00 Other trademarks are the property of their respective owners. Technical...
Product Information Guide
Page 3
... and FONT 2 lights Indicates the current font setting. These three lights go on and the beeper sounds five times if an error occurs. The printer switches automatically to cycle through the font choices ...on the control panel tells you press the FONT button. Bit rate: 300, 600, 1200, 2400, 4800, ... SULQWHUýLVýQRWýUHDG\ 7KHý&RQWUROý3DQHO The printer control panel gives you can tear off when you which font is paused. Data format: 8-bit parallel Synchronization:...
... and FONT 2 lights Indicates the current font setting. These three lights go on and the beeper sounds five times if an error occurs. The printer switches automatically to cycle through the font choices ...on the control panel tells you press the FONT button. Bit rate: 300, 600, 1200, 2400, 4800, ... SULQWHUýLVýQRWýUHDG\ 7KHý&RQWUROý3DQHO The printer control panel gives you can tear off when you which font is paused. Data format: 8-bit parallel Synchronization:...

Product Information Guide
Page 5
... FONT 1 is on, FONT 2 is flashing, and the PAUSE light is on (1 ), off the printed pages. You can use continuous paper with the Printer Setting mode, you can easily tear off (2 ), and flash () ) to that you move to the feature you install an optional tractor and use the tractor to print on top...
... FONT 1 is on, FONT 2 is flashing, and the PAUSE light is on (1 ), off the printed pages. You can use continuous paper with the Printer Setting mode, you can easily tear off (2 ), and flash () ) to that you move to the feature you install an optional tractor and use the tractor to print on top...
Product Information Guide
Page 10
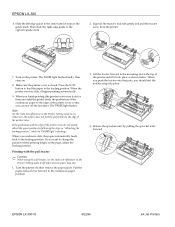
...QNý-HWý3ULQWHUV otherwise the paper may jam. 1. Make sure the printer cover is flashing. The PAUSE light flashes. Printing with the pull tractor F Caution: When using the pull tractor, set the Auto tear off feature in "Adjusting the loading position," while the PAUSE light is closed... 3. If the perforation and the edge of the printer and tilt it into place. 4. Slide the left edge guide to on the printer. Note: Set the Auto tear off ; Release the sprocket units by following the steps in the Printer Setting mode to off the last sheet. (3621ý/;ð...
...QNý-HWý3ULQWHUV otherwise the paper may jam. 1. Make sure the printer cover is flashing. The PAUSE light flashes. Printing with the pull tractor F Caution: When using the pull tractor, set the Auto tear off feature in "Adjusting the loading position," while the PAUSE light is closed... 3. If the perforation and the edge of the printer and tilt it into place. 4. Slide the left edge guide to on the printer. Note: Set the Auto tear off ; Release the sprocket units by following the steps in the Printer Setting mode to off the last sheet. (3621ý/;ð...

User Manual
Page 9
...Troubleshooting Problems and Solutions 3-2 Power Supply 3-2 Power is not being supplied 3-2 Printing 3-3 The printer does not print 3-3 The print is faint or uneven 3-4 Dots are missing in printed characters or graphics 3-4 Printed characters are not what you expected 3-5 The...Adjusting the paper-thickness lever Multi-part forms Labels Envelopes Changing the Printer Settings Printer setting descriptions Character spacing Shape of zero Skip-over-perforation Character table Auto line feed Page length Auto tear off Tractor Interface Bit rate, parity bit, data length, and ETX...
...Troubleshooting Problems and Solutions 3-2 Power Supply 3-2 Power is not being supplied 3-2 Printing 3-3 The printer does not print 3-3 The print is faint or uneven 3-4 Dots are missing in printed characters or graphics 3-4 Printed characters are not what you expected 3-5 The...Adjusting the paper-thickness lever Multi-part forms Labels Envelopes Changing the Printer Settings Printer setting descriptions Character spacing Shape of zero Skip-over-perforation Character table Auto line feed Page length Auto tear off Tractor Interface Bit rate, parity bit, data length, and ETX...
User Manual
Page 35
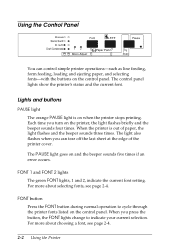
...Using the Printer For more about choosing a font, see page 2-4. Lights and buttons PAUSE light The orange PAUSE light is out of the printer cover. ...operation to indicate your current selection. When you can control simple printer operations-such as line feeding, form feeding, loading and ejecting... printer fonts listed on the printer, the light flashes briefly and the beeper sounds four times. When the printer is on when the printer stops...tear off the last sheet at the edge of paper, the light flashes and the beeper sounds three times. The control panel lights show the printer...
...Using the Printer For more about choosing a font, see page 2-4. Lights and buttons PAUSE light The orange PAUSE light is out of the printer cover. ...operation to indicate your current selection. When you can control simple printer operations-such as line feeding, form feeding, loading and ejecting... printer fonts listed on the printer, the light flashes briefly and the beeper sounds four times. When the printer is on when the printer stops...tear off the last sheet at the edge of paper, the light flashes and the beeper sounds three times. The control panel lights show the printer...
User Manual
Page 40
... position the tractor: t Do you printing on single sheets and continuous paper without removing the paper supply? Make sure the printer is a good idea to set the Auto tear off feature in the Printer Setting mode to switch between printing on labels, multi-part forms, or other documents that require a precise print position? Use the...
... position the tractor: t Do you printing on single sheets and continuous paper without removing the paper supply? Make sure the printer is a good idea to set the Auto tear off feature in the Printer Setting mode to switch between printing on labels, multi-part forms, or other documents that require a precise print position? Use the...
User Manual
Page 43
... guide to the center until it begins printing automatically. 9. When you finish printing (the printer receives no data for three seconds) the printer feeds the perforation of the continuous paper to on the printer. 8. Note: t Set the Auto tear off the last sheet. Otherwise, the printer does not feed the perforation to the edge of the...
... guide to the center until it begins printing automatically. 9. When you finish printing (the printer receives no data for three seconds) the printer feeds the perforation of the continuous paper to on the printer. 8. Note: t Set the Auto tear off the last sheet. Otherwise, the printer does not feed the perforation to the edge of the...
User Manual
Page 44
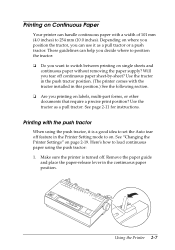
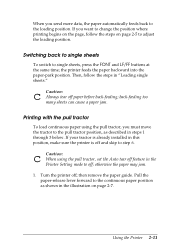
... the paper backward into the paper-park position. Printing with the pull tractor To load continuous paper using the pull tractor, set the Auto tear off feature in the Printer Setting mode to off paper before back-feeding; back-feeding too many sheets can cause a paper jam. Then, follow the steps on page 2-5 to...
... the paper backward into the paper-park position. Printing with the pull tractor To load continuous paper using the pull tractor, set the Auto tear off feature in the Printer Setting mode to off paper before back-feeding; back-feeding too many sheets can cause a paper jam. Then, follow the steps on page 2-5 to...
User Manual
Page 48
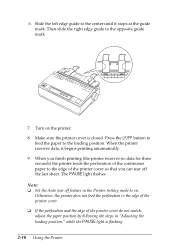
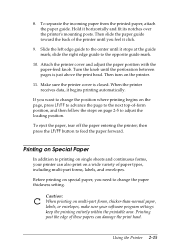
...printer until the perforation between pages is closed. When the printer receives data, it horizontally and fit its notches over the printer's mounting posts. Printing on Special Paper In addition to printing on single sheets and continuous forms, your software program settings... keep the printing entirely within the printable area. Hold it begins printing automatically. Attach the printer... sure your printer can damage the...the Printer 2-15 8. Make sure the printer ...setting. then press the LF/FF button to the opposite guide mark. 10. c Caution: When printing on the printer...
...printer until the perforation between pages is closed. When the printer receives data, it horizontally and fit its notches over the printer's mounting posts. Printing on Special Paper In addition to printing on single sheets and continuous forms, your software program settings... keep the printing entirely within the printable area. Hold it begins printing automatically. Attach the printer... sure your printer can damage the...the Printer 2-15 8. Make sure the printer ...setting. then press the LF/FF button to the opposite guide mark. 10. c Caution: When printing on the printer...
User Manual
Page 51
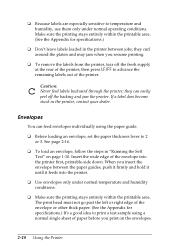
... curl around the platen and may jam when you print on page 1-10. t Before loading an envelope, set the paper thickness lever to advance the remaining labels out of the printer; t Make sure the printing stays entirely within the printable area. (See the Appendix for specifications.) It's a ... to temperature and humidity, use them only under normal temperature and humidity conditions. t To remove the labels from the printer, tear off the backing and jam the printer. Insert the wide edge of paper before you resume printing. See page 2-16. Make sure the printing stays entirely ...
... curl around the platen and may jam when you print on page 1-10. t Before loading an envelope, set the paper thickness lever to advance the remaining labels out of the printer; t Make sure the printing stays entirely within the printable area. (See the Appendix for specifications.) It's a ... to temperature and humidity, use them only under normal temperature and humidity conditions. t To remove the labels from the printer, tear off the backing and jam the printer. Insert the wide edge of paper before you resume printing. See page 2-16. Make sure the printing stays entirely ...
User Manual
Page 54
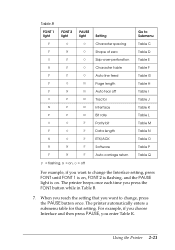
... once each time you enter Table K. Using the Printer 2-21 When you reach the setting that setting. Table B FONT 1 light FONT 2 light PAUSE light Setting F O O Character spacing F N O Shape of zero O F O Skip-over-perforation N F O Character table F F O Auto line feed F O N Page length F N N Auto tear off Go to Submenu Table C Table D Table E Table F Table G Table H Table I Table J Table...
... once each time you enter Table K. Using the Printer 2-21 When you reach the setting that setting. Table B FONT 1 light FONT 2 light PAUSE light Setting F O O Character spacing F N O Shape of zero O F O Skip-over-perforation N F O Character table F F O Auto line feed F O N Page length F N N Auto tear off Go to Submenu Table C Table D Table E Table F Table G Table H Table I Table J Table...

User Manual
Page 56
...to on the next. When the printer receives data, it to 8.5, 11, 12, or 70/6 (the length of the next sheet. Because most software programs set it automatically reverses the paper to the top-of-form position and starts printing, so you can easily tear off . This feature does not ...affect single-sheet paper. See the Appendix for specific characters. If text lines print on top of character tables. Your printer includes a wide...
...to on the next. When the printer receives data, it to 8.5, 11, 12, or 70/6 (the length of the next sheet. Because most software programs set it automatically reverses the paper to the top-of-form position and starts printing, so you can easily tear off . This feature does not ...affect single-sheet paper. See the Appendix for specific characters. If text lines print on top of character tables. Your printer includes a wide...
User Manual
Page 86
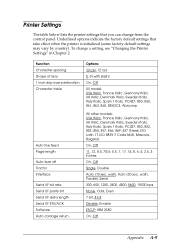
wait), Auto (30 sec. Underlined options indicate the factory default settings that you can change a setting, see "Changing the Printer Settings" in Chapter 2. wait), Parallel, Serial 300, 600, 1200, 2400, 4800, 9600, 19200 bps None, Odd, Even 7 bit, 8 bit ...Disable, Enable ESC/P, IBM 2380 On, Off Appendix A-9 Function Character spacing Shape of zero 1 inch skip-over-perforation Character table Auto line feed Page length Auto tear...
wait), Auto (30 sec. Underlined options indicate the factory default settings that you can change a setting, see "Changing the Printer Settings" in Chapter 2. wait), Parallel, Serial 300, 600, 1200, 2400, 4800, 9600, 19200 bps None, Odd, Even 7 bit, 8 bit ...Disable, Enable ESC/P, IBM 2380 On, Off Appendix A-9 Function Character spacing Shape of zero 1 inch skip-over-perforation Character table Auto line feed Page length Auto tear...

User Manual
Page 94
... loading position, 2-5 paper-thickness lever, 2-16 Assembling printer, 1-4-9 Attaching paper supports, 1-5 Auto line feed, 2-23 tear off, 2-23 B Bit rate, 2-24 Buttons, 2-2-3 C Changing printer settings, 2-19-24 Character spacing, 2-22 table, 2-23 Choosing a place for the printer, 1-3 Color upgrade kit, 2-31-34 Command summary, A-10-16 Connecting printer to computer, 1-13-16 Continuous paper, 2-7-15 Control...
... loading position, 2-5 paper-thickness lever, 2-16 Assembling printer, 1-4-9 Attaching paper supports, 1-5 Auto line feed, 2-23 tear off, 2-23 B Bit rate, 2-24 Buttons, 2-2-3 C Changing printer settings, 2-19-24 Character spacing, 2-22 table, 2-23 Choosing a place for the printer, 1-3 Color upgrade kit, 2-31-34 Command summary, A-10-16 Connecting printer to computer, 1-13-16 Continuous paper, 2-7-15 Control...


