Product Information Guide
Page 1
... User Replaceable Parts EPSON FX-890/FX-2190 - 1 Options ...EPSON FX-890/FX-2190 - 1 Printer Specifications EPSON FX-890/FX-2190 - 2 Control Panel Buttons and Lights EPSON FX-890/FX-2190 - 7 Error Indicators EPSON FX-890/FX-2190 - 8 Selecting a Font and Pitch EPSON FX-890/FX-2190 - 8 Selecting a Paper Source EPSON FX-890/FX-2190 - 9 Setting the Paper Release Lever EPSON FX-890/FX-2190 - 10 Adjusting the Paper-Thickness Setting EPSON FX-890/FX-2190 - 10 Using the Micro Adjust Function EPSON FX-890/FX-2190 - 11 Loading Special Papers EPSON FX-890/FX-2190 - 12 Switching Paper Types...
... User Replaceable Parts EPSON FX-890/FX-2190 - 1 Options ...EPSON FX-890/FX-2190 - 1 Printer Specifications EPSON FX-890/FX-2190 - 2 Control Panel Buttons and Lights EPSON FX-890/FX-2190 - 7 Error Indicators EPSON FX-890/FX-2190 - 8 Selecting a Font and Pitch EPSON FX-890/FX-2190 - 8 Selecting a Paper Source EPSON FX-890/FX-2190 - 9 Setting the Paper Release Lever EPSON FX-890/FX-2190 - 10 Adjusting the Paper-Thickness Setting EPSON FX-890/FX-2190 - 10 Using the Micro Adjust Function EPSON FX-890/FX-2190 - 11 Loading Special Papers EPSON FX-890/FX-2190 - 12 Switching Paper Types...
Product Information Guide
Page 3
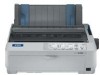
... to load single sheets and carbonless single-sheet multi-part forms of up to 6 parts. EPSON FX-890/FX-2190 6/03 Check with your printer's built-in USB and parallel interfaces and provide added network compatibility. additional tractor is required Cut-sheet feeders (optional) Roll paper holder (optional) Normal mode: 1/6-inch (4.23 mm) feed, 62 msec; Continuous: 5 inches (127 mm)/ second Copy mode: 1/6-inch (4.23 mm) feed, 83 msec; The EPSON interface cards in...
... to load single sheets and carbonless single-sheet multi-part forms of up to 6 parts. EPSON FX-890/FX-2190 6/03 Check with your printer's built-in USB and parallel interfaces and provide added network compatibility. additional tractor is required Cut-sheet feeders (optional) Roll paper holder (optional) Normal mode: 1/6-inch (4.23 mm) feed, 62 msec; Continuous: 5 inches (127 mm)/ second Copy mode: 1/6-inch (4.23 mm) feed, 83 msec; The EPSON interface cards in...
Product Information Guide
Page 8
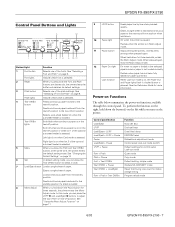
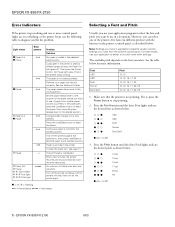
... a single sheet or advances continuous paper to adjust the top-of paper. Power-on Functions The table below summarizes the power-on page 8. EPSON FX-890/FX-2190 Control Panel Buttons and Lights Button/Light Function 1 Font button Selects one of the pitch settings. When held down the Pause button for ribbon change timing Program reload mode 6/03 EPSON FX-890/FX-2190 - 7 Pitch lights Indicate which font is paused. Selects a cut-sheet feeder bin when the cut -sheet feeder is in...
... a single sheet or advances continuous paper to adjust the top-of paper. Power-on Functions The table below summarizes the power-on page 8. EPSON FX-890/FX-2190 Control Panel Buttons and Lights Button/Light Function 1 Font button Selects one of the pitch settings. When held down the Pause button for ribbon change timing Program reload mode 6/03 EPSON FX-890/FX-2190 - 7 Pitch lights Indicate which font is paused. Selects a cut-sheet feeder bin when the cut -sheet feeder is in...
Product Information Guide
Page 9
... fix the problem. Make sure that the printer is not fully ejected. Press the Load/Eject button to the standby position. Continuous paper is currently in the paper path, press the Load/Eject button to the standby position. the Paper Out light goes off for the paper source you want to use. O = on the printer again. the printer resumes printing automatically once the print head cools. However, you select. EPSON FX-890/FX...
... fix the problem. Make sure that the printer is not fully ejected. Press the Load/Eject button to the standby position. Continuous paper is currently in the paper path, press the Load/Eject button to the standby position. the Paper Out light goes off for the paper source you want to use. O = on the printer again. the printer resumes printing automatically once the print head cools. However, you select. EPSON FX-890/FX...
Product Information Guide
Page 11
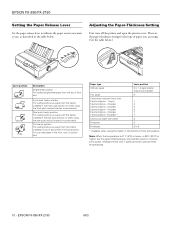
Adjusting the Paper-Thickness Setting First turn off the printer and open the printer cover. Pull tractor position For loading continuous paper from the tractor installed on top of paper you want to improve print quality. EPSON FX-890/FX-2190 6/03 Rear push tractor position For loading continuous paper with the tractor installed in the front push position or when using . (See the table below . Then set the paper-thickness lever one position...
Adjusting the Paper-Thickness Setting First turn off the printer and open the printer cover. Pull tractor position For loading continuous paper from the tractor installed on top of paper you want to improve print quality. EPSON FX-890/FX-2190 6/03 Rear push tractor position For loading continuous paper with the tractor installed in the front push position or when using . (See the table below . Then set the paper-thickness lever one position...
Product Information Guide
Page 12
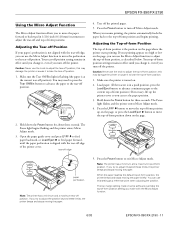
... the printer is turned on the page. 2. Note: The printer has a minimum and a maximum top-of -form positions. The top margin setting made in effect until you change it , even if you make with the Micro Adjust function. 6/03 EPSON FX-890/FX-2190 - 11 Your tear-off the printer. Caution: Never use this may need to press the Tear Off/Bin button to advance the paper...
... the printer is turned on the page. 2. Note: The printer has a minimum and a maximum top-of -form positions. The top margin setting made in effect until you change it , even if you make with the Micro Adjust function. 6/03 EPSON FX-890/FX-2190 - 11 Your tear-off the printer. Caution: Never use this may need to press the Tear Off/Bin button to advance the paper...
Product Information Guide
Page 13
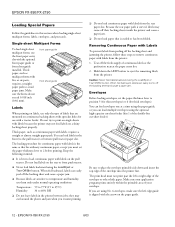
... the printer. You can load multiple envelopes using the Load/Eject or Tear Off/Bin button. When fed backward, labels can feed envelopes one at the perforation nearest the paper entry slot. 2. You can easily peel off the fresh supply of the double-bin cut-sheet feeder). Make sure your application program prints entirely within the printable area of the envelope or other thick paper. Envelopes Before loading envelopes, set the paper...
... the printer. You can load multiple envelopes using the Load/Eject or Tear Off/Bin button. When fed backward, labels can feed envelopes one at the perforation nearest the paper entry slot. 2. You can easily peel off the fresh supply of the double-bin cut-sheet feeder). Make sure your application program prints entirely within the printable area of the envelope or other thick paper. Envelopes Before loading envelopes, set the paper...
Product Information Guide
Page 15
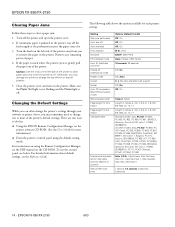
... printer's settings through your software or printer driver, you may damage the printer or change one or more information.) ❏ From the printer's control panel using the Remote Configuration Manager, see the PDF manual on the printer. To use the control panel, see the Reference Guide. If continuous paper is off the fresh supply at the perforation nearest the paper entry slot. 3. If the paper is off Auto line feed Print direction Software I/F (interface) mode Auto I/F (interface) wait time Parallel I/F bidirectional mode...
... printer's settings through your software or printer driver, you may damage the printer or change one or more information.) ❏ From the printer's control panel using the Remote Configuration Manager, see the PDF manual on the printer. To use the control panel, see the Reference Guide. If continuous paper is off the fresh supply at the perforation nearest the paper entry slot. 3. If the paper is off Auto line feed Print direction Software I/F (interface) mode Auto I/F (interface) wait time Parallel I/F bidirectional mode...
Product Information Guide
Page 16
... changes you made to the printer's settings in the original mode are consistent with your printer in bold) are restored to load a new sheet of continuous paper that came with your printer in Okidata mode. If you use your printer. EPSON FX-890/FX-2190 Follow the steps below to enter Menu mode, and then press PRINT. You'll need to their default values. If you switch from the control panel. 4. To do not install the Windows driver that...
... changes you made to the printer's settings in the original mode are consistent with your printer in bold) are restored to load a new sheet of continuous paper that came with your printer in Okidata mode. If you use your printer. EPSON FX-890/FX-2190 Follow the steps below to enter Menu mode, and then press PRINT. You'll need to their default values. If you switch from the control panel. 4. To do not install the Windows driver that...
Product Information Guide
Page 17
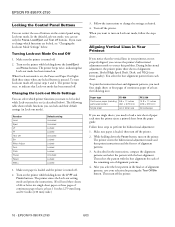
... the instructions to change which functions you can lock and their default settings (in the final set of alignment patterns. 3. Follow these steps to turn on . EPSON FX-890/FX-2190 6/03 EPSON FX-890/FX-2190 Locking the Control Panel Buttons You can restrict the use single sheets, you need to load a new sheet of paper each time the printer ejects a printed sheet from each sheet. Function Load Eject LF FF Tear Off Bin Micro Adjust Font Pitch Pause Reset Menu Default setting Unlocked Unlocked...
... the instructions to change which functions you can lock and their default settings (in the final set of alignment patterns. 3. Follow these steps to turn on . EPSON FX-890/FX-2190 6/03 EPSON FX-890/FX-2190 Locking the Control Panel Buttons You can restrict the use single sheets, you need to load a new sheet of paper each time the printer ejects a printed sheet from each sheet. Function Load Eject LF FF Tear Off Bin Micro Adjust Font Pitch Pause Reset Menu Default setting Unlocked Unlocked...
Product Information Guide
Page 18
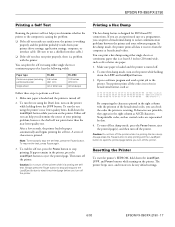
... EPSON FX-890/FX-2190 - 17 Make sure paper is loaded and the printer is turned off . 2. To run the test using the Draft font, turn off the printer. To run the test using the printer's near letter-quality test. however, the draft self test prints faster than the near letter-quality fonts, hold down the Load/Eject button while you can print a hexadecimal dump to isolate communication problems between the printer and your printer driver settings...
... EPSON FX-890/FX-2190 - 17 Make sure paper is loaded and the printer is turned off . 2. To run the test using the Draft font, turn off the printer. To run the test using the printer's near letter-quality test. however, the draft self test prints faster than the near letter-quality fonts, hold down the Load/Eject button while you can print a hexadecimal dump to isolate communication problems between the printer and your printer driver settings...

Technical Brief (Impact Printers)
Page 5
... : ON Auto Tear off : OFF Auto Line Feed : OFF Control Code : ESC/P 0 slash : OFF Buzzer : ON Roll Paper : OFF F1 : Execute F10: Previous F2 : Quit CR : Select item F3 : Default F4 : Change Port Printer Status Monitor Utility The Printer Status Monitor provides Windows 95/98 users with automatic error messaging for direct printer to the Printer Status Monitor. L Windows 3.51 and NT 4.0 users can add an optional Ethernet card to have access to host computer connection. Utility EPSON Remote!
... : ON Auto Tear off : OFF Auto Line Feed : OFF Control Code : ESC/P 0 slash : OFF Buzzer : ON Roll Paper : OFF F1 : Execute F10: Previous F2 : Quit CR : Select item F3 : Default F4 : Change Port Printer Status Monitor Utility The Printer Status Monitor provides Windows 95/98 users with automatic error messaging for direct printer to the Printer Status Monitor. L Windows 3.51 and NT 4.0 users can add an optional Ethernet card to have access to host computer connection. Utility EPSON Remote!
User Manual
Page 10
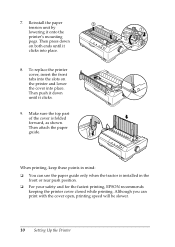
... printing, EPSON recommends keeping the printer cover closed while printing. Then attach the paper guide. Reinstall the paper tension unit by lowering it clicks. 9. To replace the printer cover, insert the front tabs into the slots on both ends until it onto the printer's mounting pegs. Make sure the top part of the cover is installed in mind: ❏ You can print with the cover open, printing speed will be slower. 10 Setting...
... printing, EPSON recommends keeping the printer cover closed while printing. Then attach the paper guide. Reinstall the paper tension unit by lowering it clicks. 9. To replace the printer cover, insert the front tabs into the slots on both ends until it onto the printer's mounting pegs. Make sure the top part of the cover is installed in mind: ❏ You can print with the cover open, printing speed will be slower. 10 Setting...
User Manual
Page 13
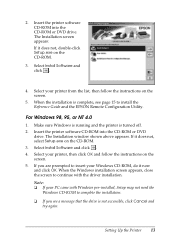
... follow the instructions on the CD-ROM. 3. Make sure Windows is running and the printer is not accessible, click Cancel and try again. If it does not, double-click Setup.exe on the screen. 5. The Installation screen appears: If it does not, select Setup.exe on the screen. 5. When the installation is complete, see a message that the drive is turned off. 2. Select Install Software and...
... follow the instructions on the CD-ROM. 3. Make sure Windows is running and the printer is not accessible, click Cancel and try again. If it does not, double-click Setup.exe on the screen. 5. The Installation screen appears: If it does not, select Setup.exe on the screen. 5. When the installation is complete, see a message that the drive is turned off. 2. Select Install Software and...
User Manual
Page 14
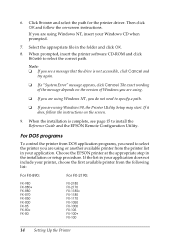
... using Windows 98, the Printer Utility Setup may start. When prompted, insert the printer software CD-ROM and click Browse to select the printer you need to install the Reference Guide and the EPSON Remote Configuration Utility. If it does, follow the on the screen. 9. For DOS programs To control the printer from the following list: For FX-890: For FX-2190: FX-980 FX-880+ FX-880 FX-870 FX-850 FX-800 FX...
... using Windows 98, the Printer Utility Setup may start. When prompted, insert the printer software CD-ROM and click Browse to select the printer you need to install the Reference Guide and the EPSON Remote Configuration Utility. If it does, follow the on the screen. 9. For DOS programs To control the printer from the following list: For FX-890: For FX-2190: FX-980 FX-880+ FX-880 FX-870 FX-850 FX-800 FX...
User Manual
Page 15
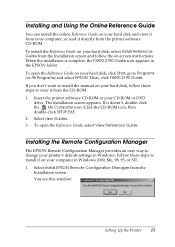
... appears. If it directly from the Installation screen. To open the Reference Guide on your computer in Windows. Installing the Remote Configuration Manager The EPSON Remote Configuration Manager provides an easy way to install the manual on your hard disk, follow the on your hard disk, click Start, go to view it on -screen instructions. You see this window: Setting Up the Printer 15 Click the CD...
... appears. If it directly from the Installation screen. To open the Reference Guide on your computer in Windows. Installing the Remote Configuration Manager The EPSON Remote Configuration Manager provides an easy way to install the manual on your hard disk, follow the on your hard disk, click Start, go to view it on -screen instructions. You see this window: Setting Up the Printer 15 Click the CD...
User Manual
Page 38
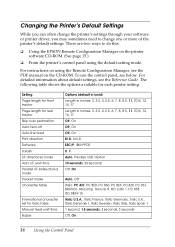
... over perforation Auto tear-off Auto line feed Print direction Software 0 slash I/F (interface) mode Auto I/F wait time Parallel I/F bidirectional mode Packet mode Character table International character set for each printer setting. There are two ways to change one or more of the printer's default settings. To use the control panel, see the Reference Guide. Changing the Printer's Default Settings While you can often change the printer's settings through your software or printer driver, you may sometimes need to do this: ❏ Using the EPSON Remote Configuration Manager...
... over perforation Auto tear-off Auto line feed Print direction Software 0 slash I/F (interface) mode Auto I/F wait time Parallel I/F bidirectional mode Packet mode Character table International character set for each printer setting. There are two ways to change one or more of the printer's default settings. To use the control panel, see the Reference Guide. Changing the Printer's Default Settings While you can often change the printer's settings through your software or printer driver, you may sometimes need to do this: ❏ Using the EPSON Remote Configuration Manager...

User Manual
Page 39
... underlined. 3. The printer prints all the current settings. 4. Press the Set button to scroll through the settings one you want . Using the Control Panel 39 The selected language is currently selected for printing the instructions. The printer prints the first setting and its current value. 5. The printer enters default-setting mode and prints a line showing which language is underlined. 2. The printer prints a line asking if you want to change . 7. To print a list of paper each time the printer ejects a printed page. 1. Press the...
... underlined. 3. The printer prints all the current settings. 4. Press the Set button to scroll through the settings one you want . Using the Control Panel 39 The selected language is currently selected for printing the instructions. The printer prints the first setting and its current value. 5. The printer enters default-setting mode and prints a line showing which language is underlined. 2. The printer prints a line asking if you want to change . 7. To print a list of paper each time the printer ejects a printed page. 1. Press the...
User Manual
Page 40
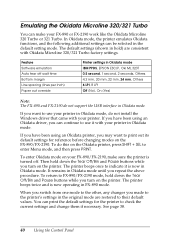
... factory settings. Feature Software emulation Auto tear off . To enter Okidata mode on the printer. The printer beeps once to their default values. You can be selected in the default setting mode. If you have been using an Okidata driver, you turn on your printer. When you switch from one mode to the other, any changes you repeat the above procedure. The printer beeps twice and is now operating in FX-890 mode. Emulating the Okidata...
... factory settings. Feature Software emulation Auto tear off . To enter Okidata mode on the printer. The printer beeps once to their default values. You can be selected in the default setting mode. If you have been using an Okidata driver, you turn on your printer. When you switch from one mode to the other, any changes you repeat the above procedure. The printer beeps twice and is now operating in FX-890 mode. Emulating the Okidata...
User Manual - Remote Configuration Manager
Page 1
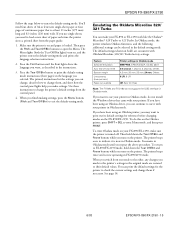
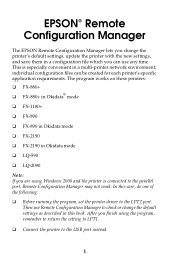
... time. After you finish using Windows 2000 and the printer is especially convenient in a multi-printer network environment; EPSON® Remote Configuration Manager The EPSON Remote Configuration Manager lets you change the default settings as described in this case, do one of the following: ❏ Before running the program, set the printer driver to the USB port instead. 1 In this book. This is connected to check or change the printer's default settings, update the printer with the new settings...
... time. After you finish using Windows 2000 and the printer is especially convenient in a multi-printer network environment; EPSON® Remote Configuration Manager The EPSON Remote Configuration Manager lets you change the default settings as described in this case, do one of the following: ❏ Before running the program, set the printer driver to the USB port instead. 1 In this book. This is connected to check or change the printer's default settings, update the printer with the new settings...


