User Manual
Page 3
... Installing the Remote Configuration Manager 15 Paper Handling Setting the Paper Release Lever 17 Adjusting the Paper-Thickness Setting 18 Loading Continuous Paper with the Front Push Tractor 19 Loading Continuous Paper with the Rear Push Tractor 21 Loading Continuous Paper with the Pull Tractor 22 Removing paper from the pull tractor 26 Loading Single Sheets with the Paper Guide 26 Loading Special Papers 28 Single-sheet multipart forms 28 Labels 28 Envelopes 29 Postcards 30 Using the Micro Adjust Function 31 Adjusting the tear-off position...
... Installing the Remote Configuration Manager 15 Paper Handling Setting the Paper Release Lever 17 Adjusting the Paper-Thickness Setting 18 Loading Continuous Paper with the Front Push Tractor 19 Loading Continuous Paper with the Rear Push Tractor 21 Loading Continuous Paper with the Pull Tractor 22 Removing paper from the pull tractor 26 Loading Single Sheets with the Paper Guide 26 Loading Special Papers 28 Single-sheet multipart forms 28 Labels 28 Envelopes 29 Postcards 30 Using the Micro Adjust Function 31 Adjusting the tear-off position...
User Manual
Page 4
Using the Control Panel Buttons and Lights 35 Selecting a Font and Pitch 37 Changing the Printer's Default Settings 38 Default-setting mode 39 Emulating the Okidata Microline 320/321 Turbo 40 Troubleshooting Using the Error Indicators 41 Clearing Paper Jams 42 Printing a Self Test 43 Where To Get Help 44 Product Information Safety Instructions 45 Hot Parts Caution Symbol 45 Important Safety Instructions 45 ENERGY STAR Compliance 46 FCC Compliance Statement for United States Users 46 WARNING 47 For Canadian users 47 EPSON AMERICA, INC., LIMITED WARRANTY 47 4
Using the Control Panel Buttons and Lights 35 Selecting a Font and Pitch 37 Changing the Printer's Default Settings 38 Default-setting mode 39 Emulating the Okidata Microline 320/321 Turbo 40 Troubleshooting Using the Error Indicators 41 Clearing Paper Jams 42 Printing a Self Test 43 Where To Get Help 44 Product Information Safety Instructions 45 Hot Parts Caution Symbol 45 Important Safety Instructions 45 ENERGY STAR Compliance 46 FCC Compliance Statement for United States Users 46 WARNING 47 For Canadian users 47 EPSON AMERICA, INC., LIMITED WARRANTY 47 4
User Manual
Page 5
... can make your FX-890 or FX-2190 work like the Okidata® Microline® 320 Turbo or 321 Turbo by turning the printer on page 15. For detailed information about using your printer. See "Installing and Using the Online Reference Guide" on in this manual show the FX-890, the instructions apply to both the FX-890 and the FX-2190. For help using your printer: ❏ Setting Up the Printer ❏ Paper Handling ❏ Using the Control Panel ❏ Troubleshooting ❏...
... can make your FX-890 or FX-2190 work like the Okidata® Microline® 320 Turbo or 321 Turbo by turning the printer on page 15. For detailed information about using your printer. See "Installing and Using the Online Reference Guide" on in this manual show the FX-890, the instructions apply to both the FX-890 and the FX-2190. For help using your printer: ❏ Setting Up the Printer ❏ Paper Handling ❏ Using the Control Panel ❏ Troubleshooting ❏...

User Manual
Page 7
... can easily unplug the power cord. Unpacking the Printer Make sure you have the following items. Printer Ribbon cartridge Power cord Paper guide Printer software Follow the directions on the Notice Sheet to unpack and set up your printer. Position the power cord and interface cable so they do not interfere with paper feeding. Chapter 1 Setting Up the Printer This chapter describes how to remove the protective materials before you turn on a flat, stable...
... can easily unplug the power cord. Unpacking the Printer Make sure you have the following items. Printer Ribbon cartridge Power cord Paper guide Printer software Follow the directions on the Notice Sheet to unpack and set up your printer. Position the power cord and interface cable so they do not interfere with paper feeding. Chapter 1 Setting Up the Printer This chapter describes how to remove the protective materials before you turn on a flat, stable...
User Manual
Page 10
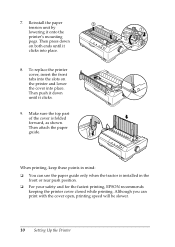
... fastest printing, EPSON recommends keeping the printer cover closed while printing. Reinstall the paper tension unit by lowering it clicks. 9. To replace the printer cover, insert the front tabs into the slots on both ends until it onto the printer's mounting pegs. Make sure the top part of the cover is installed in mind: ❏ You can print with the cover open, printing speed will be slower. 10 Setting...
... fastest printing, EPSON recommends keeping the printer cover closed while printing. Reinstall the paper tension unit by lowering it clicks. 9. To replace the printer cover, insert the front tabs into the slots on both ends until it onto the printer's mounting pegs. Make sure the top part of the cover is installed in mind: ❏ You can print with the cover open, printing speed will be slower. 10 Setting...
User Manual
Page 13
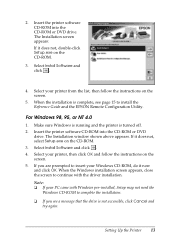
... not, select Setup.exe on the CD-ROM. 3. Insert the printer software CD-ROM into the CD-ROM or DVD drive. Select Install Software and click . 4. When the Windows installation screen appears, close the screen to continue with Windows pre-installed, Setup may not need the Windows CD-ROM to complete the installation. ❏ If you are prompted to install the Reference Guide and the EPSON Remote Configuration Utility.
... not, select Setup.exe on the CD-ROM. 3. Insert the printer software CD-ROM into the CD-ROM or DVD drive. Select Install Software and click . 4. When the Windows installation screen appears, close the screen to continue with Windows pre-installed, Setup may not need the Windows CD-ROM to complete the installation. ❏ If you are prompted to install the Reference Guide and the EPSON Remote Configuration Utility.
User Manual
Page 14
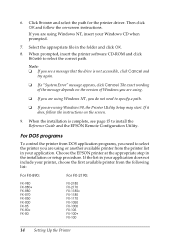
... EPSON printer at the appropriate step in the folder and click OK. 8. If you are using Windows NT, insert your Windows CD when prompted. 7. When the installation is not accessible, click Cancel and try again. ❏ If a "System Error" message appears, click Cancel. For DOS programs To control the printer from the following list: For FX-890: For FX-2190: FX-980 FX-880+ FX-880 FX-870 FX-850 FX-800 FX...
... EPSON printer at the appropriate step in the folder and click OK. 8. If you are using Windows NT, insert your Windows CD when prompted. 7. When the installation is not accessible, click Cancel and try again. ❏ If a "System Error" message appears, click Cancel. For DOS programs To control the printer from the following list: For FX-890: For FX-2190: FX-980 FX-880+ FX-880 FX-870 FX-850 FX-800 FX...
User Manual
Page 15
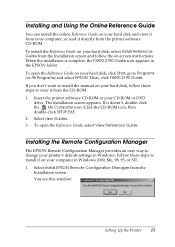
...-ROM: 1. If you don't want to install the manual on -screen instructions. Insert the printer software CD-ROM in your printer's default settings in the EPSON folder. Select Install EPSON Remote Configuration Manager from the Installation screen. To install the Reference Guide on your hard disk, select Install Reference Guide from the Installation screen and follow these steps to install it on your computer in Windows 2000, Me, 98, 95, or NT...
...-ROM: 1. If you don't want to install the manual on -screen instructions. Insert the printer software CD-ROM in your printer's default settings in the EPSON folder. Select Install EPSON Remote Configuration Manager from the Installation screen. To install the Reference Guide on your hard disk, select Install Reference Guide from the Installation screen and follow these steps to install it on your computer in Windows 2000, Me, 98, 95, or NT...
User Manual
Page 16
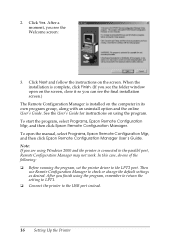
...; Connect the printer to the parallel port, Remote Configuration Manager may not work. Note: If you finish using Windows 2000 and the printer is complete, click Finish. (If you see the folder window open the manual, select Programs, Epson Remote Configuration Mgr, and then click Epson Remote Configuration Manager User's Guide. Click Yes. After a moment, you can see the Welcome screen: 3. When the installation is connected to the USB port instead. 16 Setting...
...; Connect the printer to the parallel port, Remote Configuration Manager may not work. Note: If you finish using Windows 2000 and the printer is complete, click Finish. (If you see the folder window open the manual, select Programs, Epson Remote Configuration Mgr, and then click Epson Remote Configuration Manager User's Guide. Click Yes. After a moment, you can see the Welcome screen: 3. When the installation is connected to the USB port instead. 16 Setting...

User Manual
Page 18
... start printing, make sure the paper-thickness setting is correct for the type of the printer. The paper-thickness lever is 41°F (5°C) or lower, or 95°F (35°C) or higher, multipart forms with labels Postcards Envelopes Lever position 0 or 1 (single sheets) 0 (continuous paper) 0 1 3 5 6 7 7 2 2 5 or 6 * Available when using . Select the correct setting according to the lever indicate the thickness setting. Adjusting the Paper-Thickness Setting...
... start printing, make sure the paper-thickness setting is correct for the type of the printer. The paper-thickness lever is 41°F (5°C) or lower, or 95°F (35°C) or higher, multipart forms with labels Postcards Envelopes Lever position 0 or 1 (single sheets) 0 (continuous paper) 0 1 3 5 6 7 7 2 2 5 or 6 * Available when using . Select the correct setting according to the lever indicate the thickness setting. Adjusting the Paper-Thickness Setting...
User Manual
Page 19
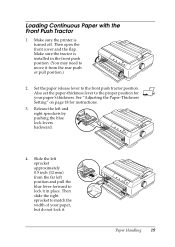
Make sure the tractor is turned off. Then open the front cover and the flap. Make sure the printer is installed in place. Set the paper release lever to the proper position for instructions. 3. See "Adjusting the Paper-Thickness Setting" on page 18 for your paper, but do not lock it from the far left and right sprockets by pushing the blue lock levers backward. 4. Then slide the right sprocket to...
Make sure the tractor is turned off. Then open the front cover and the flap. Make sure the printer is installed in place. Set the paper release lever to the proper position for instructions. 3. See "Adjusting the Paper-Thickness Setting" on page 18 for your paper, but do not lock it from the far left and right sprockets by pushing the blue lock levers backward. 4. Then slide the right sprocket to...
User Manual
Page 21
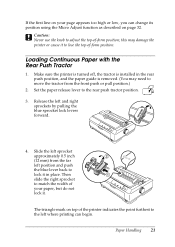
... rear push tractor position. 3. this may need to match the width of -form position; Release the left where printing can change its position using the Micro Adjust function as described on your paper, but do not lock it in the rear push position, and the paper guide is installed in place. The triangle mark on top of -form position. If the first line on page 32. Set the paper release lever to lock it . Slide the left...
... rear push tractor position. 3. this may need to match the width of -form position; Release the left where printing can change its position using the Micro Adjust function as described on your paper, but do not lock it in the rear push position, and the paper guide is installed in place. The triangle mark on top of -form position. If the first line on page 32. Set the paper release lever to lock it . Slide the left...

User Manual
Page 33
...-of -form position, the printer beeps and stops moving the paper. ❏ When the paper reaches the default top-of -form position down the Pause button for three seconds. Press the Pause button to adjust it beyond these limits, the printer beeps and stops moving the paper briefly. Load paper. (If the tractor is turned on the page. 5. The Pause light flashes and the printer enters the Micro Adjust mode. 4. If you can use this setting as...
...-of -form position, the printer beeps and stops moving the paper. ❏ When the paper reaches the default top-of -form position down the Pause button for three seconds. Press the Pause button to adjust it beyond these limits, the printer beeps and stops moving the paper briefly. Load paper. (If the tractor is turned on the page. 5. The Pause light flashes and the printer enters the Micro Adjust mode. 4. If you can use this setting as...
User Manual
Page 35
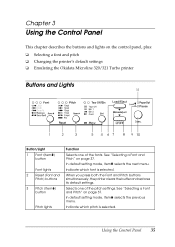
... printer clears the buffer and restores its default settings. Selects one of the pitch settings. See "Selecting a Font and Pitch" on page 37. Using the Control Panel 35 See "Selecting a Font and Pitch" on page 37. Indicate which pitch is selected. Chapter 3 Using the Control Panel This chapter describes the buttons and lights on the control panel, plus: ❏ Selecting a font and pitch ❏ Changing the printer's default settings ❏ Emulating the Okidata Microline 320/321 Turbo printer Buttons and Lights Button/Light 1 Font (ItemD) button Font lights 2 Reset...
... printer clears the buffer and restores its default settings. Selects one of the pitch settings. See "Selecting a Font and Pitch" on page 37. Using the Control Panel 35 See "Selecting a Font and Pitch" on page 37. Indicate which pitch is selected. Chapter 3 Using the Control Panel This chapter describes the buttons and lights on the control panel, plus: ❏ Selecting a font and pitch ❏ Changing the printer's default settings ❏ Emulating the Okidata Microline 320/321 Turbo printer Buttons and Lights Button/Light 1 Font (ItemD) button Font lights 2 Reset...

User Manual
Page 36
... the optional cut-sheet feeder is jammed. 36 Using the Control Panel Loads a single sheet of paper. Ejects a single sheet or advances continuous paper to the standby position if a sheet is loaded. Flashes when paper has not been fully ejected or paper is selected. Left light is on when the printer is in default setting mode. Feeds continuous paper backward to the next top-of-form position when held down for three seconds, the printer enters the Micro Adjust mode. Stops printing temporarily, and...
... the optional cut-sheet feeder is jammed. 36 Using the Control Panel Loads a single sheet of paper. Ejects a single sheet or advances continuous paper to the standby position if a sheet is loaded. Flashes when paper has not been fully ejected or paper is selected. Left light is on when the printer is in default setting mode. Feeds continuous paper backward to the next top-of-form position when held down for three seconds, the printer enters the Micro Adjust mode. Stops printing temporarily, and...

User Manual
Page 39
... Tear Off/Bin lights turn on and paper is underlined. 2. The printer enters default-setting mode and prints a line showing which language is on . The selected language is loaded. If you want underlined. 3. Repeat step 5 for any other settings you want to exit default-setting mode. If you use single sheets, you finish, press the Menu buttons again to change . 6. To print a list of paper each time the printer ejects a printed page. 1. Your new settings become the printer's defaults...
... Tear Off/Bin lights turn on and paper is underlined. 2. The printer enters default-setting mode and prints a line showing which language is on . The selected language is loaded. If you want underlined. 3. Repeat step 5 for any other settings you want to exit default-setting mode. If you use single sheets, you finish, press the Menu buttons again to change . 6. To print a list of paper each time the printer ejects a printed page. 1. Your new settings become the printer's defaults...
User Manual
Page 40
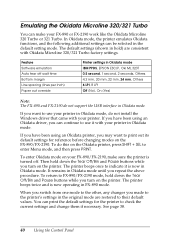
... Control Panel Feature Software emulation Auto tear off . In Okidata mode, the printer emulates Okidata functions, and the following additional settings can continue to print out its default settings for the printer to check the current settings and change them if necessary. To do not support the USB interface in the default setting mode. If you have been using an Okidata printer, you want to use your printer in Okidata mode, do not install the Windows driver that came with your FX-890 or FX-2190 work like the Okidata Microline...
... Control Panel Feature Software emulation Auto tear off . In Okidata mode, the printer emulates Okidata functions, and the following additional settings can continue to print out its default settings for the printer to check the current settings and change them if necessary. To do not support the USB interface in the default setting mode. If you have been using an Okidata printer, you want to use your printer in Okidata mode, do not install the Windows driver that came with your FX-890 or FX-2190 work like the Okidata Microline...
User Manual
Page 41
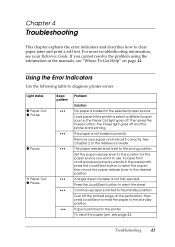
Using the Error Indicators Use the following table to eject the sheet. the Pause light goes off . Press the Load/Eject button to diagnose printer errors. If you want to the wrong position. the Paper Out light goes off and the printer starts printing. Remove your Reference Guide. Troubleshooting 41 Light status O Paper Out O Pause O Pause O Paper Out O Pause Beep pattern ••• Problem Solution No paper is loaded in the printer. The paper release lever is...
Using the Error Indicators Use the following table to eject the sheet. the Pause light goes off . Press the Load/Eject button to diagnose printer errors. If you want to the wrong position. the Paper Out light goes off and the printer starts printing. Remove your Reference Guide. Troubleshooting 41 Light status O Paper Out O Pause O Pause O Paper Out O Pause Beep pattern ••• Problem Solution No paper is loaded in the printer. The paper release lever is...
User Manual
Page 42
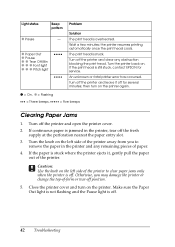
Turn off . 42 Troubleshooting If the paper is stuck where the printer ejects it off the printer and leave it , gently pull the paper out of the printer to remove the paper in the printer, tear off position. 5. Turn off for service. O = On, O = Flashing ••• = Three beeps Five beeps Clearing Paper Jams 1. Make sure the Paper Out light is not flashing and the Pause light is off the printer and open the printer cover. 2. The print head is...
Turn off . 42 Troubleshooting If the paper is stuck where the printer ejects it off the printer and leave it , gently pull the paper out of the printer to remove the paper in the printer, tear off position. 5. Turn off for service. O = On, O = Flashing ••• = Three beeps Five beeps Clearing Paper Jams 1. Make sure the Paper Out light is not flashing and the Pause light is off the printer and open the printer cover. 2. The print head is...
User Manual
Page 43
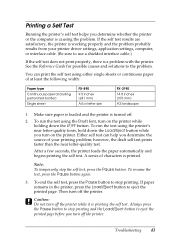
...-quality test. Either self test can print the self test using the Draft font, turn on the printer. A series of characters is causing the problem. If paper remains in the printer, press the Load/Eject button to the problem. c Caution: Do not turn on the printer while holding down the Load/Eject button while you determine the source of at least the following width: Paper type Continuous paper (including perforated border) Single sheet FX-890 9.5 inches (241 mm) A4 or letter size FX...
...-quality test. Either self test can print the self test using the Draft font, turn on the printer. A series of characters is causing the problem. If paper remains in the printer, press the Load/Eject button to the problem. c Caution: Do not turn on the printer while holding down the Load/Eject button while you determine the source of at least the following width: Paper type Continuous paper (including perforated border) Single sheet FX-890 9.5 inches (241 mm) A4 or letter size FX...


