
Technical Brief (Impact Printers)
Page 3
... rear or front push tractors and use . Paper feed method Top friction feed (standard paper guide) Optional high-capacity cutsheet feeder Optional second-bin cutsheet feeder Type of paper Single sheets, single sheet labels, top- L Paper thickness adjustment: Most EPSON impact printers have an Automatic Platten Gap Adjustment which helps eliminate paper jams and minimizes misfeeds, especially when printing...
... rear or front push tractors and use . Paper feed method Top friction feed (standard paper guide) Optional high-capacity cutsheet feeder Optional second-bin cutsheet feeder Type of paper Single sheets, single sheet labels, top- L Paper thickness adjustment: Most EPSON impact printers have an Automatic Platten Gap Adjustment which helps eliminate paper jams and minimizes misfeeds, especially when printing...
Product Information Guide
Page 1
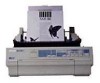
.../ 609 mm (24 0 Inches) : I366 mm 114.5 inches) ! 16.4 kg (18.5 lb) 24-Pin Printers 8/20/91 LQ-570/1070-l Fort1 I I 1 Epson Drafi Epson Cower Epson Roman 1 Epson San6 Sent Epson Presllge ~Epson Scnpt I Epson Sormt C Epson Orator 1 Epson Orator-S I OCR-B IP o i n t / Pitch i7P' 10.5 pl / 15cpl , 1Ocpl , 12cpl !o ... Printer Specifications Printing Printing method: Printing speed: Quellly Mgh-speed draft DraR I Letter quality 24-pin impact dot matrix Chemcten per Inch 10 10 / 12 110 ! 12 Cheratefdecondlllne 225 210 252 I 70 184 Printing direction: Line spacing: Paper feed speed...
.../ 609 mm (24 0 Inches) : I366 mm 114.5 inches) ! 16.4 kg (18.5 lb) 24-Pin Printers 8/20/91 LQ-570/1070-l Fort1 I I 1 Epson Drafi Epson Cower Epson Roman 1 Epson San6 Sent Epson Presllge ~Epson Scnpt I Epson Sormt C Epson Orator 1 Epson Orator-S I OCR-B IP o i n t / Pitch i7P' 10.5 pl / 15cpl , 1Ocpl , 12cpl !o ... Printer Specifications Printing Printing method: Printing speed: Quellly Mgh-speed draft DraR I Letter quality 24-pin impact dot matrix Chemcten per Inch 10 10 / 12 110 ! 12 Cheratefdecondlllne 225 210 252 I 70 184 Printing direction: Line spacing: Paper feed speed...
Product Information Guide
Page 3
... properly and gives you control many of communication problems between the printer and the computer. When printing on 24-Pin Printers 8/20/91 LQ-570/1070-3 Press this button briefly to temporarily stop printing. LF/FF (Line feed/Form feed) Tap this button again to feed the paper backward to the standby position. You can see the current...
... properly and gives you control many of communication problems between the printer and the computer. When printing on 24-Pin Printers 8/20/91 LQ-570/1070-3 Press this button briefly to temporarily stop printing. LF/FF (Line feed/Form feed) Tap this button again to feed the paper backward to the standby position. You can see the current...
User Manual
Page 8
... Around 3 Warnings, Cautions, and Notes 3 Printer Parts 4 Chapter 1 Setting Up the Printer 1-1 Unpacking the Printer 1-2 Choosing a Place for the Printer 1-3 Assembling the Printer 1-5 Testing the Printer 1-10 Connecting the Printer to Your Computer 1-13 Configuring Your Software for the Printer 1-14 Chapter 2 Paper Handling 2-1 Selecting a Paper Feeding Method 2-2 Using Single Sheets 2-4 Using Continuous Paper 2-9 Switching Between Continuous Paper and Single Sheets . . . 2-21 Printing...
... Around 3 Warnings, Cautions, and Notes 3 Printer Parts 4 Chapter 1 Setting Up the Printer 1-1 Unpacking the Printer 1-2 Choosing a Place for the Printer 1-3 Assembling the Printer 1-5 Testing the Printer 1-10 Connecting the Printer to Your Computer 1-13 Configuring Your Software for the Printer 1-14 Chapter 2 Paper Handling 2-1 Selecting a Paper Feeding Method 2-2 Using Single Sheets 2-4 Using Continuous Paper 2-9 Switching Between Continuous Paper and Single Sheets . . . 2-21 Printing...
User Manual
Page 17
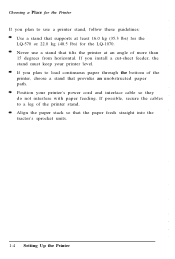
... LQ-570 or 22.0 kg (48.5 lbs) for the Printer If you plan to use a printer stand, follow these guidelines: Use a stand that supports at an angle of more than 15 degrees from horizontal. If possible, secure the cables to load continuous paper through the bottom of the printer ...sheet feeder, the stand must keep your printer's power cord and interface cable so they do not interfere with paper feeding. Align the paper stack so that provides an unobstructed paper path. If you plan to a leg of the printer, choose a stand that the paper feeds straight into the tractor's sprocket units. ...
... LQ-570 or 22.0 kg (48.5 lbs) for the Printer If you plan to use a printer stand, follow these guidelines: Use a stand that supports at an angle of more than 15 degrees from horizontal. If possible, secure the cables to load continuous paper through the bottom of the printer ...sheet feeder, the stand must keep your printer's power cord and interface cable so they do not interfere with paper feeding. Align the paper stack so that provides an unobstructed paper path. If you plan to a leg of the printer, choose a stand that the paper feeds straight into the tractor's sprocket units. ...
User Manual
Page 28
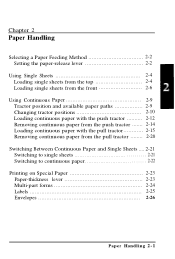
Chapter 2 Paper Handling Selecting a Paper Feeding Method 2-2 Setting the paper-release lever 2-2 Using Single Sheets 2-4 Loading single sheets from the top 2-4 Loading single sheets from the front 2-6 Using Continuous Paper 2-9 Tractor position and available paper paths 2-9 Changing tractor positions 2-10 Loading continuous paper with the push tractor .......... 2-12 Removing continuous paper from the push tractor ....... 2-14 Loading continuous paper with...
Chapter 2 Paper Handling Selecting a Paper Feeding Method 2-2 Setting the paper-release lever 2-2 Using Single Sheets 2-4 Loading single sheets from the top 2-4 Loading single sheets from the front 2-6 Using Continuous Paper 2-9 Tractor position and available paper paths 2-9 Changing tractor positions 2-10 Loading continuous paper with the push tractor .......... 2-12 Removing continuous paper from the push tractor ....... 2-14 Loading continuous paper with...
User Manual
Page 29
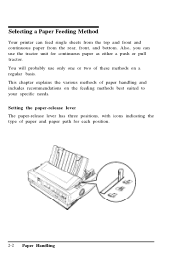
... the tractor unit for each position. 2-2 Paper Handling Setting the paper-release lever The paper-release lever has three positions, with icons indicating the type of paper and paper path for continuous paper as either a push or pull tractor. Selecting a Paper Feeding Method Your printer can use only one or two of paper handling and includes recommendations on a regular basis...
... the tractor unit for each position. 2-2 Paper Handling Setting the paper-release lever The paper-release lever has three positions, with icons indicating the type of paper and paper path for continuous paper as either a push or pull tractor. Selecting a Paper Feeding Method Your printer can use only one or two of paper handling and includes recommendations on a regular basis...
User Manual
Page 30
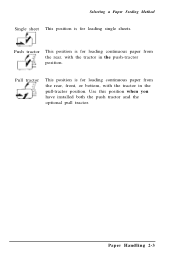
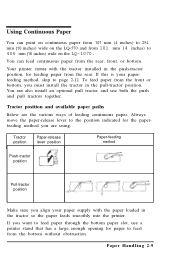
Paper Handling 2-3 Push tractor This position is for loading continuous paper from the rear, with the tractor in the push-tractor position. Pull tractor This position is for loading single sheets. Selecting a Paper Feeding Method Single sheet This position is for loading continuous paper from the rear, front, or bottom, with the tractor in the pull-tractor position. Use this position when you have installed both the push tractor and the optional pull tractor.
Paper Handling 2-3 Push tractor This position is for loading continuous paper from the rear, with the tractor in the push-tractor position. Pull tractor This position is for loading single sheets. Selecting a Paper Feeding Method Single sheet This position is for loading continuous paper from the rear, front, or bottom, with the tractor in the pull-tractor position. Use this position when you have installed both the push tractor and the optional pull tractor.
User Manual
Page 36
... of feeding continuous paper. Tractor position Paper-release lever position Paper-feeding method Push-tractor position Pull-tractor position I I I Make sure you want to feed from the bottom without obstruction. If you align your paperfeeding method, skip to 406 mm (16 inches) wide on the LQ-570 and from 101 mm (4 inches) to page 2-12. Paper Handling 2-9 Your printer comes...
... of feeding continuous paper. Tractor position Paper-release lever position Paper-feeding method Push-tractor position Pull-tractor position I I I Make sure you want to feed from the bottom without obstruction. If you align your paperfeeding method, skip to 406 mm (16 inches) wide on the LQ-570 and from 101 mm (4 inches) to page 2-12. Paper Handling 2-9 Your printer comes...
User Manual
Page 37
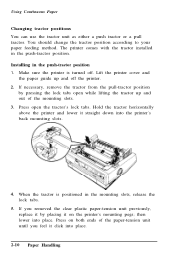
... 5. Make sure the printer is positioned in the push-tractor position. Hold the tractor horizontally above the printer and lower it click into place. 2-10 Paper Handling Lift the printer cover and the paper guide up and out of the paper-tension unit until you ...printer's back mounting slots. 4. Installing in the push-tractor position 1. If necessary, remove the tractor from the pull-tractor position by placing it on both ends of the mounting slots. 3. Press open while lifting the tractor up and off . You should change the tractor position according to your paper feeding...
... 5. Make sure the printer is positioned in the push-tractor position. Hold the tractor horizontally above the printer and lower it click into place. 2-10 Paper Handling Lift the printer cover and the paper guide up and out of the paper-tension unit until you ...printer's back mounting slots. 4. Installing in the push-tractor position 1. If necessary, remove the tractor from the pull-tractor position by placing it on both ends of the mounting slots. 3. Press open while lifting the tractor up and off . You should change the tractor position according to your paper feeding...
User Manual
Page 55
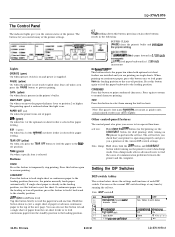
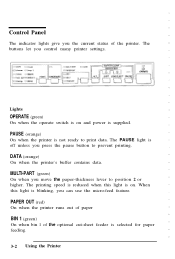
...the printer runs out of paper BIN 1 (green) On when bin 1 of the printer. Lights OPERATE (green) On when the operate switch is on . When this light is blinking, you the current status of the optional cut-sheet feeder is supplied. Control Panel The indicator lights give you can use the micro-feed feature.... The printing speed is reduced when this light is on and power is selected for paper feeding. 3-2 Using the Printer
...the printer runs out of paper BIN 1 (green) On when bin 1 of the printer. Lights OPERATE (green) On when the operate switch is on . When this light is blinking, you the current status of the optional cut-sheet feeder is supplied. Control Panel The indicator lights give you can use the micro-feed feature.... The printing speed is reduced when this light is on and power is selected for paper feeding. 3-2 Using the Printer

User Manual
Page 56
... button to resume printing. However, the printer normally loads paper automatically. Using the Printer 3-3 Buttons PAUSE Press this button again to temporarily stop printing. If continuous paper is already in the loading or tear-off position. LF/FF (line feed/form feed) Tap this button to feed it backward to feed the paper forward one line. Hold this button...
... button to resume printing. However, the printer normally loads paper automatically. Using the Printer 3-3 Buttons PAUSE Press this button again to temporarily stop printing. If continuous paper is already in the loading or tear-off position. LF/FF (line feed/form feed) Tap this button to feed it backward to feed the paper forward one line. Hold this button...
User Manual
Page 68
... has been turned off the power. When the paper reaches the factory-set loading position, the printer beeps and paper feeding pauses briefly. The printer has a minimum and maximum loading position. The loading position returns to advance the loading position beyond these limits, the printer beeps and the paper stops moving. If you turn off and back...
... has been turned off the power. When the paper reaches the factory-set loading position, the printer beeps and paper feeding pauses briefly. The printer has a minimum and maximum loading position. The loading position returns to advance the loading position beyond these limits, the printer beeps and the paper stops moving. If you turn off and back...
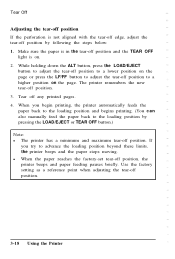
User Manual
Page 71
...when adjusting the tear-off position by pressing the LOAD/EJECT or TEAR OFF button.) Note: l The printer has a minimum and maximum tear-off position, the printer beeps and paper feeding pauses briefly. Tear off position. 3. While holding down the ALT button, press the LOAD/EJECT button ... position by following the steps below: 1. Make sure the paper is on the page. If you begin printing, the printer automatically feeds the paper back to the loading position and begins printing. (You c a n also manually feed the paper back to advance the loading position beyond these limits, the...
...when adjusting the tear-off position by pressing the LOAD/EJECT or TEAR OFF button.) Note: l The printer has a minimum and maximum tear-off position, the printer beeps and paper feeding pauses briefly. Tear off position. 3. While holding down the ALT button, press the LOAD/EJECT button ... position by following the steps below: 1. Make sure the paper is on the page. If you begin printing, the printer automatically feeds the paper back to the loading position and begins printing. (You c a n also manually feed the paper back to advance the loading position beyond these limits, the...
User Manual
Page 105
... feeder, see the section on options starting on the paper guide. See page 7-4. Reinsert the paper more firmly. See page 7-4. 6-8 Troubleshooting l Paper feeding is aligned with the arrow on page 6-10. Make sure the paper is crooked or the paper jams. Turn off the printer and move the paper-release lever to the pull-tractor position. Do not...
... feeder, see the section on options starting on the paper guide. See page 7-4. Reinsert the paper more firmly. See page 7-4. 6-8 Troubleshooting l Paper feeding is aligned with the arrow on page 6-10. Make sure the paper is crooked or the paper jams. Turn off the printer and move the paper-release lever to the pull-tractor position. Do not...
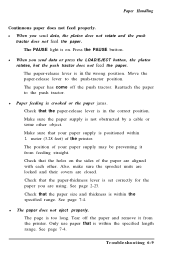
User Manual
Page 106
... the sides of the printer. Also, make sure the sprocket units are locked and their covers are using. Tear off the push tractor. The PAUSE light is in the correct position. l Paper feeding is crooked or the paper jams. Check that your paper supply may be preventing it from feeding straight. Move the paper-release lever to...
... the sides of the printer. Also, make sure the sprocket units are locked and their covers are using. Tear off the push tractor. The PAUSE light is in the correct position. l Paper feeding is crooked or the paper jams. Check that your paper supply may be preventing it from feeding straight. Move the paper-release lever to...
User Manual
Page 108
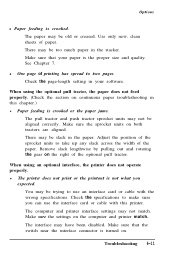
... with this chapter.) l Paper feeding is crooked or the paper jams. The pull tractor and push tractor sprocket units may not be too much paper in the stacker. See Chapter 7. Adjust the position of the paper. The paper may be slack in your paper is turned on continuous paper troubleshooting in this printer. The computer and printer interface settings may...
... with this chapter.) l Paper feeding is crooked or the paper jams. The pull tractor and push tractor sprocket units may not be too much paper in the stacker. See Chapter 7. Adjust the position of the paper. The paper may be slack in your paper is turned on continuous paper troubleshooting in this printer. The computer and printer interface settings may...
User Manual
Page 111
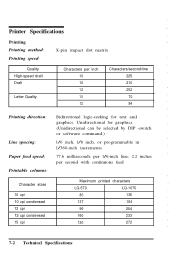
... spacing: Paper feed speed: Printable columns: Bidirectional logic-seeking for text and graphics. Printer Specifications Printing Printing method: Printing speed: X-pin impact dot matrix Quality High-speed draft Draft Letter Quality Characters per second with continuous feed Character sizes 10 cpi 10 cpi condensed 12 cpi 12 cpi condensed 15 cpi Maximum printed characters LQ-570 LQ-1070 80...
... spacing: Paper feed speed: Printable columns: Bidirectional logic-seeking for text and graphics. Printer Specifications Printing Printing method: Printing speed: X-pin impact dot matrix Quality High-speed draft Draft Letter Quality Characters per second with continuous feed Character sizes 10 cpi 10 cpi condensed 12 cpi 12 cpi condensed 15 cpi Maximum printed characters LQ-570 LQ-1070 80...

User Manual
Page 116
Printer Specifications Mechanical Paper-feed methods: Friction Push tractor Pull tractor Single-bin cut-sheet feeder (optional) High-capacity cut-sheet feeder (optional) Double-bin cut-sheet feeder (by combining both optional cut-sheet feeders) Ribbon: Black ribbon cartridge #7753 (LQ-570) or #7754 (LQ-1070) : Life expectancy: In LQ, at 48 dots/character: 2 million characters In draft, at...
Printer Specifications Mechanical Paper-feed methods: Friction Push tractor Pull tractor Single-bin cut-sheet feeder (optional) High-capacity cut-sheet feeder (optional) Double-bin cut-sheet feeder (by combining both optional cut-sheet feeders) Ribbon: Black ribbon cartridge #7753 (LQ-570) or #7754 (LQ-1070) : Life expectancy: In LQ, at 48 dots/character: 2 million characters In draft, at...
User Manual
Page 126
Chapter 8 Command Summary Using the Command Summary 8-2 Commands Arranged by Topic 8-3 General operation 8-3 Paper feeding 8-3 Page format 8-4 Print position motion 8-5 Font selection 8-6 Font enhancement 8 - 7 Spacing 8-9 Character handling 8-9 Bit image 8-11 Graphics 8-12 Command Summary 8-1
Chapter 8 Command Summary Using the Command Summary 8-2 Commands Arranged by Topic 8-3 General operation 8-3 Paper feeding 8-3 Page format 8-4 Print position motion 8-5 Font selection 8-6 Font enhancement 8 - 7 Spacing 8-9 Character handling 8-9 Bit image 8-11 Graphics 8-12 Command Summary 8-1


