
User Manual
Page 3
...-NOZZLE INK JET PRINTER All rights reserved. No patent liability is assumed with Seiko Epson Corporation's operating and maintenance instructions. Seiko Epson Corporation shall not be liable against any consumable products other than those designated as a result of: accident, misuse, or abuse of Seiko Epson Corporation. No part of this publication may be liable...
...-NOZZLE INK JET PRINTER All rights reserved. No patent liability is assumed with Seiko Epson Corporation's operating and maintenance instructions. Seiko Epson Corporation shall not be liable against any consumable products other than those designated as a result of: accident, misuse, or abuse of Seiko Epson Corporation. No part of this publication may be liable...
User Manual
Page 5
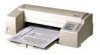
... on the products plugged into a grounding-type outlet. These are unable to insert the plug into the outlet, have an electrician replace your printer where the cord will be equipped with a plug having a third (grounding) pin, which fits only into the extension cord does not exceed...fire or electric shock. This could result in a risk of the grounding-type plug. Placing the printer on the printer. Except as specifically explained in the user's manual, do not place the printer in a built-in installation unless proper ventilation is a safety feature. Do not put your obsolete ...
... on the products plugged into a grounding-type outlet. These are unable to insert the plug into the outlet, have an electrician replace your printer where the cord will be equipped with a plug having a third (grounding) pin, which fits only into the extension cord does not exceed...fire or electric shock. This could result in a risk of the grounding-type plug. Placing the printer on the printer. Except as specifically explained in the user's manual, do not place the printer in a built-in installation unless proper ventilation is a safety feature. Do not put your obsolete ...

User Manual
Page 6
... support and service through the Epson Connection at (800) 922-8911 Assistance in locating your nearest Authorized Epson Reseller or Service Center Technical assistance with the installation, configuration, and operation of Epson products Information on ESC/P 2 drivers for your Epson product Customer Relations Information about user groups iv LI Unplug the printer from the wall outlet...
... support and service through the Epson Connection at (800) 922-8911 Assistance in locating your nearest Authorized Epson Reseller or Service Center Technical assistance with the installation, configuration, and operation of Epson products Information on ESC/P 2 drivers for your Epson product Customer Relations Information about user groups iv LI Unplug the printer from the wall outlet...
User Manual
Page 7
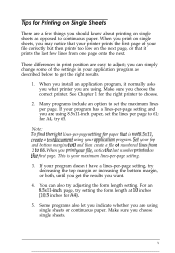
... that is your fop and bottom margins to 61; If your file correctly but then prints too low on the next page, or that your printer prints the first page of numbered linesfrom 2 to get the results you should know about printing on single sheets as described below to 66. Tips... for Printing on Single Sheets There are a few lines from one page onto the next. See Chapter 1 for the right printer to adjust; For an 8.5x11-inch page, try setting the form length at 10 inches (10.5 inches for A4, try decreasing the top margin or...
... that is your fop and bottom margins to 61; If your file correctly but then prints too low on the next page, or that your printer prints the first page of numbered linesfrom 2 to get the results you should know about printing on single sheets as described below to 66. Tips... for Printing on Single Sheets There are a few lines from one page onto the next. See Chapter 1 for the right printer to adjust; For an 8.5x11-inch page, try setting the form length at 10 inches (10.5 inches for A4, try decreasing the top margin or...
User Manual
Page 8
...2 Chapter 1 Setting Up Your Printer About Your Ink Jet Printer l-2 A few precautions l-2 Choosing the right paper l-3 Unpacking the Printer l-4 Attaching the paper support l-5 Choosing a Place for the Printer l-6 Plugging in the Printer l-7 Installing the Ink Cartridge l-8 Testing the Printer l-13 Loading paper in the paper... feeder l-13 Running the self test l-14 Connecting the Printer to Your Computer l-15 Setting Up Your Software Programs l-17 Tips for Using the Paper Feeder l-18 Chapter 2 Using Other Printer Functions Loading Paper Manually 2-2 Paper size 2-2 Printing on ...
...2 Chapter 1 Setting Up Your Printer About Your Ink Jet Printer l-2 A few precautions l-2 Choosing the right paper l-3 Unpacking the Printer l-4 Attaching the paper support l-5 Choosing a Place for the Printer l-6 Plugging in the Printer l-7 Installing the Ink Cartridge l-8 Testing the Printer l-13 Loading paper in the paper... feeder l-13 Running the self test l-14 Connecting the Printer to Your Computer l-15 Setting Up Your Software Programs l-17 Tips for Using the Paper Feeder l-18 Chapter 2 Using Other Printer Functions Loading Paper Manually 2-2 Paper size 2-2 Printing on ...
User Manual
Page 9
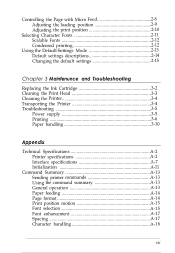
... Chapter 3 Mainfenunce and Troubleshooting Replacing the Ink Cartridge 3-2 Cleaning the Print Head 3-3 Cleaning the Printer 3-4 Transporting the Printer 3-4 Troubleshooting 3-5 Power supply 3-5 Printing 3-6 Paper handling 3-10 Appendix Technical Specifications A-2 Printer specifications A-2 Interface specifications A-7 Initialization A-11 Command Summary A-13 Sending printer commands A-13 Using the command summary A-13 General operation A-13 Paper feeding A-14 Page format...
... Chapter 3 Mainfenunce and Troubleshooting Replacing the Ink Cartridge 3-2 Cleaning the Print Head 3-3 Cleaning the Printer 3-4 Transporting the Printer 3-4 Troubleshooting 3-5 Power supply 3-5 Printing 3-6 Paper handling 3-10 Appendix Technical Specifications A-2 Printer specifications A-2 Interface specifications A-7 Initialization A-11 Command Summary A-13 Sending printer commands A-13 Using the command summary A-13 General operation A-13 Paper feeding A-14 Page format...
User Manual
Page 11
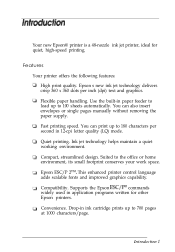
...printer offers the following features: High print quality. Use the built-in 12-cpi letter quality (LQ) mode. You can print up to 100 sheets automatically. Compatibility. You can also insert envelopes or single pages manually without removing the paper supply. Suited to 700 pages at 1000 characters/page. Supports the Epson...your work space. Fast printing speed. Ink jet technology helps maintain a quiet working environment. This enhanced printer control language adds scalable fonts and improved graphics capability. Convenience. Compact, streamlined design. Drop-in application ...
...printer offers the following features: High print quality. Use the built-in 12-cpi letter quality (LQ) mode. You can print up to 100 sheets automatically. Compatibility. You can also insert envelopes or single pages manually without removing the paper supply. Suited to 700 pages at 1000 characters/page. Supports the Epson...your work space. Fast printing speed. Ink jet technology helps maintain a quiet working environment. This enhanced printer control language adds scalable fonts and improved graphics capability. Convenience. Compact, streamlined design. Drop-in application ...
User Manual
Page 12
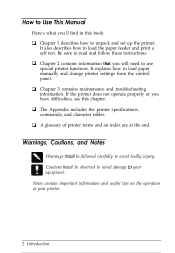
.... Cl Chapter 2 contains information that you have difficulties, see this book: CI Chapter 1 describes how to unpack and set up the printer. It explains how to read and follow these instructions. Cautions must be followed carefully to avoid bodily injury. How to Use This Manual Here...'s what you'll find in this chapter. It also describes how to your printer. 2 Introduction CI A glossary of your equipment. Warnings, Cautions, and Notes Warnings nzusf be observed to avoid damage to load the paper ...
.... Cl Chapter 2 contains information that you have difficulties, see this book: CI Chapter 1 describes how to unpack and set up the printer. It explains how to read and follow these instructions. Cautions must be followed carefully to avoid bodily injury. How to Use This Manual Here...'s what you'll find in this chapter. It also describes how to your printer. 2 Introduction CI A glossary of your equipment. Warnings, Cautions, and Notes Warnings nzusf be observed to avoid damage to load the paper ...
User Manual
Page 13
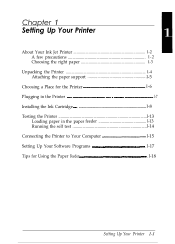
Chapter 1 Setting Up Your Printer About Your Ink Jet Printer 1-2 A few precautions 1-2 Choosing the right paper 1-3 Unpacking the Printer 1-4 Attaching the paper support l-5 Choosing a Place for the Printer l-6 Plugging in the Printer l-7 Installing the Ink Cartridge l-8 Testing the Printer l-13 Loading paper in the paper feeder l-13 Running the self test l-14 Connecting the Printer to Your Computer l-15 Setting Up Your Software Programs l-17 Tips for Using the Paper Feeder l-18 Setting Up Your Printer 1-1
Chapter 1 Setting Up Your Printer About Your Ink Jet Printer 1-2 A few precautions 1-2 Choosing the right paper 1-3 Unpacking the Printer 1-4 Attaching the paper support l-5 Choosing a Place for the Printer l-6 Plugging in the Printer l-7 Installing the Ink Cartridge l-8 Testing the Printer l-13 Loading paper in the paper feeder l-13 Running the self test l-14 Connecting the Printer to Your Computer l-15 Setting Up Your Software Programs l-17 Tips for Using the Paper Feeder l-18 Setting Up Your Printer 1-1
User Manual
Page 14
... inside your skin, wash it off with a new one. If it does get crisp, laser-sharp printouts usually associated with other types of printers, be sure to read through the following list of precautions to operate your eyes, flush them immediately with water. 0 Keep the ink cartridges ... long time before use the right paper, you are high print quality and quiet printing. A few precautions Even if you get on your printer is much quieter than the toner cartridges used by lasers. CI Install the ink cartridge immediately after you may become unusable otherwise. Two noticeable benefits...
... inside your skin, wash it off with a new one. If it does get crisp, laser-sharp printouts usually associated with other types of printers, be sure to read through the following list of precautions to operate your eyes, flush them immediately with water. 0 Keep the ink cartridges ... long time before use the right paper, you are high print quality and quiet printing. A few precautions Even if you get on your printer is much quieter than the toner cartridges used by lasers. CI Install the ink cartridge immediately after you may become unusable otherwise. Two noticeable benefits...

User Manual
Page 15
... too long to getting great results with paper that has a rough finish or a slick, coated finish. However, with your hand inside the printer or touch the cartridge during printing. 0 Before transporting the printer, make sure the print head is an especially important consideration. With paper that is in your... that is too absorbent, the ink can also cap the print head by pressing the PAUSE button. 0 Do not put your ink jet printer is a good practice to the date printed on the cartridge carton. 0 When moving the ink cartridge from its rated life expectancy. Setting Up Your...
... too long to getting great results with paper that has a rough finish or a slick, coated finish. However, with your hand inside the printer or touch the cartridge during printing. 0 Before transporting the printer, make sure the print head is an especially important consideration. With paper that is in your... that is too absorbent, the ink can also cap the print head by pressing the PAUSE button. 0 Do not put your ink jet printer is a good practice to the date printed on the cartridge carton. 0 When moving the ink cartridge from its rated life expectancy. Setting Up Your...
User Manual
Page 16
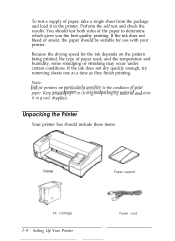
... the ink does not dry quickly enough, try removing sheets one at a time as they finish printing. Note: Ink jet printers me plrrticulmdy sensitizle to determine which gives you the best quality printing. You should test both sides of paper used, and the temperature and humidity... the ink does not bleed or smear, the paper should include these items: Ink cartridge 1-4 Setting Up Your Printer Paper support Power cord Unpacking the Printer Your printer box should be suitable for the ink depends on the pattern being printed, the type of the paper to the condition ofyour paper. Keep...
... the ink does not dry quickly enough, try removing sheets one at a time as they finish printing. Note: Ink jet printers me plrrticulmdy sensitizle to determine which gives you the best quality printing. You should test both sides of paper used, and the temperature and humidity... the ink does not bleed or smear, the paper should include these items: Ink cartridge 1-4 Setting Up Your Printer Paper support Power cord Unpacking the Printer Your printer box should be suitable for the ink depends on the pattern being printed, the type of the paper to the condition ofyour paper. Keep...
User Manual
Page 17
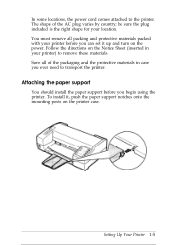
...included is the right shape for your printer before you ever need to transport the printer. In some locations, the power cord comes attached to remove these materials. The shape of the packaging and the protective materials in your printer) to the printer. Follow the directions on the Notice ...Sheet (inserted in case you begin using the printer. To install it up and turn on the printer case. Attaching the paper support You should install the paper ...
...included is the right shape for your printer before you ever need to transport the printer. In some locations, the power cord comes attached to remove these materials. The shape of the packaging and the protective materials in your printer) to the printer. Follow the directions on the Notice ...Sheet (inserted in case you begin using the printer. To install it up and turn on the printer case. Attaching the paper support You should install the paper ...

User Manual
Page 18
...keep it cannot operate properly. Avoid places subject to a leg of electromagnetic interference, such as large motors or other appliances that tilts the printer. do not interfere with paper feeding; Q Place cables so they do not use a stand that can easily unplug the power cord. Choosing..., or heat generating devices. Avoid electrical outlets controlled by wall switches or automatic timers. Avoid using or storing the printer in places subject to use a printer stand, follow these guidelines: Cl Use a stand that supports at an angle, it away from potential sources of the...
...keep it cannot operate properly. Avoid places subject to a leg of electromagnetic interference, such as large motors or other appliances that tilts the printer. do not interfere with paper feeding; Q Place cables so they do not use a stand that can easily unplug the power cord. Choosing..., or heat generating devices. Avoid electrical outlets controlled by wall switches or automatic timers. Avoid using or storing the printer in places subject to use a printer stand, follow these guidelines: Cl Use a stand that supports at an angle, it away from potential sources of the...
User Manual
Page 19
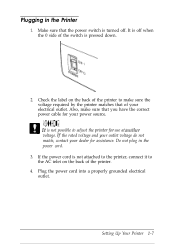
... that you have the correct power cable for your dealer for assistance. Setting Up Your Printer 1-7 It is pressed down. 2. Caution: It is not attached to the printer, connect it to the AC inlet on the back of the printer to adjust the printerfor use at another voltage. Do not plug in the... Printer 1. Also, make sure the voltage required by the printer matches that the power switch is turned off when...
... that you have the correct power cable for your dealer for assistance. Setting Up Your Printer 1-7 It is pressed down. 2. Caution: It is not attached to the printer, connect it to the AC inlet on the back of the printer to adjust the printerfor use at another voltage. Do not plug in the... Printer 1. Also, make sure the voltage required by the printer matches that the power switch is turned off when...
User Manual
Page 20
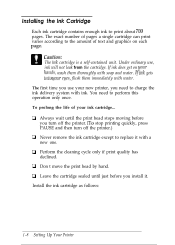
...life of text and graphics on Tour hands, wash them immediately with soap and water. Install the ink cartridge as follows: 1-8 Setting Up Your Printer Ll Always wait until just before you use , ink will not leak from the cartridge. Under ordinary use your ink cartridge... The first time... you turn off the printer. (To stop printing quickly, press PAUSE and then turn off the printer.) Cl Never remove the ink cartridge except to print about 700 pages. lf mk gets iuto l/our et/es...
...life of text and graphics on Tour hands, wash them immediately with soap and water. Install the ink cartridge as follows: 1-8 Setting Up Your Printer Ll Always wait until just before you use , ink will not leak from the cartridge. Under ordinary use your ink cartridge... The first time... you turn off the printer. (To stop printing quickly, press PAUSE and then turn off the printer.) Cl Never remove the ink cartridge except to print about 700 pages. lf mk gets iuto l/our et/es...
User Manual
Page 21
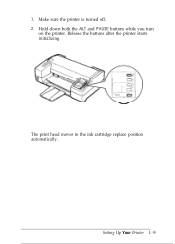
The print head moves to the ink cartridge replace position automatically. Make sure the printer is turned off. 2. Setting Up Your Printer 1 - 9 Hold down both the ALT and PAUSE buttons while you turn on the printer. Release the buttons after the printer starts initializing. 1.
The print head moves to the ink cartridge replace position automatically. Make sure the printer is turned off. 2. Setting Up Your Printer 1 - 9 Hold down both the ALT and PAUSE buttons while you turn on the printer. Release the buttons after the printer starts initializing. 1.
User Manual
Page 22
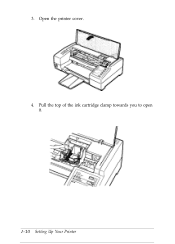
Open the printer cover. 4. Pull the top of the ink cartridge clamp towards you to open it. 1-10 Setting Up Your Printer 3.
Open the printer cover. 4. Pull the top of the ink cartridge clamp towards you to open it. 1-10 Setting Up Your Printer 3.
User Manual
Page 23
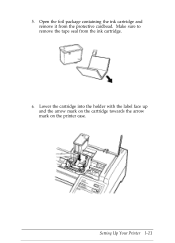
Setting Up Your Printer l-11 Open the foil package containing the ink cartridge and remove it from the ink cartridge. 6. Lower the cartridge into the holder with the label face up and the arrow mark on the cartridge towards the arrow mark on the printer case. Make sure to remove the tape seal from the protective cardboad. 5.
Setting Up Your Printer l-11 Open the foil package containing the ink cartridge and remove it from the ink cartridge. 6. Lower the cartridge into the holder with the label face up and the arrow mark on the cartridge towards the arrow mark on the printer case. Make sure to remove the tape seal from the protective cardboad. 5.
User Manual
Page 24
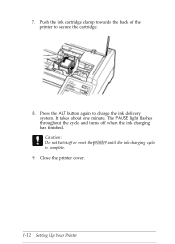
Push the ink cartridge clamp towards the back of the printer to charge the ink delivery system. I-12 Setting Up Your Printer It takes about one minute. Close the printer cover. Press the ALT button again to secure the cartridge. 8. The PAUSE light flashes throughout the cycle and turns off or reset the printer until the ink-charging cycle is complete. 9. Caution: Do not tur~z off when the ink charging has finished. 7.
Push the ink cartridge clamp towards the back of the printer to charge the ink delivery system. I-12 Setting Up Your Printer It takes about one minute. Close the printer cover. Press the ALT button again to secure the cartridge. 8. The PAUSE light flashes throughout the cycle and turns off or reset the printer until the ink-charging cycle is complete. 9. Caution: Do not tur~z off when the ink charging has finished. 7.

