
Product Information Guide
Page 2
... A 30 W (during self-test printing in draft mode at Dielectric strength: AP-3250-2 3/17/92 24-Pin Printers B The minimum left margin is 3 mm (0.12 inches). If you notice increases...life: Dimensions and weight: Friction (paper cassette and manual insertion) Push tractor (optional) Black ribbon cartridge S015032 Life expectancy : 2 million character at 48 dots/character 4000 power-on hours (...margins am 13 mm (0.51 inches). The maximum printable width is 13.5 mm (0.53 inches). ActionPrinter 3250 Single sheets (Manual insertion): Width 148 to 257 mm (5.8 to 10.1 inches) 92 lo 364...
... A 30 W (during self-test printing in draft mode at Dielectric strength: AP-3250-2 3/17/92 24-Pin Printers B The minimum left margin is 3 mm (0.12 inches). If you notice increases...life: Dimensions and weight: Friction (paper cassette and manual insertion) Push tractor (optional) Black ribbon cartridge S015032 Life expectancy : 2 million character at 48 dots/character 4000 power-on hours (...margins am 13 mm (0.51 inches). The maximum printable width is 13.5 mm (0.53 inches). ActionPrinter 3250 Single sheets (Manual insertion): Width 148 to 257 mm (5.8 to 10.1 inches) 92 lo 364...

Product Information Guide
Page 5
...a single sheet automatically and begins to eject a sheet of -form position with the gear under the printer cover. ActionPrinter 3250 To take full advantage at any time to exit the default settings mode; Until you get the best... it in effect until you use so that includes one of the first three printers on the ribbon mask indicate the base line of the three. It is loaded. 2. The ...tips below . You can load single sheets of the following: EX, FX, LX, RX, MX, Epson printer, Standard printer, Draft printer. LQ-100 LQ-570 1 ESC/P2 LQ870 J LQ-510/550 LQ-860 LQ-850 1 LQ-200...
...a single sheet automatically and begins to eject a sheet of -form position with the gear under the printer cover. ActionPrinter 3250 To take full advantage at any time to exit the default settings mode; Until you get the best... it in effect until you use so that includes one of the first three printers on the ribbon mask indicate the base line of the three. It is loaded. 2. The ...tips below . You can load single sheets of the following: EX, FX, LX, RX, MX, Epson printer, Standard printer, Draft printer. LQ-100 LQ-570 1 ESC/P2 LQ870 J LQ-510/550 LQ-860 LQ-850 1 LQ-200...

Product Support Bulletin(s)
Page 3
...in Centronics compatible parallel interface. Decreasing the program's maximum number of lines per page. The AP-3250 printer was designed any unnecessary buttons. Why does the AP-3250 produce two (2) long and two (2) short beeps when first power-on initialization process and is ...ready to 0.18mm. 10. What are the product codes for the AP-3250 optional push tractor and ribbon cartridge. Listed below for additional information.) 7. S015032 C800262 Fabric Ribbon Cartridge Push Tractor 9. Q. The AP-3250 comes standard with ? Because of this print position difference. 6. PSB No:...
...in Centronics compatible parallel interface. Decreasing the program's maximum number of lines per page. The AP-3250 printer was designed any unnecessary buttons. Why does the AP-3250 produce two (2) long and two (2) short beeps when first power-on initialization process and is ...ready to 0.18mm. 10. What are the product codes for the AP-3250 optional push tractor and ribbon cartridge. Listed below for additional information.) 7. S015032 C800262 Fabric Ribbon Cartridge Push Tractor 9. Q. The AP-3250 comes standard with ? Because of this print position difference. 6. PSB No:...

User Manual
Page 6
...have it repaired by a qualified technician to restore the printer to rain or water If it exhibits a distinct change in performance, indicating a need for service Where United States Users Can Get Help Epson America provides local customer support and service through the Epson Consumer Resource Center at (800) 922-8911: Assistance in... has been damaged If it does not operate normally when the operating instructions are covered by the operating instructions since improper adjustment of ribbons, supplies, parts, documentation, and accessories for your Epson product Customer Relations iv
...have it repaired by a qualified technician to restore the printer to rain or water If it exhibits a distinct change in performance, indicating a need for service Where United States Users Can Get Help Epson America provides local customer support and service through the Epson Consumer Resource Center at (800) 922-8911: Assistance in... has been damaged If it does not operate normally when the operating instructions are covered by the operating instructions since improper adjustment of ribbons, supplies, parts, documentation, and accessories for your Epson product Customer Relations iv
User Manual
Page 10
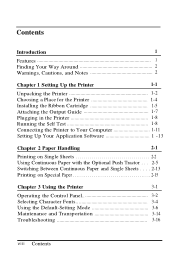
... Cautions, and Notes 2 Chapter 1 Setting Up the Printer 1-1 Unpacking the Printer 1-2 Choosing a Place for the Printer 1-4 Installing the Ribbon Cartridge 1-5 Attaching the Output Guide 1-7 Plugging in the Printer 1-8 Running the Self Test 1-8 Connecting the Printer to Your Computer 1-11 Setting Up Your Application Software ...Paper and Single Sheets . . . . 2-13 Printing on Special Paper 2-15 Chapter 3 Using the Printer 3-1 Operating the Control Panel 3-2 Selecting Character Fonts 3-4 Using the Default-Setting Mode 3-6 Maintenance and Transportation 3-14 Troubleshooting 3-16 v i i ...
... Cautions, and Notes 2 Chapter 1 Setting Up the Printer 1-1 Unpacking the Printer 1-2 Choosing a Place for the Printer 1-4 Installing the Ribbon Cartridge 1-5 Attaching the Output Guide 1-7 Plugging in the Printer 1-8 Running the Self Test 1-8 Connecting the Printer to Your Computer 1-11 Setting Up Your Application Software ...Paper and Single Sheets . . . . 2-13 Printing on Special Paper 2-15 Chapter 3 Using the Printer 3-1 Operating the Control Panel 3-2 Selecting Character Fonts 3-4 Using the Default-Setting Mode 3-6 Maintenance and Transportation 3-14 Troubleshooting 3-16 v i i ...

User Manual
Page 14
Chapter 1 Setting Up the Printer Unpacking the Printer 1-2 Removing the protective materials 1-3 Choosing a Place for the Printer 1-4 Installing the Ribbon Cartridge 1-5 Attaching the Output Guide 1-7 Plugging in the Printer 1-8 Running the Self Test 1-8 Loading paper into the paper cassette 1-9 Running the test 1-10 Connecting the Printer to Your Computer 1-11 Setting Up Your Application Software 1-13 Printing a test file 1-14 Setting Up the Printer l-l
Chapter 1 Setting Up the Printer Unpacking the Printer 1-2 Removing the protective materials 1-3 Choosing a Place for the Printer 1-4 Installing the Ribbon Cartridge 1-5 Attaching the Output Guide 1-7 Plugging in the Printer 1-8 Running the Self Test 1-8 Loading paper into the paper cassette 1-9 Running the test 1-10 Connecting the Printer to Your Computer 1-11 Setting Up Your Application Software 1-13 Printing a test file 1-14 Setting Up the Printer l-l

User Manual
Page 15
... not show the correct voltage for different voltages, and it is an option (part number C80026*). Unpacking the Printer Your printer box should include these items. printer output guide power cord** cable clip push tractor*** * The ribbon cartridge is attached near the parallel interface connector with a piece of tape. ** In some locations, the power...
... not show the correct voltage for different voltages, and it is an option (part number C80026*). Unpacking the Printer Your printer box should include these items. printer output guide power cord** cable clip push tractor*** * The ribbon cartridge is attached near the parallel interface connector with a piece of tape. ** In some locations, the power...
User Manual
Page 18
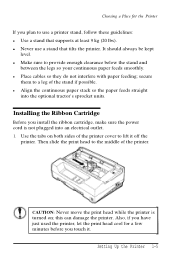
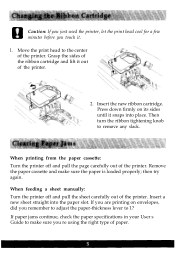
...be kept level. Installing the Ribbon Cartridge Before you install the ribbon cartridge, make sure the power cord is turned on both sides of the printer cover to use a stand that supports at least 9 kg (20 lbs). this can damage the printer. Also, if you have just used the printer, let the print head ...cool for the Printer If you plan ...
...be kept level. Installing the Ribbon Cartridge Before you install the ribbon cartridge, make sure the power cord is turned on both sides of the printer cover to use a stand that supports at least 9 kg (20 lbs). this can damage the printer. Also, if you have just used the printer, let the print head ...cool for the Printer If you plan ...

User Manual
Page 19
Installing the Ribbon Cartridge 2. then press both sides of the arrow to remove any slack in the direction of the cartridge firmly to feed the ribbon into place. Make sure it is not twisted or creased. 1-6 Setting Up the Printer Turn the ribbon-tightening knob in the ribbon. 3. Insert the ribbon cartridge into the slots. 4. Turn the ribbon-tightening knob to fit the plastic posts into the printer as shown;
Installing the Ribbon Cartridge 2. then press both sides of the arrow to remove any slack in the direction of the cartridge firmly to feed the ribbon into place. Make sure it is not twisted or creased. 1-6 Setting Up the Printer Turn the ribbon-tightening knob in the ribbon. 3. Insert the ribbon cartridge into the slots. 4. Turn the ribbon-tightening knob to fit the plastic posts into the printer as shown;
User Manual
Page 20
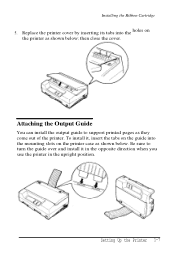
Be sure to support printed pages as shown below . To install it in the opposite direction when you use the printer in the upright position. Installing the Ribbon Cartridge 5. then close the cover. Attaching the Output Guide You can install the output guide to turn the guide over and install it , insert the tabs on the guide into the holes on the printer case as shown below ; Setting Up the Printer 1-7 Replace the printer cover by inserting its tabs into the mounting slots on the printer as they come out of the printer.
Be sure to support printed pages as shown below . To install it in the opposite direction when you use the printer in the upright position. Installing the Ribbon Cartridge 5. then close the cover. Attaching the Output Guide You can install the output guide to turn the guide over and install it , insert the tabs on the guide into the holes on the printer case as shown below ; Setting Up the Printer 1-7 Replace the printer cover by inserting its tabs into the mounting slots on the printer as they come out of the printer.

User Manual
Page 29
... the steps for loading paper in the paper cassette before you turn the gear to 257 mm (10.1 inches) wide with the gear under the printer cover. Load paper in the paper cassette, see "Loading paper into the paper cassette" on page 1-9. If you want to change the top-of... with the cassette. It is marked by + and - When the printer receives data from 148 mm (5.8 inches) to adjust the position. The notches on the ribbon mask indicate the base line of -form position on the printer. 2-2 Paper Handling If the printer runs out of -form position with the manual insertion slot. The...
... the steps for loading paper in the paper cassette before you turn the gear to 257 mm (10.1 inches) wide with the gear under the printer cover. Load paper in the paper cassette, see "Loading paper into the paper cassette" on page 1-9. If you want to change the top-of... with the cassette. It is marked by + and - When the printer receives data from 148 mm (5.8 inches) to adjust the position. The notches on the ribbon mask indicate the base line of -form position on the printer. 2-2 Paper Handling If the printer runs out of -form position with the manual insertion slot. The...

User Manual
Page 46
Chapter 3 Using the Printer Operating the Control Panel 3-2 Lights 3-2 Buttons 3-3 Other control-panel features 3-4 Selecting Character Fonts 3-4 Using the Default-Setting Mode 3-6 Changing the default settings 3-7 Default setting features 3-11 Maintenance and Transportation 3-14 Cleaning the printer 3-14 Replacing the ribbon cartridge 3-14 Transporting the printer 3-15 Troubleshooting 3-16 Power supply 3-17 Printing 3-17 Paper handling 3-21 Using the Printer 3-1
Chapter 3 Using the Printer Operating the Control Panel 3-2 Lights 3-2 Buttons 3-3 Other control-panel features 3-4 Selecting Character Fonts 3-4 Using the Default-Setting Mode 3-6 Changing the default settings 3-7 Default setting features 3-11 Maintenance and Transportation 3-14 Cleaning the printer 3-14 Replacing the ribbon cartridge 3-14 Transporting the printer 3-15 Troubleshooting 3-16 Power supply 3-17 Printing 3-17 Paper handling 3-21 Using the Printer 3-1

User Manual
Page 59
...minutes before you touch it with a soft, clean cloth dampened with lubricants; Contact your printer operating at its best, you should clean it thoroughly several times a year. 1. Epson recommends the SO15032 ribbon cartridge. If the outer case or paper cassette is dirty or dusty, clean it . ...3-14 Using the Printer these chemicals can damage the mechanism. l Do not use alcohol or thinners to clean the printer; l Be careful not ...
...minutes before you touch it with a soft, clean cloth dampened with lubricants; Contact your printer operating at its best, you should clean it thoroughly several times a year. 1. Epson recommends the SO15032 ribbon cartridge. If the outer case or paper cassette is dirty or dusty, clean it . ...3-14 Using the Printer these chemicals can damage the mechanism. l Do not use alcohol or thinners to clean the printer; l Be careful not ...

User Manual
Page 60
... the interface cable from the electrical outlet; Turn off the printer. 2. Using the Printer 3-15 Unplug the power cord from the printer. 3. To replace the ribbon cartridge, follow the steps in "Installing the Ribbon Cartridge" in the printer's original box. Transporting the printer If you need to the printer and paper cassette. Attach the protective materials to transport...
... the interface cable from the electrical outlet; Turn off the printer. 2. Using the Printer 3-15 Unplug the power cord from the printer. 3. To replace the ribbon cartridge, follow the steps in "Installing the Ribbon Cartridge" in the printer's original box. Transporting the printer If you need to the printer and paper cassette. Attach the protective materials to transport...
User Manual
Page 63
... light stays off , An error has occurred. See the section on ribbon installation in this chapter. Replace the ribbon cartridge as described earlier in Chapter 1. 3-18 Using the Printer Turn off the printer and check for a paper jam, a ribbon jam, or other problems. If the printer still does not print correctly, contact your dealer or a qualified...
... light stays off , An error has occurred. See the section on ribbon installation in this chapter. Replace the ribbon cartridge as described earlier in Chapter 1. 3-18 Using the Printer Turn off the printer and check for a paper jam, a ribbon jam, or other problems. If the printer still does not print correctly, contact your dealer or a qualified...

User Manual
Page 64
Replace the ribbon cartridge as described in Chapter 1. Stop printing and contact your printer. Printed characters are not what you sent with your software are not printed.... l The typestyles or characters you expected. The wrong character table is damaged. Dots are printed. Re-install the ribbon cartridge as described earlier in "Changing the default settings" on the control panel does not print. For instructions, see ...for your dealer to replace it. Either there is faint. Using the Printer 3-19 The ribbon may be worn out. Check the font setting in the...
Replace the ribbon cartridge as described in Chapter 1. Stop printing and contact your printer. Printed characters are not what you sent with your software are not printed.... l The typestyles or characters you expected. The wrong character table is damaged. Dots are printed. Re-install the ribbon cartridge as described earlier in "Changing the default settings" on the control panel does not print. For instructions, see ...for your dealer to replace it. Either there is faint. Using the Printer 3-19 The ribbon may be worn out. Check the font setting in the...

User Manual
Page 72
... mm (6.5 x 3.6 inches) 240 x 104 mm (9.4 x 4.1 inches) 0.16 to 0.48 mm (0.0063 to 0.0197 inches) 45 to 75 g/m2 (12 to 15 lb) per sheet in ribbon consumption and paper jamming, use recycled paper under normal temperature and humidity conditions. A-4 Appendix If you notice increases in multi-part forms l Use only two...
... mm (6.5 x 3.6 inches) 240 x 104 mm (9.4 x 4.1 inches) 0.16 to 0.48 mm (0.0063 to 0.0197 inches) 45 to 75 g/m2 (12 to 15 lb) per sheet in ribbon consumption and paper jamming, use recycled paper under normal temperature and humidity conditions. A-4 Appendix If you notice increases in multi-part forms l Use only two...

User Manual
Page 74
...: Print head life: Dimensions and weight: Friction (paper cassette and manual insertion) Push tractor (optional) Black ribbon cartridge SO15032 Life expectancy: 2 million characters at 48 dots/character 4000 power-on hours (10% duty) 100 million strokes/wire Height Width Depth Weight 130 ...
...: Print head life: Dimensions and weight: Friction (paper cassette and manual insertion) Push tractor (optional) Black ribbon cartridge SO15032 Life expectancy: 2 million characters at 48 dots/character 4000 power-on hours (10% duty) 100 million strokes/wire Height Width Depth Weight 130 ...

User Manual
Page 101
...2-16 labels, 2-17-18 manually, 2-3-4 single sheets, 1-9-10 LQ printing, 3-5, A-2, A-3 M Maintenance, 3-14-15 Manual loading, 2-3-4 Moving the printer, 3-15 Multi-part forms, 2-17, A-4 N NO button, 3-2, 3-3, 3-7 0 Optional push tractor, 2-5-14 Output guide, 1-7 P Page length ...11-13, A-8-10 Plugging in the printer, l-8 Printable area, A-5-6 Print direction, 3-6, 3-12, A-2 Printer stand, 1-5 Problems, see Troubleshooting Protective materials replacing, 3-15 removing, 1-3 Push tractor, 2-5-14 installing, 2-5 loading paper, 2-7-9 R READY light, 3-2 Ribbon cartridge installing, 1-5-7 replacing, 3-14...
...2-16 labels, 2-17-18 manually, 2-3-4 single sheets, 1-9-10 LQ printing, 3-5, A-2, A-3 M Maintenance, 3-14-15 Manual loading, 2-3-4 Moving the printer, 3-15 Multi-part forms, 2-17, A-4 N NO button, 3-2, 3-3, 3-7 0 Optional push tractor, 2-5-14 Output guide, 1-7 P Page length ...11-13, A-8-10 Plugging in the printer, l-8 Printable area, A-5-6 Print direction, 3-6, 3-12, A-2 Printer stand, 1-5 Problems, see Troubleshooting Protective materials replacing, 3-15 removing, 1-3 Push tractor, 2-5-14 installing, 2-5 loading paper, 2-7-9 R READY light, 3-2 Ribbon cartridge installing, 1-5-7 replacing, 3-14...
User Setup Information
Page 5
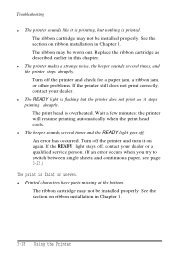
...page carefully out of the printer. R Caution: If you just used the printer, let the print head cool for a few minutes before you touch it snaps into the paper slot. Move the print head to make sure the paper is loaded properly; Grasp the sides of the ribbon cartridge and lift it ...out of the printer. When printing from the paper cassette: Turn the printer off and pull the sheet carefully out of paper. Insert a new sheet straight into place. If ...
...page carefully out of the printer. R Caution: If you just used the printer, let the print head cool for a few minutes before you touch it snaps into the paper slot. Move the print head to make sure the paper is loaded properly; Grasp the sides of the ribbon cartridge and lift it ...out of the printer. When printing from the paper cassette: Turn the printer off and pull the sheet carefully out of paper. Insert a new sheet straight into place. If ...


