
Product Information Guide
Page 2
... inches) total 68 g/m2 (17 lb) l Use continuous type labels only with the optional push tractor. l Load enveIopes with the longer side inserted into the rear slot by manual insertion only. If you notice increases in draft mode at Dielectric strength: AP-3250-2 3/17/92 24-Pin Printers Note: You can use recycled paper under normaI temperature and humidity conditions...
... inches) total 68 g/m2 (17 lb) l Use continuous type labels only with the optional push tractor. l Load enveIopes with the longer side inserted into the rear slot by manual insertion only. If you notice increases in draft mode at Dielectric strength: AP-3250-2 3/17/92 24-Pin Printers Note: You can use recycled paper under normaI temperature and humidity conditions...

Product Information Guide
Page 3
... or equivalent Default settings ActionPrinter 3250 Character Tables These character tables are characters (EX 6) or control codes (ESC 7). The rest of farm position Page length Left and right margins Line spacing Character size Horizontal tab positions Font selection Special printing effects Download character set Default setting Current paper position or setting in the default setting mode. Single sheets: 65 lines for A4-size paper, 61 lines for letter-size paper, 22 inches for hex codes 80 through...
... or equivalent Default settings ActionPrinter 3250 Character Tables These character tables are characters (EX 6) or control codes (ESC 7). The rest of farm position Page length Left and right margins Line spacing Character size Horizontal tab positions Font selection Special printing effects Download character set Default setting Current paper position or setting in the default setting mode. Single sheets: 65 lines for A4-size paper, 61 lines for letter-size paper, 22 inches for hex codes 80 through...

Product Information Guide
Page 4
... on the printer mode, FONT/YES Press the FONT button during normal operation to load a single sheet of text and type enhancements that shows you can press the FORM FEED and FONT buttons at the font menu on the control panel. Use the FORM FEED button to pinpoint communications problems between the printer and computer. Selecting Character Fonts To choose one of paper. . The table below lists the fonts...
... on the printer mode, FONT/YES Press the FONT button during normal operation to load a single sheet of text and type enhancements that shows you can press the FORM FEED and FONT buttons at the font menu on the control panel. Use the FORM FEED button to pinpoint communications problems between the printer and computer. Selecting Character Fonts To choose one of paper. . The table below lists the fonts...

Product Information Guide
Page 5
... . Open the printer cover and turn on the list below help you turn the gear to print. then replace the narrow cover. Demonstration Printing a Self Test You can adjust it loads a single sheet automatically and begins to adjust the position. You usually don't need to 257 mm (10.1 inches) wide with the manual insertion slot. Load paper in the default-setting mode. You can take care of printer you turn off position TOF position Graphic print direction Download Auto line feed...
... . Open the printer cover and turn on the list below help you turn the gear to print. then replace the narrow cover. Demonstration Printing a Self Test You can adjust it loads a single sheet automatically and begins to adjust the position. You usually don't need to 257 mm (10.1 inches) wide with the manual insertion slot. Load paper in the default-setting mode. You can take care of printer you turn off position TOF position Graphic print direction Download Auto line feed...
Product Information Guide
Page 8
... continuous paper. ** = 1) Power supply voltage error 2) Internal air temperature error 3) Print head temperature error 4) Line feed or carriage motor is ready. If a single sheet is ready to 1 reduces the printing speed. 2. Paper Type Lever Position l- 1 Note: Setting the paper-thickness level to print. Make sure your paper. You can print on initialization process and is still loaded, the printer beeps and the READY light goes off. When the printer receives data, it . 2. Before loading an envelope, set to...
... continuous paper. ** = 1) Power supply voltage error 2) Internal air temperature error 3) Print head temperature error 4) Line feed or carriage motor is ready. If a single sheet is ready to 1 reduces the printing speed. 2. Paper Type Lever Position l- 1 Note: Setting the paper-thickness level to print. Make sure your paper. You can print on initialization process and is still loaded, the printer beeps and the READY light goes off. When the printer receives data, it . 2. Before loading an envelope, set to...

Product Support Bulletin(s)
Page 2
... a default page length of third party software. Enhanced Graphics also allows for most easily selected within application software programs that provide ESC/P 2 printer drivers. When printing multi-page documents, what would cause the AP-3250 to these margins are also available. What are divided into a wide range of 66 lines per page when using 11" continuous paper. In addition to print the first page correctly but print...
... a default page length of third party software. Enhanced Graphics also allows for most easily selected within application software programs that provide ESC/P 2 printer drivers. When printing multi-page documents, what would cause the AP-3250 to these margins are also available. What are divided into a wide range of 66 lines per page when using 11" continuous paper. In addition to print the first page correctly but print...
User Manual
Page 5
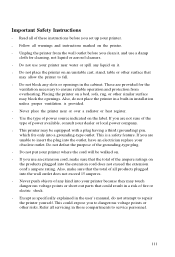
... repair the printer yourself. This is provided. . Do not put your printer where the cord will be equipped with a plug having a third (grounding) pin, which fits only into the outlet, have an electrician replace your dealer or local power company. . Never push objects of these instructions before you use an extension cord, make sure that could expose you set...
... repair the printer yourself. This is provided. . Do not put your printer where the cord will be equipped with a plug having a third (grounding) pin, which fits only into the outlet, have an electrician replace your dealer or local power company. . Never push objects of these instructions before you use an extension cord, make sure that could expose you set...

User Manual
Page 9
... -page setting and you may notice that your printer prints the first page of the settings in print position are using single sheets or continuous paper. If your file correctly but then prints too low on the next page, or that it normally asks you what printer you print your application program. You can simply change some of your program doesn't have a lines-per-page setting, try adjusting the form length setting. Make...
... -page setting and you may notice that your printer prints the first page of the settings in print position are using single sheets or continuous paper. If your file correctly but then prints too low on the next page, or that it normally asks you what printer you print your application program. You can simply change some of your program doesn't have a lines-per-page setting, try adjusting the form length setting. Make...
User Manual
Page 18
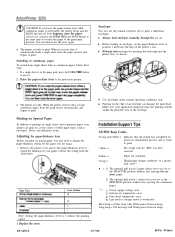
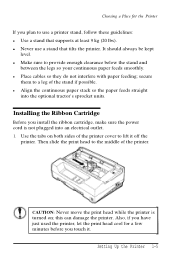
... print head to lift it . this can damage the printer. It should always be kept level. secure them to provide enough clearance below the stand and between the legs so your continuous paper feeds smoothly. l Place cables so they do not interfere with paper feeding; Installing the Ribbon Cartridge Before you install the ribbon cartridge, make sure the power cord is turned on both sides of the printer cover...
... print head to lift it . this can damage the printer. It should always be kept level. secure them to provide enough clearance below the stand and between the legs so your continuous paper feeds smoothly. l Place cables so they do not interfere with paper feeding; Installing the Ribbon Cartridge Before you install the ribbon cartridge, make sure the power cord is turned on both sides of the printer cover...
User Manual
Page 52
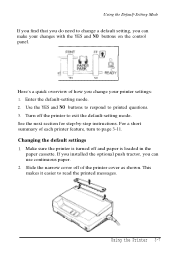
... control panel. --- Enter the default-setting mode. 2. Use the YES and NO buttons to respond to page 3-11. Changing the default settings 1. See the next section for step-by-step instructions. Slide the narrow cover off and paper is turned off of how you change a default setting, you can make your printer settings: 1. If you installed the optional push tractor, you can use continuous paper. 2. Using the Printer 3-7 Make sure the printer is loaded in the paper cassette. Turn off the printer...
... control panel. --- Enter the default-setting mode. 2. Use the YES and NO buttons to respond to page 3-11. Changing the default settings 1. See the next section for step-by-step instructions. Slide the narrow cover off and paper is turned off of how you change a default setting, you can make your printer settings: 1. If you installed the optional push tractor, you can use continuous paper. 2. Using the Printer 3-7 Make sure the printer is loaded in the paper cassette. Turn off the printer...

User Manual
Page 53
... turn on this question. The printer prints another language, press NO. To choose English, press YES. The printer loads a sheet of what you want to press the NO button until the language you 'll see: Current Settinss; Once you are using the push tractor, the printer skips this list. 5. Here's a sample of paper automatically and prints a message: English? Continue to select appears; Message Direction: Normal. Using the Default-Seffing Mode...
... turn on this question. The printer prints another language, press NO. To choose English, press YES. The printer loads a sheet of what you want to press the NO button until the language you 'll see: Current Settinss; Once you are using the push tractor, the printer skips this list. 5. Here's a sample of paper automatically and prints a message: English? Continue to select appears; Message Direction: Normal. Using the Default-Seffing Mode...

User Manual
Page 54
... press YES, the printer changes the print direction and goes on to the next feature. YES/NO If you press YES, the printer saves the new setting and goes on to make your choice with the YES button. If you make a mistake and press NO, don't worry. If you press NO, the printer adds a third line: Message Direction: Normal, Upside-down Change? Using the Default-Setting Mode The steps for...
... press YES, the printer changes the print direction and goes on to the next feature. YES/NO If you press YES, the printer saves the new setting and goes on to make your choice with the YES button. If you make a mistake and press NO, don't worry. If you press NO, the printer adds a third line: Message Direction: Normal, Upside-down Change? Using the Default-Setting Mode The steps for...

User Manual
Page 59
... detergent. Remove any paper as well as the case. Replacing the ribbon cartridge When the printing becomes faint, you think lubrication is turned off. Maintenance and Transportation Cleaning the printer To keep your dealer or a qualified service person if you need to replace the ribbon cartridge. Make sure the printer is needed. l Do not spray the inside the printer. CAUTION: If you have just used the printer, let the print head cool...
... detergent. Remove any paper as well as the case. Replacing the ribbon cartridge When the printing becomes faint, you think lubrication is turned off. Maintenance and Transportation Cleaning the printer To keep your dealer or a qualified service person if you need to replace the ribbon cartridge. Make sure the printer is needed. l Do not spray the inside the printer. CAUTION: If you have just used the printer, let the print head cool...

User Manual
Page 61
..., the software, or the interface cable. See 3-17. See 3-19. l Single sheets do not feed properly from the manual insertion slot. You can check the operation of your dealer or a qualified service person for help. If the self test does not work, contact your printer using the self test. If you expected. l The print position is not what you may encounter while operating your printer have a printer problem, find...
..., the software, or the interface cable. See 3-17. See 3-19. l Single sheets do not feed properly from the manual insertion slot. You can check the operation of your dealer or a qualified service person for help. If the self test does not work, contact your printer using the self test. If you expected. l The print position is not what you may encounter while operating your printer have a printer problem, find...

User Manual
Page 62
... contact your printer. Plug another electrical device into the electrical outlet properly. l The READY light is printed. Check both the printer and computer specifications. Make sure this cable is a shielded twistedpair parallel cable that the software is controlled by an outside switch or automatic timer, use a different outlet. The printer may be out of paper. Using the Printer 3-17 The lights stay off . Printing The printer does not print. Load paper in the...
... contact your printer. Plug another electrical device into the electrical outlet properly. l The READY light is printed. Check both the printer and computer specifications. Make sure this cable is a shielded twistedpair parallel cable that the software is controlled by an outside switch or automatic timer, use a different outlet. The printer may be out of paper. Using the Printer 3-17 The lights stay off . Printing The printer does not print. Load paper in the...
User Manual
Page 63
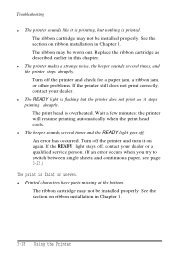
... printer makes a strange noise, the beeper sounds several times and the READY light goes off the printer and check for a paper jam, a ribbon jam, or other problems. If the printer still does not print correctly, contact your dealer or a qualified service person. (If an error occurs when you try to switch between single sheets and continuous paper, see page 3-23.) The print is flashing but nothing is overheated. Turn off , An error...
... printer makes a strange noise, the beeper sounds several times and the READY light goes off the printer and check for a paper jam, a ribbon jam, or other problems. If the printer still does not print correctly, contact your dealer or a qualified service person. (If an error occurs when you try to switch between single sheets and continuous paper, see page 3-23.) The print is flashing but nothing is overheated. Turn off , An error...

User Manual
Page 65
Troubleshooting The print position is incorrect. Line spacing is not what you expected. If you are using continuous paper, change the page length in the default-setting mode. Also, it is printed on the same line. Set the auto line feed to on the page, or the bottom part of one page is printed with extra blank lines between the lines of the next page. l The text is printed at the top of text. Adjust the line-space...
Troubleshooting The print position is incorrect. Line spacing is not what you expected. If you are using continuous paper, change the page length in the default-setting mode. Also, it is printed on the same line. Set the auto line feed to on the page, or the bottom part of one page is printed with extra blank lines between the lines of the next page. l The text is printed at the top of text. Adjust the line-space...
User Manual
Page 66
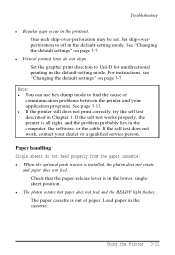
... problem probably lies in Chapter 1. Troubleshooting l Regular gaps occur in the cassette. The paper cassette is installed, the platen does not rotate and paper does not feed. l If the printer still does not print correctly, try the self test described in the computer, the software, or the cable. l Vertical printed lines do not feed properly from the paper cassette. Using the Printer 3-21 For instructions, see "Changing the default settings" on page...
... problem probably lies in Chapter 1. Troubleshooting l Regular gaps occur in the cassette. The paper cassette is installed, the platen does not rotate and paper does not feed. l If the printer still does not print correctly, try the self test described in the computer, the software, or the cable. l Vertical printed lines do not feed properly from the paper cassette. Using the Printer 3-21 For instructions, see "Changing the default settings" on page...

User Manual
Page 101
..., 1-11-13, A-8-10 Plugging in the printer, l-8 Printable area, A-5-6 Print direction, 3-6, 3-12, A-2 Printer stand, 1-5 Problems, see Troubleshooting Protective materials replacing, 3-15 removing, 1-3 Push tractor, 2-5-14 installing, 2-5 loading paper, 2-7-9 R READY light, 3-2 Ribbon cartridge installing, 1-5-7 replacing, 3-14-15 specifications, A-6 S Safety approvals, A-8 Safety information for , vii, 2-2-3 see also Loading paper Skip-over-perforation, 3-6, 3-12 IN-2 Index iv Scalable fonts, 3-5, A-16 Self test, 1-8-11, 3-4 Single sheets, tips for UK users, vi Safety instructions, iii -
..., 1-11-13, A-8-10 Plugging in the printer, l-8 Printable area, A-5-6 Print direction, 3-6, 3-12, A-2 Printer stand, 1-5 Problems, see Troubleshooting Protective materials replacing, 3-15 removing, 1-3 Push tractor, 2-5-14 installing, 2-5 loading paper, 2-7-9 R READY light, 3-2 Ribbon cartridge installing, 1-5-7 replacing, 3-14-15 specifications, A-6 S Safety approvals, A-8 Safety information for , vii, 2-2-3 see also Loading paper Skip-over-perforation, 3-6, 3-12 IN-2 Index iv Scalable fonts, 3-5, A-16 Self test, 1-8-11, 3-4 Single sheets, tips for UK users, vi Safety instructions, iii -
User Setup Information
Page 5
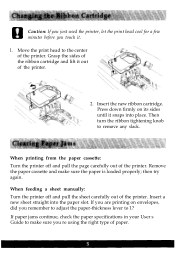
... the print head to 1? Press down firmly on envelopes, did you remember to adjust the paper-thickness lever to the center of paper. If paper jams continue, check the paper specifications in your User's Guide to remove any slack. Grasp the sides of the ribbon cartridge and lift it . 1. Insert the new ribbon cartridge. then try again. When feeding a sheet manually: Turn the printer off and pull the page carefully out of the printer. Then turn...
... the print head to 1? Press down firmly on envelopes, did you remember to adjust the paper-thickness lever to the center of paper. If paper jams continue, check the paper specifications in your User's Guide to remove any slack. Grasp the sides of the ribbon cartridge and lift it . 1. Insert the new ribbon cartridge. then try again. When feeding a sheet manually: Turn the printer off and pull the page carefully out of the printer. Then turn...


