
Getting Started - ColorBurst RIP
Page 9
... ColorBurst, then click Next. 22. Then click Next. 23. Follow the on recycled paper. © 2006 Epson America, Inc. 11/06 8 Epson and Epson Stylus are for identification purposes only and may be trademarks of Seiko Epson Corporation. ColorBurst is a registered trademark and SpectralVision is a trademark of the installation, click...their respective owners. Printed on -screen instructions to the Install from Disk window. 20. Browse to close the Add Standard TCP/IP Printer Port Wizard. 17. Click Finish to the folder that you unzipped. At the next screen, click Have Disk, then click Browse...
... ColorBurst, then click Next. 22. Then click Next. 23. Follow the on recycled paper. © 2006 Epson America, Inc. 11/06 8 Epson and Epson Stylus are for identification purposes only and may be trademarks of Seiko Epson Corporation. ColorBurst is a registered trademark and SpectralVision is a trademark of the installation, click...their respective owners. Printed on -screen instructions to the Install from Disk window. 20. Browse to close the Add Standard TCP/IP Printer Port Wizard. 17. Click Finish to the folder that you unzipped. At the next screen, click Have Disk, then click Browse...

Printer Guide
Page 2
... service. Printed on recycled paper. © 2006 Epson America, Inc. 2/06 2 CPD-20271R1 PhotoEnhance, UltraSmooth, and Epson UltraChrome K3 are trademarks, and Epson Preferred and Epson Store are for any means, electronic, mechanical, photocopying, recording, or otherwise, without the prior written permission of any and all rights in any consumable products other printers. Legal Notices Neither...
... service. Printed on recycled paper. © 2006 Epson America, Inc. 2/06 2 CPD-20271R1 PhotoEnhance, UltraSmooth, and Epson UltraChrome K3 are trademarks, and Epson Preferred and Epson Store are for any means, electronic, mechanical, photocopying, recording, or otherwise, without the prior written permission of any and all rights in any consumable products other printers. Legal Notices Neither...
Printer Guide
Page 5
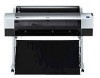
... Important Safety Instructions 13 Ink Cartridge Safety Instructions 15 1 Setting Up the Printer Unpacking and Assembling the Epson Stylus Pro 7800 17 Unpacking and Assembling the Stand 18 Unpacking the Printer 20 Mounting the Printer on the Stand 22 Attaching the Paper Basket 25 Unpacking and Assembling the Epson Stylus Pro 9800 27 Unpacking and Assembling the Stand 28 Unpacking the...
... Important Safety Instructions 13 Ink Cartridge Safety Instructions 15 1 Setting Up the Printer Unpacking and Assembling the Epson Stylus Pro 7800 17 Unpacking and Assembling the Stand 18 Unpacking the Printer 20 Mounting the Printer on the Stand 22 Attaching the Paper Basket 25 Unpacking and Assembling the Epson Stylus Pro 9800 27 Unpacking and Assembling the Stand 28 Unpacking the...
Printer Guide
Page 6
... From the Epson Stylus Pro 7800 71 Catching Printouts in Front of the Epson Stylus Pro 9800 72 Catching Printouts Under the Epson Stylus Pro 9800 73 Optimizing the Settings for Your Paper 75 Creating Paper Configurations 75 Printing Your Paper Configurations 77 Selecting Paper Configurations 77 3 Printing with Epson Drivers for Macintosh Choosing Page Setup Options 80 Choosing Basic Print Options 83 Choosing Color Management Options...
... From the Epson Stylus Pro 7800 71 Catching Printouts in Front of the Epson Stylus Pro 9800 72 Catching Printouts Under the Epson Stylus Pro 9800 73 Optimizing the Settings for Your Paper 75 Creating Paper Configurations 75 Printing Your Paper Configurations 77 Selecting Paper Configurations 77 3 Printing with Epson Drivers for Macintosh Choosing Page Setup Options 80 Choosing Basic Print Options 83 Choosing Color Management Options...

Printer Guide
Page 7
Contents | 7 4 Printing with Epson Drivers for Windows Choosing Basic Print Options 100 Choosing Paper and Layout Options 103 Choosing Roll Paper Options 103 Borderless Printing 106 Choosing Cut Sheet Paper Options 107 Choosing Layout Options 108 Choosing Advanced Print Options 109 Choosing Advanced Black and White ...Draining the Old Ink 132 Installing the New Black Ink Cartridge 134 Updating the Printer Driver Information 135 Changing the Date and Time 136 Using Maintenance Mode 136 Replacing the Paper Cutter Blade 138 Removing the Old Blade 138 Installing the New Cutter Blade ...
Contents | 7 4 Printing with Epson Drivers for Windows Choosing Basic Print Options 100 Choosing Paper and Layout Options 103 Choosing Roll Paper Options 103 Borderless Printing 106 Choosing Cut Sheet Paper Options 107 Choosing Layout Options 108 Choosing Advanced Print Options 109 Choosing Advanced Black and White ...Draining the Old Ink 132 Installing the New Black Ink Cartridge 134 Updating the Printer Driver Information 135 Changing the Date and Time 136 Using Maintenance Mode 136 Replacing the Paper Cutter Blade 138 Removing the Old Blade 138 Installing the New Cutter Blade ...

Printer Guide
Page 8
... Problems 149 Checking Error Messages and Lights 150 Improving Print Quality 154 Solving Operational Problems 158 Solving Miscellaneous Printing Problems 159 Solving Paper Problems 160 Fixing Paper Eject Problems 161 Clearing Paper Jams 162 Uninstalling and Reinstalling the Printer Driver 164 Macintosh 164 Windows 164 A Specifications Environmental 165 Electrical 165 Dimensions and Weight 166...
... Problems 149 Checking Error Messages and Lights 150 Improving Print Quality 154 Solving Operational Problems 158 Solving Miscellaneous Printing Problems 159 Solving Paper Problems 160 Fixing Paper Eject Problems 161 Clearing Paper Jams 162 Uninstalling and Reinstalling the Printer Driver 164 Macintosh 164 Windows 164 A Specifications Environmental 165 Electrical 165 Dimensions and Weight 166...
Printer Guide
Page 9
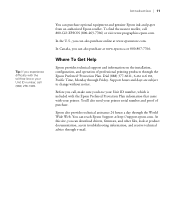
...setting up and using your printer, loading paper, using a web browser, such as you have a problem. You can read the guide using the Epson® printer drivers, and replacing ink cartridges. Tips contain additional hints on the CD-ROM provides additional information about your printer. 9 Warnings, Cautions,... Reference Guide on how to avoid bodily injury. It also tells you how to maintain your printer to keep it to your printer for daily use and printer maintenance-loading paper, replacing ink cartridges and other components, cleaning and aligning the print head, and using the...
...setting up and using your printer, loading paper, using a web browser, such as you have a problem. You can read the guide using the Epson® printer drivers, and replacing ink cartridges. Tips contain additional hints on the CD-ROM provides additional information about your printer. 9 Warnings, Cautions,... Reference Guide on how to avoid bodily injury. It also tells you how to maintain your printer to keep it to your printer for daily use and printer maintenance-loading paper, replacing ink cartridges and other components, cleaning and aligning the print head, and using the...
Printer Guide
Page 10
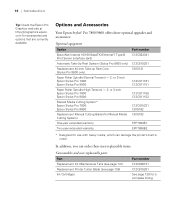
... (Stylus Pro 9800 only) Replacement 44-inch Take-up Reel Core (Stylus Pro 9800 only) Paper Roller Spindle (Normal Tension) - 2- 10 | Introduction Tip: Check the Epson Pro Graphics web site at http://prographics.epson. Options and Accessories Your Epson Stylus® Pro 7800/9800 offers these user-replaceable items: Consumables and user-replaceable parts Part Replacement Ink Maintenance Tank (see page 141) Replacement Printer Cutter...
... (Stylus Pro 9800 only) Replacement 44-inch Take-up Reel Core (Stylus Pro 9800 only) Paper Roller Spindle (Normal Tension) - 2- 10 | Introduction Tip: Check the Epson Pro Graphics web site at http://prographics.epson. Options and Accessories Your Epson Stylus® Pro 7800/9800 offers these user-replaceable items: Consumables and user-replaceable parts Part Replacement Ink Maintenance Tank (see page 141) Replacement Printer Cutter...
Printer Guide
Page 11
...Epson also provides technical assistance 24 hours a day through the Epson PreferredSM Protection Plan. In Canada, you can also purchase online at www.epson...Epson provides technical support and information on the installation, configuration, and operation of purchase. Before you call (562) 276-1305. You'll also need your printer.... You can download drivers, firmware, and other files, look at http://support.epson.com. At this site, you can reach Epson ...which is included with the Epson Preferred Protection Plan information that came with your printer serial number and proof of...
...Epson also provides technical assistance 24 hours a day through the Epson PreferredSM Protection Plan. In Canada, you can also purchase online at www.epson...Epson provides technical support and information on the installation, configuration, and operation of purchase. Before you call (562) 276-1305. You'll also need your printer.... You can download drivers, firmware, and other files, look at http://support.epson.com. At this site, you can reach Epson ...which is included with the Epson Preferred Protection Plan information that came with your printer serial number and proof of...
Printer Guide
Page 13
... make sure you use the equipment safely and effectively. • The printer weighs about 131 lb (Epson Stylus Pro 7800) or 198 lb (Epson Stylus Pro 9800) without ink or paper. Use of another cord may need more space behind the printer if you have sufficient assistance when lifting it. (See page 23 for... the 7800 or 32 for the 9800.) • When setting up to 10 ...
... make sure you use the equipment safely and effectively. • The printer weighs about 131 lb (Epson Stylus Pro 7800) or 198 lb (Epson Stylus Pro 9800) without ink or paper. Use of another cord may need more space behind the printer if you have sufficient assistance when lifting it. (See page 23 for... the 7800 or 32 for the 9800.) • When setting up to 10 ...

Printer Guide
Page 18
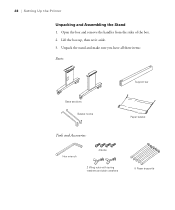
18 | Setting Up the Printer Unpacking and Assembling the Stand 1. Unpack the stand and make sure you have all these items. Parts: 2 Bases 2 Legs Bottom horizontal strut Top horizontal strut Tools and Accessories: 4 Basket hooks 2 Hex wrenches 4 Base bolts 6 Hex screws with washers 2 Collars Paper basket 2 Strut bolts 2 Wing screws 1-18
18 | Setting Up the Printer Unpacking and Assembling the Stand 1. Unpack the stand and make sure you have all these items. Parts: 2 Bases 2 Legs Bottom horizontal strut Top horizontal strut Tools and Accessories: 4 Basket hooks 2 Hex wrenches 4 Base bolts 6 Hex screws with washers 2 Collars Paper basket 2 Strut bolts 2 Wing screws 1-18

Printer Guide
Page 20
Unpacking the Printer 1. Make sure each part of the stand is tightened securely. Open the box and remove the roll paper, spindle, polystyrene foam, and cardboard cushions. 1-20 20 | Setting Up the Printer 5. Attach the top horizontal strut as shown. Use the small hex wrench to fasten the hex screws. 6.
Unpacking the Printer 1. Make sure each part of the stand is tightened securely. Open the box and remove the roll paper, spindle, polystyrene foam, and cardboard cushions. 1-20 20 | Setting Up the Printer 5. Attach the top horizontal strut as shown. Use the small hex wrench to fasten the hex screws. 6.
Printer Guide
Page 21
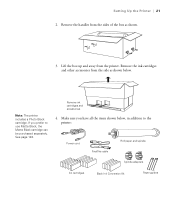
Remove ink cartridges and accessories # " 4. Make sure you prefer to the printer: Power cord FireWire cable Roll paper and spindle Spindle adapters Ink cartridges Black Ink Conversion Kit Paper guides 1-21 Note: The printer includes a Photo Black cartridge. Lift the box up and away from the sides of the box as shown below , in addition... purchased separately. Remove the ink cartridges and other accessories from the side as shown. 3. If you have all the items shown below . Setting Up the Printer | 21 2. Remove the handles from the...
Remove ink cartridges and accessories # " 4. Make sure you prefer to the printer: Power cord FireWire cable Roll paper and spindle Spindle adapters Ink cartridges Black Ink Conversion Kit Paper guides 1-21 Note: The printer includes a Photo Black cartridge. Lift the box up and away from the sides of the box as shown below , in addition... purchased separately. Remove the ink cartridges and other accessories from the side as shown. 3. If you have all the items shown below . Setting Up the Printer | 21 2. Remove the handles from the...
Printer Guide
Page 24
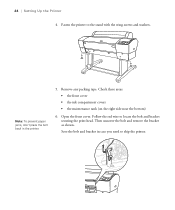
Fasten the printer to locate the bolt and bracket securing the print head. Check these areas: • the front cover • the ink compartment covers • the maintenance tank (on the right side near the bottom) 6. Open the front cover. Save the bolt and bracket in the printer. 5. Remove any packing tape. Follow the red wire to the stand with the wing screws and washers. Then unscrew the bolt and remove the bracket as shown. 24 | Setting Up the Printer 4. Note: To prevent paper jams, don't place the bolt back in case you need to ship the printer. 1-24
Fasten the printer to locate the bolt and bracket securing the print head. Check these areas: • the front cover • the ink compartment covers • the maintenance tank (on the right side near the bottom) 6. Open the front cover. Save the bolt and bracket in the printer. 5. Remove any packing tape. Follow the red wire to the stand with the wing screws and washers. Then unscrew the bolt and remove the bracket as shown. 24 | Setting Up the Printer 4. Note: To prevent paper jams, don't place the bolt back in case you need to ship the printer. 1-24
Printer Guide
Page 25
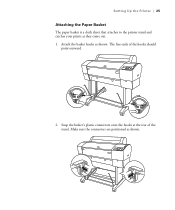
Snap the basket's plastic connectors onto the hooks at the rear of the hooks should point outward. 2. Attach the basket hooks as shown. 1-25 Make sure the connectors are positioned as shown. The free ends of the stand. Setting Up the Printer | 25 Attaching the Paper Basket The paper basket is a cloth sheet that attaches to the printer stand and catches your prints as they come out. 1.
Snap the basket's plastic connectors onto the hooks at the rear of the hooks should point outward. 2. Attach the basket hooks as shown. 1-25 Make sure the connectors are positioned as shown. The free ends of the stand. Setting Up the Printer | 25 Attaching the Paper Basket The paper basket is a cloth sheet that attaches to the printer stand and catches your prints as they come out. 1.
Printer Guide
Page 26
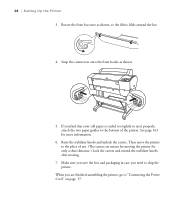
... and unlock the casters. 26 | Setting Up the Printer 3. Rotate the front bar once as shown. 5. Then move the printer to the place of the printer. When you find that your roll paper is curled too tightly to eject properly, attach the two paper guides to the bottom of use. (The casters are... finished assembling the printer, go to ship the printer. See page 161 for only a ...
... and unlock the casters. 26 | Setting Up the Printer 3. Rotate the front bar once as shown. 5. Then move the printer to the place of the printer. When you find that your roll paper is curled too tightly to eject properly, attach the two paper guides to the bottom of use. (The casters are... finished assembling the printer, go to ship the printer. See page 161 for only a ...
Printer Guide
Page 28
Lift the box up, then set it aside. 3. Unpack the stand and make sure you have all these items: Parts: Support bar Base sections Basket hooks Paper basket Tools and Accessories: Hex wrench 4 Bolts 2 Wing nuts with spring washers and plain washers 5 Paper supports 1-28 28 | Setting Up the Printer Unpacking and Assembling the Stand 1. Open the box and remove the handles from the sides of the box. 2.
Lift the box up, then set it aside. 3. Unpack the stand and make sure you have all these items: Parts: Support bar Base sections Basket hooks Paper basket Tools and Accessories: Hex wrench 4 Bolts 2 Wing nuts with spring washers and plain washers 5 Paper supports 1-28 28 | Setting Up the Printer Unpacking and Assembling the Stand 1. Open the box and remove the handles from the sides of the box. 2.

Printer Guide
Page 150
... nozzles. nozzles are still clogged, contact Epson. Message Explanation Response BORDERLESS ERROR LOAD CORRECT SIZE PAPER The borderless setting is selected for head cleaning. Remove the print. 6-150 Printer could not feed the printed page. Release the paper lever to indicate the status of the printer: Paper Ink light light Paper feed up button Power button and...
... nozzles. nozzles are still clogged, contact Epson. Message Explanation Response BORDERLESS ERROR LOAD CORRECT SIZE PAPER The borderless setting is selected for head cleaning. Remove the print. 6-150 Printer could not feed the printed page. Release the paper lever to indicate the status of the printer: Paper Ink light light Paper feed up button Power button and...

Printer Guide
Page 153
...PRINTER PAPER ERROR Printer cannot detect paper. Release the paper lever and reload paper. Release the paper lever and remove the jammed paper. LOAD CUT SHEET PAPER Load cut correctly. Load roll paper as described on page 59. Then return the lever to run the power cleaning cycle. Select YES and follow the instructions to the locked position. printer. For the 9800..., note which tank is wrong. The cutter may be blunt or incorrectly installed. Reinstall or replace the cutter blade if necessary; LOAD PAPER PAPER SETTING ERROR The paper path is...
...PRINTER PAPER ERROR Printer cannot detect paper. Release the paper lever and reload paper. Release the paper lever and remove the jammed paper. LOAD CUT SHEET PAPER Load cut correctly. Load roll paper as described on page 59. Then return the lever to run the power cleaning cycle. Select YES and follow the instructions to the locked position. printer. For the 9800..., note which tank is wrong. The cutter may be blunt or incorrectly installed. Reinstall or replace the cutter blade if necessary; LOAD PAPER PAPER SETTING ERROR The paper path is...
Product Information Guide
Page 3
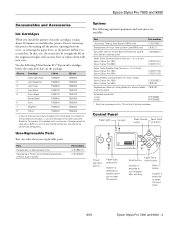
... your printer. Changing black ink uses about 10 minutes to re-initialize. or 3-inch Epson Stylus Pro 7800 Epson Stylus Pro 9800 C12C811155 C12C811152 Manual Media Cutting System (for thick media) Epson Stylus Pro 7800 Epson Stylus Pro 9800 C12C815231 C815182 Replacement Manual Cutting Blade (for 3 seconds to replace them with new ones. Control Panel Paper light Ink light Paper Source Paper Feed button up Reel Core (9800 only...
... your printer. Changing black ink uses about 10 minutes to re-initialize. or 3-inch Epson Stylus Pro 7800 Epson Stylus Pro 9800 C12C811155 C12C811152 Manual Media Cutting System (for thick media) Epson Stylus Pro 7800 Epson Stylus Pro 9800 C12C815231 C815182 Replacement Manual Cutting Blade (for 3 seconds to replace them with new ones. Control Panel Paper light Ink light Paper Source Paper Feed button up Reel Core (9800 only...


