Printer Guide
Page 6
... Under the Epson Stylus Pro 9800 73 Optimizing the Settings for Your Paper 75 Creating Paper Configurations 75 Printing Your Paper Configurations 77 Selecting Paper Configurations 77 3 Printing with Epson Drivers for Macintosh Choosing Page Setup Options 80 Choosing Basic Print Options 83 Choosing Color Management Options 87 Choosing Paper Configuration Options 88 Choosing Roll Paper Options 89 Borderless Printing 90 Creating a Custom Preset and Printing 93 Choosing Advanced Black and White Photo Settings 94 Managing Print Jobs 96 Checking Ink Levels and the Maintenance Tank 97...
... Under the Epson Stylus Pro 9800 73 Optimizing the Settings for Your Paper 75 Creating Paper Configurations 75 Printing Your Paper Configurations 77 Selecting Paper Configurations 77 3 Printing with Epson Drivers for Macintosh Choosing Page Setup Options 80 Choosing Basic Print Options 83 Choosing Color Management Options 87 Choosing Paper Configuration Options 88 Choosing Roll Paper Options 89 Borderless Printing 90 Creating a Custom Preset and Printing 93 Choosing Advanced Black and White Photo Settings 94 Managing Print Jobs 96 Checking Ink Levels and the Maintenance Tank 97...
Printer Guide
Page 100
... can click the Help button on any screen. Follow these steps to set basic printing properties. Then click Properties on page 110. You see the Print window. 2. Make sure your printer is selected, then click the Properties button. You can 't change them from the CD-ROM. Start an application, open the file you 're using Epson media. You see a window like the following: Note: If you need more information about...
... can click the Help button on any screen. Follow these steps to set basic printing properties. Then click Properties on page 110. You see the Print window. 2. Make sure your printer is selected, then click the Properties button. You can 't change them from the CD-ROM. Start an application, open the file you 're using Epson media. You see a window like the following: Note: If you need more information about...
Printer Guide
Page 119
...and Transporting the Printer The Epson Stylus Pro 7800/9800 requires little maintenance to fine-tune a variety of printer settings. This chapter describes the following routine procedures: • Checking printer status and part life • Checking and cleaning the print head • Aligning the print head • Replacing ink cartridges • Changing the black ink cartridge • Changing the date and time • Performing additional maintenance tasks • Replacing the paper cutter blade • Replacing the maintenance tank • Cleaning the printer • Transporting...
...and Transporting the Printer The Epson Stylus Pro 7800/9800 requires little maintenance to fine-tune a variety of printer settings. This chapter describes the following routine procedures: • Checking printer status and part life • Checking and cleaning the print head • Aligning the print head • Replacing ink cartridges • Changing the black ink cartridge • Changing the date and time • Performing additional maintenance tasks • Replacing the paper cutter blade • Replacing the maintenance tank • Cleaning the printer • Transporting...
Printer Guide
Page 126
... Press the Menu button. 3. 126 | Maintaining and Transporting the Printer Note: You must use Epson Doubleweight Matte Paper or Premium Luster Photo Paper. If you can do the most Epson papers. 5. Tip: To properly align the print head, you haven't already done so, it 's all automatic. When cleaning is the correct thickness setting for assistance. If banding appears on . Make sure the printer is the most important thing you need to save...
... Press the Menu button. 3. 126 | Maintaining and Transporting the Printer Note: You must use Epson Doubleweight Matte Paper or Premium Luster Photo Paper. If you can do the most Epson papers. 5. Tip: To properly align the print head, you haven't already done so, it 's all automatic. When cleaning is the correct thickness setting for assistance. If banding appears on . Make sure the printer is the most important thing you need to save...

Printer Guide
Page 150
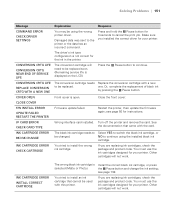
...instructions for correcting the problem. Printer could not feed the printed page. Head cleaning starts automatically. Message Explanation Response BORDERLESS ERROR LOAD CORRECT SIZE PAPER The borderless setting is selected for head cleaning. see page 33. CLEANING ERROR REMOVE THICK PAPER Paper is locked. CLEANING ERROR PRESS PAUSE BUTTON Head cleaning did not clear the Run the head cleaning utility again. Release the paper lever to indicate the status of the printer: Paper Ink light light Paper feed up button Power button and light Enter or cut button Menu...
...instructions for correcting the problem. Printer could not feed the printed page. Head cleaning starts automatically. Message Explanation Response BORDERLESS ERROR LOAD CORRECT SIZE PAPER The borderless setting is selected for head cleaning. see page 33. CLEANING ERROR REMOVE THICK PAPER Paper is locked. CLEANING ERROR PRESS PAUSE BUTTON Head cleaning did not clear the Run the head cleaning utility again. Release the paper lever to indicate the status of the printer: Paper Ink light light Paper feed up button Power button and light Enter or cut button Menu...
Printer Guide
Page 151
... to switch the black ink cartridge, or be changed. CONVERSION CRTG LIFE CONVERSION CRTG NEAR END OF SERVICE LIFE The conversion cartridge will not work . Or, complete the replacement of black ink by pressing the Pause button. Turn off the printer and remove the card. You tried to install the wrong ink cartridge. You must use the ink cartridges designed for the ink in the printer. Close the front cover. I/F CARD ERROR CHECK CARD TYPE Wrong interface card installed. Solving Problems | 151 Message Explanation Response COMMAND ERROR CHECK DRIVER SETTINGS...
... to switch the black ink cartridge, or be changed. CONVERSION CRTG LIFE CONVERSION CRTG NEAR END OF SERVICE LIFE The conversion cartridge will not work . Or, complete the replacement of black ink by pressing the Pause button. Turn off the printer and remove the card. You tried to install the wrong ink cartridge. You must use the ink cartridges designed for the ink in the printer. Close the front cover. I/F CARD ERROR CHECK CARD TYPE Wrong interface card installed. Solving Problems | 151 Message Explanation Response COMMAND ERROR CHECK DRIVER SETTINGS...
Printer Guide
Page 152
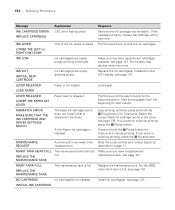
...code number and contact Epson as replaced soon. Press and hold the Pause button for best results. MAINT TANK NEAR FULL REPLACE THE MAINTENANCE TANK The maintenance tank is raised. Print quality may need to cancel printing. LOAD PAPER LEVER RELEASED LOWER THE PAPER SET LEVER Paper lever is low. see page 127. MAINTENANCE REQUEST A printer part may decline when ink is released Pull the lever all the way forward, to lock the ink cartridges. INK OUT INSTALL NEW CARTRIDGE Ink cartridge(s) are nearly empty (printing continues). LEVER RELEASED Paper...
...code number and contact Epson as replaced soon. Press and hold the Pause button for best results. MAINT TANK NEAR FULL REPLACE THE MAINTENANCE TANK The maintenance tank is raised. Print quality may need to cancel printing. LOAD PAPER LEVER RELEASED LOWER THE PAPER SET LEVER Paper lever is low. see page 127. MAINTENANCE REQUEST A printer part may decline when ink is released Pull the lever all the way forward, to lock the ink cartridges. INK OUT INSTALL NEW CARTRIDGE Ink cartridge(s) are nearly empty (printing continues). LEVER RELEASED Paper...

Printer Guide
Page 154
... l Paper Source button to print patterns such as described on page 11. Unplug the printer and wait 30 seconds. Exit the Test Print menu, and check for instructions. • Align the print head. Solution ◗ Check the ink indicators and light to see page 33. If the message remains, contact Epson as a nozzle check. Note the error number, then turn it in the printer software is correct for the media you're printing on. ◗ If you send a print job, make sure the printable side...
... l Paper Source button to print patterns such as described on page 11. Unplug the printer and wait 30 seconds. Exit the Test Print menu, and check for instructions. • Align the print head. Solution ◗ Check the ink indicators and light to see page 33. If the message remains, contact Epson as a nozzle check. Note the error number, then turn it in the printer software is correct for the media you're printing on. ◗ If you send a print job, make sure the printable side...
Printer Guide
Page 156
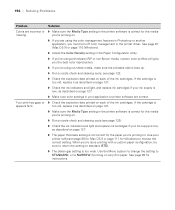
... on page 127. ◗ Make sure the Media Type setting in the printer software is correct for the paper you are using cut sheet media, make sure the printable side is appears faint. too old, replace it as described on page 127. ◗ Check the ink indicators and light, and replace ink cartridges if your ink supply is low, as described on page 127. ◗ The paper thickness setting is low, as described on . See page 69 for the media missing. 156 | Solving Problems Problem Solution Colors...
... on page 127. ◗ Make sure the Media Type setting in the printer software is correct for the paper you are using cut sheet media, make sure the printable side is appears faint. too old, replace it as described on page 127. ◗ Check the ink indicators and light, and replace ink cartridges if your ink supply is low, as described on page 127. ◗ The paper thickness setting is low, as described on . See page 69 for the media missing. 156 | Solving Problems Problem Solution Colors...

Printer Guide
Page 158
... voltage supplied by the electrical outlet matches the voltage on the control panel to clean the print head. Click the Ports tab and make sure your printer port is selected. Right-click the icon for assistance; Check the display message and lights on page 123 to see page 12 or 13. ◗ The printer port setting doesn't match the printer connection port (Windows). Nothing prints. ◗ Turn off the power and unplug the power cord immediately. Windows XP: Click Start > Control Panel > Printers...
... voltage supplied by the electrical outlet matches the voltage on the control panel to clean the print head. Click the Ports tab and make sure your printer port is selected. Right-click the icon for assistance; Check the display message and lights on page 123 to see page 12 or 13. ◗ The printer port setting doesn't match the printer connection port (Windows). Nothing prints. ◗ Turn off the power and unplug the power cord immediately. Windows XP: Click Start > Control Panel > Printers...

Printer Guide
Page 160
... paper sensors may not operate correctly. • Make sure the Media Type and Paper Source settings in the printer software are inside the paper path. • Make sure the printer isn't located in your printer software for faster printing. ◗ Clear space on your hard drive or run a defragmentation utility. ◗ Don't run too many applications at the same time. ◗ Turn off virtual memory. ◗ Add RAM to your system. ◗ Consider upgrading your printer driver...
... paper sensors may not operate correctly. • Make sure the Media Type and Paper Source settings in the printer software are inside the paper path. • Make sure the printer isn't located in your printer software for faster printing. ◗ Clear space on your hard drive or run a defragmentation utility. ◗ Don't run too many applications at the same time. ◗ Turn off virtual memory. ◗ Add RAM to your system. ◗ Consider upgrading your printer driver...
Printer Guide
Page 169
... 114 Color problems, 159 ColorSync settings, 87 Component life, checking, 120 to 122 Connecting printer, 40 Control panel aligning print head, 126 to 127 buttons, 150 changing language, 136 changing measurement units, 136 cleaning print head, 124 to 126 component life, checking, 120 to 122 illustration, 150 ink levels, checking, 120 to 122, 127 lights, 150 messages, 150 to 154 monitoring printer, 150 to 154 restoring default settings, 136 status check, printing, 120 CR (carriage) motor, checking status, 120 to 122 Custom paper size Mac OS...
... 114 Color problems, 159 ColorSync settings, 87 Component life, checking, 120 to 122 Connecting printer, 40 Control panel aligning print head, 126 to 127 buttons, 150 changing language, 136 changing measurement units, 136 cleaning print head, 124 to 126 component life, checking, 120 to 122 illustration, 150 ink levels, checking, 120 to 122, 127 lights, 150 messages, 150 to 154 monitoring printer, 150 to 154 restoring default settings, 136 status check, printing, 120 CR (carriage) motor, checking status, 120 to 122 Custom paper size Mac OS...
Printer Guide
Page 171
... Windows options, 103 to 108 LFP Remote Panel, 50 to 52 Lightfastness, 168 Lights, control panel, 150 Loading cut sheet paper, 64 to 66 posterboard, 67 to 69 roll paper, 56 to 61 M Mac OS X basic print options, 83 to 86 black and white photos, 94 to 96 borderless printing, 80 to 82, 90 to 91 canceling print jobs, 97 checking ink levels, 97 to 98 color management, 87, 94 to 96 custom preset, 93 installing software...
... Windows options, 103 to 108 LFP Remote Panel, 50 to 52 Lightfastness, 168 Lights, control panel, 150 Loading cut sheet paper, 64 to 66 posterboard, 67 to 69 roll paper, 56 to 61 M Mac OS X basic print options, 83 to 86 black and white photos, 94 to 96 borderless printing, 80 to 82, 90 to 91 canceling print jobs, 97 checking ink levels, 97 to 98 color management, 87, 94 to 96 custom preset, 93 installing software...
Printer Guide
Page 172
... SP 9800, 34 to 36, 72 to 74 Paper cutter operating manually, 63 replacing blade, 138 to 141 Paper light, 150 Paper Size setting Mac OS X, 81 to 83 problems, 159 Windows, 105 -172 Paper Source setting problems, 159 Windows, 103, 107 Pause light, 150 Pausing print jobs Mac OS X, 97 Windows, 114 PF (paper feed) motor, checking status, 120 to 122 PhotoEnhance, 110 Platen Gap setting control panel, 69 to 70 Macintosh, 89 problems, 156 Windows, 112 Posterboard, 67 to 69 Power cleaning...
... SP 9800, 34 to 36, 72 to 74 Paper cutter operating manually, 63 replacing blade, 138 to 141 Paper light, 150 Paper Size setting Mac OS X, 81 to 83 problems, 159 Windows, 105 -172 Paper Source setting problems, 159 Windows, 103, 107 Pause light, 150 Pausing print jobs Mac OS X, 97 Windows, 114 PF (paper feed) motor, checking status, 120 to 122 PhotoEnhance, 110 Platen Gap setting control panel, 69 to 70 Macintosh, 89 problems, 156 Windows, 112 Posterboard, 67 to 69 Power cleaning...
Printer Guide
Page 173
..., 166 Problems banding, 154 blank paper, 159 blurry prints, 157 cable, 158, 159 color, 159 diagnosing, 149 faint prints, 156 garbled characters, 159 ghosting, 155 graininess, 155 inverted image, 159 margin, 159 misalignment, 154 misregistration, 155 nothing prints, 158 operational, 158 paper, 160 to 163 print quality, 154 to 157 print speed, 116 printer driver, 158 to 159 -173 Index | 173 printing stops, 158 roll paper cannot be cut, 159 size limitation...
..., 166 Problems banding, 154 blank paper, 159 blurry prints, 157 cable, 158, 159 color, 159 diagnosing, 149 faint prints, 156 garbled characters, 159 ghosting, 155 graininess, 155 inverted image, 159 margin, 159 misalignment, 154 misregistration, 155 nothing prints, 158 operational, 158 paper, 160 to 163 print quality, 154 to 157 print speed, 116 printer driver, 158 to 159 -173 Index | 173 printing stops, 158 roll paper cannot be cut, 159 size limitation...

Product Brochure
Page 4
... various media types, dramatically improving the final print quality. Introducing the all new Epson Stylus® Pro 7800 and Epson Stylus® Pro 9800. The standard Photo Black ink mode can utilize two different black ink modes - Incorporating our latest 1-inch wide print head, produces almost twice the print performance of our previous model line, while an astonishing resolution up to 2880 x 1440 dpi delivers a level of pigment ink, Epson UltraChrome K3 incorporates eight new color pigments, including a new three-level black technology...
... various media types, dramatically improving the final print quality. Introducing the all new Epson Stylus® Pro 7800 and Epson Stylus® Pro 9800. The standard Photo Black ink mode can utilize two different black ink modes - Incorporating our latest 1-inch wide print head, produces almost twice the print performance of our previous model line, while an astonishing resolution up to 2880 x 1440 dpi delivers a level of pigment ink, Epson UltraChrome K3 incorporates eight new color pigments, including a new three-level black technology...

Product Brochure
Page 8
... during printing on -demand ink jet with Pro Edition bundle) Supported by most leading third-party RIPs and workflows Operating Systems Supported Macintosh Panther 10.3.9 or higher Tiger 10.4 or higher Windows 2000 or XP (Pro or Home Edition) Printer Interfaces Includes one USB (1.1 and 2.0 compatible), one IEEE 1394 (FireWire) and one Epson Expansion Slot used Media Handling SP7800 Media input Cut-sheet size SP9800 Media input Cut-sheet size Media core...
... during printing on -demand ink jet with Pro Edition bundle) Supported by most leading third-party RIPs and workflows Operating Systems Supported Macintosh Panther 10.3.9 or higher Tiger 10.4 or higher Windows 2000 or XP (Pro or Home Edition) Printer Interfaces Includes one USB (1.1 and 2.0 compatible), one IEEE 1394 (FireWire) and one Epson Expansion Slot used Media Handling SP7800 Media input Cut-sheet size SP9800 Media input Cut-sheet size Media core...
Product Information Guide
Page 5
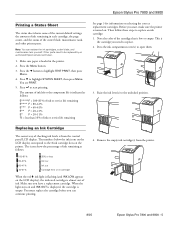
...% or less Ink low Ink out Cartridge error or no cartridge When the red B ink light is almost out of the cutter blade, maintenance tank, and other printer parts. Press the ink compartment cover(s) to the 8 ink cartridge slots on and INK OUT is displayed, the cartridge is turned on. Press the Menu button. 3. Epson Stylus Pro 7800 and 9800 Printing a Status Sheet The status sheet shows some of the current default settings, the amount of ink remaining in the printer. 2. Note: You can continue printing. 4. Make sure you start printing.
...% or less Ink low Ink out Cartridge error or no cartridge When the red B ink light is almost out of the cutter blade, maintenance tank, and other printer parts. Press the ink compartment cover(s) to the 8 ink cartridge slots on and INK OUT is displayed, the cartridge is turned on. Press the Menu button. 3. Epson Stylus Pro 7800 and 9800 Printing a Status Sheet The status sheet shows some of the current default settings, the amount of ink remaining in the printer. 2. Note: You can continue printing. 4. Make sure you start printing.
Product Information Guide
Page 6
... are clogged or deflected. Make sure the replacement cartridge is recommended only as a last resort. To correct this problem, make sure the print head needs cleaning, as clogged print head nozzles or a misaligned print head. If necessary, the printer will automatically run a cleaning cycle to make sure you should check the print head to use the printer's menu system to create a custom paper type. NOZZLE CHECK is printed and automatically read. Print a nozzle check to clear the nozzles. 1. Epson Stylus Pro 7800 and 9800 8/05 Then insert the cartridge into the slot...
... are clogged or deflected. Make sure the replacement cartridge is recommended only as a last resort. To correct this problem, make sure the print head needs cleaning, as clogged print head nozzles or a misaligned print head. If necessary, the printer will automatically run a cleaning cycle to make sure you should check the print head to use the printer's menu system to create a custom paper type. NOZZLE CHECK is printed and automatically read. Print a nozzle check to clear the nozzles. 1. Epson Stylus Pro 7800 and 9800 8/05 Then insert the cartridge into the slot...
Product Information Guide
Page 7
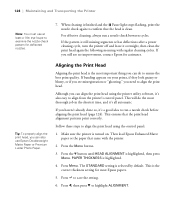
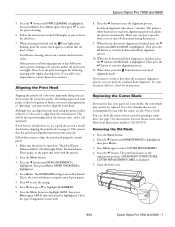
... run a nozzle check between cycles. You can check the status of your paper isn't cut cleanly, the cutter blade may need to align the print head using the printer utility software, it 's a good idea to align from Epson (part number C12C815291). Press the Menu button. 2. Epson Stylus Pro 7800 and 9800 5. Aligning the Print Head Aligning the print head is highlighted. If you notice that your cutter by default. Follow these steps to be replaced. Press the Menu button. 3. PAPER THICKNESS is turned on. Then press the button to exit head alignment mode. When...
... run a nozzle check between cycles. You can check the status of your paper isn't cut cleanly, the cutter blade may need to align the print head using the printer utility software, it 's a good idea to align from Epson (part number C12C815291). Press the Menu button. 2. Epson Stylus Pro 7800 and 9800 5. Aligning the Print Head Aligning the print head is highlighted. If you notice that your cutter by default. Follow these steps to be replaced. Press the Menu button. 3. PAPER THICKNESS is turned on. Then press the button to exit head alignment mode. When...


