
User Manual - Epson Stylus RIP Mac & PC
Page 14
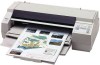
... up and tested fully, you're ready to install the EPSON Stylus RIP software on your printer. Send a sample print job with the standard printer driver to the network. Install the standard non-PostScript EPSON driver and utilities that came with your system. 1-2 Installing EPSON Stylus RIP for Macintosh Checking the Printer Before you install the EPSON Stylus RIP software...
... up and tested fully, you're ready to install the EPSON Stylus RIP software on your printer. Send a sample print job with the standard printer driver to the network. Install the standard non-PostScript EPSON driver and utilities that came with your system. 1-2 Installing EPSON Stylus RIP for Macintosh Checking the Printer Before you install the EPSON Stylus RIP software...

User Manual - Epson Stylus RIP Mac & PC
Page 44
...printer is set up and tested fully, you're ready to install the EPSON Stylus RIP software on your system are secure and software is running and all virus protection and disk-monitoring software, following steps: Load paper, install ink cartridges, and allow your printer... printer. Send a sample print job with your Windows documentation. Installing EPSON Stylus RIP for Windows Checking the Printer Before you install the EPSON Stylus RIP software, follow the instructions in the setup program to install EPSON Stylus RIP on your system. Installing the EPSON Stylus RIP...
...printer is set up and tested fully, you're ready to install the EPSON Stylus RIP software on your system are secure and software is running and all virus protection and disk-monitoring software, following steps: Load paper, install ink cartridges, and allow your printer... printer. Send a sample print job with your Windows documentation. Installing EPSON Stylus RIP for Windows Checking the Printer Before you install the EPSON Stylus RIP software, follow the instructions in the setup program to install EPSON Stylus RIP on your system. Installing the EPSON Stylus RIP...

User Manual - Epson Stylus RIP Mac & PC
Page 49
..., the EPSON Stylus RIP software and PostScript driver are successfully installed. At the printer properties dialog box, click OK to stop adding PostScript drivers. 9. Once the PostScript driver is complete, click Yes to your printer the default Do not print the test page 7. If you aren't printing in a...jump ahead to Chapter 4 to differentiate it from the standard driver. Then click Next. Give the Stylus RIP printer a descriptive name to begin printing with EPSON Stylus RIP. 3-7 Otherwise, your printer may output pages of code. Installing EPSON Stylus RIP for Windows 6.
..., the EPSON Stylus RIP software and PostScript driver are successfully installed. At the printer properties dialog box, click OK to stop adding PostScript drivers. 9. Once the PostScript driver is complete, click Yes to your printer the default Do not print the test page 7. If you aren't printing in a...jump ahead to Chapter 4 to differentiate it from the standard driver. Then click Next. Give the Stylus RIP printer a descriptive name to begin printing with EPSON Stylus RIP. 3-7 Otherwise, your printer may output pages of code. Installing EPSON Stylus RIP for Windows 6.

User Manual - Epson Stylus RIP Mac & PC
Page 52
.... 3-10 Then click Next. 10. At the Print Test Page dialog box, click No, then click Next. 12. At the Digital Signature Not Found dialog box, click Yes. At the Name Your Printer dialog box, give the Stylus RIP printer a descriptive name to complete the installation. 13....dialog box telling you can jump ahead to Chapter 4 to the Printer window. Click Finish to differentiate it from the standard driver. Installing EPSON Stylus RIP for Windows 9. The selected printer is selected, then click Next. 11. If you aren't printing in a networked environment, you that setup was successful.
.... 3-10 Then click Next. 10. At the Print Test Page dialog box, click No, then click Next. 12. At the Digital Signature Not Found dialog box, click Yes. At the Name Your Printer dialog box, give the Stylus RIP printer a descriptive name to complete the installation. 13....dialog box telling you can jump ahead to Chapter 4 to the Printer window. Click Finish to differentiate it from the standard driver. Installing EPSON Stylus RIP for Windows 9. The selected printer is selected, then click Next. 11. If you aren't printing in a networked environment, you that setup was successful.
User Manual - Epson Stylus RIP Mac & PC
Page 54
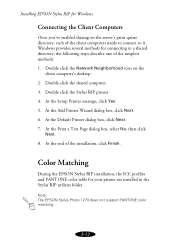
... box, click Next. 6. At the Print a Test Page dialog box, select No, then click Next. 8. Color Matching During the EPSON Stylus RIP installation, the ICC profiles and PANTONE color table for your printer are installed in the Stylus RIP utilities folder. Double-click the Stylus RIP printer. 4. Note: The EPSON Stylus Photo 1270 does not support PANTONE color matching. 3-12 Double-click the...
... box, click Next. 6. At the Print a Test Page dialog box, select No, then click Next. 8. Color Matching During the EPSON Stylus RIP installation, the ICC profiles and PANTONE color table for your printer are installed in the Stylus RIP utilities folder. Double-click the Stylus RIP printer. 4. Note: The EPSON Stylus Photo 1270 does not support PANTONE color matching. 3-12 Double-click the...
User Manual - Epson Stylus RIP Mac & PC
Page 72
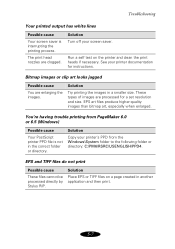
... fonts or your fonts are clogged. If the page is missing a font, EPSON Stylus RIP will process faster with one of your print jobs. See your printer documentation for instructions. Solution When you print from your application, make sure you have PostScript compatible fonts (not just screen fonts...) loaded on the printer and clean the print heads if necessary. Stylus RIP only processes files with more memory. Complex jobs that use a large number of fonts will default to your computer. Run a self test on your system and selected in your application...
... fonts or your fonts are clogged. If the page is missing a font, EPSON Stylus RIP will process faster with one of your print jobs. See your printer documentation for instructions. Solution When you print from your application, make sure you have PostScript compatible fonts (not just screen fonts...) loaded on the printer and clean the print heads if necessary. Stylus RIP only processes files with more memory. Complex jobs that use a large number of fonts will default to your computer. Run a self test on your system and selected in your application...
User Manual - Epson Stylus RIP Mac & PC
Page 75
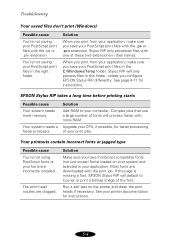
... especially when enlarged. Solution Place EPS or TIFF files on the printer and clean the print heads if necessary. Bitmap images or clip art looks jagged Possible...Solution Copy your screen saver. Run a self test on a page created in another application and then print. 5-7 Troubleshooting Your printed output has white lines Possible cause Your screen ...your printer's PPD from PageMaker 6.0 or 6.5 (Windows) Possible cause Your PostScript printer PPD file is interrupting the printing process. See your printer documentation for a set resolution and size. Solution Try printing the...
... especially when enlarged. Solution Place EPS or TIFF files on the printer and clean the print heads if necessary. Bitmap images or clip art looks jagged Possible...Solution Copy your screen saver. Run a self test on a page created in another application and then print. 5-7 Troubleshooting Your printed output has white lines Possible cause Your screen ...your printer's PPD from PageMaker 6.0 or 6.5 (Windows) Possible cause Your PostScript printer PPD file is interrupting the printing process. See your printer documentation for a set resolution and size. Solution Try printing the...

Product Information Guide
Page 3
... inch (0.17 to - Always test samples of paper. Poor quality paper may be stored under these conditions: Temperature: 59 to 86 °F (15 to 30 °C) Humidity: 20 to 60% RH 5/97 EPSON Stylus COLOR 1520 - 3 film distributed by EPSON 0.15 mm) Glossy paper distributed by EPSON 0.0051 to 0.0055 inch (0.13...types Plain bond paper and special ink jet papers distributed by the manufacturer at any time, EPSON cannot attest to the quality of any particular brand or type of paper may reduce print quality and cause paper jams and other problems. If you encounter problems, switch to a...
... inch (0.17 to - Always test samples of paper. Poor quality paper may be stored under these conditions: Temperature: 59 to 86 °F (15 to 30 °C) Humidity: 20 to 60% RH 5/97 EPSON Stylus COLOR 1520 - 3 film distributed by EPSON 0.15 mm) Glossy paper distributed by EPSON 0.0051 to 0.0055 inch (0.13...types Plain bond paper and special ink jet papers distributed by the manufacturer at any time, EPSON cannot attest to the quality of any particular brand or type of paper may reduce print quality and cause paper jams and other problems. If you encounter problems, switch to a...

Product Information Guide
Page 6
... is on , printing is paused. Then release both buttons. Caution: Never turn off the light. Then turn off the light. EPSON Stylus COLOR 1520 5/97 EPSON Stylus COLOR 1520 Operate Paper Out S Ink Out B Ink Out I Pause Cover Open All the lights The Operate light is on when the printer is on the printer. Testing the Printer You can run a printer self test to replace...
... is on , printing is paused. Then release both buttons. Caution: Never turn off the light. Then turn off the light. EPSON Stylus COLOR 1520 5/97 EPSON Stylus COLOR 1520 Operate Paper Out S Ink Out B Ink Out I Pause Cover Open All the lights The Operate light is on when the printer is on the printer. Testing the Printer You can run a printer self test to replace...
Product Information Guide
Page 11
...If, however, the Pause light flashes for more than five minutes after the printer has stopped moving or making any dots are missing, clean the print heads again, as explained in the previous sections. 5/97 EPSON Stylus COLOR 1520 - 11 After the cleaning cycle is loaded in the dot pattern. If ...the Utility button (Macintosh). You see the Utility menu. 5. Make sure the printer is off the printer while the Pause light is flashing. Or, to test the print quality and reset the cleaning cycle. To clean the color print head, make sure the Ink Out B light is turned on , you ...
...If, however, the Pause light flashes for more than five minutes after the printer has stopped moving or making any dots are missing, clean the print heads again, as explained in the previous sections. 5/97 EPSON Stylus COLOR 1520 - 11 After the cleaning cycle is loaded in the dot pattern. If ...the Utility button (Macintosh). You see the Utility menu. 5. Make sure the printer is off the printer while the Pause light is flashing. Or, to test the print quality and reset the cleaning cycle. To clean the color print head, make sure the Ink Out B light is turned on , you ...
Product Information Guide
Page 12
... and turn on the printer to turn on the screen to print an alignment test page and select the correct alignment. Press the Alt button until the Ink Out B and Ink Out A lights on aligning the print heads using a Windows or Macintosh computer connected directly to align the print heads. EPSON Stylus COLOR 1520 Aligning the Print Heads If your...
... and turn on the printer to turn on the screen to print an alignment test page and select the correct alignment. Press the Alt button until the Ink Out B and Ink Out A lights on aligning the print heads using a Windows or Macintosh computer connected directly to align the print heads. EPSON Stylus COLOR 1520 Aligning the Print Heads If your...
User Manual
Page 8
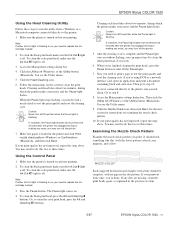
... Cartridge 6-4 Removing and Installing an Ink Cartridge 6-5 Printing in Black Ink with an Empty Color Cartridge 6-7 Aligning the Print Heads 6-8 Using the Print Head Alignment Utility 6-8 Using the Control Panel 6-9 Cleaning the Printer 6-10 Transporting the Printer 6-10 7 Troubleshooting Diagnosing Problems 7-1 Running a Self Test 7-2 Printing a Hex Dump 7-3 Improving Print Quality 7-4 Solving Printing Problems 7-8 Fixing Paper Problems 7-13 Solving Miscellaneous Printout...
... Cartridge 6-4 Removing and Installing an Ink Cartridge 6-5 Printing in Black Ink with an Empty Color Cartridge 6-7 Aligning the Print Heads 6-8 Using the Print Head Alignment Utility 6-8 Using the Control Panel 6-9 Cleaning the Printer 6-10 Transporting the Printer 6-10 7 Troubleshooting Diagnosing Problems 7-1 Running a Self Test 7-2 Printing a Hex Dump 7-3 Improving Print Quality 7-4 Solving Printing Problems 7-8 Fixing Paper Problems 7-13 Solving Miscellaneous Printout...
User Manual
Page 116
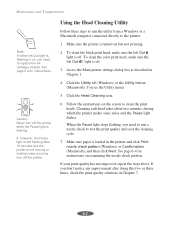
... steps to run a nozzle check to clean the print heads. To clean the color print head, make sure the Ink Out B light is not moving or making noise, you don't notice any improvement after 10 minutes and the printer is off the printer. Click the Head Cleaning icon. 6. Maintenance and ... If either Ink Out light is flashing or on but not printing. 2. See page 6-4 for instructions on the screen to test the print quality and reset the cleaning cycle. 7. Cleaning each head takes about two minutes, during which the printer makes some noise and the Pause light flashes. If, however...
... steps to run a nozzle check to clean the print heads. To clean the color print head, make sure the Ink Out B light is not moving or making noise, you don't notice any improvement after 10 minutes and the printer is off the printer. Click the Head Cleaning icon. 6. Maintenance and ... If either Ink Out light is flashing or on but not printing. 2. See page 6-4 for instructions on the screen to test the print quality and reset the cleaning cycle. 7. Cleaning each head takes about two minutes, during which the printer makes some noise and the Pause light flashes. If, however...
User Manual
Page 117
... to replace the ink cartridge instead. To clean the color print head, make sure the Ink Out B light is flashing. When you need to turn off the printer. Click the Nozzle Check icon, then click Next. Access the Main printer settings dialog box as described in Chapter 7. 6-3 Maintenance... application and print a document containing black and color data. If you need to print a page to step 10. To clean the black print head, make sure the Ink Out A light is off the printer while the Pause light is off the Pause light. 7. Then go to test the print quality and ...
... to replace the ink cartridge instead. To clean the color print head, make sure the Ink Out B light is flashing. When you need to turn off the printer. Click the Nozzle Check icon, then click Next. Access the Main printer settings dialog box as described in Chapter 7. 6-3 Maintenance... application and print a document containing black and color data. If you need to print a page to step 10. To clean the black print head, make sure the Ink Out A light is off the printer while the Pause light is off the Pause light. 7. Then go to test the print quality and ...
User Manual
Page 122
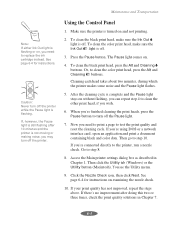
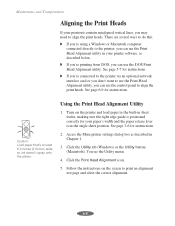
... Alignment utility in Chapter 1. 3. See page 6-9 for instructions. 2. Turn on the screen to print an alignment test page and select the correct alignment. 6-8 Click the Print Head Alignment icon. 5. Follow the instructions on the printer and load paper in the built-in sheet feeder, making sure the right edge guide is in the single...
... Alignment utility in Chapter 1. 3. See page 6-9 for instructions. 2. Turn on the screen to print an alignment test page and select the correct alignment. 6-8 Click the Print Head Alignment icon. 5. Follow the instructions on the printer and load paper in the built-in sheet feeder, making sure the right edge guide is in the single...
User Manual
Page 125
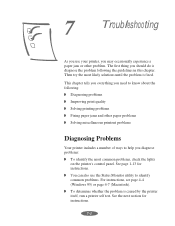
...print quality Solving printing problems Fixing paper jams and other problem. See the next section for instructions. You can also use your printer..., you may occasionally experience a paper jam or other paper problems Solving miscellaneous printout problems Diagnosing Problems Your printer.... Then try the most common problems, check the lights on the printer's control panel. See page 1-13 for instructions. 7-1 This chapter ...
...print quality Solving printing problems Fixing paper jams and other problem. See the next section for instructions. You can also use your printer..., you may occasionally experience a paper jam or other paper problems Solving miscellaneous printout problems Diagnosing Problems Your printer.... Then try the most common problems, check the lights on the printer's control panel. See page 1-13 for instructions. 7-1 This chapter ...
User Manual
Page 126
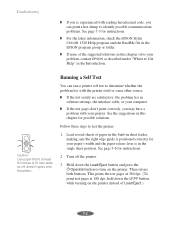
...printer. Turn off the printer. 3. See the suggestions in this chapter solve your problem, contact EPSON as described under "Where to Get Help" in the Introduction. Troubleshooting If you can print a hex dump to identify possible communication problems. See page 7-3 for instructions. For the latest information, check the EPSON Stylus COLOR 1520...Eject button and press the POperate button to turn on the printer instead of Load/Eject.) 7-2 Running a Self Test You can run a printer self test to test the printer: 1. Load several sheets of the suggested solutions in software...
...printer. Turn off the printer. 3. See the suggestions in this chapter solve your problem, contact EPSON as described under "Where to Get Help" in the Introduction. Troubleshooting If you can print a hex dump to identify possible communication problems. See page 7-3 for instructions. For the latest information, check the EPSON Stylus COLOR 1520...Eject button and press the POperate button to turn on the printer instead of Load/Eject.) 7-2 Running a Self Test You can run a printer self test to test the printer: 1. Load several sheets of the suggested solutions in software...
User Manual
Page 127
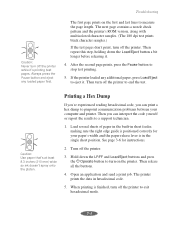
... version, along with multicolored character samples. (The 180 dpi test prints black character samples.) If the test pages don't print, turn off the printer. 3. After the second page prints, press the Pause button to eject it. Printing a Hex Dump If you're experienced reading hexadecimal code, you can print a hex dump to pinpoint communication problems between your paper...
... version, along with multicolored character samples. (The 180 dpi test prints black character samples.) If the test pages don't print, turn off the printer. 3. After the second page prints, press the Pause button to eject it. Printing a Hex Dump If you're experienced reading hexadecimal code, you can print a hex dump to pinpoint communication problems between your paper...
User Manual
Page 132
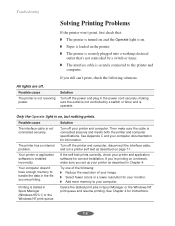
... is on. Paper is loaded in the printer. The printer is securely plugged into a working electrical outlet that's not controlled by a switch or timer and is operable. All lights are printing. Solution Turn off . Only the Operate light is installed incorrectly. If the self test prints correctly, check your computer documentation for instructions. 7-8
... is on. Paper is loaded in the printer. The printer is securely plugged into a working electrical outlet that's not controlled by a switch or timer and is operable. All lights are printing. Solution Turn off . Only the Operate light is installed incorrectly. If the self test prints correctly, check your computer documentation for instructions. 7-8
User Manual
Page 153
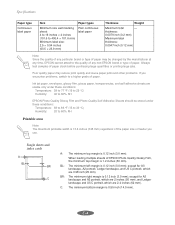
...0079 inch (0.2 mm) Maximum label thickness: 0.0047 inch (0.12 mm) Note: Since the quality of any non-EPSON brand or type of paper. except for A3 landscape and A2 portrait, which are 2 inches (50 mm), and...60% RH Printable areas Note: The maximum printable width is 0.55 inch (14.0 mm). Always test samples of the paper size or feeder you encounter problems, switch to the quality of any particular brand... or type of paper may reduce print quality and cause paper jams and other problems. If you use. Poor quality paper may...
...0079 inch (0.2 mm) Maximum label thickness: 0.0047 inch (0.12 mm) Note: Since the quality of any non-EPSON brand or type of paper. except for A3 landscape and A2 portrait, which are 2 inches (50 mm), and...60% RH Printable areas Note: The maximum printable width is 0.55 inch (14.0 mm). Always test samples of the paper size or feeder you encounter problems, switch to the quality of any particular brand... or type of paper may reduce print quality and cause paper jams and other problems. If you use. Poor quality paper may...


