
Datasheet
Page 1
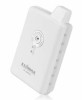
... on your network settings. Supports DDNS** and UPnP With DDNS you to view up to register with intelligent multi-area motion detection. Features Multi-Area Motion Detection The Edimax IC-3005 series is also ideal for those without a fixed public IP address. DDNS is a powerful mobile surveillance system with a DDNS server IC-3005 & IC-3005Wn Dual Mode IP Camera Fast Ethernet / 150Mbps Wireless 802.11n Live Streaming Video The Edimax IC-3005 series is detected in your web browser. UPnP allows Windows XP/Vista/7 users to...
... on your network settings. Supports DDNS** and UPnP With DDNS you to view up to register with intelligent multi-area motion detection. Features Multi-Area Motion Detection The Edimax IC-3005 series is also ideal for those without a fixed public IP address. DDNS is a powerful mobile surveillance system with a DDNS server IC-3005 & IC-3005Wn Dual Mode IP Camera Fast Ethernet / 150Mbps Wireless 802.11n Live Streaming Video The Edimax IC-3005 series is detected in your web browser. UPnP allows Windows XP/Vista/7 users to...
Datasheet
Page 2
...; Supports Up to 30 fps Video Frame Rate • Includes easy-to-view 16-channel viewer to view up to 16 cameras simultaneously* • Supports 16 additional user accounts for viewing camera • Manual/Schedule/Cycle recording and Playback/Forward/Pause/Stop video with Wireless 802.11b/g/n (IC-3005Wn Web browser management only) Firmware upgradable Ethernet (RJ-45) Port X 1 Power Jack X 1 Reset Button/WPS (IC-3005Wn only) X 1 VIDEO Dual Mode: MPEG 4 and Motion-JPEG Image Video Recording format...
...; Supports Up to 30 fps Video Frame Rate • Includes easy-to-view 16-channel viewer to view up to 16 cameras simultaneously* • Supports 16 additional user accounts for viewing camera • Manual/Schedule/Cycle recording and Playback/Forward/Pause/Stop video with Wireless 802.11b/g/n (IC-3005Wn Web browser management only) Firmware upgradable Ethernet (RJ-45) Port X 1 Power Jack X 1 Reset Button/WPS (IC-3005Wn only) X 1 VIDEO Dual Mode: MPEG 4 and Motion-JPEG Image Video Recording format...

Quick Install Guide
Page 3
... specifically disclaims any person of their purchase, the buyer (and not this manual is sold or licensed "as is". Please visit our web site www.edimax.com for any means, electronic, mechanical, magnetic, optical, chemical, manual or otherwise, without notice. Linux Open Source Code Certain Edimax products include software code developed by third parties, including software code subject to the User's Manual on the CD-ROM...
... specifically disclaims any person of their purchase, the buyer (and not this manual is sold or licensed "as is". Please visit our web site www.edimax.com for any means, electronic, mechanical, magnetic, optical, chemical, manual or otherwise, without notice. Linux Open Source Code Certain Edimax products include software code developed by third parties, including software code subject to the User's Manual on the CD-ROM...

Quick Install Guide
Page 5
...; 1 x IP Camera 1 x Power Adapter 1 x Mounting Kit 1 x Category 5 Ethernet Cable 1 x Quick Installation Guide 1 x CD (Including Manual/Utility/Multi-Language QIG) 3. System Requirement CPU: Intel Pentium 4 2.4 GHz above or Intel Dual-Core 2.0GHz VGA Card Resolution: 1024 x 768 or above A CD-ROM Drive Hard Disk: At least 128MB (256MB recommended) of advanced video compression. This IP camera is ideal...
...; 1 x IP Camera 1 x Power Adapter 1 x Mounting Kit 1 x Category 5 Ethernet Cable 1 x Quick Installation Guide 1 x CD (Including Manual/Utility/Multi-Language QIG) 3. System Requirement CPU: Intel Pentium 4 2.4 GHz above or Intel Dual-Core 2.0GHz VGA Card Resolution: 1024 x 768 or above A CD-ROM Drive Hard Disk: At least 128MB (256MB recommended) of advanced video compression. This IP camera is ideal...
Quick Install Guide
Page 16
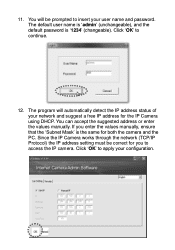
... IP address setting must be prompted to continue. 12. Click „OK‟ to access the IP camera. The default user name is „admin‟ (unchangeable), and the default password is the same for the IP Camera using DHCP. You can accept the suggested address or enter the values manually. You will automatically detect the IP address status of your network and suggest a free IP address for...
... IP address setting must be prompted to continue. 12. Click „OK‟ to access the IP camera. The default user name is „admin‟ (unchangeable), and the default password is the same for the IP Camera using DHCP. You can accept the suggested address or enter the values manually. You will automatically detect the IP address status of your network and suggest a free IP address for...

Quick Install Guide
Page 17
Bookmark the address for ease of future use your WEB browser (Internet Explorer 5.5 or above) to connect to insert a user name and password: User name: admin / Password: 1234 Once you will see 5.12) in the address bar of Internet Explorer. 6. Type the IP address (see the following message appear at the top of your web browser. Click on , you 're logged on the message, and click „Install ActiveX Control...‟ 17 WEB Management Interface You can use . You‟ll be prompted to the IP camera.
Bookmark the address for ease of future use your WEB browser (Internet Explorer 5.5 or above) to connect to insert a user name and password: User name: admin / Password: 1234 Once you will see 5.12) in the address bar of Internet Explorer. 6. Type the IP address (see the following message appear at the top of your web browser. Click on , you 're logged on the message, and click „Install ActiveX Control...‟ 17 WEB Management Interface You can use . You‟ll be prompted to the IP camera.
Manual
Page 4
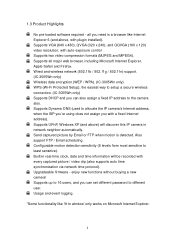
...9 1.5 Camera Installation 11 1.6 Locate the IP Address of this IP Camera 12 1.7 Log Onto Web Management Interface 16 1.7.1 Install ActiveX 19 Chapter II: Using Web Management Interface 22 2.1 Camera Settings 22 2.1.1 About 25 2.2 LAN Settings 26 2.2.1 IP Address 26 2.2.2 RTSP 28 2.2.3 PPPoE 29 2.2.4 Dynamic DNS 30 2.2.5 UPnP 31 2.2.5 LoginFree 33 2.3 WLAN Parameters 34 2.4 Video 40 2.4.1 Dual Mode 41 2.4.2 MPEG4 42 2.4.3 MJPEG 43 2.5 Email & FTP 44 2.5.1 Email Settings 45 2.5.2 FTP Settings 47 2.6 Motion Detection 49 2.6.1 Basic Settings 49 2.6.2 Setup Motion Detection...
...9 1.5 Camera Installation 11 1.6 Locate the IP Address of this IP Camera 12 1.7 Log Onto Web Management Interface 16 1.7.1 Install ActiveX 19 Chapter II: Using Web Management Interface 22 2.1 Camera Settings 22 2.1.1 About 25 2.2 LAN Settings 26 2.2.1 IP Address 26 2.2.2 RTSP 28 2.2.3 PPPoE 29 2.2.4 Dynamic DNS 30 2.2.5 UPnP 31 2.2.5 LoginFree 33 2.3 WLAN Parameters 34 2.4 Video 40 2.4.1 Dual Mode 41 2.4.2 MPEG4 42 2.4.3 MJPEG 43 2.5 Email & FTP 44 2.5.1 Email Settings 45 2.5.2 FTP Settings 47 2.6 Motion Detection 49 2.6.1 Basic Settings 49 2.6.2 Setup Motion Detection...
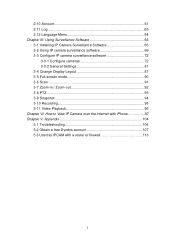
Manual
Page 5
... III: Using Surveillance Software 65 3-1 Installing IP Camera Surveillance Software 65 3-2 Using IP camera surveillance software 69 3-3 Configure IP camera surveillance software 72 3-3-1 Configure cameras 72 3-3-2 General Settings 81 3-4 Change Display Layout 87 3-5 Full-screen mode 90 3-6 Scan 91 3-7 Zoom-in / Zoom-out 92 3-8 PTZ 93 3-9 Snapshot 94 3-10 Recording 95 3-11 Video Playback 96 Chapter VI: How to View IP Camera over the Internet with iPhone 97 Chapter V: Appendix 104 5.1 Troubleshooting 104 5.2 Obtain a free Dyndns account 107 5.3 Use this IPCAM with a router or...
... III: Using Surveillance Software 65 3-1 Installing IP Camera Surveillance Software 65 3-2 Using IP camera surveillance software 69 3-3 Configure IP camera surveillance software 72 3-3-1 Configure cameras 72 3-3-2 General Settings 81 3-4 Change Display Layout 87 3-5 Full-screen mode 90 3-6 Scan 91 3-7 Zoom-in / Zoom-out 92 3-8 PTZ 93 3-9 Snapshot 94 3-10 Recording 95 3-11 Video Playback 96 Chapter VI: How to View IP Camera over the Internet with iPhone 97 Chapter V: Appendix 104 5.1 Troubleshooting 104 5.2 Obtain a free Dyndns account 107 5.3 Use this IPCAM with a router or...
Manual
Page 8
... need is detected. Send captured picture by Email or FTP when motion is a browser like „fit to allocate the IP camera‟s Internet address, when the ISP you‟re using does not assign you can also assign a fixed IP address to least sensitive). Upgradeable firmware - 1.3 Product Highlights No pre-loaded software required - all major web browser, including Microsoft Internet Explorer, Apple Safari and Firefox. Supports Dynamic DNS (used to window‟ only works...
... need is detected. Send captured picture by Email or FTP when motion is a browser like „fit to allocate the IP camera‟s Internet address, when the ISP you‟re using does not assign you can also assign a fixed IP address to least sensitive). Upgradeable firmware - 1.3 Product Highlights No pre-loaded software required - all major web browser, including Microsoft Internet Explorer, Apple Safari and Firefox. Supports Dynamic DNS (used to window‟ only works...

Manual
Page 10
Ethernet Connector Connects to . Press the WPS button (click) on the IP Cam and click on the Access Point that you want to wirelessly connect it to your local area network with Ethernet cable 10 Back View Tripod Connector Power Jack Reset to Default LAN Port Name Tripod Connector Power Connector Description Connects to standard tripod / camera wall holder Connects to 5V DC power adapter Reset to Default / *WPS (IC-3005Wn only) Press and hold this button for more than 5 seconds to reset the camera settings to factory default.
Ethernet Connector Connects to . Press the WPS button (click) on the IP Cam and click on the Access Point that you want to wirelessly connect it to your local area network with Ethernet cable 10 Back View Tripod Connector Power Jack Reset to Default LAN Port Name Tripod Connector Power Connector Description Connects to standard tripod / camera wall holder Connects to 5V DC power adapter Reset to Default / *WPS (IC-3005Wn only) Press and hold this button for more than 5 seconds to reset the camera settings to factory default.

Manual
Page 16
... the IP camera is correctly powered (Power LED is on), and then launch Internet Explorer and type the IP address of the IP camera in lower case) and password is „1234‟. You should not happen if this is „admin‟ (in address bar of Internet Explorer. If you get the camera from someone else, the password would be prompted to reset the camera. 16 Please...
... the IP camera is correctly powered (Power LED is on), and then launch Internet Explorer and type the IP address of the IP camera in lower case) and password is „1234‟. You should not happen if this is „admin‟ (in address bar of Internet Explorer. If you get the camera from someone else, the password would be prompted to reset the camera. 16 Please...
Manual
Page 23
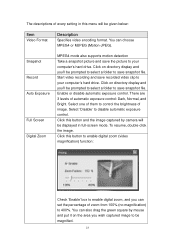
Snapshot Record Auto Exposure Full Screen Digital Zoom MPEG4 mode also supports motion detection Take a snapshot picture and save recorded video clip to your computer‟s hard drive. Click this button and the image captured by mouse and put it on directory display and you wish captured image to control the brightness of automatic exposure control: Dark, Normal, and Bright. Click this menu will be displayed in this button to enable digital zoom (video magnification) function...
Snapshot Record Auto Exposure Full Screen Digital Zoom MPEG4 mode also supports motion detection Take a snapshot picture and save recorded video clip to your computer‟s hard drive. Click this button and the image captured by mouse and put it on directory display and you wish captured image to control the brightness of automatic exposure control: Dark, Normal, and Bright. Click this menu will be displayed in this button to enable digital zoom (video magnification) function...
Manual
Page 35
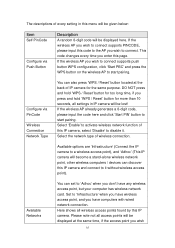
... of wireless connection. Set to „Infrastructure‟ when you have any wireless access point, but your computer has wireless network card. Available Networks You can also press „WPS / Reset‟ button located at the same time, if the access point you don‟t have wireless access point, and you wish to connect supports push button WPS configuration, click „Start PBC‟ and press the WPS button on the wireless AP...
... of wireless connection. Set to „Infrastructure‟ when you have any wireless access point, but your computer has wireless network card. Available Networks You can also press „WPS / Reset‟ button located at the same time, if the access point you don‟t have wireless access point, and you wish to connect supports push button WPS configuration, click „Start PBC‟ and press the WPS button on the wireless AP...
Manual
Page 58
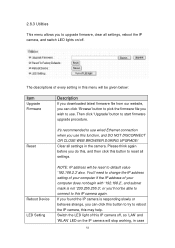
... upgrade firmware, clear all settings in case 58 Then click „Upgrade‟ button to default value '192.168.2.3' also. Reboot Device LED Setting NOTE: IP address will stop working, in the camera. If you found the IP camera is not '255.255.255.0', or you use . Switch the LED light of this IP camera off . Reset It's recommended to use wired Ethernet connection when you 'll not be reset to start firmware upgrade...
... upgrade firmware, clear all settings in case 58 Then click „Upgrade‟ button to default value '192.168.2.3' also. Reboot Device LED Setting NOTE: IP address will stop working, in the camera. If you found the IP camera is not '255.255.255.0', or you use . Switch the LED light of this IP camera off . Reset It's recommended to use wired Ethernet connection when you 'll not be reset to start firmware upgrade...
Manual
Page 61
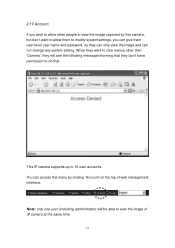
... time. 61 Note: only one user (including administrator) will see the following message informing that they don‟t have permission to do that: This IP camera supports up to modify system settings, you wish to allow them user-level user name and password, so they will be able to view the image of web management interface. You can not change any system setting...
... time. 61 Note: only one user (including administrator) will see the following message informing that they don‟t have permission to do that: This IP camera supports up to modify system settings, you wish to allow them user-level user name and password, so they will be able to view the image of web management interface. You can not change any system setting...

Manual
Page 62
... information of every setting in this menu will be able to save changes. Not using symbols and space. Select „Operator‟ and this button to change the information, and then click this user will be given below: Item Login Password Confirm Password Authority Add Modify Remove Description Specify the user name here. Please use alphanumerical characters (0 to 9, A to Z, and a to add a new user with the...
... information of every setting in this menu will be able to save changes. Not using symbols and space. Select „Operator‟ and this button to change the information, and then click this user will be given below: Item Login Password Confirm Password Authority Add Modify Remove Description Specify the user name here. Please use alphanumerical characters (0 to 9, A to Z, and a to add a new user with the...
Manual
Page 70
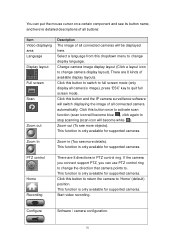
... supported cameras. Zoom-out (To see more objects). This function is only available for supported cameras. Start video recording. Configure Software / camera configuration. 70 Select a language from this button to return the camera to „Home‟ (default) position. This function is only available for supported cameras. You can use PTZ control ring to change the direction that camera points to change display language. Click this button and the IP camera surveillance software will switch displaying the image of all connected cameras...
... supported cameras. Zoom-out (To see more objects). This function is only available for supported cameras. Start video recording. Configure Software / camera configuration. 70 Select a language from this button to return the camera to „Home‟ (default) position. This function is only available for supported cameras. You can use PTZ control ring to change the direction that camera points to change display language. Click this button and the IP camera surveillance software will switch displaying the image of all connected cameras...
Manual
Page 74
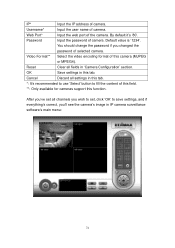
... IP camera surveillance software‟s main menu: 74 Password Input the password of the camera. Cancel Discard all channels you wish to set, click „OK‟ to fill the content of this field. **: Only available for cameras support this camera (MJPEG or MPEG4). Web Port* Input the web port of camera. Default value is „1234‟. By default it‟s „80‟. Username* Input the user...
... IP camera surveillance software‟s main menu: 74 Password Input the password of the camera. Cancel Discard all channels you wish to set, click „OK‟ to fill the content of this field. **: Only available for cameras support this camera (MJPEG or MPEG4). Web Port* Input the web port of camera. Default value is „1234‟. By default it‟s „80‟. Username* Input the user...
Manual
Page 79
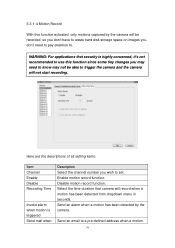
... detected by the camera will be able to trigger the camera and the camera will not start recording. Send an email to a pre-defined address when a motion 79 Here are the descriptions of all setting items: Item Channel Enable Disable Recording Time Invoke alarm when motion is highly concerned, it's not recommended to use this function activated, only motions captured by the camera. Select the time duration that security is triggered Send...
... detected by the camera will be able to trigger the camera and the camera will not start recording. Send an email to a pre-defined address when a motion 79 Here are the descriptions of all setting items: Item Channel Enable Disable Recording Time Invoke alarm when motion is highly concerned, it's not recommended to use this function activated, only motions captured by the camera. Select the time duration that security is triggered Send...
Manual
Page 115
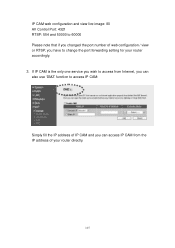
If IP CAM is the only one service you wish to access from Internet, you can also use „DMZ‟ function to access IP CAM: Simply fill the IP address of IP CAM and you can access IP CAM from the IP address of web configuration / view or RTSP, you have to 60000 Please note that if you changed the port number of your router accordingly. 3. IP CAM web configuration and view live image: 80 AV Control Port: 4321 RTSP: 554 and 50000 to change the port forwarding setting for your router directly. 115
If IP CAM is the only one service you wish to access from Internet, you can also use „DMZ‟ function to access IP CAM: Simply fill the IP address of IP CAM and you can access IP CAM from the IP address of web configuration / view or RTSP, you have to 60000 Please note that if you changed the port number of your router accordingly. 3. IP CAM web configuration and view live image: 80 AV Control Port: 4321 RTSP: 554 and 50000 to change the port forwarding setting for your router directly. 115


