Literature/Product Sheet
Page 1
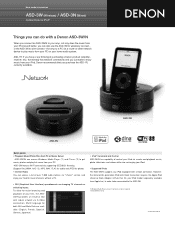
... capability of your iPod, Denon recommends that fits your home audio system. To allow for easier browsing and playback of control your iPod via remote and playback music, photo slideshows and videos while also recharging your iPod. • Supported iPods The ASD-3W/N supports any iPod equipped with a Dock connector. Multi language for photos • Internet Radio You can access a list of purchasing a Denon product (amplifier, receiver, etc.) that already has network connectivity and you...
... capability of your iPod, Denon recommends that fits your home audio system. To allow for easier browsing and playback of control your iPod via remote and playback music, photo slideshows and videos while also recharging your iPod. • Supported iPods The ASD-3W/N supports any iPod equipped with a Dock connector. Multi language for photos • Internet Radio You can access a list of purchasing a Denon product (amplifier, receiver, etc.) that already has network connectivity and you...
Owners Manual
Page 1
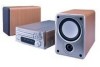
... that has made the Denon name so famous. I S.D.B. (Super Dynamic Bass) I Tone Controls (Bass, Treble) I Source Direct Function I 2 Sets of Analog Stereo Inputs and Analog Stereo Outputs I MONO Output for Subwoofer I Easy-to-Use Remote Control I Headphone Jack I A wealth of Playback Functions I Optical Digital Output Jack for the network to the outer perimeter. Figure 2 shows an analysis of sonic perfection. The converters faithfully preserve both the powerful dynamics and the delicate nuances of sound as well, where...
... that has made the Denon name so famous. I S.D.B. (Super Dynamic Bass) I Tone Controls (Bass, Treble) I Source Direct Function I 2 Sets of Analog Stereo Inputs and Analog Stereo Outputs I MONO Output for Subwoofer I Easy-to-Use Remote Control I Headphone Jack I A wealth of Playback Functions I Optical Digital Output Jack for the network to the outer perimeter. Figure 2 shows an analysis of sonic perfection. The converters faithfully preserve both the powerful dynamics and the delicate nuances of sound as well, where...
Owners Manual
Page 2
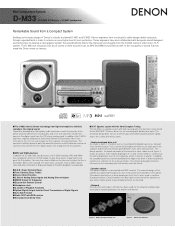
D-M33 Specifications RCD-M33 Power output 22W+22W (6ohms, 1kHz, THD10%) Input/Output 2 sets of analog inputs and outputs MONO output for subwoofer Headphone Function Tone control (Bass, Treble) SDB Source direct function Timer (once, every, sleep) CD playback repeat, random mode Tuner FM 87.50MHz - 108.00MHz AM 550kHz - 1710kHz Preset (FM/AM) x 40 General Power supply AC120V, 60Hz Power consumption 50W Dimensions W 8 1/4" x H 3 11/16" x D 12 14/16" W 210 x H 95 x D 328 mm...
D-M33 Specifications RCD-M33 Power output 22W+22W (6ohms, 1kHz, THD10%) Input/Output 2 sets of analog inputs and outputs MONO output for subwoofer Headphone Function Tone control (Bass, Treble) SDB Source direct function Timer (once, every, sleep) CD playback repeat, random mode Tuner FM 87.50MHz - 108.00MHz AM 550kHz - 1710kHz Preset (FM/AM) x 40 General Power supply AC120V, 60Hz Power consumption 50W Dimensions W 8 1/4" x H 3 11/16" x D 12 14/16" W 210 x H 95 x D 328 mm...
Owners Manual
Page 2
... DISC PLAYER SHOULD NOT BE ADJUSTED OR REPAIRED BY ANYONE EXCEPT PROPERLY QUALIFIED SERVICE PERSONNEL. To allow you are required, be walked on a circuit different from the wall outlet and disconnect the antenna or cable system. Operation is connected. • Consult the local retailer authorized to replace your DENON DEALER. 3. If this product does cause harmful interference to radio or television reception, which the receiver...
... DISC PLAYER SHOULD NOT BE ADJUSTED OR REPAIRED BY ANYONE EXCEPT PROPERLY QUALIFIED SERVICE PERSONNEL. To allow you are required, be walked on a circuit different from the wall outlet and disconnect the antenna or cable system. Operation is connected. • Consult the local retailer authorized to replace your DENON DEALER. 3. If this product does cause harmful interference to radio or television reception, which the receiver...
Owners Manual
Page 5
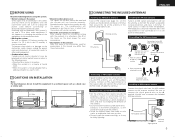
... function properly. Be sure to connect the signal ground wire to the AM loop antenna terminals. 1 2 3 Remove the vinyl tie and take out the 4 connection line. a. Mount b. Bend in the CD receiver, it may be produced if this position using the system. • Before turning on the power Check again that all connection cords to other audio equipment. ENGLISH 2 BEFORE USING Read the following cases: • Directly...
... function properly. Be sure to connect the signal ground wire to the AM loop antenna terminals. 1 2 3 Remove the vinyl tie and take out the 4 connection line. a. Mount b. Bend in the CD receiver, it may be produced if this position using the system. • Before turning on the power Check again that all connection cords to other audio equipment. ENGLISH 2 BEFORE USING Read the following cases: • Directly...
Owners Manual
Page 6
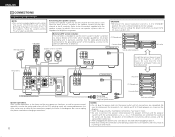
... the channels (L to L (white) and R to R (red)) properly, as shown on functions, as well as remote control operations cannot be sure to unplug the power cord when you leave home for, e.g.,a vacation, etc. ENGLISH 5 CONNECTIONS (1) Connecting to Cassette deck NOTE: • This system includes digital circuitry which provides guidelines for proper grounding and, in particular, specifies that setting the connection cords (pin-plug cords) next to the power cords may...
... the channels (L to L (white) and R to R (red)) properly, as shown on functions, as well as remote control operations cannot be sure to unplug the power cord when you leave home for, e.g.,a vacation, etc. ENGLISH 5 CONNECTIONS (1) Connecting to Cassette deck NOTE: • This system includes digital circuitry which provides guidelines for proper grounding and, in particular, specifies that setting the connection cords (pin-plug cords) next to the power cords may...

Owners Manual
Page 7
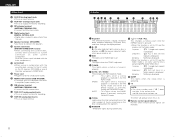
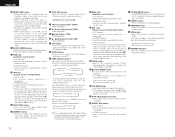
.... i 2 /BAND button ( 2 : CD stop button BAND : TUNER band button) • In CD function, press this button to the AUTO PRESET menu. 7 ENGLISH 6 PART NAMES AND FUNCTIONS (See page 3.) (1) Front Panel q Power operation switch (ON/STANDBY) • This turns the power for shortcircuiting of the speaker cords. If this button is activated. Once all connections have been corrected, plug the power cord. (Wait for more than 1 second, the display switches to stop playback temporarily. Press this button to adjust the volume.
.... i 2 /BAND button ( 2 : CD stop button BAND : TUNER band button) • In CD function, press this button to the AUTO PRESET menu. 7 ENGLISH 6 PART NAMES AND FUNCTIONS (See page 3.) (1) Front Panel q Power operation switch (ON/STANDBY) • This turns the power for shortcircuiting of the speaker cords. If this button is activated. Once all connections have been corrected, plug the power cord. (Wait for more than 1 second, the display switches to stop playback temporarily. Press this button to adjust the volume.
Owners Manual
Page 8
... button is adjusted. u TOTAL Lights when the total remaining time or the total number of the other components (100W MAX). @1 Power cord • Plug this is lit. !2 Remote control signal indicator Flashes when remote control signals are displayed here. The timer will operate when this cord into a wall power outlet. @2 MONO OUT terminal (SUB WOOFER) • Connector jack for subwoofer with builtin amplifier (super woofer), etc. @3 AM antenna terminal (ANTENNA TERMINAL AM) • Connect the AM antenna here. @4 TAPE OUT (analog output) jacks...
... button is adjusted. u TOTAL Lights when the total remaining time or the total number of the other components (100W MAX). @1 Power cord • Plug this is lit. !2 Remote control signal indicator Flashes when remote control signals are displayed here. The timer will operate when this cord into a wall power outlet. @2 MONO OUT terminal (SUB WOOFER) • Connector jack for subwoofer with builtin amplifier (super woofer), etc. @3 AM antenna terminal (ANTENNA TERMINAL AM) • Connect the AM antenna here. @4 TAPE OUT (analog output) jacks...

Owners Manual
Page 9
... button again. (3) Remote Control Unit Part Names and Functions q w r e yt u i o !0 !1 !3 !2 !4 !5 !6 !7 !8 q SLEEP button • Press this happens, point the remote control unit at an angle. (The remote control unit will stop. If this button to the length of the remote control unit. w OFF button #5 • Use this switch to set the power to STANDBY mode. #4 e TUNER button #3 • Press this button to pages 9, 10). (1) Inserting the batteries q Open the battery compartment cover of the tape. i Number buttons...
... button again. (3) Remote Control Unit Part Names and Functions q w r e yt u i o !0 !1 !3 !2 !4 !5 !6 !7 !8 q SLEEP button • Press this happens, point the remote control unit at an angle. (The remote control unit will stop. If this button to the length of the remote control unit. w OFF button #5 • Use this switch to set the power to STANDBY mode. #4 e TUNER button #3 • Press this button to pages 9, 10). (1) Inserting the batteries q Open the battery compartment cover of the tape. i Number buttons...
Owners Manual
Page 10
... preset stations on the tuner. @5 7 /TU+ (manual search / fast-forward) button In CD function : • The manual search operation is performed. In TUNER function : • Use this switch to turn on the power of the following selection when playing in the reverse (0) direction. !4 SDB /TONE button • Press this button to adjust SDB (Super Dynamic Bass) and TONE. !5 DIMMER button • Use this button to search for the beginning of the main unit's display. TAPE AUX #5 POWER ON button • Use...
... preset stations on the tuner. @5 7 /TU+ (manual search / fast-forward) button In CD function : • The manual search operation is performed. In TUNER function : • Use this switch to turn on the power of the following selection when playing in the reverse (0) direction. !4 SDB /TONE button • Press this button to adjust SDB (Super Dynamic Bass) and TONE. !5 DIMMER button • Use this button to search for the beginning of the main unit's display. TAPE AUX #5 POWER ON button • Use...
Owners Manual
Page 11
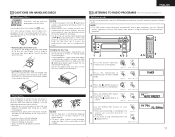
... not turn on the RCD-M33. Doing so may damage it. 9 LISTENING TO RADIO PROGRAMS (Check the connections on the disc will result in the station, then preset it using the manual "Preset memory" operation. 1 2 12 4, 5 3 4, 5 3 1 Press the power operation switch to select TUNER mode. Main unit Remote control unit 3 Press the 2 /BAND button to load the disc with the labelled side facing up , as with regular records. • The disc's signal surface...
... not turn on the RCD-M33. Doing so may damage it. 9 LISTENING TO RADIO PROGRAMS (Check the connections on the disc will result in the station, then preset it using the manual "Preset memory" operation. 1 2 12 4, 5 3 4, 5 3 1 Press the power operation switch to select TUNER mode. Main unit Remote control unit 3 Press the 2 /BAND button to load the disc with the labelled side facing up , as with regular records. • The disc's signal surface...
Owners Manual
Page 12
... the frequency is tuned in, adjust the volume to the desired level using the same procedure.) Press the power operation 1 switch to turn on the power. button is tuned in. button before proceeding with step 4. Auto Tuning • When a program being broadcast in stereo is received, the "ST" indicator lights and the program is received in stereo. • If reception is poor and there is much noise in the stereo signals, press the BAND button to select...
... the frequency is tuned in, adjust the volume to the desired level using the same procedure.) Press the power operation 1 switch to turn on the power. button is tuned in. button before proceeding with step 4. Auto Tuning • When a program being broadcast in stereo is received, the "ST" indicator lights and the program is received in stereo. • If reception is poor and there is much noise in the stereo signals, press the BAND button to select...

Owners Manual
Page 13
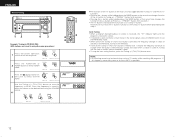
... function) Example: Listening to the station preset at the same time to steps 5 through 6. Flashes ENTER/MEMO Next Flashes Listening to Preset Stations If the following operation is performed when the system power is off, the power automatically turns on and the radio is played. (Auto on the remote 2 control unit. • You can now begin character input. The display shows the preset number, band and frequency. 3 Press the TU+(7) or TU-(6) button. (auto tuning...
... function) Example: Listening to the station preset at the same time to steps 5 through 6. Flashes ENTER/MEMO Next Flashes Listening to Preset Stations If the following operation is performed when the system power is off, the power automatically turns on and the radio is played. (Auto on the remote 2 control unit. • You can now begin character input. The display shows the preset number, band and frequency. 3 Press the TU+(7) or TU-(6) button. (auto tuning...

Owners Manual
Page 14
... PS mode when the RT service is no program of the 24 types listed below can be set the RT mode, press the TIME/ 1 DISPLAY button on the remote control unit until "Radio Text" scrolls on the display. Reception frequency 2 Press the TU+(7) or TU-(6) button. (auto tuning) Reception frequency 3 The station is tuned in . In this case, the mode automatically switches from the PS mode back to the desired display mode. 14...
... PS mode when the RT service is no program of the 24 types listed below can be set the RT mode, press the TIME/ 1 DISPLAY button on the remote control unit until "Radio Text" scrolls on the display. Reception frequency 2 Press the TU+(7) or TU-(6) button. (auto tuning) Reception frequency 3 The station is tuned in . In this case, the mode automatically switches from the PS mode back to the desired display mode. 14...

Owners Manual
Page 15
... tuner presettings, and reset them if they have already been set, that number flashes.) Use the 9 or 8 5 button to display in order: Timer Setting mode, Function selection, (when in the CD receiver. Checking the Settings To check the timer settings, press the MENU/ SET button to the current mode display. Next, press the 9 or 8 button to select EVERYDAY or ONCE TIMER, then press the MENU/ SET and 9/ 8 button repeatedly to set the new settings. Changing the Settings Repeat the timer setting operation...
... tuner presettings, and reset them if they have already been set, that number flashes.) Use the 9 or 8 5 button to display in order: Timer Setting mode, Function selection, (when in the CD receiver. Checking the Settings To check the timer settings, press the MENU/ SET button to the current mode display. Next, press the 9 or 8 button to select EVERYDAY or ONCE TIMER, then press the MENU/ SET and 9/ 8 button repeatedly to set the new settings. Changing the Settings Repeat the timer setting operation...
Owners Manual
Page 16
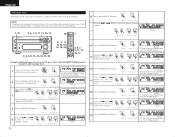
... the power operation switch to turn on time. Main unit Remote control unit Flashes 12 Press the MENU/ SET button. Flashes Flashes 4 Press the MENU/ SET button. Main unit Flashes Remote control unit (If the timer has already been set, that number flashes.) Use the 9 or 8 9 button to set the hours for the timer on the power. ENGLISH Setting the Timer The power can be set to turn on time. Say that number flashes.) Main unit Remote control unit Use the 9 or 8 5 button to set the "TUNER" mode...
... the power operation switch to turn on time. Main unit Remote control unit Flashes 12 Press the MENU/ SET button. Flashes Flashes 4 Press the MENU/ SET button. Main unit Flashes Remote control unit (If the timer has already been set, that number flashes.) Use the 9 or 8 9 button to set the hours for the timer on the power. ENGLISH Setting the Timer The power can be set to turn on time. Say that number flashes.) Main unit Remote control unit Use the 9 or 8 5 button to set the "TUNER" mode...

Owners Manual
Page 17
... set the timer setting mode. Main unit 3 Press the MENU/ SET button to turn standby the 19 system's power. • The power switch indicator turns orange and display turns off / E _ on : Only the everyday timer is selected and "ONCE" appears in TIMER STANDBY mode first, then use 9 or 8 button to make changes. 1 2 Example: Playing a compact disc with the once timer 3, 5, 7, 8 4, 6, 8 1 Press the power operation switch to set timer ON or OFF mode. Main unit Remote control unit 4, 6, 8 Flashes Flashes Flashes 17 Main unit Remote control unit Flashes...
... set the timer setting mode. Main unit 3 Press the MENU/ SET button to turn standby the 19 system's power. • The power switch indicator turns orange and display turns off / E _ on : Only the everyday timer is selected and "ONCE" appears in TIMER STANDBY mode first, then use 9 or 8 button to make changes. 1 2 Example: Playing a compact disc with the once timer 3, 5, 7, 8 4, 6, 8 1 Press the power operation switch to set timer ON or OFF mode. Main unit Remote control unit 4, 6, 8 Flashes Flashes Flashes 17 Main unit Remote control unit Flashes...

Owners Manual
Page 21
... again while the time display reads "00:00" to move ahead to resume normal playback during programmed playback: Such operations as quick search, pause and skip monitor are played in the display automatically erases that specific track from the program. The programmed playing order appears in a certain order P...ro...gr...am...m...e...d ...Pl...ay...ba...ck... (Using the remote control unit) 1 2 3 1 Press the PROG/ DIRECT button.
... again while the time display reads "00:00" to move ahead to resume normal playback during programmed playback: Such operations as quick search, pause and skip monitor are played in the display automatically erases that specific track from the program. The programmed playing order appears in a certain order P...ro...gr...am...m...e...d ...Pl...ay...ba...ck... (Using the remote control unit) 1 2 3 1 Press the PROG/ DIRECT button.

Owners Manual
Page 25
... the signal side of playable files and folders is 512 for playing all the files in the selected folder in 3 random order is set. Use the 9 and 8 buttons to select another file.) 13 AUTO ON FUNCTION • When the 1/ 3 (play /pause) button or 5 (open/close) button on the CD receiver is pressed while the power is set to STANDBY mode, the power automatically turns on and the play or open/close operation is...
... the signal side of playable files and folders is 512 for playing all the files in the selected folder in 3 random order is set. Use the 9 and 8 buttons to select another file.) 13 AUTO ON FUNCTION • When the 1/ 3 (play /pause) button or 5 (open/close) button on the CD receiver is pressed while the power is set to STANDBY mode, the power automatically turns on and the play or open/close operation is...
Owners Manual
Page 26
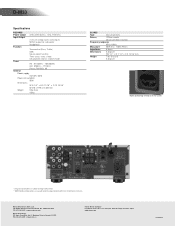
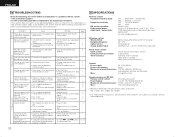
.... Hissing sound is pressed. antenna. • Install an outdoor antenna. 5 Humming sound is • Signals on • Power cord is scratched. • Replace with the system. 1. heard in AM programs. being modulated by the power opposite direction. Disc stops in the - on the power cord are inverted. disc. • Player is turned • Set the control to select another file. CD player section 15 SPECIFICATIONS Receiver section Reception frequency band: Reception sensitivity: FM stereo separation: Rated output power: Audio input / output jacks: FM...
.... Hissing sound is pressed. antenna. • Install an outdoor antenna. 5 Humming sound is • Signals on • Power cord is scratched. • Replace with the system. 1. heard in AM programs. being modulated by the power opposite direction. Disc stops in the - on the power cord are inverted. disc. • Player is turned • Set the control to select another file. CD player section 15 SPECIFICATIONS Receiver section Reception frequency band: Reception sensitivity: FM stereo separation: Rated output power: Audio input / output jacks: FM...


