
Owner's Manual
Page 5
...Problems 47 If the screen is blank 47 If the screen is difficult to read 48 3 Troubleshooting Tools 49 Diagnostic Lights 49 Dell Diagnostics 52 Dell Diagnostics Main Menu 52 Drivers 53 What Is a Driver 53 Identifying Drivers 53 Reinstalling Drivers 54 Resolving Software and Hardware Incompatibilities 55... Restoring Your Operating System 55 Using Microsoft Windows XP System Restore 56 Using Dell PC Restore 57 Using the Operating System CD 59 4 Removing and Installing Parts 61 Before You Begin 61 Recommended Tools 61...
...Problems 47 If the screen is blank 47 If the screen is difficult to read 48 3 Troubleshooting Tools 49 Diagnostic Lights 49 Dell Diagnostics 52 Dell Diagnostics Main Menu 52 Drivers 53 What Is a Driver 53 Identifying Drivers 53 Reinstalling Drivers 54 Resolving Software and Hardware Incompatibilities 55... Restoring Your Operating System 55 Using Microsoft Windows XP System Restore 56 Using Dell PC Restore 57 Using the Operating System CD 59 4 Removing and Installing Parts 61 Before You Begin 61 Recommended Tools 61...
Owner's Manual
Page 12
... headphone connector to the computer. 12 Setting Up and Using Your Computer The light might also be on the computer. Press the power button to turn off the computer. The light in the center of the vents. NOTICE: To avoid losing data, do not block any object near these vents. For... between all vents and any of this button indicates power state. It is recommended that there is on page 22. Use the microphone connector to turn on when a device such as a CD player is on the diagnostic code. Instead, perform an operating system shutdown. Use the front USB connectors for more...
... headphone connector to the computer. 12 Setting Up and Using Your Computer The light might also be on the computer. Press the power button to turn off the computer. The light in the center of the vents. NOTICE: To avoid losing data, do not block any object near these vents. For... between all vents and any of this button indicates power state. It is recommended that there is on page 22. Use the microphone connector to turn on when a device such as a CD player is on the diagnostic code. Instead, perform an operating system shutdown. Use the front USB connectors for more...
Owner's Manual
Page 15
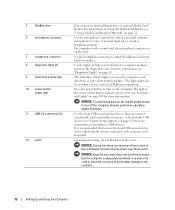
... connects to your computer with your computer, the cable may not come with a printer cable, so if you purchase a cable separately, ensure that it is turned on the computer. Connecting a Printer NOTE: You can connect USB devices while the computer is compatible with a USB cable. On computers with 7.1 speakers. For technical...
... connects to your computer with your computer, the cable may not come with a printer cable, so if you purchase a cable separately, ensure that it is turned on the computer. Connecting a Printer NOTE: You can connect USB devices while the computer is compatible with a USB cable. On computers with 7.1 speakers. For technical...

Owner's Manual
Page 16
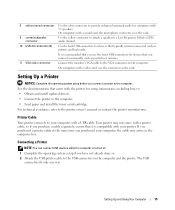
... can access the Internet and use your telephone on the computer. 1 2 3 1 USB connector on computer 2 USB printer cable 3 USB connector on printer 3 Turn on the printer and then turn on the same line simultaneously. • Cable modem connections that provide high-speed Internet access through your ISP for setup instructions. 16 Setting...
... can access the Internet and use your telephone on the computer. 1 2 3 1 USB connector on computer 2 USB printer cable 3 USB connector on printer 3 Turn on the printer and then turn on the same line simultaneously. • Cable modem connections that provide high-speed Internet access through your ISP for setup instructions. 16 Setting...

Owner's Manual
Page 25
... in the display settings. • In clone mode, both monitors display the same image. • In extended desktop mode, you connect the monitor(s) or TV, turn on changing the display settings for your computer. Setting Up a Home and Office Network Connecting to a Network Adapter NOTICE: Plug the network cable into place...
... in the display settings. • In clone mode, both monitors display the same image. • In extended desktop mode, you connect the monitor(s) or TV, turn on changing the display settings for your computer. Setting Up a Home and Office Network Connecting to a Network Adapter NOTICE: Plug the network cable into place...

Owner's Manual
Page 26
...® XP operating system provides a Network Setup Wizard to guide you through the process of inactivity, click the Start button, click Turn Off Computer, and then click Stand by turning off the display and the hard drive after a defined period of electricity your computer loses power while in Windows XP Home Edition...
...® XP operating system provides a Network Setup Wizard to guide you through the process of inactivity, click the Start button, click Turn Off Computer, and then click Stand by turning off the display and the hard drive after a defined period of electricity your computer loses power while in Windows XP Home Edition...

Owner's Manual
Page 27
... of time. Hibernate Mode Hibernate mode conserves power by copying system data to a reserved area on the hard drive and then completely turning off the hard drive. If you want your computer from the Power schemes drop-down menu displays the following schemes: • Always...the standard Windows schemes installed on your computer, choose a scheme from batteries for starting standby mode or hibernate mode, turning off the monitor, and turning off the computer. To exit from hibernate mode, press the power button. Each scheme has different settings for extended periods...
... of time. Hibernate Mode Hibernate mode conserves power by copying system data to a reserved area on the hard drive and then completely turning off the hard drive. If you want your computer from the Power schemes drop-down menu displays the following schemes: • Always...the standard Windows schemes installed on your computer, choose a scheme from batteries for starting standby mode or hibernate mode, turning off the monitor, and turning off the computer. To exit from hibernate mode, press the power button. Each scheme has different settings for extended periods...

Owner's Manual
Page 28
... your computer may appear to be saved. Advanced Tab The Advanced tab allows you to: • Place the power options icon in the Turn off monitor, Turn off the computer. For more information on power management options: 1 Click the Start button and click Help and Support. 2 In the Help... before the computer exits from standby mode or hibernate mode. • Program the power button to activate standby mode, activate hibernate mode, or turn off hard disks, System stand by, or System hibernates field, and then select a time-out from the corresponding drop-down menu and select ...
... your computer may appear to be saved. Advanced Tab The Advanced tab allows you to: • Place the power options icon in the Turn off monitor, Turn off the computer. For more information on power management options: 1 Click the Start button and click Help and Support. 2 In the Help... before the computer exits from standby mode or hibernate mode. • Program the power button to activate standby mode, activate hibernate mode, or turn off hard disks, System stand by, or System hibernates field, and then select a time-out from the corresponding drop-down menu and select ...
Owner's Manual
Page 33
... the battery still does not work , ensure that the device is incorrectly installed. Discard used batteries according to repeatedly reset time and date information after turning on the computer, or if an incorrect time or date displays during start-up, replace the battery (see the program's documentation. Solving Problems 33 If... before the problem started, review the installation procedures and ensure that the part is correctly installed. • If a peripheral device does not work properly, contact Dell (see "Contacting Dell" on page 104).
... the battery still does not work , ensure that the device is incorrectly installed. Discard used batteries according to repeatedly reset time and date information after turning on the computer, or if an incorrect time or date displays during start-up, replace the battery (see the program's documentation. Solving Problems 33 If... before the problem started, review the installation procedures and ensure that the part is correctly installed. • If a peripheral device does not work properly, contact Dell (see "Contacting Dell" on page 104).
Owner's Manual
Page 34
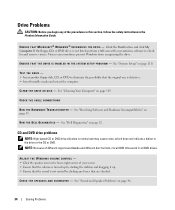
... normal and may cause noise, which does not indicate a defect in the Product Information Guide. Viruses can sometimes prevent Windows from recognizing the drive. E N S U R E T H A T T H E D R I V E I S E N A B L E D I V E - See "Dell Diagnostics" on page 55. C H E C K T H E S P E A K E R S A N D S U B W O O F E R - E N S U R E T H A T M I C R O S O F T ® W I N D O W S ® R E C O G N I Z E S T H E D R I N T H E S YS T E M S E T U P P R O ... a full scan with your screen. • Ensure that the volume is turned up by clicking the slidebar and dragging it up. • Ensure that ...
... normal and may cause noise, which does not indicate a defect in the Product Information Guide. Viruses can sometimes prevent Windows from recognizing the drive. E N S U R E T H A T T H E D R I V E I S E N A B L E D I V E - See "Dell Diagnostics" on page 55. C H E C K T H E S P E A K E R S A N D S U B W O O F E R - E N S U R E T H A T M I C R O S O F T ® W I N D O W S ® R E C O G N I Z E S T H E D R I N T H E S YS T E M S E T U P P R O ... a full scan with your screen. • Ensure that the volume is turned up by clicking the slidebar and dragging it up. • Ensure that ...
Owner's Manual
Page 35
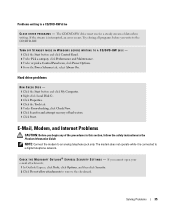
Problems writing to the CD/DVD-RW. TURN OFF STANDBY MODE IN WINDOWS BEFORE WRITING TO A CD/DVD-RW DISC - 1 Click the Start button and click Control Panel. 2 Under Pick a category, click Performance ...
Problems writing to the CD/DVD-RW. TURN OFF STANDBY MODE IN WINDOWS BEFORE WRITING TO A CD/DVD-RW DISC - 1 Click the Start button and click Control Panel. 2 Under Pick a category, click Performance ...
Owner's Manual
Page 37
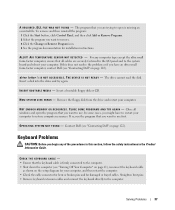
... program: 1 Click the Start button, click Control Panel, and then click Add or Remove Programs. 2 Select the program you have to restart your computer. O P E R A T I L E W A S N O T F O U N D - Contact Dell (see "Turning Off Your Computer" on page 61), reconnect the keyboard cable as shown on the setup diagram for damaged or frayed cables. D L L F I N G S YS T E M N O T F O U N D - I N S E R T B O O T A B L E M E D I /O panel and...
... program: 1 Click the Start button, click Control Panel, and then click Add or Remove Programs. 2 Select the program you have to restart your computer. O P E R A T I L E W A S N O T F O U N D - Contact Dell (see "Turning Off Your Computer" on page 61), reconnect the keyboard cable as shown on the setup diagram for damaged or frayed cables. D L L F I N G S YS T E M N O T F O U N D - I N S E R T B O O T A B L E M E D I /O panel and...

Owner's Manual
Page 38
... get a response by pressing a key on page 49. The computer does not start up C H E C K T H E D I A G N O S T I C L I N T H E S YS T E M S E T U P P R O G R A M - Connect a properly working keyboard to 10 seconds until the computer turns off. ENSURE THAT THE POWER CABLE IS FIRMLY CONNECTED TO THE COMPUTER AND TO THE ELECTRICAL OUTLET The computer stops responding NOTICE: You might lose...
... get a response by pressing a key on page 49. The computer does not start up C H E C K T H E D I A G N O S T I C L I N T H E S YS T E M S E T U P P R O G R A M - Connect a properly working keyboard to 10 seconds until the computer turns off. ENSURE THAT THE POWER CABLE IS FIRMLY CONNECTED TO THE COMPUTER AND TO THE ELECTRICAL OUTLET The computer stops responding NOTICE: You might lose...
Owner's Manual
Page 39
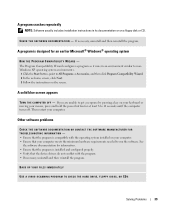
... Solving Problems 39 A program is designed for information. • Ensure that your computer meets the minimum hardware requirements needed to 10 seconds until the computer turns off. Then restart your mouse, press and hold the power button for at least 8 to run the software. If necessary, uninstall and then reinstall the...
... Solving Problems 39 A program is designed for information. • Ensure that your computer meets the minimum hardware requirements needed to 10 seconds until the computer turns off. Then restart your mouse, press and hold the power button for at least 8 to run the software. If necessary, uninstall and then reinstall the...

Owner's Manual
Page 42
... procedures in this section, follow the safety instructions in the Product Information Guide. E N S U R E T H A T T H E U S B P O R T S A R E E N A B L E D I V E R - Connect a properly working mouse to highlight Shut down or Turn Off, and then press . 3 After the computer turns off , that the network cable is off , reconnect the mouse cable as shown on the on page 109. C H E C K T H E N E T W O R K L I G H T S O N T H E B A C K O F T H E C O M P U T E R - RESTART THE COMPUTER...
... procedures in this section, follow the safety instructions in the Product Information Guide. E N S U R E T H A T T H E U S B P O R T S A R E E N A B L E D I V E R - Connect a properly working mouse to highlight Shut down or Turn Off, and then press . 3 After the computer turns off , that the network cable is off , reconnect the mouse cable as shown on the on page 109. C H E C K T H E N E T W O R K L I G H T S O N T H E B A C K O F T H E C O M P U T E R - RESTART THE COMPUTER...

Owner's Manual
Page 43
... cable and front panel cable are correct and that the power strip is securely connected to verify that the 12-volt power connector (12V) is turned on page 65). Solving Problems 43 Power Problems CAUTION: Before you begin any cards (see "Cards" on page 70). • Remove and then ...reinstall the graphics card, if applicable (see "System Board Components" on . The computer is either turned off or is not receiving power. • Reseat the power cable into both the power connector on the back of the procedures in this section...
... cable and front panel cable are correct and that the power strip is securely connected to verify that the 12-volt power connector (12V) is turned on page 65). Solving Problems 43 Power Problems CAUTION: Before you begin any cards (see "Cards" on page 70). • Remove and then ...reinstall the graphics card, if applicable (see "System Board Components" on . The computer is either turned off or is not receiving power. • Reseat the power cable into both the power connector on the back of the procedures in this section...

Owner's Manual
Page 44
...). E L I M I N A T E I C A L O U T L E T - NOTE: If you begin any of the procedures in this section, follow the safety instructions in the Product Information Guide. ENSURE THAT THE PRINTER IS TURNED ON CHECK THE PRINTER CABLE CONNECTIONS - • See the printer documentation for setup and troubleshooting information. See "Back View of interference are securely connected to...
...). E L I M I N A T E I C A L O U T L E T - NOTE: If you begin any of the procedures in this section, follow the safety instructions in the Product Information Guide. ENSURE THAT THE PRINTER IS TURNED ON CHECK THE PRINTER CABLE CONNECTIONS - • See the printer documentation for setup and troubleshooting information. See "Back View of interference are securely connected to...
Owner's Manual
Page 46
...E W I S C O N N E C T H E A D P H O N E S F R O M T H E H E A D P H O N E C O N N E C T O R - D I N D O W S V O L U M E C O N T R O L - Turn off nearby fans, fluorescent lights, or halogen lamps to MP3 songs, ensure that you did not turn the player volume down or off. See the setup diagram supplied with the speakers. Ensure that the... volume is turned up and that the speakers are connected to the computer's front-panel headphone connector. E L I M I N A T E P O S S I B L E I ...
...E W I S C O N N E C T H E A D P H O N E S F R O M T H E H E A D P H O N E C O N N E C T O R - D I N D O W S V O L U M E C O N T R O L - Turn off nearby fans, fluorescent lights, or halogen lamps to MP3 songs, ensure that you did not turn the player volume down or off. See the setup diagram supplied with the speakers. Ensure that the... volume is turned up and that the speakers are connected to the computer's front-panel headphone connector. E L I M I N A T E P O S S I B L E I ...

Owner's Manual
Page 47
... screen is blank CHECK THE MONITOR CABLE CONNECTION - • Ensure that the monitor is blinking, press a key on page 11). If the power light is turned on the setup diagram for troubleshooting procedures. E N S U R E T H A T T H E C O R R E C T A U D I O S O L U T I O N I S E N A B L E D I N T H E B I C A L O U T...R O L - If the power light is not muted. C H E C K T H E D I A G N O S T I C L I O N - Ensure that the volume is turned up and that the electrical outlet is connected as a lamp. Click or double-click the speaker icon in the Product Information Guide. No sound from...
... screen is blank CHECK THE MONITOR CABLE CONNECTION - • Ensure that the monitor is blinking, press a key on page 11). If the power light is turned on the setup diagram for troubleshooting procedures. E N S U R E T H A T T H E C O R R E C T A U D I O S O L U T I O N I S E N A B L E D I N T H E B I C A L O U T...R O L - If the power light is not muted. C H E C K T H E D I A G N O S T I C L I O N - Ensure that the volume is turned up and that the electrical outlet is connected as a lamp. Click or double-click the speaker icon in the Product Information Guide. No sound from...

Owner's Manual
Page 48
... that the subwoofer is difficult to read C H E C K T H E M O N I T O R S E T T I T O R A W A Y F R O M E X T E R N A L P O W E R S O U R C E S - Fans, fluorescent lights, halogen lamps, and other electrical devices can cause the screen image to check for interference. M O V E T H E M O N I N G S - M O V E T H E S U B W O O F E R A W A Y F R O M T H E M O N I T O R - Turn off nearby devices to appear "shaky."
... that the subwoofer is difficult to read C H E C K T H E M O N I T O R S E T T I T O R A W A Y F R O M E X T E R N A L P O W E R S O U R C E S - Fans, fluorescent lights, halogen lamps, and other electrical devices can cause the screen image to check for interference. M O V E T H E M O N I N G S - M O V E T H E S U B W O O F E R A W A Y F R O M T H E M O N I T O R - Turn off nearby devices to appear "shaky."


