
Product Manual
Page 2
DCS-950 User's Manual Table of Contents Table Of Contents Package Contents 5 Minimum System Requirements 5 Introduction 6 Features and Benefits 7 Hardware Overview 8 Connections ...8 LEDs ...9 Hardware Installation 10 Security ......33 System ...34 Default ...35 Firmware 36 Recording 37 Trigger ...38 Motion Detection 39 Port ...40 Status ...41 Device Info 41 Help ...42 Installing the DCS-950 Behind a Router 43 Single Camera Installation 43 Multiple Camera Installation 43 D-Link Systems, Inc. 2
DCS-950 User's Manual Table of Contents Table Of Contents Package Contents 5 Minimum System Requirements 5 Introduction 6 Features and Benefits 7 Hardware Overview 8 Connections ...8 LEDs ...9 Hardware Installation 10 Security ......33 System ...34 Default ...35 Firmware 36 Recording 37 Trigger ...38 Motion Detection 39 Port ...40 Status ...41 Device Info 41 Help ...42 Installing the DCS-950 Behind a Router 43 Single Camera Installation 43 Multiple Camera Installation 43 D-Link Systems, Inc. 2
Product Manual
Page 3
DCS-950 User's Manual Table of Contents 1) Identify Your Camera on the Network 44 2) Assign a Local IP Address for Your Camera 44 Assigning and Opening the HTTP Port on the DCS-950 45 3) Open the HTTP Port 45 Router Setup and Installation 46 Assigning and ...Manual Recording 63 Scheduled Recording 64 Motion Trigger Recording 65 Menu Bar...66 File ...66 View ...67 Columns 67 List View 68 Camera ...69 Enable Function 69 Tools ...69 Account 70 System Configuration 70 About ...71 IPView Lite Icon Description 72 Context Sensitive Menu 73 Uninstall IPView Application 74 D-Link...
DCS-950 User's Manual Table of Contents 1) Identify Your Camera on the Network 44 2) Assign a Local IP Address for Your Camera 44 Assigning and Opening the HTTP Port on the DCS-950 45 3) Open the HTTP Port 45 Router Setup and Installation 46 Assigning and ...Manual Recording 63 Scheduled Recording 64 Motion Trigger Recording 65 Menu Bar...66 File ...66 View ...67 Columns 67 List View 68 Camera ...69 Enable Function 69 Tools ...69 Account 70 System Configuration 70 About ...71 IPView Lite Icon Description 72 Context Sensitive Menu 73 Uninstall IPView Application 74 D-Link...
Product Manual
Page 4
DCS-950 User's Manual Table of Contents Frequently Asked Questions 76 Internet Camera Features 76 Internet Camera Installation 78 How to Ping Your IP Address 80 Time Zone Table 82 Adjusting the Camera Focus 84 Technical Specifications 85 Contacting Technical Support 87 Warranty 88 Registration 92 D-Link Systems, Inc. 4
DCS-950 User's Manual Table of Contents Frequently Asked Questions 76 Internet Camera Features 76 Internet Camera Installation 78 How to Ping Your IP Address 80 Time Zone Table 82 Adjusting the Camera Focus 84 Technical Specifications 85 Contacting Technical Support 87 Warranty 88 Registration 92 D-Link Systems, Inc. 4

Product Manual
Page 5
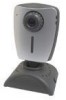
DCS-950 User's Manual Package Contents D-Link SECURICAM Network DCS-950 Internet Camera Cat5 Ethernet Cable Power Adapter (5.0V, 2.5A) Camera Stand with Mounting Bracket and Screws CD-ROM with Software and Manual Quick Installation Guide Package Contents Note: Using a power supply with a different voltage than the one included with 512MB memory and a 32Mb video...
DCS-950 User's Manual Package Contents D-Link SECURICAM Network DCS-950 Internet Camera Cat5 Ethernet Cable Power Adapter (5.0V, 2.5A) Camera Stand with Mounting Bracket and Screws CD-ROM with Software and Manual Quick Installation Guide Package Contents Note: Using a power supply with a different voltage than the one included with 512MB memory and a 32Mb video...
Product Manual
Page 6
... integration with your small of the DCS-950 Internet Camera! The DCS-950 can be accessed remotely, and controlled from any PC/Notebook over the Intranet or Internet via a web browser. D-Link Systems, Inc. 6 The DCS-950 is a stand-alone system with remote monitoring capability for your Ethernet or Fast Ethernet network. DCS-950 User's Manual Introduction Introduction Congratulations on your purchase...
... integration with your small of the DCS-950 Internet Camera! The DCS-950 can be accessed remotely, and controlled from any PC/Notebook over the Intranet or Internet via a web browser. D-Link Systems, Inc. 6 The DCS-950 is a stand-alone system with remote monitoring capability for your Ethernet or Fast Ethernet network. DCS-950 User's Manual Introduction Introduction Congratulations on your purchase...
Product Manual
Page 7
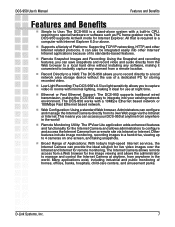
D-Link Systems, Inc. 7 Other features include image monitoring, recording images to a hard drive, viewing up to 4 cameras on one screen, and taking snapshots. Broad Range of Applications: With today's high-speed Internet services, the Internet Camera can save snapshots and record video ...the Internet Camera from anywhere in CPU, requiring no special hardware or software such as PC frame grabber cards. It can access your existing network environment. DCS-950 User's Manual Features and Benefits Features and Benefits Simple to Use: The DCS-950 is ...
D-Link Systems, Inc. 7 Other features include image monitoring, recording images to a hard drive, viewing up to 4 cameras on one screen, and taking snapshots. Broad Range of Applications: With today's high-speed Internet services, the Internet Camera can save snapshots and record video ...the Internet Camera from anywhere in CPU, requiring no special hardware or software such as PC frame grabber cards. It can access your existing network environment. DCS-950 User's Manual Features and Benefits Features and Benefits Simple to Use: The DCS-950 is ...
Product Manual
Page 8
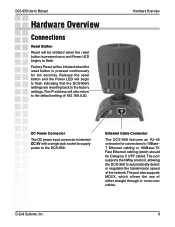
...DCS-950 User's Manual Hardware Overview Connections Reset Button Reset will be Category 5 UTP cable). Ethernet Cable Connector The DCS-950...DCS-950 to the factory settings. Hardware Overview DC Power Connector The DC power input connector is pressed once and Power LED begins to the default setting of the network...DCS-950. Release the reset button and the Power LED will also return to flash. The IP address will begin to flash indicating that the DCS-950's settings are reverting back to automatically detect or negotiate the transmission speed of 192.168.0.20. D-Link...
...DCS-950 User's Manual Hardware Overview Connections Reset Button Reset will be Category 5 UTP cable). Ethernet Cable Connector The DCS-950...DCS-950 to the factory settings. Hardware Overview DC Power Connector The DC power input connector is pressed once and Power LED begins to the default setting of the network...DCS-950. Release the reset button and the Power LED will also return to flash. The IP address will begin to flash indicating that the DCS-950's settings are reverting back to automatically detect or negotiate the transmission speed of 192.168.0.20. D-Link...
Product Manual
Page 9
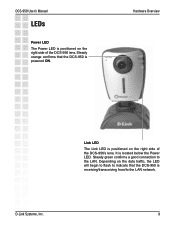
It is located below the Power LED. Steady green confirms a good connection to the LAN network. Depending on the data traffic, the LED will begin to flash to indicate that the DCS-950 is powered ON. Hardware Overview Link LED The Link LED is positioned on the right side of the DCS-950 lens. Steady orange confirms that the DCS-950 is receiving/transceiving from/to the LAN. DCS-950 User's Manual LEDs Power LED The Power LED is positioned on the right side of the DCS-950's lens. D-Link Systems, Inc. 9
It is located below the Power LED. Steady green confirms a good connection to the LAN network. Depending on the data traffic, the LED will begin to flash to indicate that the DCS-950 is powered ON. Hardware Overview Link LED The Link LED is positioned on the right side of the DCS-950 lens. Steady orange confirms that the DCS-950 is receiving/transceiving from/to the LAN. DCS-950 User's Manual LEDs Power LED The Power LED is positioned on the right side of the DCS-950's lens. D-Link Systems, Inc. 9

Product Manual
Page 10
D-Link Systems, Inc. 10 DCS-950 User's Manual Hardware Installation Hardware Installation Attach the External Power Supply Attach the external power supply to the DC power input connector located on the rear panel of the lens on the DCS-950 is illuminated. Network Connectivity is confirmed when the green LED Indicator on the back panel of the...
D-Link Systems, Inc. 10 DCS-950 User's Manual Hardware Installation Hardware Installation Attach the External Power Supply Attach the external power supply to the DC power input connector located on the rear panel of the lens on the DCS-950 is illuminated. Network Connectivity is confirmed when the green LED Indicator on the back panel of the...
Product Manual
Page 11
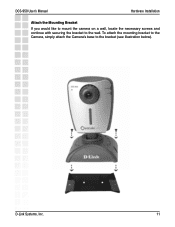
To attach the mounting bracket to the Camera, simply attach the Camera's base to the wall. D-Link Systems, Inc. 11 DCS-950 User's Manual Hardware Installation Attach the Mounting Bracket If you would like to mount the camera on a wall, locate the necessary screws and continue with securing the bracket to the bracket (see illustration below).
To attach the mounting bracket to the Camera, simply attach the Camera's base to the wall. D-Link Systems, Inc. 11 DCS-950 User's Manual Hardware Installation Attach the Mounting Bracket If you would like to mount the camera on a wall, locate the necessary screws and continue with securing the bracket to the bracket (see illustration below).
Product Manual
Page 12
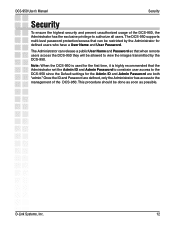
...Default settings for the Admin ID and Admin Password are defined, only the Administrator has access to the management of the DCS-950, the Administrator has the exclusive privilege to view the images transmitted by the Administrator for the first time, it is used...and Password so that when remote users access the DCS-950 they will be allowed to authorize all users. This procedure should be restricted by the DCS-950. The Administrator can be done as soon as possible. D-Link Systems, Inc. 12 DCS-950 User's Manual Security Security To ensure the highest security and ...
...Default settings for the Admin ID and Admin Password are defined, only the Administrator has access to the management of the DCS-950, the Administrator has the exclusive privilege to view the images transmitted by the Administrator for the first time, it is used...and Password so that when remote users access the DCS-950 they will be allowed to authorize all users. This procedure should be restricted by the DCS-950. The Administrator can be done as soon as possible. D-Link Systems, Inc. 12 DCS-950 User's Manual Security Security To ensure the highest security and ...
Product Manual
Page 13
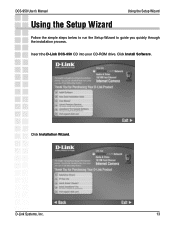
Click Installation Wizard. D-Link Systems, Inc. 13 Click Install Software. Insert the D-Link DCS-950 CD into your CD-ROM drive. DCS-950 User's Manual Using the Setup Wizard Using the Setup Wizard Follow the simple steps below to run the Setup Wizard to guide you quickly through the installation process.
Click Installation Wizard. D-Link Systems, Inc. 13 Click Install Software. Insert the D-Link DCS-950 CD into your CD-ROM drive. DCS-950 User's Manual Using the Setup Wizard Using the Setup Wizard Follow the simple steps below to run the Setup Wizard to guide you quickly through the installation process.
Product Manual
Page 14
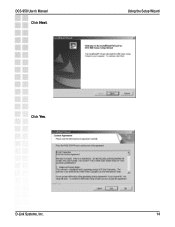
Using the Setup Wizard Click Yes. D-Link Systems, Inc. 14 DCS-950 User's Manual Click Next.
Using the Setup Wizard Click Yes. D-Link Systems, Inc. 14 DCS-950 User's Manual Click Next.
Product Manual
Page 15
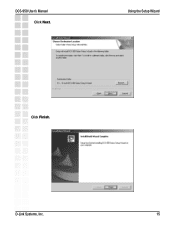
D-Link Systems, Inc. 15 Using the Setup Wizard Click Finish. DCS-950 User's Manual Click Next.
D-Link Systems, Inc. 15 Using the Setup Wizard Click Finish. DCS-950 User's Manual Click Next.
Product Manual
Page 16
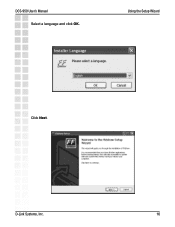
DCS-950 User's Manual Select a language and click OK. Using the Setup Wizard Click Next. D-Link Systems, Inc. 16
DCS-950 User's Manual Select a language and click OK. Using the Setup Wizard Click Next. D-Link Systems, Inc. 16
Product Manual
Page 17
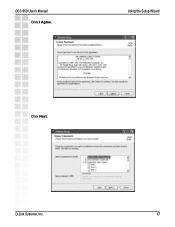
D-Link Systems, Inc. 17 Using the Setup Wizard Click Next. DCS-950 User's Manual Click I Agree.
D-Link Systems, Inc. 17 Using the Setup Wizard Click Next. DCS-950 User's Manual Click I Agree.
Product Manual
Page 18
D-Link Systems, Inc. 18 DCS-950 User's Manual Click Install. Using the Setup Wizard Click Next.
D-Link Systems, Inc. 18 DCS-950 User's Manual Click Install. Using the Setup Wizard Click Next.
Product Manual
Page 19
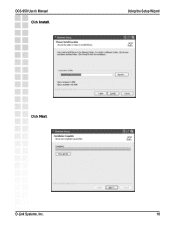
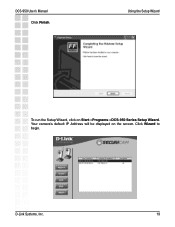
DCS-950 User's Manual Click Finish. Click Wizard to begin. Your camera's default IP Address will be displayed on Start->Programs->DCS-950 Series Setup Wizard. D-Link Systems, Inc. 19 Using the Setup Wizard To run the Setup Wizard, click on the screen.
DCS-950 User's Manual Click Finish. Click Wizard to begin. Your camera's default IP Address will be displayed on Start->Programs->DCS-950 Series Setup Wizard. D-Link Systems, Inc. 19 Using the Setup Wizard To run the Setup Wizard, click on the screen.
Product Manual
Page 20
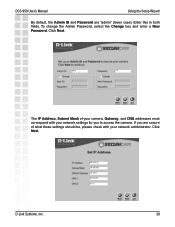
If you are "admin" (lower case). Click Next. Click Next. The IP Address, Subnet Mask of what these settings should be, please check with your network administrator. D-Link Systems, Inc. 20 DCS-950 User's Manual Using the Setup Wizard By default, the Admin ID and Password are unsure of your camera, Gateway, and DNS addresses must correspond with your network settings for you to access the camera. To change the Admin Password, select the Change box and enter a New Password. Enter this in both fields.
If you are "admin" (lower case). Click Next. Click Next. The IP Address, Subnet Mask of what these settings should be, please check with your network administrator. D-Link Systems, Inc. 20 DCS-950 User's Manual Using the Setup Wizard By default, the Admin ID and Password are unsure of your camera, Gateway, and DNS addresses must correspond with your network settings for you to access the camera. To change the Admin Password, select the Change box and enter a New Password. Enter this in both fields.
Product Manual
Page 21
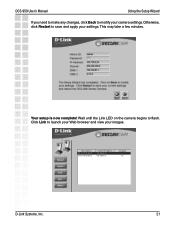
Wait until the Link LED on the camera begins to save and apply your settings. DCS-950 User's Manual Using the Setup Wizard If you need to make any changes, click Back to modify your images. Your setup is now complete! D-Link Systems, Inc. 21 Click Link to launch your Web browser and view your camera settings. Otherwise, click Restart to flash. This may take a few minutes.
Wait until the Link LED on the camera begins to save and apply your settings. DCS-950 User's Manual Using the Setup Wizard If you need to make any changes, click Back to modify your images. Your setup is now complete! D-Link Systems, Inc. 21 Click Link to launch your Web browser and view your camera settings. Otherwise, click Restart to flash. This may take a few minutes.