Product Manual
Page 2
Contents Package Contents 3 Introduction 4 Hardware Installation 9 Security 10 Using the Setup Wizard 11 DCS-900W Configuration 17 Installing the DCS-900W Behind a Router 27 IPView Lite Application Installation 41 IPView Lite 46 Uninstall IPView Lite Application 78 Appendix (FAQ, Troubleshooting, How to Ping Your IP Address Time Zone Table, Active X Installation) ..........80 Technical Specifications 93 Contacting Technical Support 95 Warranty 96 Registration 99 2
Contents Package Contents 3 Introduction 4 Hardware Installation 9 Security 10 Using the Setup Wizard 11 DCS-900W Configuration 17 Installing the DCS-900W Behind a Router 27 IPView Lite Application Installation 41 IPView Lite 46 Uninstall IPView Lite Application 78 Appendix (FAQ, Troubleshooting, How to Ping Your IP Address Time Zone Table, Active X Installation) ..........80 Technical Specifications 93 Contacting Technical Support 95 Warranty 96 Registration 99 2
Product Manual
Page 11
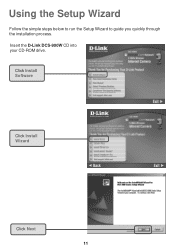
Click Install Software Click Install Wizard Click Next 11 Using the Setup Wizard Follow the simple steps below to run the Setup Wizard to guide you quickly through the installation process. Insert the D-Link DCS-900W CD into your CD-ROM drive.
Click Install Software Click Install Wizard Click Next 11 Using the Setup Wizard Follow the simple steps below to run the Setup Wizard to guide you quickly through the installation process. Insert the D-Link DCS-900W CD into your CD-ROM drive.
Product Manual
Page 12
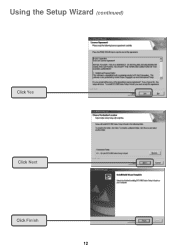
Using the Setup Wizard (continued) Click Yes Click Next Click Finish 12
Using the Setup Wizard (continued) Click Yes Click Next Click Finish 12
Product Manual
Page 13
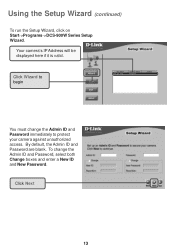
By default, the Admin ID and Password are blank. Click Wizard to protect your camera against unauthorized access. To change the Admin ID and Password immediately to begin You must change the Admin ID and Password, select both Change boxes and enter a New ID and New Password. Click Next 13 Your camera's IP Address will be displayed here if it is valid. Using the Setup Wizard (continued) To run the Setup Wizard, click on Start->Programs->DCS-900W Series Setup Wizard.
By default, the Admin ID and Password are blank. Click Wizard to protect your camera against unauthorized access. To change the Admin ID and Password immediately to begin You must change the Admin ID and Password, select both Change boxes and enter a New ID and New Password. Click Next 13 Your camera's IP Address will be displayed here if it is valid. Using the Setup Wizard (continued) To run the Setup Wizard, click on Start->Programs->DCS-900W Series Setup Wizard.
Product Manual
Page 14
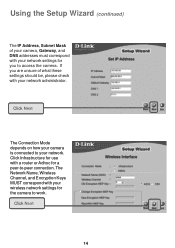
...Setup Wizard (continued) The IP Address, Subnet Mask of your camera, Gateway, and DNS addresses must correspond with your network settings for you are unsure of what these settings should be, please check with a router or Adhoc for a peer-to your network. The Network Name, Wireless Channel, and Encryption Keys MUST correspond with your wireless... network settings for use with your camera is connected to -peer connection. Click Next The Connection Mode depends ...
...Setup Wizard (continued) The IP Address, Subnet Mask of your camera, Gateway, and DNS addresses must correspond with your network settings for you are unsure of what these settings should be, please check with a router or Adhoc for a peer-to your network. The Network Name, Wireless Channel, and Encryption Keys MUST correspond with your wireless... network settings for use with your camera is connected to -peer connection. Click Next The Connection Mode depends ...
Product Manual
Page 15
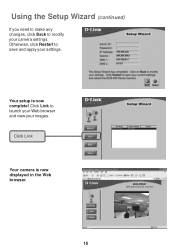
Your setup is now displayed in the Web browser. 15 Using the Setup Wizard (continued) If you need to make any changes, click Back to modify your settings. Otherwise, click Restart to launch your Web browser and view your images. Click Link to save and apply your camera settings. Click Link Your camera is now complete!
Your setup is now displayed in the Web browser. 15 Using the Setup Wizard (continued) If you need to make any changes, click Back to modify your settings. Otherwise, click Restart to launch your Web browser and view your images. Click Link to save and apply your camera settings. Click Link Your camera is now complete!
Product Manual
Page 16
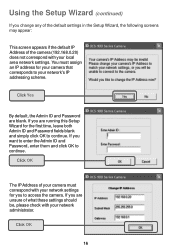
...OK The IP Address of your camera must assign an IP address for the first time, leave both Admin ID and Password fields blank and simply click OK to continue. Using the Setup Wizard (continued) If you change any of the default settings in the Setup Wizard, the following screens may appear: ...This screen appears if the default IP Address of the camera (192.168.0.20) does not correspond with your network's IP...
...OK The IP Address of your camera must assign an IP address for the first time, leave both Admin ID and Password fields blank and simply click OK to continue. Using the Setup Wizard (continued) If you change any of the default settings in the Setup Wizard, the following screens may appear: ...This screen appears if the default IP Address of the camera (192.168.0.20) does not correspond with your network's IP...
Product Manual
Page 17
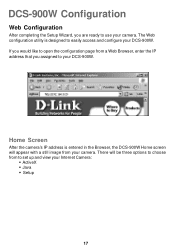
... choose from to easily access and configure your DCS-900W. Home Screen After the camera's IP address is designed to set up and view your Internet Camera: ƒ ActiveX ƒ Java ƒ Setup 17 If you would like to open the configuration page from your camera. DCS-900W Configuration Web Configuration After completing the Setup Wizard, you are ready to your...
... choose from to easily access and configure your DCS-900W. Home Screen After the camera's IP address is designed to set up and view your Internet Camera: ƒ ActiveX ƒ Java ƒ Setup 17 If you would like to open the configuration page from your camera. DCS-900W Configuration Web Configuration After completing the Setup Wizard, you are ready to your...
Product Manual
Page 19
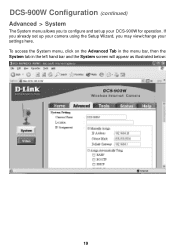
DCS-900W Configuration (continued) Advanced > System The System menu allows you may view/change your DCS-900W for operation. If you already set up your camera using the Setup Wizard, you to configure and set up your settings here. To access the System menu, click on the Advanced Tab in the menu bar, then the System tab in the left hand bar and the System screen will appear as illustrated below: 19
DCS-900W Configuration (continued) Advanced > System The System menu allows you may view/change your DCS-900W for operation. If you already set up your camera using the Setup Wizard, you to configure and set up your settings here. To access the System menu, click on the Advanced Tab in the menu bar, then the System tab in the left hand bar and the System screen will appear as illustrated below: 19
Product Manual
Page 81
... network cable. Frequently Asked Questions (continued) Internet Camera Installation Q: Can the DCS-900W be used only on Ethernet and Fast Ethernet network and supported by wireless transmission. A: The Internet Camera uses Category 5 UTP Twisted-pair cable allowing...Internet Camera be faulty. 81 A: The DCS-900W is required for the Internet Camera is not available, a second port needs to first disconnect the Internet Camera from a web browser. A: No, the Internet Camera is not recommended that there is not solved the Internet Camera might be open. Then run the Install Wizard...
... network cable. Frequently Asked Questions (continued) Internet Camera Installation Q: Can the DCS-900W be used only on Ethernet and Fast Ethernet network and supported by wireless transmission. A: The Internet Camera uses Category 5 UTP Twisted-pair cable allowing...Internet Camera be faulty. 81 A: The DCS-900W is required for the Internet Camera is not available, a second port needs to first disconnect the Internet Camera from a web browser. A: No, the Internet Camera is not recommended that there is not solved the Internet Camera might be open. Then run the Install Wizard...

