
Product Manual
Page 6
... or negotiate the transmission speed of using an external microphone by plugging it into the A/V out connector to use the DCS-5300 with a television or VCR. 6 This network port supports the NWay protocol, allowing the Internet Camera to 10Base-T Ethernet cabling or 100Base-TX Fast Ethernet cabling. This is the recommended cable type when the...
... or negotiate the transmission speed of using an external microphone by plugging it into the A/V out connector to use the DCS-5300 with a television or VCR. 6 This network port supports the NWay protocol, allowing the Internet Camera to 10Base-T Ethernet cabling or 100Base-TX Fast Ethernet cabling. This is the recommended cable type when the...

Product Manual
Page 7
... Panel Socket for stand Attachment socket for the Camera Stand Located on the bottom panel of the DCS-5300, the socket is used to connect the camera stand to the Internet Camera by attaching the screw head on the camera stand to the appendix in this manual for detailed information. As ... physical interface to send and receive digital signals to the Internet camera, the power LED will turn green to indicate a good connection to an Ethernet port or red to indicate no connection has been made. 7 The I /O Connector The DCS-5300 provides a terminal block with two pairs of connectors situated on...
... Panel Socket for stand Attachment socket for the Camera Stand Located on the bottom panel of the DCS-5300, the socket is used to connect the camera stand to the Internet Camera by attaching the screw head on the camera stand to the appendix in this manual for detailed information. As ... physical interface to send and receive digital signals to the Internet camera, the power LED will turn green to indicate a good connection to an Ethernet port or red to indicate no connection has been made. 7 The I /O Connector The DCS-5300 provides a terminal block with two pairs of connectors situated on...
Product Manual
Page 15
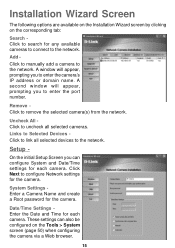
Add Click to manually add a camera to remove the selected camera(s) from the network. Uncheck All Click to uncheck all selected devices to the network. Click Next to configure Network settings for any available cameras to connect to the network. Links to Selected Devices Click to search for the camera. Installation Wizard Screen The following options are available on the...
Add Click to manually add a camera to remove the selected camera(s) from the network. Uncheck All Click to uncheck all selected devices to the network. Click Next to configure Network settings for any available cameras to connect to the network. Links to Selected Devices Click to search for the camera. Installation Wizard Screen The following options are available on the...

Product Manual
Page 28
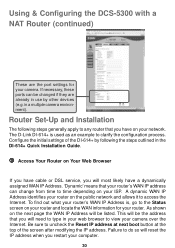
... Gateway D-Link's DCS-5300 is configured to allow remote viewing of the camera over the Internet. After you have completed the setup of the DCS-5300, follow the steps outlined in the Quick Installation Guide you will have an operating camera that allows it to configure the DCS-5300. Assign a Local IP Address for installing your Local Area Network (LAN...
... Gateway D-Link's DCS-5300 is configured to allow remote viewing of the camera over the Internet. After you have completed the setup of the DCS-5300, follow the steps outlined in the Quick Installation Guide you will have an operating camera that allows it to configure the DCS-5300. Assign a Local IP Address for installing your Local Area Network (LAN...

Product Manual
Page 29
.... Click on the left side of the Network Configuration page to your Internet Explorer Web browser. Scroll to the bottom of the display. In the address bar, type in the IP Address that was assigned to view this screen from the camera. The DCS-5300 Home Page appears with a NAT Router (...the Internet Camera using your Internet Explorer Web browser Run your camera. Viewing the Video on the browser to test the connection Click on the Configuration button on the Configuration button. Write it down for later use. 192.168.0.101 is the IP Address assigned to display the ports used ...
.... Click on the left side of the Network Configuration page to your Internet Explorer Web browser. Scroll to the bottom of the display. In the address bar, type in the IP Address that was assigned to view this screen from the camera. The DCS-5300 Home Page appears with a NAT Router (...the Internet Camera using your Internet Explorer Web browser Run your camera. Viewing the Video on the browser to test the connection Click on the Configuration button on the Configuration button. Write it down for later use. 192.168.0.101 is the IP Address assigned to display the ports used ...
Product Manual
Page 30
in the DI-614+ Quick Installation Guide. A dynamic WAN IP Address identifies your router on the public network and allows it to clarify the configuration process. If necessary, these ports can change from time to any router that you have on the next page the WAN IP Address will ...D-Link DI-614+ is , go to do so will reset the IP address when you restart your computer. 30 Using & Configuring the DCS-5300 with a NAT Router (continued) These are already in use by following steps generally apply to time depending on your router and locate the WAN information for your camera....
in the DI-614+ Quick Installation Guide. A dynamic WAN IP Address identifies your router on the public network and allows it to clarify the configuration process. If necessary, these ports can change from time to any router that you have on the next page the WAN IP Address will ...D-Link DI-614+ is , go to do so will reset the IP address when you restart your computer. 30 Using & Configuring the DCS-5300 with a NAT Router (continued) These are already in use by following steps generally apply to time depending on your router and locate the WAN information for your camera....

Product Manual
Page 31
... Viewing The firewall security features built into the DI-614+ router prevent users from accessing the video from your camera. The ports normally used by the DCS-5300 are blocked from a remote location. Using & Configuring the DCS-5300 with a NAT Router (continued) Your WAN IP Address will be made accessible over the Internet. Open Virtual Server...
... Viewing The firewall security features built into the DI-614+ router prevent users from accessing the video from your camera. The ports normally used by the DCS-5300 are blocked from a remote location. Using & Configuring the DCS-5300 with a NAT Router (continued) Your WAN IP Address will be made accessible over the Internet. Open Virtual Server...

Product Manual
Page 32
... will need to change the port the camera uses from 80 to something else, such as 800. Enter valid ports in to the Public and Private Port section, click Apply. • Scheduling should be set to open the appropriate ports accordingly. Using & Configuring the DCS-5300 with your ISP so that ...you can be accessed at any time. Important: Some ISPs block access to both the Public and Private Port sections. Be sure to check with a NAT Router (continued...
... will need to change the port the camera uses from 80 to something else, such as 800. Enter valid ports in to the Public and Private Port section, click Apply. • Scheduling should be set to open the appropriate ports accordingly. Using & Configuring the DCS-5300 with your ISP so that ...you can be accessed at any time. Important: Some ISPs block access to both the Public and Private Port sections. Be sure to check with a NAT Router (continued...

Product Manual
Page 33
... type the IP Address of the Camera followed by a colon, and the port number that you gave your camera (e.g., http://205.163.122.96:83). http://205.163.122.96:83 Viewing the DCS-5300 Remotely 33 To access the camera from a computer on your local (home) network, simply enter the local IP Address... of the router given to the camera through the Internet...
... type the IP Address of the Camera followed by a colon, and the port number that you gave your camera (e.g., http://205.163.122.96:83). http://205.163.122.96:83 Viewing the DCS-5300 Remotely 33 To access the camera from a computer on your local (home) network, simply enter the local IP Address... of the router given to the camera through the Internet...

Product Manual
Page 37
... used for the next connection. Only the HTTP port must be chosen for users to the DCS-5300 successfully, the working protocol will not be displayed in the following options are available from the Connections settings screen: Media Option: Option for most users. If the network environment is less likely to occur compared to...
... used for the next connection. Only the HTTP port must be chosen for users to the DCS-5300 successfully, the working protocol will not be displayed in the following options are available from the Connections settings screen: Media Option: Option for most users. If the network environment is less likely to occur compared to...

Product Manual
Page 40
... external FTP server. Granted folder on the external FTP server. Using the DCS-5300 with an Internet browser (continued) Configuration > Advanced >Network (continued) SMTP(mail) server 2 - The return e-mail address to use port 60 for authentication purposes.) FTP Settings Local FTP server port - 1st FTP server - 1st FTP user name 1st FTP password 1st FTP...
... external FTP server. Granted folder on the external FTP server. Using the DCS-5300 with an Internet browser (continued) Configuration > Advanced >Network (continued) SMTP(mail) server 2 - The return e-mail address to use port 60 for authentication purposes.) FTP Settings Local FTP server port - 1st FTP server - 1st FTP user name 1st FTP password 1st FTP...

Product Manual
Page 41
....168.0.146) from 80 to correspond with an Internet browser (continued) Configuration > Advanced >Network (continued) Primary FTP Passive Mode- 2nd FTP server - Passive mode FTP can automatically attempt to other than the default port 80. Using the DCS-5300 with the port opened by a firewall, a data connection for the backup FTP server. Granted folder on...
....168.0.146) from 80 to correspond with an Internet browser (continued) Configuration > Advanced >Network (continued) Primary FTP Passive Mode- 2nd FTP server - Passive mode FTP can automatically attempt to other than the default port 80. Using the DCS-5300 with the port opened by a firewall, a data connection for the backup FTP server. Granted folder on...

Product Manual
Page 42
.... Can be set to other than the default port 5003 to improve audio quality by the firewall. Video channel port - If you cannot connect to the camera, refer to not respond. Consult with an Internet browser (continued) Configuration > Advanced >Network (continued) Audio channel port - Using the DCS-5300 with your network administrator or your Internet Service Provider (ISP...
.... Can be set to other than the default port 5003 to improve audio quality by the firewall. Video channel port - If you cannot connect to the camera, refer to not respond. Consult with an Internet browser (continued) Configuration > Advanced >Network (continued) Audio channel port - Using the DCS-5300 with your network administrator or your Internet Service Provider (ISP...

Product Manual
Page 63
... do not change the port number unless your camera is recommended that you can assign any port number to this window, enter the settings for the FTP server you must be correctly configured for the DCS-5300. Record Snapshots to your FTP server with Motion Detection (continued) Next, click the Network button under the Advanced tab...
... do not change the port number unless your camera is recommended that you can assign any port number to this window, enter the settings for the FTP server you must be correctly configured for the DCS-5300. Record Snapshots to your FTP server with Motion Detection (continued) Next, click the Network button under the Advanced tab...

Product Manual
Page 79
... the system will see the IP address of the camera and also the port that is opened on the camera (port 80 in this example), so that the images can be inserted to the camera selection list. Click Ok Once added, you will try to connect to the selection list. ...79 Specify the IP address, port, and admin password of the camera. Specify the IP address, port, and admin password of the network camera, click the "Ok" button to the camera list. To insert a remote network camera to close the dialog. If the connection succeeds, the camera will popup, as shown below. Using ...
... the system will see the IP address of the camera and also the port that is opened on the camera (port 80 in this example), so that the images can be inserted to the camera selection list. Click Ok Once added, you will try to connect to the selection list. ...79 Specify the IP address, port, and admin password of the camera. Specify the IP address, port, and admin password of the network camera, click the "Ok" button to the camera list. To insert a remote network camera to close the dialog. If the connection succeeds, the camera will popup, as shown below. Using ...

Product Manual
Page 126
... an Ethernet or Fast Ethernet network. Check with the DCS-5300. A2: Make sure that the configuration of the router settings allow the Internet Camera to be opened on the firewall. The D-Link DSB-C110, DSB-C310, can be connected to a LAN with any Web server you change the default ports) need to be accessed outside...
... an Ethernet or Fast Ethernet network. Check with the DCS-5300. A2: Make sure that the configuration of the router settings allow the Internet Camera to be opened on the firewall. The D-Link DSB-C110, DSB-C310, can be connected to a LAN with any Web server you change the default ports) need to be accessed outside...
Product Manual
Page 131
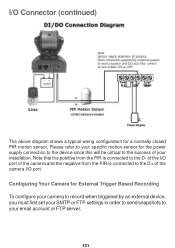
...when triggered by an external device, you must first set your SMTP or FTP settings in order to send snapshots to the success of the camera I /O Connector (continued) The above diagram shows a typical wiring configuration for the power supply connection to the device since this will be ...critical to your installation. I /O port. of the I/O port of the camera and the negative from the PIR is connected to the D- Note that the positive from the PIR is connected to the D+ of ...
...when triggered by an external device, you must first set your SMTP or FTP settings in order to send snapshots to the success of the camera I /O Connector (continued) The above diagram shows a typical wiring configuration for the power supply connection to the device since this will be ...critical to your installation. I /O port. of the I/O port of the camera and the negative from the PIR is connected to the D- Note that the positive from the PIR is connected to the D+ of ...
