User Manual
Page 3
1) Identify Your Camera on the Network ...42 2) Assign a Local IP Address and Port for Your Camera ...43 3) Open the HTTP Port ...44 4) Open Virtual Server Ports to Enable Remote Image Viewing ...46 Viewing Your Camera Over the Internet ...47 Viewing Your Camera Over the Internet Behind a Router...47 Frequently Asked Questions...48 Internet Camera Features ...48 Internet Camera Installation ...49 How to Ping Your IP Address...51 Time Zone Table ...53 DI/DO Input specifications ...54 Technical Specifications...55 ii
1) Identify Your Camera on the Network ...42 2) Assign a Local IP Address and Port for Your Camera ...43 3) Open the HTTP Port ...44 4) Open Virtual Server Ports to Enable Remote Image Viewing ...46 Viewing Your Camera Over the Internet ...47 Viewing Your Camera Over the Internet Behind a Router...47 Frequently Asked Questions...48 Internet Camera Features ...48 Internet Camera Installation ...49 How to Ping Your IP Address...51 Time Zone Table ...53 DI/DO Input specifications ...54 Technical Specifications...55 ii
User Manual
Page 7
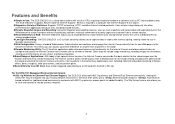
... TCP/IP networking, HTTP, and other Internet/Intranet applications because of its own Web page via Intranet or Internet. It can also be integrated easily into your DCS-2102/2121 at anytime, from anywhere in low-light environments. „ Web Configuration: Using a standard Web browser, Administrators can configure and manage the Internet Camera directly from...
... TCP/IP networking, HTTP, and other Internet/Intranet applications because of its own Web page via Intranet or Internet. It can also be integrated easily into your DCS-2102/2121 at anytime, from anywhere in low-light environments. „ Web Configuration: Using a standard Web browser, Administrators can configure and manage the Internet Camera directly from...
User Manual
Page 18
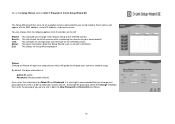
...also highly recommended that you through initial network setup of cameras after rescanning for cameras on the left: Wizard: Search: Link: About: Exit: This will then scan for all available cameras connected to keep your password at this information for the selected camera. It is blank] Here, enter this... information. This will open the setup wizard, which will appear with its MAC address, current IP address, and camera name. This will refresh the list of the selected camera. To run the Setup Wizard, click on Wizard will open the configuration web interface for Admin...
...also highly recommended that you through initial network setup of cameras after rescanning for cameras on the left: Wizard: Search: Link: About: Exit: This will then scan for all available cameras connected to keep your password at this information for the selected camera. It is blank] Here, enter this... information. This will open the setup wizard, which will appear with its MAC address, current IP address, and camera name. This will refresh the list of the selected camera. To run the Setup Wizard, click on Wizard will open the configuration web interface for Admin...
User Manual
Page 19
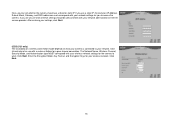
After entering your settings, click Next. (DCS-2121 only) The availability of what these settings should use a direct or static IP. Click Next. 16 Click Infrastructure for use a static IP, the camera's IP Address, Subnet Mask, Gateway, and DNS addresses must correspond with your network. Click Next. Enter the Encryption Mode, Key Format, and Encryption Keys for...
After entering your settings, click Next. (DCS-2121 only) The availability of what these settings should use a direct or static IP. Click Next. 16 Click Infrastructure for use a static IP, the camera's IP Address, Subnet Mask, Gateway, and DNS addresses must correspond with your network. Click Next. Enter the Encryption Mode, Key Format, and Encryption Keys for...
User Manual
Page 21
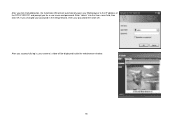
After you click the Link button, the Installation Wizard will be displayed inside the web browser window. 18 If you for a user name and password. Enter "admin" into the User name field, then click OK. After you successfully log in, your camera's video will automatically open your Web browser to the IP address of the DCS-2102/2121 and prompt you changed your password in the Setup Wizard, enter your password then click OK.
After you click the Link button, the Installation Wizard will be displayed inside the web browser window. 18 If you for a user name and password. Enter "admin" into the User name field, then click OK. After you successfully log in, your camera's video will automatically open your Web browser to the IP address of the DCS-2102/2121 and prompt you changed your password in the Setup Wizard, enter your password then click OK.
User Manual
Page 24
... service. Click the "Link" button will show up. Your DCS-2102/2121 may have a different IP Address assigned to it by default) to log in to the web interface, the home screen will open the configuration page from a Web Browser, enter the IP address that you are ready to use your camera. Use the following displayed...
... service. Click the "Link" button will show up. Your DCS-2102/2121 may have a different IP Address assigned to it by default) to log in to the web interface, the home screen will open the configuration page from a Web Browser, enter the IP address that you are ready to use your camera. Use the following displayed...
User Manual
Page 25
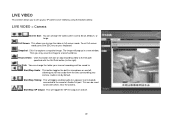
... video screen size to . Start/Stop Talking: This will pop up your IP camera's live video by default. Snapshot: Click it to view the video in full screen mode. Audio is on your... may save this button will start or stop recording video to the file path specified with others near the camera. Full Screen: This allows you to capture a snapshot image. Start/Stop GP Output: This will be ...to the right). LIVE VIDEO This section allows you to set up in a new window. LIVE VIDEO > Camera Screen Size: You can be saved to Small, Medium, or Large. This can change the folder your manual...
... video screen size to . Start/Stop Talking: This will pop up your IP camera's live video by default. Snapshot: Click it to view the video in full screen mode. Audio is on your... may save this button will start or stop recording video to the file path specified with others near the camera. Full Screen: This allows you to capture a snapshot image. Start/Stop GP Output: This will be ...to the right). LIVE VIDEO This section allows you to set up in a new window. LIVE VIDEO > Camera Screen Size: You can be saved to Small, Medium, or Large. This can change the folder your manual...

User Manual
Page 26
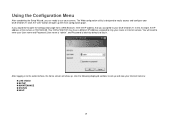
... detection options by clicking on the left side (Network Setup / Wireless Setup / Motion Detection / Snapshot). SETUP > Wizard The setup wizards guide you through initial setup of your IP camera. SETUP This section allows you to further set up your camera. Simply follow the instructions given in Audio and Video...manually set up or change the configuration of the wizard to SXGA mode in each step of your IP camera. You can use the Internet Connection Setup Wizard for initial network setup, and you can use the Motion Detection Setup Wizard to set to quickly set up motion ...
... detection options by clicking on the left side (Network Setup / Wireless Setup / Motion Detection / Snapshot). SETUP > Wizard The setup wizards guide you through initial setup of your IP camera. SETUP This section allows you to further set up your camera. Simply follow the instructions given in Audio and Video...manually set up or change the configuration of the wizard to SXGA mode in each step of your IP camera. You can use the Internet Connection Setup Wizard for initial network setup, and you can use the Motion Detection Setup Wizard to set to quickly set up motion ...
User Manual
Page 27
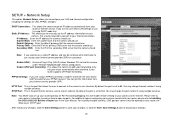
...the camera's user interface. You can get an IP address automatically from your camera. HTTP Port: This is the port that the camera should use . IP Address: Enter the IP address the camera should use. Note: You MUST also set to 80. SETUP > Network Setup This option, Network Setup,... camera should use . If you are using multiple cameras. Default Gateway: Enter the default gateway that the camera should use. Primary DNS: Enter the IP of your router, the Web server (HTTP) port. Enable UPnP: Universal Plug & Play (UPnP) allows Windows PCs to Installing the DCS-2102...
...the camera's user interface. You can get an IP address automatically from your camera. HTTP Port: This is the port that the camera should use . IP Address: Enter the IP address the camera should use. Note: You MUST also set to 80. SETUP > Network Setup This option, Network Setup,... camera should use . If you are using multiple cameras. Default Gateway: Enter the default gateway that the camera should use. Primary DNS: Enter the IP of your router, the Web server (HTTP) port. Enable UPnP: Universal Plug & Play (UPnP) allows Windows PCs to Installing the DCS-2102...
User Manual
Page 28
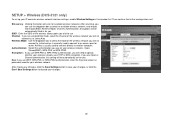
... . SETUP > Wireless (DCS-2121 only) To set for you. Then continue the further configuration next. Channel: If you are using Ad Hoc mode, select the channel of the wireless network you wish to connect to specify whether your IP camera's wireless network interface settings, enable Wireless ...Settings in for your wireless network. Ad-Hoc is normally used for you. Site survey: Clicking this ...
... . SETUP > Wireless (DCS-2121 only) To set for you. Then continue the further configuration next. Channel: If you are using Ad Hoc mode, select the channel of the wireless network you wish to connect to specify whether your IP camera's wireless network interface settings, enable Wireless ...Settings in for your wireless network. Ad-Hoc is normally used for you. Site survey: Clicking this ...
User Manual
Page 29
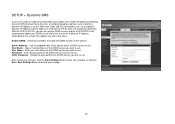
...the duration of keeping a domain name linked to a dynamic IP address, is used only for the DDNS service you wish to use. Enable DDNS: Check this update may take a few hours. With the DCS-2102/2121, you can set up your DDNS service and the DCS-2102/2121 will automatically update your changes....DDNS service you wish to use . User Name: Enter your modem IP address periodically, Dynamic DNS (Domain Name Service), a method of that specific connection. Server Address: Use the dropdown box to the right to select a DDNS service to use . Host Name: Type in the Host Name of the camera.
...the duration of keeping a domain name linked to a dynamic IP address, is used only for the DDNS service you wish to use. Enable DDNS: Check this update may take a few hours. With the DCS-2102/2121, you can set up your DDNS service and the DCS-2102/2121 will automatically update your changes....DDNS service you wish to use . User Name: Enter your modem IP address periodically, Dynamic DNS (Domain Name Service), a method of that specific connection. Server Address: Use the dropdown box to the right to select a DDNS service to use . Host Name: Type in the Host Name of the camera.
User Manual
Page 30
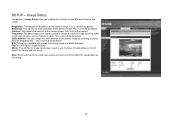
... The options in such a way that your IP camera sensor and image. Frequency: This option adjusts the camera sensor's setting to Auto by selecting a setting from the dropdown box. Saturation: This adjusts the color saturation of the camera image by default. This is set to mount the DCS-2102/2121 upside down on the left side...
... The options in such a way that your IP camera sensor and image. Frequency: This option adjusts the camera sensor's setting to Auto by selecting a setting from the dropdown box. Saturation: This adjusts the color saturation of the camera image by default. This is set to mount the DCS-2102/2121 upside down on the left side...
User Manual
Page 31
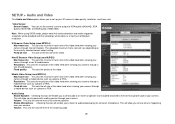
...VGA quality (640x640), XGA quality (1024x768), or SXGA quality (1280x1024). Fixed bit rate: This will enable you to listen to audio picked up your camera through a non-IE web browser. Enable Microphone: Checking this box will vary depending on the currently selected sensor output setting. Volume: This sets the... volume level of the video. Fixed quality: This sets the quality of the video feed when viewing your IP camera's video quality, resolution, and frame rate. SETUP > Audio and Video This Audio and Video option allows you to set up by the...
...VGA quality (640x640), XGA quality (1024x768), or SXGA quality (1280x1024). Fixed bit rate: This will enable you to listen to audio picked up your camera through a non-IE web browser. Enable Microphone: Checking this box will vary depending on the currently selected sensor output setting. Volume: This sets the... volume level of the video. Fixed quality: This sets the quality of the video feed when viewing your IP camera's video quality, resolution, and frame rate. SETUP > Audio and Video This Audio and Video option allows you to set up by the...

User Manual
Page 33
... be to motion, where 100% will be the most sensitive setting and 0% will be the least sensitive setting. Note: If the camera is disabled. 30 Drawing Mode: This will clear all motion detection zones. SETUP > Motion Detection This option allows you to set to SXGA mode in ... video window and draw motion detection zones by clicking and dragging your mouse. After making any changes, click the Save Settings button to save your IP camera. Red areas indicate areas that will be monitored for motion. You can then click on your changes, or click the Don't Save Settings button to...
... be to motion, where 100% will be the most sensitive setting and 0% will be the least sensitive setting. Note: If the camera is disabled. 30 Drawing Mode: This will clear all motion detection zones. SETUP > Motion Detection This option allows you to set to SXGA mode in ... video window and draw motion detection zones by clicking and dragging your mouse. After making any changes, click the Save Settings button to save your IP camera. Red areas indicate areas that will be monitored for motion. You can then click on your changes, or click the Don't Save Settings button to...

User Manual
Page 42
STATUS The Status section provides the detail information about your IP camera. STATUS> Device Info This screen shows you various information about your camera and its current settings. 39
STATUS The Status section provides the detail information about your IP camera. STATUS> Device Info This screen shows you various information about your camera and its current settings. 39
User Manual
Page 45
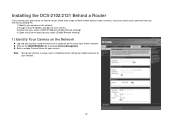
Installing the DCS-2102/2121 Behind a Router If you connect your cameras to an Internet router, follow these steps to allow remote access to your cameras, so you can access your cameras from any Internet-connected PC: 1) Identify your camera on the network 2) Assign a local IP address and port for your camera 3) Determine your router's WAN IP Address (Enable Remote Viewing...
Installing the DCS-2102/2121 Behind a Router If you connect your cameras to an Internet router, follow these steps to allow remote access to your cameras, so you can access your cameras from any Internet-connected PC: 1) Identify your camera on the network 2) Assign a local IP address and port for your camera 3) Determine your router's WAN IP Address (Enable Remote Viewing...
User Manual
Page 46
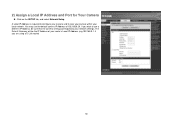
You may use a different IP Address, be the IP Address of 192.168.0.20. The Default Gateway will be sure that the camera settings correspond to your network settings. If you wish to use the default camera IP Address of your local network. 2) Assign a Local IP Address and Port for Your Camera „ Click on the SETUP tab, and select Network Setup A Local IP Address is required to configure your camera and to view your camera within your router's Local IP Address (e.g.192.168.0.1, if you are using a D-Link router) 43
You may use a different IP Address, be the IP Address of 192.168.0.20. The Default Gateway will be sure that the camera settings correspond to your network settings. If you wish to use the default camera IP Address of your local network. 2) Assign a Local IP Address and Port for Your Camera „ Click on the SETUP tab, and select Network Setup A Local IP Address is required to configure your camera and to view your camera within your router's Local IP Address (e.g.192.168.0.1, if you are using a D-Link router) 43
User Manual
Page 47
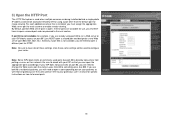
...not available, you will need to open a different port for example, if you are already using a port other than the default port for each additional camera that you can proceed to the next section. If port 80 is not available (for RTSP. Similarly, if port 554 is open a corresponding port ... ports. 44 Note: Be sure to take note of these settings since these ports are available for specific instructions on their network. Not all gateways are behind a single public IP address and will be accessed remotely OR for using port 80 to run a Web server or your ISP blocks access on...
...not available, you will need to open a different port for example, if you are already using a port other than the default port for each additional camera that you can proceed to the next section. If port 80 is not available (for RTSP. Similarly, if port 554 is open a corresponding port ... ports. 44 Note: Be sure to take note of these settings since these ports are available for specific instructions on their network. Not all gateways are behind a single public IP address and will be accessed remotely OR for using port 80 to run a Web server or your ISP blocks access on...

User Manual
Page 48
...Note: Because a dynamic WAN IP address can use DDNS to obtain an IP address, please refer to page 27 for more convenient for you to use to access your camera from your network. The D-Link DIR-300 is a fixed IP address that you have on your ISP. A Static IP address is used as an example... to obtain a Static IP address from a remote location. Router Setup The following window. Your WAN...
...Note: Because a dynamic WAN IP address can use DDNS to obtain an IP address, please refer to page 27 for more convenient for you to use to access your camera from your network. The D-Link DIR-300 is a fixed IP address that you have on your ISP. A Static IP address is used as an example... to obtain a Static IP address from a remote location. Router Setup The following window. Your WAN...

User Manual
Page 49
.... This is also referred to as follows: „ Select Enabled to enable virtual server settings. „ Select a camera name. „ Enter your camera's Local IP Address in the private/local IP field. „ Select TCP under Protocol Type. „ Enter 80 for your public port, and whatever port your... camera's HTTP port is the default). If you cannot use port 80 for your camera. „ The schedule should be ...
.... This is also referred to as follows: „ Select Enabled to enable virtual server settings. „ Select a camera name. „ Enter your camera's Local IP Address in the private/local IP field. „ Select TCP under Protocol Type. „ Enter 80 for your public port, and whatever port your... camera's HTTP port is the default). If you cannot use port 80 for your camera. „ The schedule should be ...


