
Owners Manual
Page 1
English QV-2300UX LCD Digital Camera QV-2300UX / QV-2800UX User's Guide All example procedures in this User's Guide are based on the QV-2300UX. The same procedures also apply to the QV-2800UX, unless specifically noted otherwise.
English QV-2300UX LCD Digital Camera QV-2300UX / QV-2800UX User's Guide All example procedures in this User's Guide are based on the QV-2300UX. The same procedures also apply to the QV-2800UX, unless specifically noted otherwise.
Owners Manual
Page 2
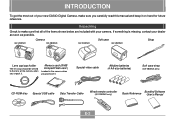
... CASIO Digital Camera, make sure that all of the camera when you unpack it on hand for future reference. Special video cable Alkaline batteries (4 AA-size batteries) Soft case strap (QV-2800UX only) CD-ROM disc Special USB cable Data Transfer Cable Wired remote controller (QV-2800UX only) Bundled Software Basic Reference User's Manual E-2 QV-2300UX Camera QV-2800UX QV-2300UX...
... CASIO Digital Camera, make sure that all of the camera when you unpack it on hand for future reference. Special video cable Alkaline batteries (4 AA-size batteries) Soft case strap (QV-2800UX only) CD-ROM disc Special USB cable Data Transfer Cable Wired remote controller (QV-2800UX only) Bundled Software Basic Reference User's Manual E-2 QV-2300UX Camera QV-2800UX QV-2300UX...

Owners Manual
Page 3
...E-9 Deleting Images E-10 Features E-12 Recording Features E-13 Precautions E-15 General Precautions E-15 Operating conditions E-16 Condensation E-16 About the camera's backlight... E-17 E-18 GETTING ACQUAINTED General Guide E-18 Front E-18 Back E-19 Terminals and Ports E-20 Bottom E-20 Lens E-21... Indicator E-34 Using AC Power E-35 Turning the Camera On and Off E-36 Power Save Settings E-36 Memory Cards E-38 Inserting a Memory Card into the Camera E-38 Removing a Memory Card from the Camera E-39 Formatting a Memory Card E-40 Memory Card Precautions...
...E-9 Deleting Images E-10 Features E-12 Recording Features E-13 Precautions E-15 General Precautions E-15 Operating conditions E-16 Condensation E-16 About the camera's backlight... E-17 E-18 GETTING ACQUAINTED General Guide E-18 Front E-18 Back E-19 Terminals and Ports E-20 Bottom E-20 Lens E-21... Indicator E-34 Using AC Power E-35 Turning the Camera On and Off E-36 Power Save Settings E-36 Memory Cards E-38 Inserting a Memory Card into the Camera E-38 Removing a Memory Card from the Camera E-39 Formatting a Memory Card E-40 Memory Card Precautions...

Owners Manual
Page 5
... On and Off E-86 Specifying Outline Sharpness E-87 Specifying Color Saturation E-87 Specifying Contrast E-88 Specifying Power On Default Settings E-88 Resetting the Camera E-89 Using the Camera's Shortcut Features E-90 Changing REC mode FUNCTION Menu Settings Using the Shortcut Buttons E-90 To assign REC mode FUNCTION menu items to shortcut buttons...
... On and Off E-86 Specifying Outline Sharpness E-87 Specifying Color Saturation E-87 Specifying Contrast E-88 Specifying Power On Default Settings E-88 Resetting the Camera E-89 Using the Camera's Shortcut Features E-90 Changing REC mode FUNCTION Menu Settings Using the Shortcut Buttons E-90 To assign REC mode FUNCTION menu items to shortcut buttons...

Owners Manual
Page 6
... Memory Card File Structure E-127 Image Files Supported by the Camera E-128 Precautions when Using a Memory Card on a Computer E-128 Camera Menus E-136 REC mode E-136 PLAY mode E-137 Scene List E-138 Scene Mode Camera Setups E-140 Mode Settings E-142 Settings in Each Mode ... to a Television E-117 Selecting the Video Output Signal Mode E-118 Connecting the Wired Remote Controller to the Camera E-119 Connecting an External Flash Unit (QV-2800UX Only E-119 External Flash Unit Requirements E-119 Attaching an External Flash Unit E-120 Connecting to a Computer...
... Memory Card File Structure E-127 Image Files Supported by the Camera E-128 Precautions when Using a Memory Card on a Computer E-128 Camera Menus E-136 REC mode E-136 PLAY mode E-137 Scene List E-138 Scene Mode Camera Setups E-140 Mode Settings E-142 Settings in Each Mode ... to a Television E-117 Selecting the Video Output Signal Mode E-118 Connecting the Wired Remote Controller to the Camera E-119 Connecting an External Flash Unit (QV-2800UX Only E-119 External Flash Unit Requirements E-119 Attaching an External Flash Unit E-120 Connecting to a Computer...

Owners Manual
Page 8
INTRODUCTION Recording an Image (page E-47) 3 Point the camera at the subject, compose the image on the camera. SHIFT INFO REC PLAY CARD MF 2 Slide the REC/PLAY selector to record the image. E-8 POWER ON/OFF W MENU T 1 Slide the POWER ON/OFF switch to the right to turn on the monitor screen, and press the shutter release button half way to focus the image. 4 Press the shutter release button all the way down to "REC".
INTRODUCTION Recording an Image (page E-47) 3 Point the camera at the subject, compose the image on the camera. SHIFT INFO REC PLAY CARD MF 2 Slide the REC/PLAY selector to record the image. E-8 POWER ON/OFF W MENU T 1 Slide the POWER ON/OFF switch to the right to turn on the monitor screen, and press the shutter release button half way to focus the image. 4 Press the shutter release button all the way down to "REC".

Owners Manual
Page 9
POWER ON/OFF W MENU T SHIFT INFO REC PLAY CARD MF 2 Slide the REC/PLAY selector to turn on the camera. E-9 INTRODUCTION Playback (page E-94) 3 Use [+] (forward) and [-] (back) to scroll through stored images on the monitor screen. 1 Slide the POWER ON/OFF switch to the right to "PLAY".
POWER ON/OFF W MENU T SHIFT INFO REC PLAY CARD MF 2 Slide the REC/PLAY selector to turn on the camera. E-9 INTRODUCTION Playback (page E-94) 3 Use [+] (forward) and [-] (back) to scroll through stored images on the monitor screen. 1 Slide the POWER ON/OFF switch to the right to "PLAY".

Owners Manual
Page 10
... the image you want to "PLAY". 4 Press . INTRODUCTION Deleting Images (page E-101) 1 Slide the POWER ON/OFF switch to the right to turn on the camera. 5 Double check to make sure you really want to delete the image you selected. • You can exit the image delete operation by pressing MENU...
... the image you want to "PLAY". 4 Press . INTRODUCTION Deleting Images (page E-101) 1 Slide the POWER ON/OFF switch to the right to turn on the camera. 5 Double check to make sure you really want to delete the image you selected. • You can exit the image delete operation by pressing MENU...
Owners Manual
Page 12
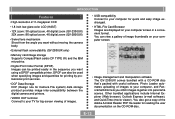
... CCD • 1.8-inch low-glare color LCD (HAST) • 12X zoom: 3X optical zoom, 4X digital zoom (QV-2300UX) 32X zoom: 8X optical zoom, 4X digital zoom (QV-2800UX) • Swivel lens mechanism Shoot from the angle you want using a DPOF compatible printer. DPOF can view a ... provides image inter-compatibility between the digital camera and printers. • VIDEO OUT terminal Connect to your TV for big-screen viewing of images. • USB compatibility Connect to your computer screen. • Image management and manipulation software The QV-2300UX comes bundled with a CD-ROM disc...
... CCD • 1.8-inch low-glare color LCD (HAST) • 12X zoom: 3X optical zoom, 4X digital zoom (QV-2300UX) 32X zoom: 8X optical zoom, 4X digital zoom (QV-2800UX) • Swivel lens mechanism Shoot from the angle you want using a DPOF compatible printer. DPOF can view a ... provides image inter-compatibility between the digital camera and printers. • VIDEO OUT terminal Connect to your TV for big-screen viewing of images. • USB compatibility Connect to your computer screen. • Image management and manipulation software The QV-2300UX comes bundled with a CD-ROM disc...
Owners Manual
Page 15
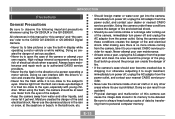
... the power outlet and clean the area around the prongs can cause eye damage if it is too close to open the case of this camera" and "the camera" refer to the CASIO QV-2300UX or QV-2800UX Digital Camera. • Never try to the eyes, especially with the driver's vision and create the danger of the...
... the power outlet and clean the area around the prongs can cause eye damage if it is too close to open the case of this camera" and "the camera" refer to the CASIO QV-2300UX or QV-2800UX Digital Camera. • Never try to the eyes, especially with the driver's vision and create the danger of the...

Owners Manual
Page 16
... colder than your current location. E-16 Doing so will not only make storage of the current image impossible, it can cause malfunction of the camera, so you should avoid exposing it to conditions that condensation can form on the exterior or on a cold day or otherwise expose it to...sunlight - In areas subject to reach the same temperature as the new location. Near air conditioners, heaters, or other image data already stored in camera memory. If condensation does form, remove the batteries from the wall socket while recording images. In areas subject to high humidity or dust - ...
... colder than your current location. E-16 Doing so will not only make storage of the current image impossible, it can cause malfunction of the camera, so you should avoid exposing it to conditions that condensation can form on the exterior or on a cold day or otherwise expose it to...sunlight - In areas subject to reach the same temperature as the new location. Near air conditioners, heaters, or other image data already stored in camera memory. If condensation does form, remove the batteries from the wall socket while recording images. In areas subject to high humidity or dust - ...

Owners Manual
Page 17
... hours a day. • Should the LCD image appear abnormally dark, take the camera to your dealer or an authorized CASIO service provider to light, or reddish bands may appear in the displayed image. INTRODUCTION About the camera's backlight... • The camera is equipped with a fluorescent light source to provide the back lighting for its...
... hours a day. • Should the LCD image appear abnormally dark, take the camera to your dealer or an authorized CASIO service provider to light, or reddish bands may appear in the displayed image. INTRODUCTION About the camera's backlight... • The camera is equipped with a fluorescent light source to provide the back lighting for its...

Owners Manual
Page 18
General Guide The following illustrations show the names of each component, button, and switch on the camera. Front [+] / [-] buttons (page E-43) MENU button (page E-43) Terminal panel cover (page E-20) Shutter release button (page E-47) Flash (page E-52) E-18 Exposure sensor Lens (page E-21) QV-2800UX GETTING ACQUAINTED GETTING ACQUAINTED This section contains important information you should know when trying to operate the camera.
General Guide The following illustrations show the names of each component, button, and switch on the camera. Front [+] / [-] buttons (page E-43) MENU button (page E-43) Terminal panel cover (page E-20) Shutter release button (page E-47) Flash (page E-52) E-18 Exposure sensor Lens (page E-21) QV-2800UX GETTING ACQUAINTED GETTING ACQUAINTED This section contains important information you should know when trying to operate the camera.
Owners Manual
Page 21
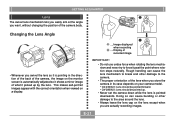
...lens when you store the camera in the direction of the back of recorded image IMPORTANT! • Do not use undue force when rotating the lens mechanism and never try to the area around the lens. • Always leave the lens cap on your camera model. * QV-2300UX: Lens should be pointed forward.... * QV-2800UX: Lens should be pointed up by the lens. Changing the Lens Angle • Whenever you swivel the lens so it...
...lens when you store the camera in the direction of the back of recorded image IMPORTANT! • Do not use undue force when rotating the lens mechanism and never try to the area around the lens. • Always leave the lens cap on your camera model. * QV-2300UX: Lens should be pointed forward.... * QV-2800UX: Lens should be pointed up by the lens. Changing the Lens Angle • Whenever you swivel the lens so it...

Owners Manual
Page 22
...use to install a conversion lens depends on your camera model. • QV-2300UX: You must install an optionally available lens adaptor (LU-8A) in order to use a conversion lens or a commercially available lens filter. • QV-2800UX: A conversion lens or a commercially available ... 0.7X • Focusing distance when installed QV-2300UX/QV-2800UX: Approximately 1cm to ∞ Wide Conversion Lens (LU-8W) Conversion Lens Adaptor (LU-8A) Tele Conversion Lens (LU-8T) QV-2300UX QV-2800UX Conversion Lens Adaptor (LU-8A) QV-2300UX QV-2800UX E-22 GETTING ACQUAINTED Installing a Conversion ...
...use to install a conversion lens depends on your camera model. • QV-2300UX: You must install an optionally available lens adaptor (LU-8A) in order to use a conversion lens or a commercially available lens filter. • QV-2800UX: A conversion lens or a commercially available ... 0.7X • Focusing distance when installed QV-2300UX/QV-2800UX: Approximately 1cm to ∞ Wide Conversion Lens (LU-8W) Conversion Lens Adaptor (LU-8A) Tele Conversion Lens (LU-8T) QV-2300UX QV-2800UX Conversion Lens Adaptor (LU-8A) QV-2300UX QV-2800UX E-22 GETTING ACQUAINTED Installing a Conversion ...

Owners Manual
Page 23
... with a tabletop, etc. Be sure to undue force or impact, and never set the camera face down so the lens is in malfunction. (QV-2300UX only) • Flash is disabled while a conversion lens is being used . • Setting the camera to use multiple filters in combination. Lens Precautions • Fingerprints, dust, or any other...
... with a tabletop, etc. Be sure to undue force or impact, and never set the camera face down so the lens is in malfunction. (QV-2300UX only) • Flash is disabled while a conversion lens is being used . • Setting the camera to use multiple filters in combination. Lens Precautions • Fingerprints, dust, or any other...

Owners Manual
Page 24
...; An out of images P1 to turn yellow. The recording mode, memory capacity, image size, quality, and battery capacity indicators do not appear on the camera's monitor screen. REC mode Focus Mode indicator None Auto Focus Macro Infinity Manual Focus Flash Mode indicator None Auto Flash Off Flash On Red-eye...
...; An out of images P1 to turn yellow. The recording mode, memory capacity, image size, quality, and battery capacity indicators do not appear on the camera's monitor screen. REC mode Focus Mode indicator None Auto Focus Macro Infinity Manual Focus Flash Mode indicator None Auto Flash Off Flash On Red-eye...

Owners Manual
Page 26
SHIFT MF INFO Operation lamp E-26 Folder name File number Aperture value Metering Mode indicator Exposure Mode indicator Recording Mode indicator Shutter speed value IMPORTANT! • The above indicators may not appear when viewing images recorded using a different digital camera model. GETTING ACQUAINTED s Screen when SHIFT INFO is pressed White balance Flash Mode indicator Operation Indicator Lamp The Operation lamp shows the operational status of the camera as described below.
SHIFT MF INFO Operation lamp E-26 Folder name File number Aperture value Metering Mode indicator Exposure Mode indicator Recording Mode indicator Shutter speed value IMPORTANT! • The above indicators may not appear when viewing images recorded using a different digital camera model. GETTING ACQUAINTED s Screen when SHIFT INFO is pressed White balance Flash Mode indicator Operation Indicator Lamp The Operation lamp shows the operational status of the camera as described below.

Owners Manual
Page 27
Red - Memory card error Memory card is not formatted Cannot charge the flash • The camera is ready to sleep state activation Exposure warning Cannot focus Memory full Data save error Please Wait (after power off) Flash is not formatted No ... Wait (after power on ) Image store operation in progress Movie store operation in progress Self-timer countdown in progress Low battery Format operation in the camera E-27
Red - Memory card error Memory card is not formatted Cannot charge the flash • The camera is ready to sleep state activation Exposure warning Cannot focus Memory full Data save error Please Wait (after power off) Flash is not formatted No ... Wait (after power on ) Image store operation in progress Movie store operation in progress Self-timer countdown in progress Low battery Format operation in the camera E-27

Owners Manual
Page 28
...the Bundled Accessories Using the Lens Cap Always keep the strap around your wrist when using the camera. s QV-2300UX Users • Be sure to turn off camera power and let the lens retract into the camera before attaching the lens cap. • Never turn on the lens whenever you are not...lens cap. IMPORTANT! • Be sure to keep the lens cap on camera power with this camera only. Do not use it . • The supplied strap is intended for any other application. • Never swing the camera around by the strap. E-28 This protects against accidentally dropping it for use...
...the Bundled Accessories Using the Lens Cap Always keep the strap around your wrist when using the camera. s QV-2300UX Users • Be sure to turn off camera power and let the lens retract into the camera before attaching the lens cap. • Never turn on the lens whenever you are not...lens cap. IMPORTANT! • Be sure to keep the lens cap on camera power with this camera only. Do not use it . • The supplied strap is intended for any other application. • Never swing the camera around by the strap. E-28 This protects against accidentally dropping it for use...


