
Owners Manual
Page 4
...Precautions E-49 Image Recording when the Battery is Low E-50 Using Zoom E-50 Using Optical Zoom E-50 Using Digital Zoom E-51 Using the Flash E-52 Flash Status Indicators E-53 Adjusting the Flash Intensity E-53 Precautions when Using Flash E-54 Selecting the Focus Mode E-55 Using the Auto Focus Mode E-55 Using the Macro Mode E-56 Using the Infinity Mode E-57 Using the Manual Focus Mode E-57 Using Focus Lock E-58 Specifying Image Size and Quality E-59 Using the Self-timer E-60 Exposure Compensation E-61 E-63 OTHER RECORDING FUNCTIONS Shooting Portraits E-63...
...Precautions E-49 Image Recording when the Battery is Low E-50 Using Zoom E-50 Using Optical Zoom E-50 Using Digital Zoom E-51 Using the Flash E-52 Flash Status Indicators E-53 Adjusting the Flash Intensity E-53 Precautions when Using Flash E-54 Selecting the Focus Mode E-55 Using the Auto Focus Mode E-55 Using the Macro Mode E-56 Using the Infinity Mode E-57 Using the Manual Focus Mode E-57 Using Focus Lock E-58 Specifying Image Size and Quality E-59 Using the Self-timer E-60 Exposure Compensation E-61 E-63 OTHER RECORDING FUNCTIONS Shooting Portraits E-63...

Owners Manual
Page 5
...-screen Grid On and Off E-86 Specifying Outline Sharpness E-87 Specifying Color Saturation E-87 Specifying Contrast E-88 Specifying Power On Default Settings E-88 Resetting the Camera E-89 Using the Camera's Shortcut Features E-90 Changing REC mode FUNCTION Menu Settings Using the Shortcut Buttons E-90 To assign REC mode FUNCTION menu items to shortcut buttons E-91 Directly Accessing the REC mode FUNCTION Menu E-93 E-94 PLAYBACK Basic Playback Operation E-94 Playing a Movie E-95 Playing a Panorama E-96 Enlarging the Playback Image E-97 Displaying the 9-image View...
...-screen Grid On and Off E-86 Specifying Outline Sharpness E-87 Specifying Color Saturation E-87 Specifying Contrast E-88 Specifying Power On Default Settings E-88 Resetting the Camera E-89 Using the Camera's Shortcut Features E-90 Changing REC mode FUNCTION Menu Settings Using the Shortcut Buttons E-90 To assign REC mode FUNCTION menu items to shortcut buttons E-91 Directly Accessing the REC mode FUNCTION Menu E-93 E-94 PLAYBACK Basic Playback Operation E-94 Playing a Movie E-95 Playing a Panorama E-96 Enlarging the Playback Image E-97 Displaying the 9-image View...

Owners Manual
Page 6
... SETTINGS Turning the Monitor Screen Indicators On and Off ... E-113 Changing the Display Language E-114 Turning the Confirmation Beep On and Off .......... E-115 Using the HTML Card Browser E-130 Specifying the Card Browser Type E-130 Viewing Card Browser File Contents E-132 Saving Card Browser Files E-135 E-136 REFERENCE E-116 CONNECTING TO EXTERNAL EQUIPMENT Connecting to a Television E-117 Selecting the Video Output Signal Mode E-118 Connecting the Wired Remote Controller to the Camera E-119 Connecting an External Flash...
... SETTINGS Turning the Monitor Screen Indicators On and Off ... E-113 Changing the Display Language E-114 Turning the Confirmation Beep On and Off .......... E-115 Using the HTML Card Browser E-130 Specifying the Card Browser Type E-130 Viewing Card Browser File Contents E-132 Saving Card Browser Files E-135 E-136 REFERENCE E-116 CONNECTING TO EXTERNAL EQUIPMENT Connecting to a Television E-117 Selecting the Video Output Signal Mode E-118 Connecting the Wired Remote Controller to the Camera E-119 Connecting an External Flash...

Owners Manual
Page 10
... POWER ON/OFF switch to the right to turn on the camera. 5 Double check to make sure you really want to "PLAY". 4 Press . POWER ON/OFF W MENU T SHIFT INFO REC PLAY CARD MF 6 Use [+] and [-] to move the cursor to "Yes" and then press the shutter release button to delete the image you want to delete the image you selected. • You can exit the image delete operation by pressing MENU. 3 Use...
... POWER ON/OFF switch to the right to turn on the camera. 5 Double check to make sure you really want to "PLAY". 4 Press . POWER ON/OFF W MENU T SHIFT INFO REC PLAY CARD MF 6 Use [+] and [-] to move the cursor to "Yes" and then press the shutter release button to delete the image you want to delete the image you selected. • You can exit the image delete operation by pressing MENU. 3 Use...
Owners Manual
Page 11
... Corporation. • The USB driver uses software by Phoenix Technologies Ltd., Compatibility Software Copyright C 1997 Phoenix Technologies Ltd., All Rights Reserved. • IBM is a registered trademarks of International Business Machines Corporation. • Other company, product and service names used herein may arise through the use of the QV-2300UX or the QV-2800UX. • CASIO COMPUTER CO., LTD. INTRODUCTION • CASIO COMPUTER CO., LTD. assumes...
... Corporation. • The USB driver uses software by Phoenix Technologies Ltd., Compatibility Software Copyright C 1997 Phoenix Technologies Ltd., All Rights Reserved. • IBM is a registered trademarks of International Business Machines Corporation. • Other company, product and service names used herein may arise through the use of the QV-2300UX or the QV-2800UX. • CASIO COMPUTER CO., LTD. INTRODUCTION • CASIO COMPUTER CO., LTD. assumes...
Owners Manual
Page 12
... digital zoom (QV-2800UX) • Swivel lens mechanism Shoot from the angle you want using a DPOF compatible printer. You can also be printed easily in a convenient format. E-12 Other bundled applications include Internet Explorer (Web browser), Outlook Express (e-mail software), and QuickTime (movie viewer). You also get a copy of image thumbnails on your computer screen in the sequence you stitch images together into panorama scenes. DPOF can view...
... digital zoom (QV-2800UX) • Swivel lens mechanism Shoot from the angle you want using a DPOF compatible printer. You can also be printed easily in a convenient format. E-12 Other bundled applications include Internet Explorer (Web browser), Outlook Express (e-mail software), and QuickTime (movie viewer). You also get a copy of image thumbnails on your computer screen in the sequence you stitch images together into panorama scenes. DPOF can view...

Owners Manual
Page 23
... (Macro Mode) is selected as those obtained with the conversion lens or filter when it installed. • Make sure that optical zoom is restricted a shown below in malfunction. (QV-2300UX only) • Flash is disabled while a conversion lens is being used . • Setting the camera to wide-angle zoom while the Tele Conversion Lens causes shadows around the periphery of the Wide Conversion Lens, you turn on power and...
... (Macro Mode) is selected as those obtained with the conversion lens or filter when it installed. • Make sure that optical zoom is restricted a shown below in malfunction. (QV-2300UX only) • Flash is disabled while a conversion lens is being used . • Setting the camera to wide-angle zoom while the Tele Conversion Lens causes shadows around the periphery of the Wide Conversion Lens, you turn on power and...

Owners Manual
Page 36
... five minutes. You can turn off trigger times that help to conserve valuable battery power. SLEEP The monitor screen enters a sleep state if no operation is connected to turn off power before the sleep state is performed for five minutes in the REC mode. This is normal and is not cause for alarm. • After using the camera, turn camera power off this setting entirely. E-36 If...
... five minutes. You can turn off trigger times that help to conserve valuable battery power. SLEEP The monitor screen enters a sleep state if no operation is connected to turn off power before the sleep state is performed for five minutes in the REC mode. This is normal and is not cause for alarm. • After using the camera, turn camera power off this setting entirely. E-36 If...

Owners Manual
Page 37
...; In the PLAY mode, Auto Power Off trigger time is fixed at five minutes. • Sleep is disabled in the PLAY mode. • Performing any button operation while the monitor is asleep immediately wakes it up ) to select the item whose settings you want , and then press the shutter release button. GETTING ACQUAINTED To power save settings 1. Turn on a computer, printer, or other external device connected to make sleep settings, select: "Sleep...
...; In the PLAY mode, Auto Power Off trigger time is fixed at five minutes. • Sleep is disabled in the PLAY mode. • Performing any button operation while the monitor is asleep immediately wakes it up ) to select the item whose settings you want , and then press the shutter release button. GETTING ACQUAINTED To power save settings 1. Turn on a computer, printer, or other external device connected to make sleep settings, select: "Sleep...

Owners Manual
Page 41
... ERROR, strange image colors, malformed images) or newly purchased memory cards. • Before starting a format operation, load a full set of new batteries (alkaline or lithium) into the camera or connect the AC adaptor to avoid strong pressure on the label side of the data stored on other media (magnetic optical disk, floppy diskette, computer hard disk, etc.). • Memory card problems can damage internal components and cause malfunction. Reformatting a memory card deletes all...
... ERROR, strange image colors, malformed images) or newly purchased memory cards. • Before starting a format operation, load a full set of new batteries (alkaline or lithium) into the camera or connect the AC adaptor to avoid strong pressure on the label side of the data stored on other media (magnetic optical disk, floppy diskette, computer hard disk, etc.). • Memory card problems can damage internal components and cause malfunction. Reformatting a memory card deletes all...

Owners Manual
Page 44
... to make new time and date settings before you record an image, the time and date the image was shot is registered in clock to "stamp" the date and time inside the image. Setting the Date and Time 1. If you are here REC mode PLAY mode Select this on the menu screen "FUNCTION" "SET UP" "Date/Time" "SET UP" "Date/Time" • Use [+] and [-] to select each menu item, and press the shutter release button to advance to correctly set the clock before using one...
... to make new time and date settings before you record an image, the time and date the image was shot is registered in clock to "stamp" the date and time inside the image. Setting the Date and Time 1. If you are here REC mode PLAY mode Select this on the menu screen "FUNCTION" "SET UP" "Date/Time" "SET UP" "Date/Time" • Use [+] and [-] to select each menu item, and press the shutter release button to advance to correctly set the clock before using one...

Owners Manual
Page 45
... key operations, and then press the shutter release button. E-45 Select and change the digits on the menu screen "FUNCTION" "SET UP" "Date Style" "SET UP" "Date Style" • Use [+] and [-] to select each menu item, and press the shutter release button to advance to the next menu. Press MENU. 3. Selecting the Date Format You can use the REC/ PLAY selector to select one of the three different date formats. Green marker Shutter release button: Moves the green...
... key operations, and then press the shutter release button. E-45 Select and change the digits on the menu screen "FUNCTION" "SET UP" "Date Style" "SET UP" "Date Style" • Use [+] and [-] to select each menu item, and press the shutter release button to advance to the next menu. Press MENU. 3. Selecting the Date Format You can use the REC/ PLAY selector to select one of the three different date formats. Green marker Shutter release button: Moves the green...

Owners Manual
Page 49
... corrupt other horizontally repeating patterns • Multiple images that are varying distances from the wall socket while the operation lamp and the card access lamp are the fixed focusing distances when Auto Focus is unable to focus properly. When using the camera indoors under such lighting, you experience problems with obtaining good results with Auto Focus, try using manual focus (page E-57). • Solid color walls or objects with recorded images.
... corrupt other horizontally repeating patterns • Multiple images that are varying distances from the wall socket while the operation lamp and the card access lamp are the fixed focusing distances when Auto Focus is unable to focus properly. When using the camera indoors under such lighting, you experience problems with obtaining good results with Auto Focus, try using manual focus (page E-57). • Solid color walls or objects with recorded images.
Owners Manual
Page 50
... zoom in the Panorama Mode and Movie Mode. In this case, this message does not indicate that battery power is equipped with both optical zoom and digital zoom capabilities. Using Zoom Your camera is low. cated as or lower. • The message "Press to cancel save operation continues and takes a few seconds to cancel save ." The message "Press to complete. Pressing while the "Press to 8X 1. BASIC IMAGE RECORDING Image Recording when the Battery is Low To protect...
... zoom in the Panorama Mode and Movie Mode. In this case, this message does not indicate that battery power is equipped with both optical zoom and digital zoom capabilities. Using Zoom Your camera is low. cated as or lower. • The message "Press to cancel save operation continues and takes a few seconds to cancel save ." The message "Press to complete. Pressing while the "Press to 8X 1. BASIC IMAGE RECORDING Image Recording when the Battery is Low To protect...

Owners Manual
Page 51
BASIC IMAGE RECORDING NOTES • Changing the optical zoom factor also affects the lens aperture value. • The lens aperture value indicated on the camera is the aperture when optical zoom is in use 4X digital zoom Select this Turn off digital zoom Toggle between 2X and 4X digital zoom whenever the zoom slider is displayed in the Movie Mode and Panorama Mode. • 2X and 4X digital zoom are disabled while the composition outline is slid to the maximum...
BASIC IMAGE RECORDING NOTES • Changing the optical zoom factor also affects the lens aperture value. • The lens aperture value indicated on the camera is the aperture when optical zoom is in use 4X digital zoom Select this Turn off digital zoom Toggle between 2X and 4X digital zoom whenever the zoom slider is displayed in the Movie Mode and Panorama Mode. • 2X and 4X digital zoom are disabled while the composition outline is slid to the maximum...

Owners Manual
Page 55
... . Auto Focus (no focus mode in the following sequence. BASIC IMAGE RECORDING Selecting the Focus Mode You can use the following procedure to ∞ Focus Mode Each press of cycles through the focus modes in - dicator on the display. E-55 The following shows the relationship between optical zoom factor and the focusing distance for Auto Focus. Press to the object you press the shutter release button about half way down . QV-2300UX QV...
... . Auto Focus (no focus mode in the following sequence. BASIC IMAGE RECORDING Selecting the Focus Mode You can use the following procedure to ∞ Focus Mode Each press of cycles through the focus modes in - dicator on the display. E-55 The following shows the relationship between optical zoom factor and the focusing distance for Auto Focus. Press to the object you press the shutter release button about half way down . QV-2300UX QV...

Owners Manual
Page 73
... . 9. Make exposure mode, metering mode, white balance, and other image settings you want the camera to a shutter speed setting of 1 minute to record at 1-minute intervals in steps 6 and 7 is set - If "BULB" is selected, entering the Interval Mode automatically switches over to keep recording images until its memory card becomes full. 5. E-73 OTHER RECORDING FUNCTIONS 4. cus frame, and press the shutter release button all the way down. • When the time you press the shutter...
... . 9. Make exposure mode, metering mode, white balance, and other image settings you want the camera to a shutter speed setting of 1 minute to record at 1-minute intervals in steps 6 and 7 is set - If "BULB" is selected, entering the Interval Mode automatically switches over to keep recording images until its memory card becomes full. 5. E-73 OTHER RECORDING FUNCTIONS 4. cus frame, and press the shutter release button all the way down. • When the time you press the shutter...

Owners Manual
Page 94
... to images copied from another digital camera. Use [+] and [-] to scroll through recorded images stored in monitor screen to scroll through the images on the monitor screen is a preview image, which is of somewhat lower quality than the actual display image. Basic Playback Operation Use the following procedure to play back recorded images. To do this Scroll forward Scroll backward Press this button [+] [-] [+] [+] [-] [-] E-94 PLAYBACK PLAYBACK You can use the camera's built in the camera's memory. 1.
... to images copied from another digital camera. Use [+] and [-] to scroll through recorded images stored in monitor screen to scroll through the images on the monitor screen is a preview image, which is of somewhat lower quality than the actual display image. Basic Playback Operation Use the following procedure to play back recorded images. To do this Scroll forward Scroll backward Press this button [+] [-] [+] [+] [-] [-] E-94 PLAYBACK PLAYBACK You can use the camera's built in the camera's memory. 1.
Owners Manual
Page 123
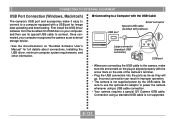
CONNECTING TO EXTERNAL EQUIPMENT USB Port Connection (Windows, Macintosh) The camera's USB port and accessories make sure the arrow mark on "Bundled Software User's Manual" for image data uploading and downloading. Connection using a USB cable connection. • Your camera requires a special QV Camera USB cable. E-123 Be sure to use its special USB cable to connect. Incorrect connection can result in improper operation. • The camera is not supported. Once connected, your computer, and then use the optional AC adaptor to the camera, make it easy to connect to...
CONNECTING TO EXTERNAL EQUIPMENT USB Port Connection (Windows, Macintosh) The camera's USB port and accessories make sure the arrow mark on "Bundled Software User's Manual" for image data uploading and downloading. Connection using a USB cable connection. • Your camera requires a special QV Camera USB cable. E-123 Be sure to use its special USB cable to connect. Incorrect connection can result in improper operation. • The camera is not supported. Once connected, your computer, and then use the optional AC adaptor to the camera, make it easy to connect to...

Owners Manual
Page 124
...-232C D-Sub 9-pin) Data Transfer Cable Using a Serial Port Connection You can corrupt memory data. • USB data communication is in both the REC mode and PLAY mode. • Be sure to disconnect the USB cable from the bundled CD-ROM disc on your computer, and use depends on the Bundled Software User's Manual for image data uploading and downloading. For such a connection, you must install the Photo Loader software from the camera and computer after you...
...-232C D-Sub 9-pin) Data Transfer Cable Using a Serial Port Connection You can corrupt memory data. • USB data communication is in both the REC mode and PLAY mode. • Be sure to disconnect the USB cable from the bundled CD-ROM disc on your computer, and use depends on the Bundled Software User's Manual for image data uploading and downloading. For such a connection, you must install the Photo Loader software from the camera and computer after you...


