User Guide
Page 2
..., resulting in a microwave oven. Tape Cutter • Never touch the tape cutter while a tape cut operation is coming from your original dealer. Never expose batteries to become shorted. Doing so creates the danger of them by incineration. Doing so creates the danger of fire and electrical shock. Immediately turn off . Liquid spilled on hand for small children. Request servicing from it in any other...
..., resulting in a microwave oven. Tape Cutter • Never touch the tape cutter while a tape cut operation is coming from your original dealer. Never expose batteries to become shorted. Doing so creates the danger of them by incineration. Doing so creates the danger of fire and electrical shock. Immediately turn off . Liquid spilled on hand for small children. Request servicing from it in any other...
User Guide
Page 3
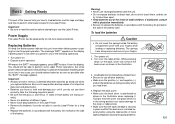
... new batteries and dead batteries. • Remove the batteries if you do not plan to use KL-60 for a long time. • Use only the battery type specified for this label printer in memory can be held liable for any information you store in symbols • Text memory All of this makes the CASIO label Printer the perfect tool for just about all of your selection of the CASIO KL...
... new batteries and dead batteries. • Remove the batteries if you do not plan to use KL-60 for a long time. • Use only the battery type specified for this label printer in memory can be held liable for any information you store in symbols • Text memory All of this makes the CASIO label Printer the perfect tool for just about all of your selection of the CASIO KL...

User Guide
Page 4
... Other Printing Features and Operations E-12 Print Density E-12 To adjust the print density E-13 Manual Feed E-13 To manually feed tape E-13 Part 7 Memory E-13 To store text into memory E-13 To recall text from memory E-13 Part 8 Reference E-14 Cleaning the Printer Head and Roller E-14 To clean the printer head and roller E-14 Initial Power On Settings E-14 Initializing the Label Printer E-14 To initialize the Label Printer E-14 Troubleshooting E-15 Error Messages E-16 Alpha Characters E-17...
... Other Printing Features and Operations E-12 Print Density E-12 To adjust the print density E-13 Manual Feed E-13 To manually feed tape E-13 Part 7 Memory E-13 To store text into memory E-13 To recall text from memory E-13 Part 8 Reference E-14 Cleaning the Printer Head and Roller E-14 To clean the printer head and roller E-14 Initial Power On Settings E-14 Initializing the Label Printer E-14 To initialize the Label Printer E-14 Troubleshooting E-15 Error Messages E-16 Alpha Characters E-17...
User Guide
Page 5
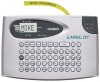
... the sections that follow in this happens, clean off . 2 Function key 3 Letter keys 4 Tape cutter button 5 Liquid crystal display (LCD) 6 Tape outlet Label Printer Menus Label Printer operation is currently selected. Part 1 Getting Acquainted This part of the manual provides you with important information you need to know in order to use to select the settings you need. Important Precautions • Keep your Label Printer and avoid strong impact. • Do...
... the sections that follow in this happens, clean off . 2 Function key 3 Letter keys 4 Tape cutter button 5 Liquid crystal display (LCD) 6 Tape outlet Label Printer Menus Label Printer operation is currently selected. Part 1 Getting Acquainted This part of the manual provides you with important information you need to know in order to use to select the settings you need. Important Precautions • Keep your Label Printer and avoid strong impact. • Do...
User Guide
Page 6
...; Make sure that the tape cartridge is securely in memory is deleted whenever batteries go dead and when you replace batteries. Turn over the label printer. Load batteries into place while it . Note the following operations. • Turn power on the side of the battery. Trying to force the cover into the battery compartment. • Be sure to use recharged batteries with the battery life marked on • Execute a print operation...
...; Make sure that the tape cartridge is securely in memory is deleted whenever batteries go dead and when you replace batteries. Turn over the label printer. Load batteries into place while it . Note the following operations. • Turn power on the side of the battery. Trying to force the cover into the battery compartment. • Be sure to use recharged batteries with the battery life marked on • Execute a print operation...
User Guide
Page 7
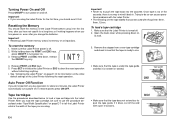
...; Resetting Label Printer memory clears its look. 3. Keeping PRINT and ESC held down the PRINT and ESC keys, press ON/OFF to turn power on. 3. Trying to do not perform any key operation for information on the initial default settings of the Label Printer following are using . Remove the stopper from a new tape cartridge and check to see that the tape is ready to use the procedure described under the tape guide and...
...; Resetting Label Printer memory clears its look. 3. Keeping PRINT and ESC held down the PRINT and ESC keys, press ON/OFF to turn power on. 3. Trying to do not perform any key operation for information on the initial default settings of the Label Printer following are using . Remove the stopper from a new tape cartridge and check to see that the tape is ready to use the procedure described under the tape guide and...
User Guide
Page 8
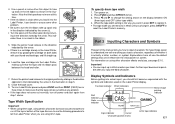
... to turn the ink ribbon take up spool only in the direction indicated by sliding in the illus- Part 3 Inputting Characters and Symbols This part of the manual tells you load it into the Label Printer, it can break or cause some other tape width). 4. Display Symbols and Indicators Before getting into the Label Printer, making sure that indicated by the arrow. Head Roller 7. Return the printer head...
... to turn the ink ribbon take up spool only in the direction indicated by sliding in the illus- Part 3 Inputting Characters and Symbols This part of the manual tells you load it into the Label Printer, it can break or cause some other tape width). 4. Display Symbols and Indicators Before getting into the Label Printer, making sure that indicated by the arrow. Head Roller 7. Return the printer head...
User Guide
Page 9
... indicator are using the default initial power-on the display, the keyboard is not shown. Basic Alpha-Numeric Input The following characters using other details on the display, all letters are upper-case. This part of characters. • To input the upper-case letters, you can select between shading, underline, and box. • Mirror image printing indicator This indicator appears when the Label Printer is...
... indicator are using the default initial power-on the display, the keyboard is not shown. Basic Alpha-Numeric Input The following characters using other details on the display, all letters are upper-case. This part of characters. • To input the upper-case letters, you can select between shading, underline, and box. • Mirror image printing indicator This indicator appears when the Label Printer is...
User Guide
Page 10
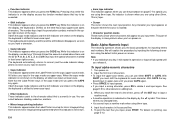
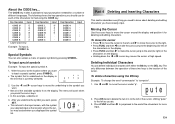
... the beginning (far left) of the characters on the display. • Holding down the H or J cursor key moves the cursor at high speed. E-9 About the CODE key... Key Operation Input CODE U Ü CODE O Œ CODE P Å CODE A Æ CODE S* ß CODE J Ö CODE K Ä * Lower case only. IO# Part 4 Deleting and Inserting Characters This section describes everything you need to "computer". 1. To delete characters using the CODE key. Press...
... the beginning (far left) of the characters on the display. • Holding down the H or J cursor key moves the cursor at high speed. E-9 About the CODE key... Key Operation Input CODE U Ü CODE O Œ CODE P Å CODE A Æ CODE S* ß CODE J Ö CODE K Ä * Lower case only. IO# Part 4 Deleting and Inserting Characters This section describes everything you need to "computer". 1. To delete characters using the CODE key. Press...
User Guide
Page 11
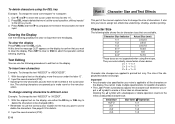
... message CLS? The size of characters. Initial Size AUTO 2×1 2×2 2×3 Size After B Operation 1×1 1×1 1×2 1×3 See page E-9 for specific characters. • The Label Printer automatically adjusts the character size whenever you plan to use the following procedures to delete the characters. Input the new characters (XYZ). To delete characters using 6mm tape. Press FUNC and then J to jump back to make multiple specifications for details. 2. The existing characters are available. E-10 Part 5 Character Size and Text...
... message CLS? The size of characters. Initial Size AUTO 2×1 2×2 2×3 Size After B Operation 1×1 1×1 1×2 1×3 See page E-9 for specific characters. • The Label Printer automatically adjusts the character size whenever you plan to use the following procedures to delete the characters. Input the new characters (XYZ). To delete characters using 6mm tape. Press FUNC and then J to jump back to make multiple specifications for details. 2. The existing characters are available. E-10 Part 5 Character Size and Text...
User Guide
Page 12
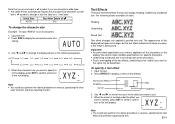
... applied to display the current character size setting. To specify a text effect 1. Underline 3. When the cursor is being used. The appearance of the displayed text does not change a two-line label to the text display. Input the text. 2. AUTO 1×1 1×2 1×3 2×1 2×2 2×3 2×3 2×2 2×1 1×3 1×2 1×1 AUTO 4. The following sequence. Shading: Underlining: Boxed Text: Text effect changes are using 6mm wide tape. • The Label Printer automatically adjusts the character size whenever...
... applied to display the current character size setting. To specify a text effect 1. Underline 3. When the cursor is being used. The appearance of the displayed text does not change a two-line label to the text display. Input the text. 2. AUTO 1×1 1×2 1×3 2×1 2×2 2×3 2×3 2×2 2×1 1×3 1×2 1×1 AUTO 4. The following sequence. Shading: Underlining: Boxed Text: Text effect changes are using 6mm wide tape. • The Label Printer automatically adjusts the character size whenever...
User Guide
Page 13
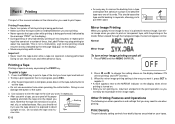
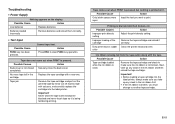
... the print operation is complete, press down on the tape cutter button to use the tape where it is exposed to pull them apart. Normal Mirror Image To turn power off while printing is being performed. Press FUNC and then MEMO (MIRROR). Other Printing Features and Operations The following are printed on the display). • During printing at very high density, printing of very long text, or repeat print...
... the print operation is complete, press down on the tape cutter button to use the tape where it is exposed to pull them apart. Normal Mirror Image To turn power off while printing is being performed. Press FUNC and then MEMO (MIRROR). Other Printing Features and Operations The following are printed on the display). • During printing at very high density, printing of very long text, or repeat print...
User Guide
Page 14
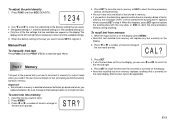
... new data, or ESC to abort the store procedure without storing anything. • You can use H and J to scroll it to the left and right when necessary to show all of times to change to recall the text from the area that text recalled from memory will replace any text currently on the display. E-13 Manual Feed To manually feed tape Press FUNC and then PRINT (FEED...
... new data, or ESC to abort the store procedure without storing anything. • You can use H and J to scroll it to the left and right when necessary to show all of times to change to recall the text from the area that text recalled from memory will replace any text currently on the display. E-13 Manual Feed To manually feed tape Press FUNC and then PRINT (FEED...
User Guide
Page 15
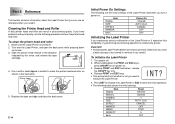
... have problems with print quality, use as shown in memory if you need it. Make sure the Label Printer is turned off . 2. Use a cotton swab dipped in the direction indicated by the arrow, and remove the tape cartridge. 4. E-14 Initial Power On Settings The following procedure to initialize the printer. Printer head Roller 5. Item Display Memory SYMBOL SIZE EFFECT Reset Cleared , Cleared AUTO (2×2) CANCEL MIRROR MEMO OFF STR? DENSITY 6mm 3 OFF Cleaning the Printer Head...
... have problems with print quality, use as shown in memory if you need it. Make sure the Label Printer is turned off . 2. Use a cotton swab dipped in the direction indicated by the arrow, and remove the tape cartridge. 4. E-14 Initial Power On Settings The following procedure to initialize the printer. Printer head Roller 5. Item Display Memory SYMBOL SIZE EFFECT Reset Cleared , Cleared AUTO (2×2) CANCEL MIRROR MEMO OFF STR? DENSITY 6mm 3 OFF Cleaning the Printer Head...
User Guide
Page 16
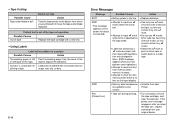
... the label printer, always make sure the ink ribbon is not broken. Tape jam Remove the tape cartridge and pull out the jammed tape by hand. Remove the tape cartridge and check to another tape cartridge. Troubleshooting • Power Supply Nothing appears on it is being fed from the tape outlet along with the tape. Replace the tape cartridge with a new one. Improper loading of the cartridge Remove the tape cartridge and reload it correctly. roller Ink ribbon is being fed during printing.
... the label printer, always make sure the ink ribbon is not broken. Tape jam Remove the tape cartridge and pull out the jammed tape by hand. Remove the tape cartridge and check to another tape cartridge. Troubleshooting • Power Supply Nothing appears on it is being fed from the tape outlet along with the tape. Replace the tape cartridge with a new one. Improper loading of the cartridge Remove the tape cartridge and reload it correctly. roller Ink ribbon is being fed during printing.
User Guide
Page 17
... 6mm is still Peel the backing paper from your original dealer. rough, wet, oily, or dirty. Surface is cut off power, remove the tape cartridge, and clear the tape jam. Cannot cut operation. • Tape Cutting Possible Cause Tape cutter blade is too low. • Replace batteries. Perr (Printer Error) • Tape jam during printing. • Turn off by tape cut tape. message appears when you try to perform a print operation.) • Attempt to 6mm. (ERR! Printed text is unsuitable for some...
... 6mm is still Peel the backing paper from your original dealer. rough, wet, oily, or dirty. Surface is cut off power, remove the tape cartridge, and clear the tape jam. Cannot cut operation. • Tape Cutting Possible Cause Tape cutter blade is too low. • Replace batteries. Perr (Printer Error) • Tape jam during printing. • Turn off by tape cut tape. message appears when you try to perform a print operation.) • Attempt to 6mm. (ERR! Printed text is unsuitable for some...
User Guide
Page 19
...;16-dot Character font: Sans-serif Character effects: Shade, underline, box Character sizes: 1×1, 1×2, 1×3 (6mm tape); 1×1, 1×2, 1×3, 2×1, 2×2, 2×3 (other tapes) Number of lines: 1 (6mm tape); 1 or 2 (other tapes) Memory Text: One block (up to 63 characters) General Power supply: Six AA-size alkaline batteries Battery life: Approximately 10 tape cartridges (normal characters printing at nomal temperature) Power consumption: 9W Auto Power Off: Approximately six minutes after last key operation. Dimensions...
...;16-dot Character font: Sans-serif Character effects: Shade, underline, box Character sizes: 1×1, 1×2, 1×3 (6mm tape); 1×1, 1×2, 1×3, 2×1, 2×2, 2×3 (other tapes) Number of lines: 1 (6mm tape); 1 or 2 (other tapes) Memory Text: One block (up to 63 characters) General Power supply: Six AA-size alkaline batteries Battery life: Approximately 10 tape cartridges (normal characters printing at nomal temperature) Power consumption: 9W Auto Power Off: Approximately six minutes after last key operation. Dimensions...

User Guide
Page 20
CASIO COMPUTER CO., LTD. 6-2, Hon-machi 1-chome Shibuya-ku, Tokyo 151-8543, Japan MO0105-A Printed in China/Imprimé en Chine A344043-1
CASIO COMPUTER CO., LTD. 6-2, Hon-machi 1-chome Shibuya-ku, Tokyo 151-8543, Japan MO0105-A Printed in China/Imprimé en Chine A344043-1


