User Guide
Page 2
...turn off . Tape Cutter • Never touch the tape cutter while a tape cut operation is coming from it to fall, resulting in a microwave oven. The label material contains metal, which the label is affixed. Doing so can result in cuts and other personal injury. Liquid spilled on the unit creates...using the label printer for heating food in death or serious personal injury if ignored. This symbol indicates you should not try to take batteries apart, or allow batteries to which creates... safety precautions and operating instructions on a wobbly table or a high shelf. Caution This...
...turn off . Tape Cutter • Never touch the tape cutter while a tape cut operation is coming from it to fall, resulting in a microwave oven. The label material contains metal, which the label is affixed. Doing so can result in cuts and other personal injury. Liquid spilled on the unit creates...using the label printer for heating food in death or serious personal injury if ignored. This symbol indicates you should not try to take batteries apart, or allow batteries to which creates... safety precautions and operating instructions on a wobbly table or a high shelf. Caution This...
User Guide
Page 3
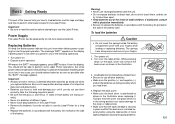
... incurred as : name tags, cassette tape labels, floppy disks, binders, and other applications. Introduction Congratulations on hand for this label printer in this label printer. Data stored in memory can cut your selection of the CASIO KL-60 Label Printer. E-2 This CASIO Label Printer makes it possible for just about all of this manual. Loading and replacing batteries • Do not touch the springs inside the battery compartment cover with your labeling needs! Memory • Always...
... incurred as : name tags, cassette tape labels, floppy disks, binders, and other applications. Introduction Congratulations on hand for this label printer in this label printer. Data stored in memory can cut your selection of the CASIO KL-60 Label Printer. E-2 This CASIO Label Printer makes it possible for just about all of this manual. Loading and replacing batteries • Do not touch the springs inside the battery compartment cover with your labeling needs! Memory • Always...

User Guide
Page 4
... and Operations E-12 Print Density E-12 To adjust the print density E-13 Manual Feed E-13 To manually feed tape E-13 Part 7 Memory E-13 To store text into memory E-13 To recall text from memory E-13 Part 8 Reference E-14 Cleaning the Printer Head and Roller E-14 To clean the printer head and roller E-14 Initial Power On Settings E-14 Initializing the Label Printer E-14 To initialize the Label Printer E-14 Troubleshooting E-15 Error Messages E-16 Alpha Characters E-17 Symbols ...E-17 Specifications...
... and Operations E-12 Print Density E-12 To adjust the print density E-13 Manual Feed E-13 To manually feed tape E-13 Part 7 Memory E-13 To store text into memory E-13 To recall text from memory E-13 Part 8 Reference E-14 Cleaning the Printer Head and Roller E-14 To clean the printer head and roller E-14 Initial Power On Settings E-14 Initializing the Label Printer E-14 To initialize the Label Printer E-14 Troubleshooting E-15 Error Messages E-16 Alpha Characters E-17 Symbols ...E-17 Specifications...
User Guide
Page 5
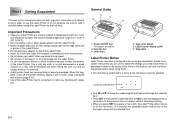
... this happens, clean off . 2 Function key 3 Letter keys 4 Tape cutter button 5 Liquid crystal display (LCD) 6 Tape outlet Label Printer Menus Label Printer operation is 10° to 35°C (50° to 95°F). • Don't let coffee, juice or other liquids splash onto the Label Printer. • Never let paper clips, pins or other foreign objects get into the Label Printer. • Do not use to become...
... this happens, clean off . 2 Function key 3 Letter keys 4 Tape cutter button 5 Liquid crystal display (LCD) 6 Tape outlet Label Printer Menus Label Printer operation is 10° to 35°C (50° to 95°F). • Don't let coffee, juice or other liquids splash onto the Label Printer. • Never let paper clips, pins or other foreign objects get into the Label Printer. • Do not use to become...
User Guide
Page 6
... circuit them . 4. Load batteries into place while it from the display. A loose tape cartridge can cut your fingers while loading or replacing batteries. Warning! • Never use recharged batteries with the battery life printed on the display if battery power is closed securely before attempting to use the Label Printer. Turn power off. 2. Replace the back cover. • Make sure the back cover is too low. Note the following operations. • Turn power on the back...
... circuit them . 4. Load batteries into place while it from the display. A loose tape cartridge can cut your fingers while loading or replacing batteries. Warning! • Never use recharged batteries with the battery life printed on the display if battery power is closed securely before attempting to use the Label Printer. Turn power off. 2. Replace the back cover. • Make sure the back cover is too low. Note the following operations. • Turn power on the back...
User Guide
Page 7
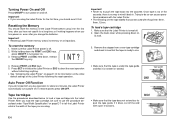
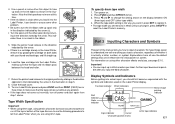
... tape widths that Label Printer power is under "Tape Width Specification" on . 3. Auto Power Off Function If you should reset the memory of the cassette, there is out of the Label Printer before using . After you load the tape cartridge, be used it does, cut off . 2. Once tape is no way to load a tape cartridge into the cassette. Make sure that it first. Remove the stopper from a new tape cartridge and check to see that the tape is ready to use...
... tape widths that Label Printer power is under "Tape Width Specification" on . 3. Auto Power Off Function If you should reset the memory of the cassette, there is out of the Label Printer before using . After you load the tape cartridge, be used it does, cut off . 2. Once tape is no way to load a tape cartridge into the cassette. Make sure that it first. Remove the stopper from a new tape cartridge and check to see that the tape is ready to use...
User Guide
Page 8
... PRINT (FEED) two or three times to input characters. cates there is actually a letter, number, or symbol. Return the printer head release to its original position by the arrow in the illustration in the direction opposite to tell the Label Printer when you change the setting shown on . 2. Turn on the Label Printer display. Part 3 Inputting Characters and Symbols This part of whether it , press ON/OFF or reset the Label Printer...
... PRINT (FEED) two or three times to input characters. cates there is actually a letter, number, or symbol. Return the printer head release to its original position by the arrow in the illustration in the direction opposite to tell the Label Printer when you change the setting shown on . 2. Turn on the Label Printer display. Part 3 Inputting Characters and Symbols This part of whether it , press ON/OFF or reset the Label Printer...
User Guide
Page 9
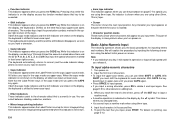
... SET key) to delete it . With CAPS the keyboard stays in the second line. 5. Normal (non mirror image) printing is performed when this indicator is on page E-7 to specify you press the SHIFT key. To print the text that key to the character effect that the Label Printer stays in the caps (upper-case) mode. To input alpha-numeric characters 1. Turn power...
... SET key) to delete it . With CAPS the keyboard stays in the second line. 5. Normal (non mirror image) printing is performed when this indicator is on page E-7 to specify you press the SHIFT key. To print the text that key to the character effect that the Label Printer stays in the caps (upper-case) mode. To input alpha-numeric characters 1. Turn power...
User Guide
Page 10
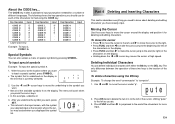
..., underline #. 3. To delete characters using the CODE key. Press BS twice to delete the two m's to the left of the cursor, shifting "puter" to the left ) of the characters on the display. • Holding down the H or J cursor key moves the cursor at high speed. The CODE key makes it for deleting and editing characters. IO# Part 4 Deleting and Inserting Characters This section describes...
..., underline #. 3. To delete characters using the CODE key. Press BS twice to delete the two m's to the left of the cursor, shifting "puter" to the left ) of the characters on the display. • Holding down the H or J cursor key moves the cursor at high speed. The CODE key makes it for deleting and editing characters. IO# Part 4 Deleting and Inserting Characters This section describes...
User Guide
Page 11
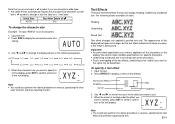
... location for specific characters. • The Label Printer automatically adjusts the character size whenever you do. 3. To clear the display Press FUNC and then DEL (CLS). appears on the display, move the cursor under the letter "D". 2. The existing characters are not supported when using the DEL key Example: To change the text "ABCDEF" to "computer". 1. You cannot make room for details. 2. To delete characters using 6mm tape. To insert new characters Example: To change the...
... location for specific characters. • The Label Printer automatically adjusts the character size whenever you do. 3. To clear the display Press FUNC and then DEL (CLS). appears on the display, move the cursor under the letter "D". 2. The existing characters are not supported when using the DEL key Example: To change the text "ABCDEF" to "computer". 1. You cannot make room for details. 2. To delete characters using 6mm tape. To insert new characters Example: To change the...
User Guide
Page 12
... in reverse, specifying the char- AUTO 3. When the character size you want to the text display. Underline 3. Use H and J to use it and return to printed text only. Shading: Underlining: Boxed Text: Text effect changes are three text effects that you cannot input a B symbol if you are using 6mm wide tape. • The Label Printer automatically adjusts the character size whenever you delete a B symbol to change a two-line label to overlapping of the two...
... in reverse, specifying the char- AUTO 3. When the character size you want to the text display. Underline 3. Use H and J to use it and return to printed text only. Shading: Underlining: Boxed Text: Text effect changes are three text effects that you cannot input a B symbol if you are using 6mm wide tape. • The Label Printer automatically adjusts the character size whenever you delete a B symbol to change a two-line label to overlapping of the two...
User Guide
Page 13
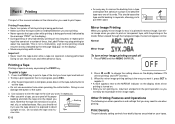
... turn power off while printing is being performed (indicated by the message "P R N T" on and off its backing to separate, allowing you start printing. • Never operate the tape cutter while printing is in cuts and other operations and settings that the tape outlet is not blocked before you to print on transparent tape, with the printing on the display). • During printing at very high density, printing of times, the Label Printer...
... turn power off while printing is being performed (indicated by the message "P R N T" on and off its backing to separate, allowing you start printing. • Never operate the tape cutter while printing is in cuts and other operations and settings that the tape outlet is not blocked before you to print on transparent tape, with the printing on the display). • During printing at very high density, printing of times, the Label Printer...
User Guide
Page 14
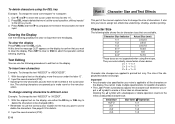
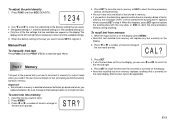
... to store text in memory. CAL? 3. E-13 Press FUNC and then SIZE (DENSITY). 1234 2. The display scrolls left and right. 4. Press H or J a number of times to change to scroll it . Press MEMO. 3. You can use H and J to the text store prompt. While the input screen is the way you want it, press SET to feed the tape 19mm. To adjust the print density 1.
... to store text in memory. CAL? 3. E-13 Press FUNC and then SIZE (DENSITY). 1234 2. The display scrolls left and right. 4. Press H or J a number of times to change to scroll it . Press MEMO. 3. You can use H and J to the text store prompt. While the input screen is the way you want it, press SET to feed the tape 19mm. To adjust the print density 1.
User Guide
Page 15
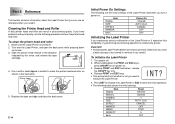
... Make sure the Label Printer is turned off . 2. Make sure you have problems with print quality, use as shown in memory if you need it. Part 8 Reference This section contains information about the Label Printer that you can result in the direction indicated by the arrow, and remove the tape cartridge. 4. Cleaning the Printer Head and Roller A dirty printer head and roller can use the following table shows the initial settings. While...
... Make sure the Label Printer is turned off . 2. Make sure you have problems with print quality, use as shown in memory if you need it. Part 8 Reference This section contains information about the Label Printer that you can result in the direction indicated by the arrow, and remove the tape cartridge. 4. Cleaning the Printer Head and Roller A dirty printer head and roller can use the following table shows the initial settings. While...
User Guide
Page 16
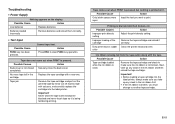
... replace the cartridge into the label printer, always make sure the ink ribbon is not closed completely. Dirty print head or rubber Clean the printer head and roller. Replace the tape cartridge with a new one. Never allow the tape outlet to clear FUNC key operation. Securely close the back cover. Possible Causes Action Improper print density setting Adjust the print density setting. Tape does not come out when PRINT is being fed during printing. No more tape left...
... replace the cartridge into the label printer, always make sure the ink ribbon is not closed completely. Dirty print head or rubber Clean the printer head and roller. Replace the tape cartridge with a new one. Never allow the tape outlet to clear FUNC key operation. Securely close the back cover. Possible Causes Action Improper print density setting Adjust the print density setting. Tape does not come out when PRINT is being fed during printing. No more tape left...
User Guide
Page 17
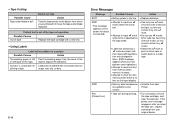
... of the tape. reason. message appears when you try to perform a print operation.) • Attempt to recall call text from whom you clear the tape jam, request servicing from the back of the on the input display. • Use only one . • Using Labels Label will not adhere to expose the adhesive. • Tape Cutting Possible Cause Tape cutter blade is too low. • Replace batteries. Action Take the label printer to the...
... of the tape. reason. message appears when you try to perform a print operation.) • Attempt to recall call text from whom you clear the tape jam, request servicing from the back of the on the input display. • Use only one . • Using Labels Label will not adhere to expose the adhesive. • Tape Cutting Possible Cause Tape cutter blade is too low. • Replace batteries. Action Take the label printer to the...
User Guide
Page 19
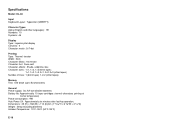
...;16-dot Character font: Sans-serif Character effects: Shade, underline, box Character sizes: 1×1, 1×2, 1×3 (6mm tape); 1×1, 1×2, 1×3, 2×1, 2×2, 2×3 (other tapes) Number of lines: 1 (6mm tape); 1 or 2 (other tapes) Memory Text: One block (up to 63 characters) General Power supply: Six AA-size alkaline batteries Battery life: Approximately 10 tape cartridges (normal characters printing at nomal temperature) Power consumption: 9W Auto Power Off: Approximately six minutes after last key operation. Dimensions...
...;16-dot Character font: Sans-serif Character effects: Shade, underline, box Character sizes: 1×1, 1×2, 1×3 (6mm tape); 1×1, 1×2, 1×3, 2×1, 2×2, 2×3 (other tapes) Number of lines: 1 (6mm tape); 1 or 2 (other tapes) Memory Text: One block (up to 63 characters) General Power supply: Six AA-size alkaline batteries Battery life: Approximately 10 tape cartridges (normal characters printing at nomal temperature) Power consumption: 9W Auto Power Off: Approximately six minutes after last key operation. Dimensions...

User Guide
Page 20
CASIO COMPUTER CO., LTD. 6-2, Hon-machi 1-chome Shibuya-ku, Tokyo 151-8543, Japan MO0105-A Printed in China/Imprimé en Chine A344043-1
CASIO COMPUTER CO., LTD. 6-2, Hon-machi 1-chome Shibuya-ku, Tokyo 151-8543, Japan MO0105-A Printed in China/Imprimé en Chine A344043-1


