
Owners Manual
Page 2
...cord plug varies according to make sure that the shape of the items shown below are included with your dealer as soon as possible. Camera Rechargeable Lithium Ion Battery (NP-40) USB Cradle (CA-27) Strap CD-ROM USB Cable Basic Reference • Note that all of the AC adaptor ...depends on the area where you purchased the camera. INTRODUCTION INTRODUCTION Unpacking Check to country or geographic area. AC Power Cord * Special AC Adaptor (Plug-in ...
...cord plug varies according to make sure that the shape of the items shown below are included with your dealer as soon as possible. Camera Rechargeable Lithium Ion Battery (NP-40) USB Cradle (CA-27) Strap CD-ROM USB Cable Basic Reference • Note that all of the AC adaptor ...depends on the area where you purchased the camera. INTRODUCTION INTRODUCTION Unpacking Check to country or geographic area. AC Power Cord * Special AC Adaptor (Plug-in ...

Owners Manual
Page 3
...This Manual 21 General Guide 22 Camera 22 USB Cradle 24 Monitor Screen Contents 25 Changing the Contents of the Monitor Screen 27 Attaching the Strap 29 Power Requirements 30 To load the battery 30 To charge the battery 31 To replace the battery 36 Power Supply Precautions 37 Turning... the Camera On and Off 40 Configuring Power Saving Settings 42 Using the On-screen Menus 43 ...
...This Manual 21 General Guide 22 Camera 22 USB Cradle 24 Monitor Screen Contents 25 Changing the Contents of the Monitor Screen 27 Attaching the Strap 29 Power Requirements 30 To load the battery 30 To charge the battery 31 To replace the battery 36 Power Supply Precautions 37 Turning... the Camera On and Off 40 Configuring Power Saving Settings 42 Using the On-screen Menus 43 ...
Owners Manual
Page 8
... marks of others. • Photo Loader and Photohands are the property of CASIO COMPUTER CO., LTD. assumes no responsibility for any damage or loss caused by the screens and configuration of the actual camera. • The SD logo is a registered trademark. • Windows, Internet... may arise through the use of this manual are subject to CASIO COMPUTER CO., LTD. 8 Except as a result of malfunction, repairs, or battery replacement. INTRODUCTION IMPORTANT! • The contents of this manual. • CASIO COMPUTER CO., LTD. assumes no responsibility for any damage or ...
... marks of others. • Photo Loader and Photohands are the property of CASIO COMPUTER CO., LTD. assumes no responsibility for any damage or loss caused by the screens and configuration of the actual camera. • The SD logo is a registered trademark. • Windows, Internet... may arise through the use of this manual are subject to CASIO COMPUTER CO., LTD. 8 Except as a result of malfunction, repairs, or battery replacement. INTRODUCTION IMPORTANT! • The contents of this manual. • CASIO COMPUTER CO., LTD. assumes no responsibility for any damage or ...
Owners Manual
Page 9
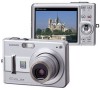
...• 2.7-inch TFT color LCD monitor screen • Long battery life A low-power design combines with a large-capacity battery to provide more recording and playback between charges. • 12X zoom (page 56) 3X optical zoom, 4X digital zoom • 9.3MB flash memory Images can be recorded without...mode or PLAY mode power up (page 40) Press [ ] (REC) or [ ] (PLAY) to turn on or always remain turned on the camera and enter the mode you lock the focus point. 9 INTRODUCTION I Copyright Restrictions Except for the purposes of your own personal enjoyment, unauthorized copying of snapshot...
...• 2.7-inch TFT color LCD monitor screen • Long battery life A low-power design combines with a large-capacity battery to provide more recording and playback between charges. • 12X zoom (page 56) 3X optical zoom, 4X digital zoom • 9.3MB flash memory Images can be recorded without...mode or PLAY mode power up (page 40) Press [ ] (REC) or [ ] (PLAY) to turn on or always remain turned on the camera and enter the mode you lock the focus point. 9 INTRODUCTION I Copyright Restrictions Except for the purposes of your own personal enjoyment, unauthorized copying of snapshot...

Owners Manual
Page 10
...8226; Alarm (page 139) A built-in alarm helps to keep you on time for important events, and even can be used to charge the camera's battery, and to transfer images to a computer. This means you can create images that include you and your current location. You can be performed. ... • BEST SHOT (page 82) Simply select the sample scene that matches the type of image you are trying to record and the camera performs troublesome setups automatically for beautiful pictures every time. • Business Shot (page 90) Business Shot automatically corrects rectangular shapes when recording the...
...8226; Alarm (page 139) A built-in alarm helps to keep you on time for important events, and even can be used to charge the camera's battery, and to transfer images to a computer. This means you can create images that include you and your current location. You can be performed. ... • BEST SHOT (page 82) Simply select the sample scene that matches the type of image you are trying to record and the camera performs troublesome setups automatically for beautiful pictures every time. • Business Shot (page 90) Business Shot automatically corrects rectangular shapes when recording the...

Owners Manual
Page 13
... from the eyes of the camera, immediately turn it off . Next, remove the camera's battery and/or unplug the AC adaptor power cord from the power outlet, and contact your nearest CASIO authorized service center for repair. Next, remove the camera's battery and/or unplug the AC ... , and do not burn your fingers, remove the camera's battery and/or unplug the AC adaptor power cord from the power outlet, and contact your dealer or nearest CASIO authorized service center. Never attempt your dealer or nearest CASIO authorized service center. • Never use is prohibited...
... from the eyes of the camera, immediately turn it off . Next, remove the camera's battery and/or unplug the AC adaptor power cord from the power outlet, and contact your nearest CASIO authorized service center for repair. Next, remove the camera's battery and/or unplug the AC ... , and do not burn your fingers, remove the camera's battery and/or unplug the AC adaptor power cord from the power outlet, and contact your dealer or nearest CASIO authorized service center. Never attempt your dealer or nearest CASIO authorized service center. • Never use is prohibited...
Owners Manual
Page 14
I Data Error Precautions • Your digital camera is performing a record or memory access operation - Removing the battery, removing the memory card, or placing the camera onto the USB cradle while the operation lamp is still flashing green after you first record a number of test... (page 208). Removing the battery or memory card, or setting the camera onto the USB cradle while the camera is manufactured using precision digital components. Doing so will not only make sure you turn off the camera - Disconnecting the USB cable, removing the camera from the USB cradle, or...
I Data Error Precautions • Your digital camera is performing a record or memory access operation - Removing the battery, removing the memory card, or placing the camera onto the USB cradle while the operation lamp is still flashing green after you first record a number of test... (page 208). Removing the battery or memory card, or setting the camera onto the USB cradle while the camera is manufactured using precision digital components. Doing so will not only make sure you turn off the camera - Disconnecting the USB cable, removing the camera from the USB cradle, or...

Owners Manual
Page 15
...to temperature extremes - INTRODUCTION I Condensation • When you should avoid exposing it to conditions that might cause condensation. • To keep the camera in the following areas. - Leave it in the sun - Near air conditioners, heaters, or other areas subject to reach the same temperature as...15 In areas subject to direct sunlight - In areas subject to high humidity or dust - If condensation does form, remove the battery from the camera and leave the battery cover open for use or keep condensation from 0°C to 40°C (32°F to 104°F). • Do ...
...to temperature extremes - INTRODUCTION I Condensation • When you should avoid exposing it to conditions that might cause condensation. • To keep the camera in the following areas. - Leave it in the sun - Near air conditioners, heaters, or other areas subject to reach the same temperature as...15 In areas subject to direct sunlight - In areas subject to high humidity or dust - If condensation does form, remove the battery from the camera and leave the battery cover open for use or keep condensation from 0°C to 40°C (32°F to 104°F). • Do ...
Owners Manual
Page 16
...blow them off (from the lens surface by using a lens blower to power this camera. Doing so can interfere with a soft, dry cloth. 16 I Other • The camera may sometimes notice some distortion in certain types of battery is totally cut off . I Lens • Never apply too much force when... (page 141). Be sure to the characteristics of lens, and does not indicate malfunction of the camera are cleared whenever power is not supported. • This camera does not have a separate battery for the clock. Use of any other soiling of the lens can scratch the lens surface and ...
...blow them off (from the lens surface by using a lens blower to power this camera. Doing so can interfere with a soft, dry cloth. 16 I Other • The camera may sometimes notice some distortion in certain types of battery is totally cut off . I Lens • Never apply too much force when... (page 141). Be sure to the characteristics of lens, and does not indicate malfunction of the camera are cleared whenever power is not supported. • This camera does not have a separate battery for the clock. Use of any other soiling of the lens can scratch the lens surface and ...

Owners Manual
Page 17
Place the camera onto the USB cradle to charge the battery (page 31). • Note that the shape of the AC adaptor depends on the area where you purchased the camera. • It takes about 190 minutes to achieve a full charge. 1 Inlet Type 2 2 Stopper 1 Plug-in Type [CHARGE] lamp Charging: Lights red Charging Complete: Lights green 3 17 Load the battery into the camera (page 30). 1 2. QUICK START GUIDE QUICK START GUIDE First, charge the battery! 1.
Place the camera onto the USB cradle to charge the battery (page 31). • Note that the shape of the AC adaptor depends on the area where you purchased the camera. • It takes about 190 minutes to achieve a full charge. 1 Inlet Type 2 2 Stopper 1 Plug-in Type [CHARGE] lamp Charging: Lights red Charging Complete: Lights green 3 17 Load the battery into the camera (page 30). 1 2. QUICK START GUIDE QUICK START GUIDE First, charge the battery! 1.

Owners Manual
Page 21
...READY This section contains information about things you record (page 51) The NP-40 Rechargeable Lithium Ion Battery The optionally available CASIO BC-30L rapid charger This term as used in this manual: "digital noise" "a REC mode" Means this: Tiny flecks or "snow" in a recorded image or on... the monitor screen, which makes the image look grainy. This term as used in this manual: "camera" "file memory" "battery" "charger" Means this: The CASIO EX-Z57 Digital Camera The location where the camera is currently storing images you need to know about and do before trying to use the...
...READY This section contains information about things you record (page 51) The NP-40 Rechargeable Lithium Ion Battery The optionally available CASIO BC-30L rapid charger This term as used in this manual: "digital noise" "a REC mode" Means this: Tiny flecks or "snow" in a recorded image or on... the monitor screen, which makes the image look grainy. This term as used in this manual: "camera" "file memory" "battery" "charger" Means this: The CASIO EX-Z57 Digital Camera The location where the camera is currently storing images you need to know about and do before trying to use the...
Owners Manual
Page 23
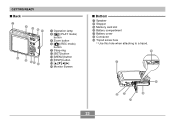
GETTING READY I Back 7 8 9 :A F E DC B 7 Operation lamp 8 [ ] (PLAY mode) button 9 Zoom button 0 [ ] (REC mode) button A Strap ring B [SET] button C [MENU] button D [DISP] button E F Monitor Screen I Bottom G Speaker H Stopper I ML J K 23 H G I Memory card slot J Battery compartment K Battery cover L Connector M Tripod screw hole * Use this hole when attaching to a tripod.
GETTING READY I Back 7 8 9 :A F E DC B 7 Operation lamp 8 [ ] (PLAY mode) button 9 Zoom button 0 [ ] (REC mode) button A Strap ring B [SET] button C [MENU] button D [DISP] button E F Monitor Screen I Bottom G Speaker H Stopper I ML J K 23 H G I Memory card slot J Battery compartment K Battery cover L Connector M Tripod screw hole * Use this hole when attaching to a tripod.
Owners Manual
Page 24
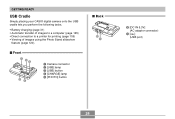
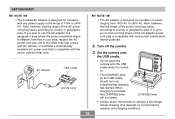
GETTING READY USB Cradle Simply placing your CASIO digital camera onto the USB cradle lets you perform the following tasks. • Battery charging (page 31) • Automatic transfer of images to a computer (page 165) • Direct connection to a printer for printing (page 159) • Viewing of images using the Photo Stand slideshow feature (page 120). I Front 1 23 54 1 Camera connector 2 [USB] lamp 3 [USB] button 4 [CHARGE] lamp 5 [PHOTO] button I Back 6 7 6 [DC IN 5.3V] (AC adaptor connector) 7[ ] (USB port) 24
GETTING READY USB Cradle Simply placing your CASIO digital camera onto the USB cradle lets you perform the following tasks. • Battery charging (page 31) • Automatic transfer of images to a computer (page 165) • Direct connection to a printer for printing (page 159) • Viewing of images using the Photo Stand slideshow feature (page 120). I Front 1 23 54 1 Camera connector 2 [USB] lamp 3 [USB] button 4 [CHARGE] lamp 5 [PHOTO] button I Back 6 7 6 [DC IN 5.3V] (AC adaptor connector) 7[ ] (USB port) 24
Owners Manual
Page 26
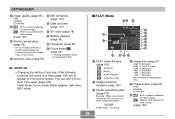
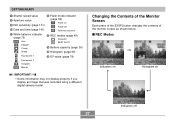
... turn amber. Memory card selected for data storage. A Aperture value (page 53) B ISO sensitivity (page 101) C Date and time (page 141) D EV value (page 78) E Battery capacity (page 36) F Histogram (page 99) G Focus frame (page 52) • Focusing complete: Green • Focusing failed: Red NOTE • Changing the setting of any...
... turn amber. Memory card selected for data storage. A Aperture value (page 53) B ISO sensitivity (page 101) C Date and time (page 141) D EV value (page 78) E Battery capacity (page 36) F Histogram (page 99) G Focus frame (page 52) • Focusing complete: Green • Focusing failed: Red NOTE • Changing the setting of any...
Owners Manual
Page 27
... modes (page 49) Snapshot BEST SHOT Daylight Cloudy D Battery capacity (page 36) Shade E Histogram (page 99) 1 Fluorescent 1 F EV value (page 78) 2 Fluorescent 2 Tungsten Manual IMPORTANT! • Some information may not display properly if you display an image that was recorded using a different digital camera model. I REC Modes Indicators on Histogram on Indicators off...
... modes (page 49) Snapshot BEST SHOT Daylight Cloudy D Battery capacity (page 36) Shade E Histogram (page 99) 1 Fluorescent 1 F EV value (page 78) 2 Fluorescent 2 Tungsten Manual IMPORTANT! • Some information may not display properly if you display an image that was recorded using a different digital camera model. I REC Modes Indicators on Histogram on Indicators off...
Owners Manual
Page 30
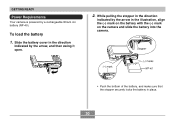
Slide the battery cover in the direction indicated by the arrow in the illustration, align the (-) mark on the battery with the (-) mark on the camera and slide the battery into the camera. (-) mark Stopper (-) marks NP-40 • Push the bottom of the battery, and make sure that the stopper securely locks the battery in the direction indicated by the arrow, and then swing it open. 2. While pulling the stopper in place. 30 To load the battery 1. GETTING READY Power Requirements Your camera is powered by a rechargeable lithium ion battery (NP-40).
Slide the battery cover in the direction indicated by the arrow in the illustration, align the (-) mark on the battery with the (-) mark on the camera and slide the battery into the camera. (-) mark Stopper (-) marks NP-40 • Push the bottom of the battery, and make sure that the stopper securely locks the battery in the direction indicated by the arrow, and then swing it open. 2. While pulling the stopper in place. 30 To load the battery 1. GETTING READY Power Requirements Your camera is powered by a rechargeable lithium ion battery (NP-40).
Owners Manual
Page 31
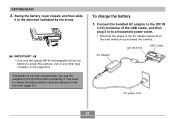
... USB cradle, and then plug it . IMPORTANT! • Use only the special NP-40 rechargeable lithium ion battery to a household power outlet. • Note that the shape of battery is not fully charged when you purchased the camera. [DC IN 5.3V] USB Cradle AC Adaptor AC power cord 31 Swing the... battery cover closed, and then slide it in to power this camera. Use of any other type of the AC adaptor ...
... USB cradle, and then plug it . IMPORTANT! • Use only the special NP-40 rechargeable lithium ion battery to a household power outlet. • Note that the shape of battery is not fully charged when you purchased the camera. [DC IN 5.3V] USB Cradle AC Adaptor AC power cord 31 Swing the... battery cover closed, and then slide it in to power this camera. Use of any other type of the AC adaptor ...
Owners Manual
Page 32
...power cord plug is compatible with the power outlets in the range of the other ones that comes with the camera, or purchase a commercially available AC power cord that the shape of the AC power cord plug varies according to... 240V AC. If you to country or geographic area. Turn off the camera. 3. Set the camera onto the USB cradle. • Do not place the camera onto the USB cradle while it is turned on. [DC IN 5.3V] •... READY NOTE NOTE • The bundled AC adaptor is designed for operation on current battery capacity and charging conditions. 32
...power cord plug is compatible with the power outlets in the range of the other ones that comes with the camera, or purchase a commercially available AC power cord that the shape of the AC power cord plug varies according to... 240V AC. If you to country or geographic area. Turn off the camera. 3. Set the camera onto the USB cradle. • Do not place the camera onto the USB cradle while it is turned on. [DC IN 5.3V] •... READY NOTE NOTE • The bundled AC adaptor is designed for operation on current battery capacity and charging conditions. 32
Owners Manual
Page 33
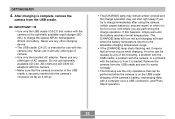
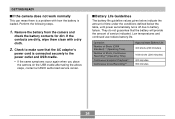
... you try to charge immediately after using the camera (which causes battery to become warm) or when it will start right away if you are the only operations that the camera connector of the USB cradle is intended for use any of camera. • Use only the bundled AC adaptor... type of the following are performing the charge operation. GETTING READY 4. Do not use any other type of the camera's battery, exchanging data with this happens, simply wait until the battery reaches normal temperature. The [CHARGE] lamp will turn red and charging will go. • The [CHARGE] lamp...
... you try to charge immediately after using the camera (which causes battery to become warm) or when it will start right away if you are the only operations that the camera connector of the USB cradle is intended for use any of camera. • Use only the bundled AC adaptor... type of the following are performing the charge operation. GETTING READY 4. Do not use any other type of the camera's battery, exchanging data with this happens, simply wait until the battery reaches normal temperature. The [CHARGE] lamp will turn red and charging will go. • The [CHARGE] lamp...
Owners Manual
Page 34
... same symptoms occur again when you place the camera on the USB cradle after taking the above steps, contact a CASIO authorized service center. They do not guarantee that the AC adaptor's power cord is a problem with a dry cloth. 2. Low temperatures and continued use reduce battery life. Operation Number of Shots (CIPA Standard)*1 (Operating...
... same symptoms occur again when you place the camera on the USB cradle after taking the above steps, contact a CASIO authorized service center. They do not guarantee that the AC adaptor's power cord is a problem with a dry cloth. 2. Low temperatures and continued use reduce battery life. Operation Number of Shots (CIPA Standard)*1 (Operating...


