
Owners Manual
Page 6
... On/Off Functions 146 Formatting Built-in Memory 147 149 USING A MEMORY CARD Using a Memory Card 150 To insert a memory card into the camera 150 To replace the memory card 151 Formatting a Memory Card 151 Copying Files 153 To copy all the files in built-in memory to a memory card 153 To copy a specific file from a memory card to built-in memory 154 155 PRINTING IMAGES DPOF 156...
... On/Off Functions 146 Formatting Built-in Memory 147 149 USING A MEMORY CARD Using a Memory Card 150 To insert a memory card into the camera 150 To replace the memory card 151 Formatting a Memory Card 151 Copying Files 153 To copy all the files in built-in memory to a memory card 153 To copy a specific file from a memory card to built-in memory 154 155 PRINTING IMAGES DPOF 156...
Owners Manual
Page 9
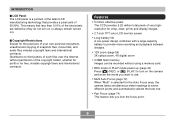
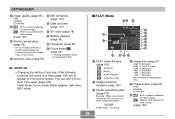
...the latest LCD manufacturing technology that less than 0.01% of the copyright holder, whether for profit or for the Auto Focus area, the camera takes simultaneous meter readings at seven different points and automatically selects the best one. • Pan Focus (page 74) This feature lets ...a large-capacity battery to provide more recording and playback between charges. • 12X zoom (page 56) 3X optical zoom, 4X digital zoom • 9.3MB flash memory Images can be recorded without using a memory card. • REC mode or PLAY mode power up (page 40) Press [ ] (REC) or [ ] (PLAY) to turn...
...the latest LCD manufacturing technology that less than 0.01% of the copyright holder, whether for profit or for the Auto Focus area, the camera takes simultaneous meter readings at seven different points and automatically selects the best one. • Pan Focus (page 74) This feature lets ...a large-capacity battery to provide more recording and playback between charges. • 12X zoom (page 56) 3X optical zoom, 4X digital zoom • 9.3MB flash memory Images can be recorded without using a memory card. • REC mode or PLAY mode power up (page 40) Press [ ] (REC) or [ ] (PLAY) to turn...

Owners Manual
Page 10
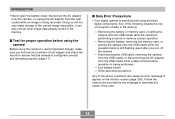
... Time (page 143) A simple operation sets the current time for your friend, even if you are trying to record and the camera performs troublesome setups automatically for beautiful pictures every time. • Business Shot (page 90) Business Shot automatically corrects rectangular shapes when recording...background image. You can be performed. This helps to avoid missing a special moment while you wait for the camera to Auto Focus. • Support for SD memory cards and MMC (MultiMedia Cards) for memory expansion (page 149) • Bundled with a USB Cradle (pages 32, 120, 159, 165) The...
... Time (page 143) A simple operation sets the current time for your friend, even if you are trying to record and the camera performs troublesome setups automatically for beautiful pictures every time. • Business Shot (page 90) Business Shot automatically corrects rectangular shapes when recording...background image. You can be performed. This helps to avoid missing a special moment while you wait for the camera to Auto Focus. • Support for SD memory cards and MMC (MultiMedia Cards) for memory expansion (page 149) • Bundled with a USB Cradle (pages 32, 120, 159, 165) The...
Owners Manual
Page 14
... corrupt other image data already stored in file memory. - I Data Error Precautions • Your digital camera is performing a record or memory access operation - Low battery power - Removing the battery or memory card, or setting the camera onto the USB cradle while the camera is manufactured using the camera to ensure that the camera is configured correctly and operating properly (page...
... corrupt other image data already stored in file memory. - I Data Error Precautions • Your digital camera is performing a record or memory access operation - Low battery power - Removing the battery or memory card, or setting the camera onto the USB cradle while the camera is manufactured using the camera to ensure that the camera is configured correctly and operating properly (page...

Owners Manual
Page 19
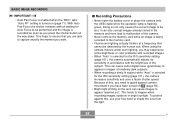
...Focus operation, the focus frame will turn green and the operation lamp will light green. 7. Point the camera at the subject, use the monitor screen to select the "REC" tab. 4. For details about formatting a memory card, see page 151. 1. Use [̆] and [̄] to select " Snapshot", and then press... Snapshot mode icon 7 10 1600 1200 NORMAL IN 1 / 1000 F2.6 05/ 12 /24 12 : 58 Focus frame 6 1 3, 4, 5 2 Before using a commercially available memory card, be sure to first format it using the camera's formatting procedure. QUICK START GUIDE To record an image See page 49 for details.
...Focus operation, the focus frame will turn green and the operation lamp will light green. 7. Point the camera at the subject, use the monitor screen to select the "REC" tab. 4. For details about formatting a memory card, see page 151. 1. Use [̆] and [̄] to select " Snapshot", and then press... Snapshot mode icon 7 10 1600 1200 NORMAL IN 1 / 1000 F2.6 05/ 12 /24 12 : 58 Focus frame 6 1 3, 4, 5 2 Before using a commercially available memory card, be sure to first format it using the camera's formatting procedure. QUICK START GUIDE To record an image See page 49 for details.

Owners Manual
Page 22
... images, see page 177. General Guide The following three locations. • The camera's built-in flash memory • An SD memory card loaded in the camera • A MultiMediaCard loaded in this manual is a general term that refers to the location where your camera is currently storing the images you record. GETTING READY I Front 12 3 45 1 Shutter...
... images, see page 177. General Guide The following three locations. • The camera's built-in flash memory • An SD memory card loaded in the camera • A MultiMediaCard loaded in this manual is a general term that refers to the location where your camera is currently storing the images you record. GETTING READY I Front 12 3 45 1 Shutter...
Owners Manual
Page 23
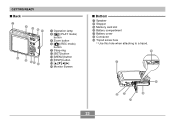
GETTING READY I Back 7 8 9 :A F E DC B 7 Operation lamp 8 [ ] (PLAY mode) button 9 Zoom button 0 [ ] (REC mode) button A Strap ring B [SET] button C [MENU] button D [DISP] button E F Monitor Screen I Bottom G Speaker H Stopper I ML J K 23 H G I Memory card slot J Battery compartment K Battery cover L Connector M Tripod screw hole * Use this hole when attaching to a tripod.
GETTING READY I Back 7 8 9 :A F E DC B 7 Operation lamp 8 [ ] (PLAY mode) button 9 Zoom button 0 [ ] (REC mode) button A Strap ring B [SET] button C [MENU] button D [DISP] button E F Monitor Screen I Bottom G Speaker H Stopper I ML J K 23 H G I Memory card slot J Battery compartment K Battery cover L Connector M Tripod screw hole * Use this hole when attaching to a tripod.
Owners Manual
Page 26
Memory card selected for data storage. (page 149) 0 Shutter speed value (page 53) • An out of the ... Movie Playback: Elapsed play time 5 Image quality (page 68) FINE NORMAL ECONOMY 6 Built-in memory selected for data storage. GETTING READY 8 Image quality (page 68) FINE NORMAL ECONOMY 9 Built-in memory selected for data storage. You can turn amber. A Aperture value (page 53) B ISO sensitivity...range aperture or shutter speed causes the corresponding monitor screen value to appear on the monitor screen. Memory card selected for data storage. (page 149) 26
Memory card selected for data storage. (page 149) 0 Shutter speed value (page 53) • An out of the ... Movie Playback: Elapsed play time 5 Image quality (page 68) FINE NORMAL ECONOMY 6 Built-in memory selected for data storage. GETTING READY 8 Image quality (page 68) FINE NORMAL ECONOMY 9 Built-in memory selected for data storage. You can turn amber. A Aperture value (page 53) B ISO sensitivity...range aperture or shutter speed causes the corresponding monitor screen value to appear on the monitor screen. Memory card selected for data storage. (page 149) 26
Owners Manual
Page 35
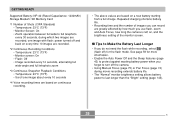
GETTING READY Supported Battery: NP-40 (Rated Capacitance: 1230mAh) Storage Medium: SD Memory Card *1 Number of the monitor screen. power turned off the camera. • Using Manual Focus (page 75) or Pan Focus (page 74) during which two images are based on continuous recording. • The above ... Power Off and the Sleep features (page 42) to protect against wasting battery power when you use flash, zoom and Auto Focus, how long the camera is left on, and the brightness setting of Shots (CIPA Standard) • Temperature: 23°C (73°F) • Monitor Screen: On • Zoom...
GETTING READY Supported Battery: NP-40 (Rated Capacitance: 1230mAh) Storage Medium: SD Memory Card *1 Number of the monitor screen. power turned off the camera. • Using Manual Focus (page 75) or Pan Focus (page 74) during which two images are based on continuous recording. • The above ... Power Off and the Sleep features (page 42) to protect against wasting battery power when you use flash, zoom and Auto Focus, how long the camera is left on, and the brightness setting of Shots (CIPA Standard) • Temperature: 23°C (73°F) • Monitor Screen: On • Zoom...
Owners Manual
Page 51
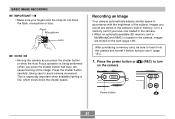
... cause blurring of the subject. After purchasing a memory card, be sure to load it into the camera and format it before trying to avoid camera movement. Press the power button or [ ] (REC) to a memory card if you have one loaded in the camera. • When an optionally available SD memory card or MultiMediaCard (MMC) is being performed (when you...
... cause blurring of the subject. After purchasing a memory card, be sure to load it into the camera and format it before trying to avoid camera movement. Press the power button or [ ] (REC) to a memory card if you have one loaded in the camera. • When an optionally available SD memory card or MultiMediaCard (MMC) is being performed (when you...
Owners Manual
Page 54
... the human eye. Because of the camera. • Never remove the memory card while an image is selected for the ISO sensitivity setting (page 101), the camera automatically adjusts its sensitivity in bright sunlight. To protect against this , you need to guard against camera movement if you may experience some digital noise (graininess) to appear in...
... the human eye. Because of the camera. • Never remove the memory card while an image is selected for the ISO sensitivity setting (page 101), the camera automatically adjusts its sensitivity in bright sunlight. To protect against this , you need to guard against camera movement if you may experience some digital noise (graininess) to appear in...

Owners Manual
Page 95
... of a JPEG file is ".JPG". • Audio Format: WAVE/ADPCM recording format This is in the case of a movie. • Certain types of memory cards take longer to record data, which can cause a vertical band to be dropped. Recording Audio Adding Audio to a Snapshot You can add audio to a snapshot... Up to let you know when a frame has been dropped. The file extension of approximately 4KB per second) 95 The file extension of the camera. and REC flash on the monitor screen during recording to about 30 seconds per image • Audio File Size: Approximately 120KB (30-second recording...
... of a JPEG file is ".JPG". • Audio Format: WAVE/ADPCM recording format This is in the case of a movie. • Certain types of memory cards take longer to record data, which can cause a vertical band to be dropped. Recording Audio Adding Audio to a Snapshot You can add audio to a snapshot... Up to let you know when a frame has been dropped. The file extension of approximately 4KB per second) 95 The file extension of the camera. and REC flash on the monitor screen during recording to about 30 seconds per image • Audio File Size: Approximately 120KB (30-second recording...
Owners Manual
Page 129
...folder to be able to store on a memory card depends on image size and quality, card capacity, etc. • For details about how the camera displays folder and file names. • The actual number of the 100th folder. 100CASIO Serial number (3 digits) Each folder can have up to 9,999.... created. Example: Name of files you record is a serial number. Folders Your camera automatically creates folders in its built-in flash memory or on page 177. 129 See page 26 for information about the folder structure, see "Memory Folder Structure" on the memory card. Example: Name of images.
...folder to be able to store on a memory card depends on image size and quality, card capacity, etc. • For details about how the camera displays folder and file names. • The actual number of the 100th folder. 100CASIO Serial number (3 digits) Each folder can have up to 9,999.... created. Example: Name of files you record is a serial number. Folders Your camera automatically creates folders in its built-in flash memory or on page 177. 129 See page 26 for information about the folder structure, see "Memory Folder Structure" on the memory card. Example: Name of images.
Owners Manual
Page 131
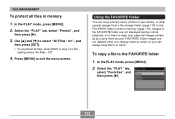
Press [MENU] to select "All Files : On", and then press [SET]. • To unprotect all files in memory 1. FAVORITE folder images are not displayed during normal playback, so it helps to keep them around. Use [̆] and [̄] to exit the menu screen. ... "Favorites", and then press [̈]. 131 To copy a file to the FAVORITE folder in built-in the FAVORITE folder are not deleted when you change memory cards, so you carry them on hand. In the PLAY mode, press [MENU]. 2. In the PLAY mode, press [MENU]. 2. Select the "PLAY" tab, select "Protect", and...
Press [MENU] to select "All Files : On", and then press [SET]. • To unprotect all files in memory 1. FAVORITE folder images are not displayed during normal playback, so it helps to keep them around. Use [̆] and [̄] to exit the menu screen. ... "Favorites", and then press [̈]. 131 To copy a file to the FAVORITE folder in built-in the FAVORITE folder are not deleted when you change memory cards, so you carry them on hand. In the PLAY mode, press [MENU]. 2. In the PLAY mode, press [MENU]. 2. Select the "PLAY" tab, select "Protect", and...
Owners Manual
Page 132
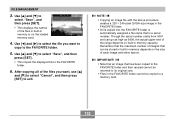
Use [̆] and [̄] to select "Save", and then press [SET]. • This copies the displayed file to a memory card. 132 FILE MANAGEMENT 3. Use [̆] and [̄] to select "Save", and then press [SET]. • This displays the names of the files you want , use [&#... folder is a serial number. NOTE • Copying an image file with the above procedure creates a 320 × 240-pixel QVGA-size image in memory depends on the loaded memory card. 4. Though the serial number starts from 0001 and can go as high as 9999, the actual upper end of the range depends on...
Use [̆] and [̄] to select "Save", and then press [SET]. • This copies the displayed file to a memory card. 132 FILE MANAGEMENT 3. Use [̆] and [̄] to select "Save", and then press [SET]. • This displays the names of the files you want , use [&#... folder is a serial number. NOTE • Copying an image file with the above procedure creates a 320 × 240-pixel QVGA-size image in memory depends on the loaded memory card. 4. Though the serial number starts from 0001 and can go as high as 9999, the actual upper end of the range depends on...
Owners Manual
Page 133
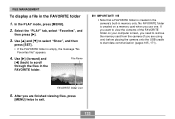
... start data communication (pages 165, 171). If you want to view the contents of the FAVORITE folder on a memory card when you are using one . After you use one ) before placing the camera onto the USB cradle to select "Show", and then press [SET]. • If the FAVORITE folder is empty...", and then press [̈]. 3. File Name IMPORTANT! • Note that a FAVORITE folder is created on your computer screen, you need to remove the memory card from the camera (if you are finished viewing files, press [MENU] twice to scroll through the files in the FAVORITE folder 1.
... start data communication (pages 165, 171). If you want to view the contents of the FAVORITE folder on a memory card when you are using one . After you use one ) before placing the camera onto the USB cradle to select "Show", and then press [SET]. • If the FAVORITE folder is empty...", and then press [̈]. 3. File Name IMPORTANT! • Note that a FAVORITE folder is created on your computer screen, you need to remove the memory card from the camera (if you are finished viewing files, press [MENU] twice to scroll through the files in the FAVORITE folder 1.
Owners Manual
Page 137
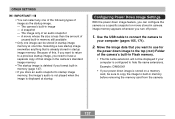
... use for the power down image to the top (root) Folder of the camera's built-in Flash memory. • The file name extension will not be sure to copy the image to built-in memory before removing the memory card from the camera. 137 Move the image data that you turn off power. 1. The... camera's built-in image - Configuring Power Down Image Settings With the power down image feature, you can select ...
... use for the power down image to the top (root) Folder of the camera's built-in Flash memory. • The file name extension will not be sure to copy the image to built-in memory before removing the memory card from the camera. 137 Move the image data that you turn off power. 1. The... camera's built-in image - Configuring Power Down Image Settings With the power down image feature, you can select ...
Owners Manual
Page 139
... file plays the audio. • You can also turn the alarm on or off. 139 You can configure up to three alarms that cause the camera to beep and display a specified image at the assigned time. Use [̆] and [̄] to change the selected setting. • You can configure up... the following procedure to specify the method for generating the serial number used and increment it, regardless of whether files are deleted or whether the memory card is replaced with a new one Find the highest file number in the current folder and increment it Select this for a newly saved file: Store...
... file plays the audio. • You can also turn the alarm on or off. 139 You can configure up to three alarms that cause the camera to beep and display a specified image at the assigned time. Use [̆] and [̄] to change the selected setting. • You can configure up... the following procedure to specify the method for generating the serial number used and increment it, regardless of whether files are deleted or whether the memory card is replaced with a new one Find the highest file number in the current folder and increment it Select this for a newly saved file: Store...

Owners Manual
Page 147
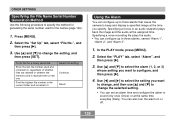
...1. Press [MENU]. 3. Check to make sure you do not need any data stored in memory deletes the following. - Formatting Built-in Memory Formatting built-in memory deletes any of the data in memory before you format it. • Formatting built-in it (page 151). 2. Startup screen image... off the camera. • Pressing [ ] (REC) in the PLAY mode switches to the currently selected recording mode, and pressing [ ] (PLAY) in the camera, remove it . Protected images - Check to make sure there is no memory card loaded in the camera. • If there is a memory card loaded in ...
...1. Press [MENU]. 3. Check to make sure you do not need any data stored in memory deletes the following. - Formatting Built-in Memory Formatting built-in memory deletes any of the data in memory before you format it. • Formatting built-in it (page 151). 2. Startup screen image... off the camera. • Pressing [ ] (REC) in the PLAY mode switches to the currently selected recording mode, and pressing [ ] (PLAY) in the camera, remove it . Protected images - Check to make sure there is no memory card loaded in the camera. • If there is a memory card loaded in ...

Owners Manual
Page 149
... against accidental deletion of your camera by using a commercially available memory card (SD memory card or MultiMediaCard). When you insert a memory card, however, the camera automatically stores files to the card. • Note that you cannot save files to built-in memory while a memory card is used. • See the instructions that come with this camera. USING A MEMORY CARD USING A MEMORY CARD You can cause data to...
... against accidental deletion of your camera by using a commercially available memory card (SD memory card or MultiMediaCard). When you insert a memory card, however, the camera automatically stores files to the card. • Note that you cannot save files to built-in memory while a memory card is used. • See the instructions that come with this camera. USING A MEMORY CARD USING A MEMORY CARD You can cause data to...

