
Owners Manual
Page 3
... ..... 18 To record an image 19 To view a recorded image 20 To delete an image 20 21 GETTING READY About This Manual 21 General Guide 22 Camera 22 USB Cradle 24 Monitor Screen Contents 25 Changing the Contents of the Monitor Screen 27 Attaching the Strap 29 Power Requirements 30... To load the battery 30 To charge the battery 31 To replace the battery 36 Power Supply Precautions 37 Turning the Camera On and Off 40 Configuring Power Saving Settings 42 Using the On-screen Menus 43 Configuring Display Language and Clock Settings ... 45 To ...
... ..... 18 To record an image 19 To view a recorded image 20 To delete an image 20 21 GETTING READY About This Manual 21 General Guide 22 Camera 22 USB Cradle 24 Monitor Screen Contents 25 Changing the Contents of the Monitor Screen 27 Attaching the Strap 29 Power Requirements 30... To load the battery 30 To charge the battery 31 To replace the battery 36 Power Supply Precautions 37 Turning the Camera On and Off 40 Configuring Power Saving Settings 42 Using the On-screen Menus 43 Configuring Display Language and Clock Settings ... 45 To ...
Owners Manual
Page 4
INTRODUCTION 49 BASIC IMAGE RECORDING Recording an Image 49 Specifying the Recording Mode 49 Aiming the Camera 50 Recording an Image 51 Using Zoom 56 Optical Zoom 56 Digital Zoom 57 Using the Flash 59 Flash Unit Status 61 Changing the Flash Intensity Setting 62 Using Flash Assist 62 Using the ...Selecting the Focus Mode 69 Using Auto Focus 70 Using the Macro Mode 73 Using Pan Focus 74 Using the Infinity Mode 75 Using Manual Focus 75 Using Focus Lock 77 Exposure Compensation (EV Shift 78 4 Adjusting White Balance 79 Configuring the White Balance Setting...
INTRODUCTION 49 BASIC IMAGE RECORDING Recording an Image 49 Specifying the Recording Mode 49 Aiming the Camera 50 Recording an Image 51 Using Zoom 56 Optical Zoom 56 Digital Zoom 57 Using the Flash 59 Flash Unit Status 61 Changing the Flash Intensity Setting 62 Using Flash Assist 62 Using the ...Selecting the Focus Mode 69 Using Auto Focus 70 Using the Macro Mode 73 Using Pan Focus 74 Using the Infinity Mode 75 Using Manual Focus 75 Using Focus Lock 77 Exposure Compensation (EV Shift 78 4 Adjusting White Balance 79 Configuring the White Balance Setting...
Owners Manual
Page 8
INTRODUCTION IMPORTANT! • The contents of this manual. • CASIO COMPUTER CO., LTD. assumes no responsibility for any third party due to the use of CASIO COMPUTER CO., LTD. assumes no responsibility for any damage or loss resulting from the use of malfunction, repairs, or battery ...., LTD. 8 Except as a result of the EX-Z57. • CASIO COMPUTER CO., LTD. assumes no responsibility for any damage or loss caused by you or any loss or claims by the screens and configuration of the actual camera. • The SD logo is a registered trademark. • Windows, ...
INTRODUCTION IMPORTANT! • The contents of this manual. • CASIO COMPUTER CO., LTD. assumes no responsibility for any third party due to the use of CASIO COMPUTER CO., LTD. assumes no responsibility for any damage or loss resulting from the use of malfunction, repairs, or battery ...., LTD. 8 Except as a result of the EX-Z57. • CASIO COMPUTER CO., LTD. assumes no responsibility for any damage or loss caused by you or any loss or claims by the screens and configuration of the actual camera. • The SD logo is a registered trademark. • Windows, ...
Owners Manual
Page 12
.... Always leave maintenance and repair work up to a CASIO authorized service center. • Keep the small parts and accessories of this manual to "camera" refer to the CASIO EX-Z57 Digital Camera. • Never try to open the case of the camera or attempt your physician immediately. • Never fire... the flash in this camera out of the reach of small children. All ...
.... Always leave maintenance and repair work up to a CASIO authorized service center. • Keep the small parts and accessories of this manual to "camera" refer to the CASIO EX-Z57 Digital Camera. • Never try to open the case of the camera or attempt your physician immediately. • Never fire... the flash in this camera out of the reach of small children. All ...

Owners Manual
Page 21
... you record (page 51) The NP-40 Rechargeable Lithium Ion Battery The optionally available CASIO BC-30L rapid charger This term as used in this manual: "camera" "file memory" "battery" "charger" Means this: The CASIO EX-Z57 Digital Camera The location where the camera is currently storing images you need to know in order to use the...
... you record (page 51) The NP-40 Rechargeable Lithium Ion Battery The optionally available CASIO BC-30L rapid charger This term as used in this manual: "camera" "file memory" "battery" "charger" Means this: The CASIO EX-Z57 Digital Camera The location where the camera is currently storing images you need to know in order to use the...

Owners Manual
Page 22
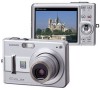
... following illustrations show the names of the following three locations. • The camera's built-in flash memory • An SD memory card loaded in the camera • A MultiMediaCard loaded in this manual is a general term that refers to the location where your camera is currently storing the images you record. GETTING READY I Front 12...
... following illustrations show the names of the following three locations. • The camera's built-in flash memory • An SD memory card loaded in the camera • A MultiMediaCard loaded in this manual is a general term that refers to the location where your camera is currently storing the images you record. GETTING READY I Front 12...
Owners Manual
Page 25
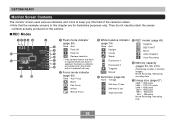
... various indicators and icons to keep you informed of storable 2 Focus mode indicator (page 69) None Auto Focus Macro Pan Focus Infinity Manual Focus Manual 4 Self-timer (page 64) None 1-Image 10s Self-timer 10 sec 2s Self-timer 2 sec x3 Triple self-timer images) Movie...) (page 59) (page 79) 7 None Auto None Auto 8 Flash Off Daylight 9 Flash On Cloudy 0 Red-eye reduction Shade A • If the camera detects that flash B is required while auto flash is pressed half way. 1 Fluorescent 1 2 Fluorescent 2 Tungsten Snapshot BEST SHOT Movie Audio Snapshot Voice Recording 6 ...
... various indicators and icons to keep you informed of storable 2 Focus mode indicator (page 69) None Auto Focus Macro Pan Focus Infinity Manual Focus Manual 4 Self-timer (page 64) None 1-Image 10s Self-timer 10 sec 2s Self-timer 2 sec x3 Triple self-timer images) Movie...) (page 59) (page 79) 7 None Auto None Auto 8 Flash Off Daylight 9 Flash On Cloudy 0 Red-eye reduction Shade A • If the camera detects that flash B is required while auto flash is pressed half way. 1 Fluorescent 1 2 Fluorescent 2 Tungsten Snapshot BEST SHOT Movie Audio Snapshot Voice Recording 6 ...
Owners Manual
Page 27
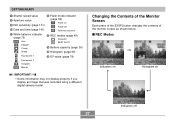
... Auto C REC modes (page 49) Snapshot BEST SHOT Daylight Cloudy D Battery capacity (page 36) Shade E Histogram (page 99) 1 Fluorescent 1 F EV value (page 78) 2 Fluorescent 2 Tungsten Manual IMPORTANT! • Some information may not display properly if you display an image that was recorded using a different digital camera model.
... Auto C REC modes (page 49) Snapshot BEST SHOT Daylight Cloudy D Battery capacity (page 36) Shade E Histogram (page 99) 1 Fluorescent 1 F EV value (page 78) 2 Fluorescent 2 Tungsten Manual IMPORTANT! • Some information may not display properly if you display an image that was recorded using a different digital camera model.
Owners Manual
Page 35
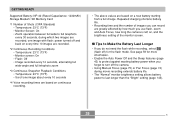
... against wasting battery power when you do not need the flash while recording, select (flash off) for the flash mode. power turned off the camera. • Using Manual Focus (page 75) or Pan Focus (page 74) during which two images are recorded, one image about every 10 seconds *4 Voice recording times... time and the number of images you can record are greatly affected by how much you use flash, zoom and Auto Focus, how long the camera is left on, and the brightness setting of Shots (CIPA Standard) • Temperature: 23°C (73°F) • Monitor Screen: On • Zoom operation...
... against wasting battery power when you do not need the flash while recording, select (flash off) for the flash mode. power turned off the camera. • Using Manual Focus (page 75) or Pan Focus (page 74) during which two images are recorded, one image about every 10 seconds *4 Voice recording times... time and the number of images you can record are greatly affected by how much you use flash, zoom and Auto Focus, how long the camera is left on, and the brightness setting of Shots (CIPA Standard) • Temperature: 23°C (73°F) • Monitor Screen: On • Zoom operation...
Owners Manual
Page 37
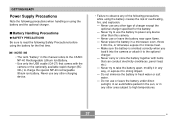
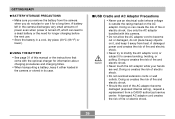
...under direct sunlight, in an automobile parked in the sun, or in any other than this manual refers to power any way, or expose it to intense heat. - Never place the battery in this camera. - Do not immerse the battery in any device other type of overheating, fire, and ...explosion. - Never use the battery to the CASIO NP-40 Rechargeable Lithium Ion Battery. • Use only the USB cradle (...
...under direct sunlight, in an automobile parked in the sun, or in any other than this manual refers to power any way, or expose it to intense heat. - Never place the battery in this camera. - Do not immerse the battery in any device other type of overheating, fire, and ...explosion. - Never use the battery to the CASIO NP-40 Rechargeable Lithium Ion Battery. • Use only the USB cradle (...
Owners Manual
Page 39
...heavy objects on the AC adaptor. Doing so creates the risk of fire or electric shock. Use only the AC adaptor bundled with this manual or the instructions that come with the optional charger for longer charging before the next use an electrical outlet whose voltage is turned off, ...power is outside the rating marked on it, and keep it away from a CASIO authorized service center. Doing so creates the risk of fire or electric shock. 39 A battery left in the camera discharges very small amounts of this camera. • Do not allow the AC adaptor cord to a dead battery or...
...heavy objects on the AC adaptor. Doing so creates the risk of fire or electric shock. Use only the AC adaptor bundled with this manual or the instructions that come with the optional charger for longer charging before the next use an electrical outlet whose voltage is turned off, ...power is outside the rating marked on it, and keep it away from a CASIO authorized service center. Doing so creates the risk of fire or electric shock. 39 A battery left in the camera discharges very small amounts of this camera. • Do not allow the AC adaptor cord to a dead battery or...
Owners Manual
Page 55
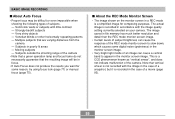
... are varying distances from the camera - Subjects in the case of the REC mode monitor screen to slow down, which causes some reason, try using focus lock (page 77) or manual focus (page 75). The actual image is recorded in a REC mode is a simplified image for some digital noise (graininess) in the monitor...
... are varying distances from the camera - Subjects in the case of the REC mode monitor screen to slow down, which causes some reason, try using focus lock (page 77) or manual focus (page 75). The actual image is recorded in a REC mode is a simplified image for some digital noise (graininess) in the monitor...

Owners Manual
Page 57
... button to start movie recording. • Whenever you perform an optical zoom operation while recording with digital zoom appears coarser than the original. 57 C The range of digital zoom is recommended to protect against hand movement when using the telephoto setting (zoom in combination with ... an image enlarged with the Macro mode or manual focus, a value will appear on the monitor screen to tell you perform a digital zoom operation, the camera manipulates the image data to enlarge the center of the image. Digital Zoom Digital zoom digitally enlarges the part of the image at the ...
... button to start movie recording. • Whenever you perform an optical zoom operation while recording with digital zoom appears coarser than the original. 57 C The range of digital zoom is recommended to protect against hand movement when using the telephoto setting (zoom in combination with ... an image enlarged with the Macro mode or manual focus, a value will appear on the monitor screen to tell you perform a digital zoom operation, the camera manipulates the image data to enlarge the center of the image. Digital Zoom Digital zoom digitally enlarges the part of the image at the ...
Owners Manual
Page 69
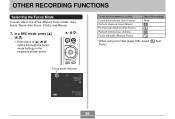
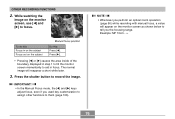
... sequence shown below. [̆] ( ) To set up the camera to do this: Focus automatically (Auto Focus)* Perform close-up focus (Macro) Fix the focal distance (Pan Focus) Perform infinity focus (Infinity) Focus manually (Manual Focus) Select this setting: None * When using Icon Help (page... 105), select " Auto Focus". In a REC mode, press [̆] ( ). • Each press of five different focus modes: Auto Focus, Macro, Pan Focus, Infinity, and Manual. 1.
... sequence shown below. [̆] ( ) To set up the camera to do this: Focus automatically (Auto Focus)* Perform close-up focus (Macro) Fix the focal distance (Pan Focus) Perform infinity focus (Infinity) Focus manually (Manual Focus) Select this setting: None * When using Icon Help (page... 105), select " Auto Focus". In a REC mode, press [̆] ( ). • Each press of five different focus modes: Auto Focus, Macro, Pan Focus, Infinity, and Manual. 1.
Owners Manual
Page 75
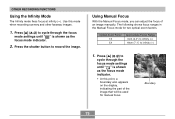
Press the shutter button to infinity (∞) 1. The following shows focus ranges in the Manual Focus mode for manual focus. Press [̆] ( ) to cycle through the focus mode settings until " " is shown as the focus mode indicator. 2. OTHER RECORDING FUNCTIONS Using the ... mode fixes focus at infinity (∞). Use this point, a boundary also appears on the display, indicating the part of an image manually. Using Manual Focus With the Manual Focus mode, you can adjust the focus of the image that will be used for two optical zoom factors. Boundary 75 Optical Zoom...
Press the shutter button to infinity (∞) 1. The following shows focus ranges in the Manual Focus mode for manual focus. Press [̆] ( ) to cycle through the focus mode settings until " " is shown as the focus mode indicator. 2. OTHER RECORDING FUNCTIONS Using the ... mode fixes focus at infinity (∞). Use this point, a boundary also appears on the display, indicating the part of an image manually. Using Manual Focus With the Manual Focus mode, you can adjust the focus of the image that will be used for two optical zoom factors. Boundary 75 Optical Zoom...
Owners Manual
Page 76
... in on the subject Focus out on the monitor screen, use [̇] and [̈] to focus. OTHER RECORDING FUNCTIONS 2. Manual focus position To do this: Focus in focus. IMPORTANT! • In the Manual Focus mode, the [̇] and [̈] keys adjust focus, even if you the focusing range. NOTE • Whenever you...
... in on the subject Focus out on the monitor screen, use [̇] and [̈] to focus. OTHER RECORDING FUNCTIONS 2. Manual focus position To do this: Focus in focus. IMPORTANT! • In the Manual Focus mode, the [̇] and [̈] keys adjust focus, even if you the focusing range. NOTE • Whenever you...
Owners Manual
Page 78
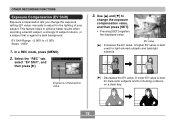
... a clear day. 78 EV value [̆] : Increases the EV value. In a REC mode, press [MENU]. 2. This feature helps to change the exposure setting (EV value) manually to +2.0EV Steps: 1/3EV 1. Exposure compensation value [̄] : Decreases the EV value.
... a clear day. 78 EV value [̆] : Increases the EV value. In a REC mode, press [MENU]. 2. This feature helps to change the exposure setting (EV value) manually to +2.0EV Steps: 1/3EV 1. Exposure compensation value [̄] : Decreases the EV value.
Owners Manual
Page 80
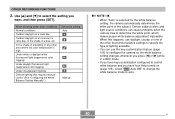
..., which makes proper white balance adjustment impossible. When this setting: Auto 1 2 Manual NOTE • When "Auto" is selected for the white balance setting, the camera automatically determines the white point of the subject. Certain subject colors and light source ...(suppresses color fogging) Under incandescent lighting Difficult lighting that requires manual control (See "Configuring the White Balance Setting Manually".) Select this happens, use the key customization feature (page 106) to configure the camera so the white balance setting changes whenever you press [̇]...
..., which makes proper white balance adjustment impossible. When this setting: Auto 1 2 Manual NOTE • When "Auto" is selected for the white balance setting, the camera automatically determines the white point of the subject. Certain subject colors and light source ...(suppresses color fogging) Under incandescent lighting Difficult lighting that requires manual control (See "Configuring the White Balance Setting Manually".) Select this happens, use the key customization feature (page 106) to configure the camera so the white balance setting changes whenever you press [̇]...

Owners Manual
Page 81
...the same settings you configured during a previous manual white balance setting operation, skip step 4 and perform step 5. 4. White paper 81 Manual white balance lets you want to set the white balance, and then press the shutter button. Point the camera at a white paper or similar object ...settings is selected for which you configure the camera for a particular light source and other environmental conditions can make it impossible to appear on hand before starting the following procedure. 1. Use [̆] and [̄] to select "Manual". • This causes the object you ...
...the same settings you configured during a previous manual white balance setting operation, skip step 4 and perform step 5. 4. White paper 81 Manual white balance lets you want to set the white balance, and then press the shutter button. Point the camera at a white paper or similar object ...settings is selected for which you configure the camera for a particular light source and other environmental conditions can make it impossible to appear on hand before starting the following procedure. 1. Use [̆] and [̄] to select "Manual". • This causes the object you ...
Owners Manual
Page 82
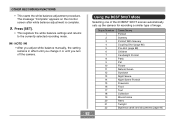
... the BEST SHOT Mode Selecting one of the 23 BEST SHOT scenes automatically sets up the camera for recording a similar type of image. NOTE • After you adjust white balance manually, the setting remains in effect until you change it or until you turn off the... camera. Press [SET]. • This registers the white balance settings and returns to the currently selected recording mode. Scene Number 1 2 3 4 5 6 ...
... the BEST SHOT Mode Selecting one of the 23 BEST SHOT scenes automatically sets up the camera for recording a similar type of image. NOTE • After you adjust white balance manually, the setting remains in effect until you change it or until you turn off the... camera. Press [SET]. • This registers the white balance settings and returns to the currently selected recording mode. Scene Number 1 2 3 4 5 6 ...

