Owners Manual
Page 2
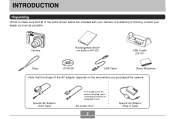
... according to make sure that the shape of the AC adaptor depends on the area where you purchased the camera. Camera Rechargeable lithium ion battery (NP-20) PHOTO CHARGE USB USB Cradle (CA-21) Strap CD-ROM USB Cable Basic Reference • Note that all of the items shown ...below are included with your dealer as soon as possible. AC power cord * 2 Special AC Adaptor (Plug-in Type) If something is missing, contact your camera. INTRODUCTION INTRODUCTION ...
... according to make sure that the shape of the AC adaptor depends on the area where you purchased the camera. Camera Rechargeable lithium ion battery (NP-20) PHOTO CHARGE USB USB Cradle (CA-21) Strap CD-ROM USB Cable Basic Reference • Note that all of the items shown ...below are included with your dealer as soon as possible. AC power cord * 2 Special AC Adaptor (Plug-in Type) If something is missing, contact your camera. INTRODUCTION INTRODUCTION ...

Owners Manual
Page 3
... record an image 17 To view a recorded image 17 To delete an image 18 19 GETTING READY About This Manual 19 General Guide 20 Camera 20 USB Cradle 21 Monitor Screen Contents 22 REC mode 22 PLAY mode 23 Changing the Contents of the Monitor Screen 24 Indicator Lamps 24 Attaching the...
... record an image 17 To view a recorded image 17 To delete an image 18 19 GETTING READY About This Manual 19 General Guide 20 Camera 20 USB Cradle 21 Monitor Screen Contents 22 REC mode 22 PLAY mode 23 Changing the Contents of the Monitor Screen 24 Indicator Lamps 24 Attaching the...
Owners Manual
Page 7
INTRODUCTION 154 APPENDIX Menu Reference 154 Indicator Lamp Reference 156 REC mode 157 PLAY mode 158 USB Cradle Indicator Lamps 158 Troubleshooting Guide 159 Display Messages 162 Specifications 163 Main Specifications 163 7
INTRODUCTION 154 APPENDIX Menu Reference 154 Indicator Lamp Reference 156 REC mode 157 PLAY mode 158 USB Cradle Indicator Lamps 158 Troubleshooting Guide 159 Display Messages 162 Specifications 163 Main Specifications 163 7
Owners Manual
Page 9
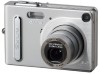
... setups automatically for your friend, even if you and your current location. You can use Coupling Shot and Pre-shot by placing the camera onto the USB cradle. • Photo Stand feature A slideshow of images in file memory can be set up to a previously recorded background image. INTRODUCTION ...million total pixels) for images that print beautifully. • 2.0-inch TFT color LCD monitor screen • 12X seamless zoom 3X optical zoom, 4X digital zoom • 10MB Flash memory Images can be recorded without using a memory card. • Support for SD memory cards and MMC (MultiMedia ...
... setups automatically for your friend, even if you and your current location. You can use Coupling Shot and Pre-shot by placing the camera onto the USB cradle. • Photo Stand feature A slideshow of images in file memory can be set up to a previously recorded background image. INTRODUCTION ...million total pixels) for images that print beautifully. • 2.0-inch TFT color LCD monitor screen • 12X seamless zoom 3X optical zoom, 4X digital zoom • 10MB Flash memory Images can be recorded without using a memory card. • Support for SD memory cards and MMC (MultiMedia ...
Owners Manual
Page 12
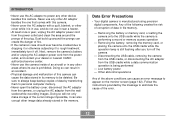
...power cord from the power outlet, and contact your dealer or nearest CASIO authorized service center. • Never use the camera inside of data in use, and do not use it off the camera - Follow the instructions provided by transferring them to be deleted. Any...memory. Data Error Precautions • Your digital camera is performing a record or memory access operation - Removing the battery or memory card, or setting the camera onto the USB cradle while the camera is manufactured using precision digital components. Next, remove the camera's battery and/or unplug the AC ...
...power cord from the power outlet, and contact your dealer or nearest CASIO authorized service center. • Never use the camera inside of data in use, and do not use it off the camera - Follow the instructions provided by transferring them to be deleted. Any...memory. Data Error Precautions • Your digital camera is performing a record or memory access operation - Removing the battery or memory card, or setting the camera onto the USB cradle while the camera is manufactured using precision digital components. Next, remove the camera's battery and/or unplug the AC ...
Owners Manual
Page 15
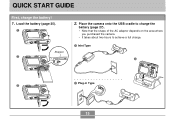
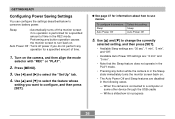
Place the camera onto the USB cradle to charge the battery (page 27). • Note that the shape of the AC adaptor depends on the area where you purchased the camera. • It takes about two hours to achieve a full charge. 1 Inlet Type Stopper 2 2 3 1 Plug-in Type PLAY REC MENU SET DISP PHOTO CHARGE USB 15 QUICK START GUIDE QUICK START GUIDE First, charge the battery! 1. Load the battery (page 25). 1 2.
Place the camera onto the USB cradle to charge the battery (page 27). • Note that the shape of the AC adaptor depends on the area where you purchased the camera. • It takes about two hours to achieve a full charge. 1 Inlet Type Stopper 2 2 3 1 Plug-in Type PLAY REC MENU SET DISP PHOTO CHARGE USB 15 QUICK START GUIDE QUICK START GUIDE First, charge the battery! 1. Load the battery (page 25). 1 2.
Owners Manual
Page 21
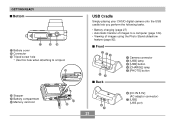
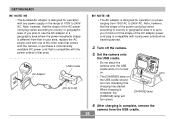
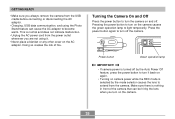
... 4 [CHARGE] lamp 5 [PHOTO] button s Back 6 7 21 6 [DC IN 5.3V] (AC adaptor connector) 7 [USB] (USB port) J J Stopper K Battery compartment L Memory card slot K L USB Cradle Simply placing your CASIO digital camera onto the USB cradle lets you perform the following tasks. • Battery charging (page 27) • Automatic transfer of images using the Photo Stand slideshow feature...
... 4 [CHARGE] lamp 5 [PHOTO] button s Back 6 7 21 6 [DC IN 5.3V] (AC adaptor connector) 7 [USB] (USB port) J J Stopper K Battery compartment L Memory card slot K L USB Cradle Simply placing your CASIO digital camera onto the USB cradle lets you perform the following tasks. • Battery charging (page 27) • Automatic transfer of images using the Photo Stand slideshow feature...
Owners Manual
Page 24
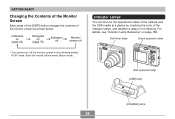
... changes the contents of the indicator lamps, and whether a lamp is lit or flashing. Indicator Lamps You can find out the operational status of the camera and the USB cradle at a glance by checking the color of the monitor screen as shown below.
... changes the contents of the indicator lamps, and whether a lamp is lit or flashing. Indicator Lamps You can find out the operational status of the camera and the USB cradle at a glance by checking the color of the monitor screen as shown below.
Owners Manual
Page 27
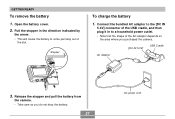
Open the battery cover. 2. Connect the bundled AC adaptor to the [DC IN 5.3V] connector of the USB cradle, and then plug it in the direction indicated by the arrow. • This will cause the battery to a household power outlet. • Note that the ...shape of the slot. Release the stopper and pull the battery from the camera. • Take care so you purchased the camera. [DC IN 5.3V] USB Cradle AC Adaptor 3. Stopper To charge the battery 1. GETTING READY To remove the battery 1. Pull the stopper in to come...
Open the battery cover. 2. Connect the bundled AC adaptor to the [DC IN 5.3V] connector of the USB cradle, and then plug it in the direction indicated by the arrow. • This will cause the battery to a household power outlet. • Note that the ...shape of the slot. Release the stopper and pull the battery from the camera. • Take care so you purchased the camera. [DC IN 5.3V] USB Cradle AC Adaptor 3. Stopper To charge the battery 1. GETTING READY To remove the battery 1. Pull the stopper in to come...
Owners Manual
Page 28
...of the power cord plug varies according to country or geographic area. It is up to you plan to 240V AC. Set the camera onto the USB cradle. • Do not place the camera onto the USB cradle while it is turned on. • The [CHARGE] lamp on power ranging from the USB... cradle. 28 Turn off the camera. 3. Note, however, that area. When charging is complete, the [CHARGE] lamp will turn red, indicating that the shape of the other ones that comes with the camera, or purchase a commercially available AC power cord that is ...
...of the power cord plug varies according to country or geographic area. It is up to you plan to 240V AC. Set the camera onto the USB cradle. • Do not place the camera onto the USB cradle while it is turned on. • The [CHARGE] lamp on power ranging from the USB... cradle. 28 Turn off the camera. 3. Note, however, that area. When charging is complete, the [CHARGE] lamp will turn red, indicating that the shape of the other ones that comes with the camera, or purchase a commercially available AC power cord that is ...
Owners Manual
Page 29
...works normally. • You can be caused by any of AC adaptor. Remove the camera from the USB cradle and see if it means that the camera connector of the USB cradle is securely inserted into the camera's connector as far as it will start right away if you are performing the charge ... AC adaptors with the battery or how it is loaded. Do not use any other type of the following: a problem with the USB cradle, a problem with the camera, or a problem with this happens, simply wait until the battery reaches normal temperature. GETTING READY IMPORTANT! • It takes about two ...
...works normally. • You can be caused by any of AC adaptor. Remove the camera from the USB cradle and see if it means that the camera connector of the USB cradle is securely inserted into the camera's connector as far as it will start right away if you are performing the charge ... AC adaptors with the battery or how it is loaded. Do not use any other type of the following: a problem with the USB cradle, a problem with the camera, or a problem with this happens, simply wait until the battery reaches normal temperature. GETTING READY IMPORTANT! • It takes about two ...
Owners Manual
Page 30
...the current charge is connected securely to the power outlet and USB cradle. • If the same symptoms occur again when you place the camera on the USB cradle after taking the above steps, contact a CASIO authorized service center. s If the camera does not work normally This can mean there is loaded. 1. If... Image recording *2 Continuous Playback Conditions • Normal temperature: 25°C (77°F) • Scroll one image about every 10 seconds using the camera until power automatically turns off due to full close-up , and then charge the battery. Remove the battery from the...
...the current charge is connected securely to the power outlet and USB cradle. • If the same symptoms occur again when you place the camera on the USB cradle after taking the above steps, contact a CASIO authorized service center. s If the camera does not work normally This can mean there is loaded. 1. If... Image recording *2 Continuous Playback Conditions • Normal temperature: 25°C (77°F) • Scroll one image about every 10 seconds using the camera until power automatically turns off due to full close-up , and then charge the battery. Remove the battery from the...
Owners Manual
Page 33
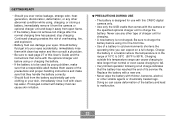
Should battery fluid get onto clothing or your skin, immediately rinse it off with the camera or the specified optional charger unit to charge the battery. q PRECAUTIONS DURING USE • The battery is designed for charging. • A new battery is ... optional charger unit before using , charging, or storing a battery, immediately remove it from the camera or optional charger unit and keep it for the first time. • Use of this CASIO digital camera only. • Use only the USB cradle that a responsible adult makes them with clean tap water and then consult a physician. •...
Should battery fluid get onto clothing or your skin, immediately rinse it off with the camera or the specified optional charger unit to charge the battery. q PRECAUTIONS DURING USE • The battery is designed for charging. • A new battery is ... optional charger unit before using , charging, or storing a battery, immediately remove it from the camera or optional charger unit and keep it for the first time. • Use of this CASIO digital camera only. • Use only the USB cradle that a responsible adult makes them with clean tap water and then consult a physician. •...

Owners Manual
Page 34
...that come with the optional charger unit for information about charging procedures and charging times. • When transporting a battery, keep it away from a CASIO authorized service center. Doing so creates the risk of electric shock. • Do not overload extension cords or wall outlets. q USING THE BATTERY ... shock. • Never try to modify the AC adaptor cord, or subject it either loaded in the camera or stored in a cool, dry place (20°C (68 °F) or lower). s USB Cradle and AC Adaptor Precautions Caution! • Never use . • Store the battery in its case.
...that come with the optional charger unit for information about charging procedures and charging times. • When transporting a battery, keep it away from a CASIO authorized service center. Doing so creates the risk of electric shock. • Do not overload extension cords or wall outlets. q USING THE BATTERY ... shock. • Never try to modify the AC adaptor cord, or subject it either loaded in the camera or stored in a cool, dry place (20°C (68 °F) or lower). s USB Cradle and AC Adaptor Precautions Caution! • Never use . • Store the battery in its case.
Owners Manual
Page 35
...be hit by the mode selector causes the lens to extend from the USB cradle before connecting or disconnecting the AC adaptor. • Charging, USB data communication, and using it back on again. • Turning on the camera causes the green operation lamp to light temporarily. Doing so creates the risk ... there is normal and does not indicate malfunction. • Unplug the AC power cord from the power outlet whenever you always remove the camera from the camera. This is nothing in front of fire. Press the power button again to turn off by the Auto Power Off feature, press the ...
...be hit by the mode selector causes the lens to extend from the USB cradle before connecting or disconnecting the AC adaptor. • Charging, USB data communication, and using it back on again. • Turning on the camera causes the green operation lamp to light temporarily. Doing so creates the risk ... there is normal and does not indicate malfunction. • Unplug the AC power cord from the power outlet whenever you always remove the camera from the camera. This is nothing in front of fire. Press the power button again to turn off by the Auto Power Off feature, press the ...
Owners Manual
Page 36
... then align the mode selector with "REC" or "PLAY". 2. While a slideshow is connected to a computer or some other device through the USB cradle - To configure this feature: Sleep Auto Power Off Select this setting: Sleep Auto Power Off 5. Use [̆] and [̄] to select the "Set ...• Available Auto Power Off settings are: "2 min" and "5 min". • Note that the Sleep feature does not operate in progress 36 When the camera is in the PLAY mode. • Pressing any operation for a specified amount of time. 1. Turn on . • The Auto Power Off and Sleep ...
... then align the mode selector with "REC" or "PLAY". 2. While a slideshow is connected to a computer or some other device through the USB cradle - To configure this feature: Sleep Auto Power Off Select this setting: Sleep Auto Power Off 5. Use [̆] and [̄] to select the "Set ...• Available Auto Power Off settings are: "2 min" and "5 min". • Note that the Sleep feature does not operate in progress 36 When the camera is in the PLAY mode. • Pressing any operation for a specified amount of time. 1. Turn on . • The Auto Power Off and Sleep ...
Owners Manual
Page 40
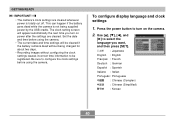
...Press the power button to be cleared if the battery remains dead without being supplied power by the USB cradle. This can happen if the battery goes dead while the camera is totally cut off. To configure display language and clock settings 1. Use and [̈] to configure the...for about two days. • Recording images without configuring the clock settings causes incorrect time information to turn on the camera. 2. Set the date and time before using the camera. • The current date and time settings will appear automatically the next time you want, and then press [SET...
...Press the power button to be cleared if the battery remains dead without being supplied power by the USB cradle. This can happen if the battery goes dead while the camera is totally cut off. To configure display language and clock settings 1. Use and [̈] to configure the...for about two days. • Recording images without configuring the clock settings causes incorrect time information to turn on the camera. 2. Set the date and time before using the camera. • The current date and time settings will appear automatically the next time you want, and then press [SET...

Owners Manual
Page 45
... color problems with your hand when recording the image. 45 Recording Precautions • Never open the battery cover or place the camera onto the USB cradle while the green operation lamp is shining on the resolution setting you may experience some static noise to appear in accordance with the... brightness of this, you need to avoid camera movement. After making sure that the image is focused properly, press the shutter release ...
... color problems with your hand when recording the image. 45 Recording Precautions • Never open the battery cover or place the camera onto the USB cradle while the green operation lamp is shining on the resolution setting you may experience some static noise to appear in accordance with the... brightness of this, you need to avoid camera movement. After making sure that the image is focused properly, press the shutter release ...

