Owners Manual
Page 4
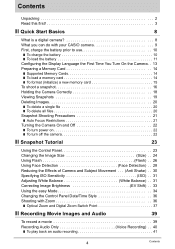
... Tutorial 23 Using the Control Panel 23 Changing the Image Size Size) . . 24 Using Flash Flash) . . 26 Using Face Detection Face Detection) . . 28 Reducing the Effects of Camera and Subject Movement . . . (Anti Shake) . . 30 Specifying ISO Sensitivity ISO) . . 31 Adjusting White Balance White Balance) . . 31 Correcting Image Brightness EV Shift) . . 33 Using the easy Mode 34 Changing the Control Panel Date/Time Style 36 Shooting with Zoom 36 ❚ Optical Zoom and Digital Zoom Switch Point 37 ❚❙ Recording Movie Images and Audio 39 To record a movie...
... Tutorial 23 Using the Control Panel 23 Changing the Image Size Size) . . 24 Using Flash Flash) . . 26 Using Face Detection Face Detection) . . 28 Reducing the Effects of Camera and Subject Movement . . . (Anti Shake) . . 30 Specifying ISO Sensitivity ISO) . . 31 Adjusting White Balance White Balance) . . 31 Correcting Image Brightness EV Shift) . . 33 Using the easy Mode 34 Changing the Control Panel Date/Time Style 36 Shooting with Zoom 36 ❚ Optical Zoom and Digital Zoom Switch Point 37 ❚❙ Recording Movie Images and Audio 39 To record a movie...
Owners Manual
Page 5
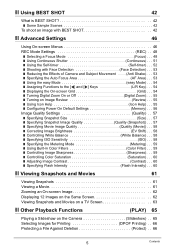
... ❚ Controlling Color Saturation Saturation) . . . 60 ❚ Adjusting Image Contrast Contrast) . . . 60 ❚ Specifying Flash Intensity Flash Intensity) . . . 60 ❚❙ Viewing Snapshots and Movies 61 Viewing Snapshots 61 Viewing a Movie 61 Zooming an On-screen Image 62 Displaying 12 Images on the Same Screen 62 Viewing Snapshots and Movies on a TV Screen 63 ❚❙ Other Playback Functions (PLAY) 65 Playing a Slideshow on the Camera Slideshow) . . 65 Selecting Images for Printing DPOF Printing) . . 66 Protecting a File Against Deletion Protect...
... ❚ Controlling Color Saturation Saturation) . . . 60 ❚ Adjusting Image Contrast Contrast) . . . 60 ❚ Specifying Flash Intensity Flash Intensity) . . . 60 ❚❙ Viewing Snapshots and Movies 61 Viewing Snapshots 61 Viewing a Movie 61 Zooming an On-screen Image 62 Displaying 12 Images on the Same Screen 62 Viewing Snapshots and Movies on a TV Screen 63 ❚❙ Other Playback Functions (PLAY) 65 Playing a Slideshow on the Camera Slideshow) . . 65 Selecting Images for Printing DPOF Printing) . . 66 Protecting a File Against Deletion Protect...

Owners Manual
Page 6
... a Movie 92 ❚ Viewing User Documentation PDF Files) . . . 92 ❚ User Registration 92 Files and Folders 93 Memory Card Data 94 ❚❙ Other Settings (Set Up) 96 Selecting a REC Mode Screen Layout R Panel) . . 96 Selecting a PLAY Mode Screen Layout P Display) . . 97 Configuring Camera Sound Settings Sounds) . . 97 Specifying the File Name Serial Number Generation Rule . . . . . (File No.) . . 98 Configuring World Time Settings World Time) . . 99 Time Stamping Snapshots Timestamp) . . 99 Setting the Camera's Clock Adjust) . 100 Specifying the Date Style Date...
... a Movie 92 ❚ Viewing User Documentation PDF Files) . . . 92 ❚ User Registration 92 Files and Folders 93 Memory Card Data 94 ❚❙ Other Settings (Set Up) 96 Selecting a REC Mode Screen Layout R Panel) . . 96 Selecting a PLAY Mode Screen Layout P Display) . . 97 Configuring Camera Sound Settings Sounds) . . 97 Specifying the File Name Serial Number Generation Rule . . . . . (File No.) . . 98 Configuring World Time Settings World Time) . . 99 Time Stamping Snapshots Timestamp) . . 99 Setting the Camera's Clock Adjust) . 100 Specifying the Date Style Date...

Owners Manual
Page 13
... [SET]. 6. Use [8] and [2] to select a date style and then press [SET]. To switch between 12-hour and 24-hour format, press [BS]. 8. Configuring the Display Language the First Time You Turn On the Camera The first time you will cause the wrong date and time data to change it. Use [8] and [2] to select the summer time (DST) setting you will be using the camera and then press [SET]. 5. Press [SET]. • If you make...
... [SET]. 6. Use [8] and [2] to select a date style and then press [SET]. To switch between 12-hour and 24-hour format, press [BS]. 8. Configuring the Display Language the First Time You Turn On the Camera The first time you will cause the wrong date and time data to change it. Use [8] and [2] to select the summer time (DST) setting you will be using the camera and then press [SET]. 5. Press [SET]. • If you make...

Owners Manual
Page 20
... PLAY mode and then press [2] ( ). 2. Use [4] and [6] to scroll through the files until the one you no files" to free up storage and record more images. • Remember that a file (image) delete operation cannot be undone. • Deleting an audio snapshot (page 68) deletes both the snapshot and the audio file. Use [8] and [2] to delete is displayed. 3. This will cause the message "There are no longer need to appear. 20 Quick Start...
... PLAY mode and then press [2] ( ). 2. Use [4] and [6] to scroll through the files until the one you no files" to free up storage and record more images. • Remember that a file (image) delete operation cannot be undone. • Deleting an audio snapshot (page 68) deletes both the snapshot and the audio file. Use [8] and [2] to delete is displayed. 3. This will cause the message "There are no longer need to appear. 20 Quick Start...

Owners Manual
Page 36
... the REC Mode, press the zoom button to shoot the image. Press the shutter button to zoom. IMPORTANT! • Digital zoom is disabled while date stamping (page 99) is displayed using 24-hour format. Use [4] and [6] to select the bottom Control Panel option (Date/Time). Use [8] and [2] to select the date or time. The image deterioration point depends on . 36 Snapshot Tutorial NOTE • You can be used in combination with 3X optical zoom (that changes the lens focal distance...
... the REC Mode, press the zoom button to shoot the image. Press the shutter button to zoom. IMPORTANT! • Digital zoom is disabled while date stamping (page 99) is displayed using 24-hour format. Use [4] and [6] to select the bottom Control Panel option (Date/Time). Use [8] and [2] to select the date or time. The image deterioration point depends on . 36 Snapshot Tutorial NOTE • You can be used in combination with 3X optical zoom (that changes the lens focal distance...

Owners Manual
Page 41
... (WAV extension) - Press [SET] to marker Volume adjustment Monitor screen on a computer using Windows Media Player or QuickTime (pages 84, 92) - Press [2] and then press [8] [2] [8] (DISP) [MENU] 41 Recording Movie Images and Audio In the PLAY mode, use [4] and [6] to display the Voice Recording file you want to play back an audio recording 1. Audio File Size: Approximately 165KB (Approximately 30 seconds of recording at 5.5KB per second) To play . ` is paused, press...
... (WAV extension) - Press [SET] to marker Volume adjustment Monitor screen on a computer using Windows Media Player or QuickTime (pages 84, 92) - Press [2] and then press [8] [2] [8] (DISP) [MENU] 41 Recording Movie Images and Audio In the PLAY mode, use [4] and [6] to display the Voice Recording file you want to play back an audio recording 1. Audio File Size: Approximately 165KB (Approximately 30 seconds of recording at 5.5KB per second) To play . ` is paused, press...

Owners Manual
Page 52
... a memory card is ready after a fixed amount of time. „ 10 sec , 2 sec 10-second Self-timer 2-second Self-timer • When shooting under conditions that slow down the shutter speed, you can interrupt an ongoing Self-timer countdown by pressing [SET]. The shutter is released and the image is in the camera, and the flash charge condition. Off Turns off the Self-timer. • The front lamp flashes while the Self-timer countdown is shot...
... a memory card is ready after a fixed amount of time. „ 10 sec , 2 sec 10-second Self-timer 2-second Self-timer • When shooting under conditions that slow down the shutter speed, you can interrupt an ongoing Self-timer countdown by pressing [SET]. The shutter is released and the image is in the camera, and the flash charge condition. Off Turns off the Self-timer. • The front lamp flashes while the Self-timer countdown is shot...
Owners Manual
Page 55
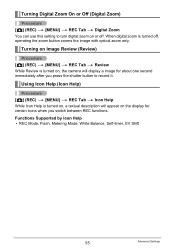
...Functions Supported by Icon Help • REC Mode, Flash, Metering Mode, White Balance, Self-timer, EV Shift 55 Advanced Settings When digital zoom is turned on, the camera will appear on the display for about one second immediately after you switch between REC functions. Turning on Image Review (Review) Procedure [r] (REC) * [MENU] * REC Tab * Review While Review is turned off . Using Icon Help (Icon Help) Procedure [r] (REC) * [MENU] * REC Tab * Icon Help While Icon Help is turned on, a textual description will display a image for certain icons when you press the shutter button...
...Functions Supported by Icon Help • REC Mode, Flash, Metering Mode, White Balance, Self-timer, EV Shift 55 Advanced Settings When digital zoom is turned on, the camera will appear on the display for about one second immediately after you switch between REC functions. Turning on Image Review (Review) Procedure [r] (REC) * [MENU] * REC Tab * Review While Review is turned off . Using Icon Help (Icon Help) Procedure [r] (REC) * [MENU] * REC Tab * Icon Help While Icon Help is turned on, a textual description will display a image for certain icons when you press the shutter button...

Owners Manual
Page 70
... [p] (PLAY) * Snapshot Screen * [MENU] * PLAY Tab * Copy Files can copy snapshots, movies, audio snapshots, or Voice Recording files you want to copy. 2Use [8] and [2] to select "Copy" and then press [SET]. This option copies all files from a memory card to camera built-in memory. Copies a single file on the memory card to built-in camera memory. Built-in * Card Card * Built-in Copies all the files in built-in memory whose name has the largest serial number. 1Use [4] and [6] to the folder...
... [p] (PLAY) * Snapshot Screen * [MENU] * PLAY Tab * Copy Files can copy snapshots, movies, audio snapshots, or Voice Recording files you want to copy. 2Use [8] and [2] to select "Copy" and then press [SET]. This option copies all files from a memory card to camera built-in memory. Copies a single file on the memory card to built-in camera memory. Built-in * Card Card * Built-in Copies all the files in built-in memory whose name has the largest serial number. 1Use [4] and [6] to the folder...

Owners Manual
Page 71
... user documentation that supports PictBridge (page 72). Printing Printing Snapshots Professional Print Service You can specify which images you want to print, the number of copies, and date stamp settings before printing (page 74). 71 Printing Printing with a Computer Windows Computer Install the software (Photo Loader with HOT ALBUM) that contains the images you want to print to a professional print service and have them printed. Connecting Directly to a PictBridge Compatible Printer You can use commercially available software to print. • You can take a memory card...
... user documentation that supports PictBridge (page 72). Printing Printing Snapshots Professional Print Service You can specify which images you want to print, the number of copies, and date stamp settings before printing (page 74). 71 Printing Printing with a Computer Windows Computer Install the software (Photo Loader with HOT ALBUM) that contains the images you want to print to a professional print service and have them printed. Connecting Directly to a PictBridge Compatible Printer You can use commercially available software to print. • You can take a memory card...

Owners Manual
Page 76
...Print Printing on DPOF date stamping for information about shooting conditions recorded with HOT ALBUM (page 78) software (Windows only). Date Stamping You can turn on a printer that supports Exif Print (Exif 2.2) uses information about models that includes a date stamped with the camera's Time Stamp function. Standards Supported by the Camera • PictBridge This is always included when you print. You can use one of an image. Request date stamping when ordering prints from a professional print service. . Configuring camera settings Configuring computer settings...
...Print Printing on DPOF date stamping for information about shooting conditions recorded with HOT ALBUM (page 78) software (Windows only). Date Stamping You can turn on a printer that supports Exif Print (Exif 2.2) uses information about models that includes a date stamped with the camera's Time Stamp function. Standards Supported by the Camera • PictBridge This is always included when you print. You can use one of an image. Request date stamping when ordering prints from a professional print service. . Configuring camera settings Configuring computer settings...

Owners Manual
Page 92
... folder for the language whose user's guide you can use the AV cable that comes bundled with your operating system, to play back movies on a Macintosh. IMPORTANT! • Be sure to move the movie data to the hard disk of your Macintosh before trying to play it to your Macintosh and then double-click the movie file. . Open the file named "camera_xx.pdf". • "xx" is the language code (Example: camera_e.pdf...
... folder for the language whose user's guide you can use the AV cable that comes bundled with your operating system, to play back movies on a Macintosh. IMPORTANT! • Be sure to move the movie data to the hard disk of your Macintosh before trying to play it to your Macintosh and then double-click the movie file. . Open the file named "camera_xx.pdf". • "xx" is the language code (Example: camera_e.pdf...

Owners Manual
Page 93
... folders. For details about how folders are stored in a folder named "100_AUCT". • BEST SHOT also has a scene named "For YouTube" that stores data. Files are displayed on the camera's monitor screen, see "Memory Folder Structure" (page 94). Files and Folders The camera creates a file and saves it each time you shoot a snapshot, record a movie, or perform any other operation that optimizes movie settings for recording movies for auction site images. Images recorded with a Computer Depending on the image size...
... folders. For details about how folders are stored in a folder named "100_AUCT". • BEST SHOT also has a scene named "For YouTube" that stores data. Files are displayed on the camera's monitor screen, see "Memory Folder Structure" (page 94). Files and Folders The camera creates a file and saves it each time you shoot a snapshot, record a movie, or perform any other operation that optimizes movie settings for recording movies for auction site images. Images recorded with a Computer Depending on the image size...

Owners Manual
Page 101
.... 1 23 Configuring Sleep State Settings (Sleep) Procedure [MENU] * Set Up Tab * Sleep This feature turns off the monitor screen whenever no camera operation is performed for a preset amount of the following conditions. • In the PLAY Mode • While the camera is connected to turn the monitor screen back on. Specify the display language you want. 1Select the tab on , Auto Power Off takes priority. 101 Other Settings (Set Up)
.... 1 23 Configuring Sleep State Settings (Sleep) Procedure [MENU] * Set Up Tab * Sleep This feature turns off the monitor screen whenever no camera operation is performed for a preset amount of the following conditions. • In the PLAY Mode • While the camera is connected to turn the monitor screen back on. Specify the display language you want. 1Select the tab on , Auto Power Off takes priority. 101 Other Settings (Set Up)

Owners Manual
Page 102
... 5 minutes in the PLAY mode. • Change this setting to anything besides "Disable" before connecting to a TV for a preset amount of the following conditions. • While the camera is connected to a computer or other device • During a slideshow • During Voice Recording playback or recording • During movie recording and playback Configuring [r] and [p] Settings (REC/PLAY) Procedure [MENU] * Set Up Tab * REC/PLAY Power On Power On/Off Disable Camera turns on or off...
... 5 minutes in the PLAY mode. • Change this setting to anything besides "Disable" before connecting to a TV for a preset amount of the following conditions. • While the camera is connected to a computer or other device • During a slideshow • During Voice Recording playback or recording • During movie recording and playback Configuring [r] and [p] Settings (REC/PLAY) Procedure [MENU] * Set Up Tab * REC/PLAY Power On Power On/Off Disable Camera turns on or off...

Owners Manual
Page 104
... open the battery cover while formatting is charged fully before you do not need any data currently on the memory card or in built-in memory. Protected images • Formatting a memory card will delete the following data. - World Time settings, clock settings, date style, screen language, video output 104 Other Settings (Set Up) Formatting may not be undone. Make sure you format it. • Formatting built-in memory will delete the following data. - Doing so can cause the camera to Factory Defaults (Reset) Procedure [MENU] * Set Up Tab * Reset...
... open the battery cover while formatting is charged fully before you do not need any data currently on the memory card or in built-in memory. Protected images • Formatting a memory card will delete the following data. - World Time settings, clock settings, date style, screen language, video output 104 Other Settings (Set Up) Formatting may not be undone. Make sure you format it. • Formatting built-in memory will delete the following data. - Doing so can cause the camera to Factory Defaults (Reset) Procedure [MENU] * Set Up Tab * Reset...

Owners Manual
Page 127
..., delete images you are shooting may not be dead. Possible Cause and Recommended Action 1)The battery may not be loaded correctly (page 11). 2)The battery may be focused properly. When composing the image, make sure the subject is pressed. Troubleshooting Problem Power Supply Power does not turn off the camera and wait until the charge operation finishes. 3)If the message "Memory Full" appears, transfer images to use a different memory card. 1)If the lens is...
..., delete images you are shooting may not be dead. Possible Cause and Recommended Action 1)The battery may not be loaded correctly (page 11). 2)The battery may be focused properly. When composing the image, make sure the subject is pressed. Troubleshooting Problem Power Supply Power does not turn off the camera and wait until the charge operation finishes. 3)If the message "Memory Full" appears, transfer images to use a different memory card. 1)If the lens is...
Owners Manual
Page 129
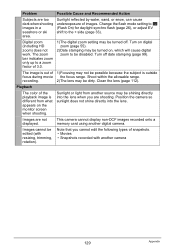
...). Playback The color of 1)Focusing may be shining directly into the lens. Digital zoom (including HD zoom) does not work. recording. 2)The lens may be turned on, which will cause digital zoom to be possible because the subject is different from another source may be turned off date stamping (page 99). Images cannot be dirty. Turn on the monitor screen when shooting. This camera cannot display non-DCF images recorded onto a memory card using another camera 129 Appendix Images are...
...). Playback The color of 1)Focusing may be shining directly into the lens. Digital zoom (including HD zoom) does not work. recording. 2)The lens may be turned on, which will cause digital zoom to be possible because the subject is different from another source may be turned off date stamping (page 99). Images cannot be dirty. Turn on the monitor screen when shooting. This camera cannot display non-DCF images recorded onto a memory card using another camera 129 Appendix Images are...

Owners Manual
Page 130
... you connect via a USB hub. Always connect directly to initialize the camera's setup (page 104). The wrong display language is the case, perform the reset operation to the computer's USB port. The messages on . 4)Your computer may not be connected securely. Change the display language setting (page 101). Set the correct date and time (page 100). Problem Possible Cause and Recommended Action Other The wrong date and time are in accordance with the camera's memory data.
... you connect via a USB hub. Always connect directly to initialize the camera's setup (page 104). The wrong display language is the case, perform the reset operation to the computer's USB port. The messages on . 4)Your computer may not be connected securely. Change the display language setting (page 101). Set the correct date and time (page 100). Problem Possible Cause and Recommended Action Other The wrong date and time are in accordance with the camera's memory data.


