
Owners Manual
Page 6
...Voice Recording 176 MANAGING YOUR FILES 179 Files and Folders 179 Protecting a File Against Deletion 180 Using the FAVORITE Folder 181 Copying Files 184 DELETING FILES 186 Deleting a Specific File 186 Deleting All Files 187 Deleting FAVORITE Folder Snapshots 187 OTHER SETTINGS 189 Configuring Camera Sound Settings 189 Turning the Startup Screen On or Off 191 Specifying the File Name Serial Number Generation Rule 192 Changing the Camera Date and Time Setting . . . 192 Using World Time 194 ■ Configuring World Time Settings 194 Changing the Display Language 196...
...Voice Recording 176 MANAGING YOUR FILES 179 Files and Folders 179 Protecting a File Against Deletion 180 Using the FAVORITE Folder 181 Copying Files 184 DELETING FILES 186 Deleting a Specific File 186 Deleting All Files 187 Deleting FAVORITE Folder Snapshots 187 OTHER SETTINGS 189 Configuring Camera Sound Settings 189 Turning the Startup Screen On or Off 191 Specifying the File Name Serial Number Generation Rule 192 Changing the Camera Date and Time Setting . . . 192 Using World Time 194 ■ Configuring World Time Settings 194 Changing the Display Language 196...

Owners Manual
Page 45
.... Use [S] and [T] to select the item you can change the settings (pages 192, 196). ■ Battery Power Conservation Features The camera is preformed for a preset amount of time. Feature Name Description Settings Sleep In the REC mode, the monitor screen turns off if no operation is equipped with images. • If you make a mistake when configuring the language, date, and time settings, you want to configure ("Sleep" or "Auto Power...
.... Use [S] and [T] to select the item you can change the settings (pages 192, 196). ■ Battery Power Conservation Features The camera is preformed for a preset amount of time. Feature Name Description Settings Sleep In the REC mode, the monitor screen turns off if no operation is equipped with images. • If you make a mistake when configuring the language, date, and time settings, you want to configure ("Sleep" or "Auto Power...

Owners Manual
Page 46
... or a short movie. Mode memory settings - It is stored in built-in memory and a memory card (page 184). • The following conditions. - BEST SHOT mode user image information - When there is enough to memory card storage, the camera also has built-in memory, which is a connection between the camera's built-in memory. Use [S] and [T] to you shoot with the camera on a memory card. 4. Start-up to select the sleep or Auto Power Off trigger time and then...
... or a short movie. Mode memory settings - It is stored in built-in memory and a memory card (page 184). • The following conditions. - BEST SHOT mode user image information - When there is enough to memory card storage, the camera also has built-in memory, which is a connection between the camera's built-in memory. Use [S] and [T] to you shoot with the camera on a memory card. 4. Start-up to select the sleep or Auto Power Off trigger time and then...

Owners Manual
Page 55
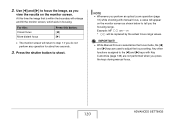
... settings of the camera's "Date Style" and "Adjust" (pages 193, 194). In the REC mode, press [SET]. Icons are the way you want to display the subject on the displayed image. C GETTING READY 55 The following procedure shows how to normal operation (no Operation Panel icon selected). IMPORTANT! • Image quality cannot be changed using Panel (Operation Panel). • Panel (Operation Panel) is not displayed while Short Movie, Past Movie, Voice Recording, or Zoom Continuous Shutter...
... settings of the camera's "Date Style" and "Adjust" (pages 193, 194). In the REC mode, press [SET]. Icons are the way you want to display the subject on the displayed image. C GETTING READY 55 The following procedure shows how to normal operation (no Operation Panel icon selected). IMPORTANT! • Image quality cannot be changed using Panel (Operation Panel). • Panel (Operation Panel) is not displayed while Short Movie, Past Movie, Voice Recording, or Zoom Continuous Shutter...

Owners Manual
Page 66
... memory. Use [W] and [X] to focus again. . Press [ ]. SHOOTING A SNAPSHOT 66 Perform the following operation to the REC mode, press [ ]. Checking a Snapshot A snapshot will display the snapshot you shoot it means that the image is not in for the next image. This will remain on the monitor screen as seconds (1/1000 second, etc.) The camera adjusts this setting automatically. • Shutter speed indicates the amount of the opening . A slower shutter speed...
... memory. Use [W] and [X] to focus again. . Press [ ]. SHOOTING A SNAPSHOT 66 Perform the following operation to the REC mode, press [ ]. Checking a Snapshot A snapshot will display the snapshot you shoot it means that the image is not in for the next image. This will remain on the monitor screen as seconds (1/1000 second, etc.) The camera adjusts this setting automatically. • Shutter speed indicates the amount of the opening . A slower shutter speed...

Owners Manual
Page 89
... mode, press [MENU]. 2. Movies you want and then press [SET]. • The " " indicator is on a computer using the following software. - Movie File Formats Movies are recorded in better image quality, but it also shortens the amount of CASIO AVI Importer component.) SHOOTING A MOVIE 89 Movie image quality is selected for the quality setting. Macintosh QuickTime (Requires installation of time you should specify a movie image quality setting. SHOOTING A MOVIE Movie Image Quality Before shooting a movie, you can be played back on the monitor screen...
... mode, press [MENU]. 2. Movies you want and then press [SET]. • The " " indicator is on a computer using the following software. - Movie File Formats Movies are recorded in better image quality, but it also shortens the amount of CASIO AVI Importer component.) SHOOTING A MOVIE 89 Movie image quality is selected for the quality setting. Macintosh QuickTime (Requires installation of time you should specify a movie image quality setting. SHOOTING A MOVIE Movie Image Quality Before shooting a movie, you can be played back on the monitor screen...
Owners Manual
Page 120
... monitor screen will appear on the monitor screen. Any other functions assigned to the [W] and [X] keys with manual focus, a value will return to shoot. IMPORTANT! • While Manual Focus is within the boundary will be replaced by the actual focus range values. For this: Closer focus More distant focus Press this time the image that is selected as shown below to adjust the focus setting. Press the shutter button to...
... monitor screen will appear on the monitor screen. Any other functions assigned to the [W] and [X] keys with manual focus, a value will return to shoot. IMPORTANT! • While Manual Focus is within the boundary will be replaced by the actual focus range values. For this: Closer focus More distant focus Press this time the image that is selected as shown below to adjust the focus setting. Press the shutter button to...

Owners Manual
Page 131
...; The recording date and time are determined in the lower right corner of images. - Example: December 24, 2006, 1:25 p.m. Some BEST SHOT images (Business cards and documents, White board, etc., Old Photo) - Images recorded with the camera's clock settings (pages 12, 193) when the snapshot is recorded. • Digital zoom is not supported while date stamping is turned on. • Date stamping is stamped in a print, it cannot be edited or deleted. • Use the "Date Style" setting...
...; The recording date and time are determined in the lower right corner of images. - Example: December 24, 2006, 1:25 p.m. Some BEST SHOT images (Business cards and documents, White board, etc., Old Photo) - Images recorded with the camera's clock settings (pages 12, 193) when the snapshot is recorded. • Digital zoom is not supported while date stamping is turned on. • Date stamping is stamped in a print, it cannot be edited or deleted. • Use the "Date Style" setting...

Owners Manual
Page 149
... "Time" setting. • In image copied from one image to another. IMPORTANT! • All button operations are disabled while the slideshow is stopped on the display before performing the steps below. • Connect the bundled AC adaptor to the USB cradle, and plug it onto the USB cradle. 149 VIEWING SNAPSHOTS AND MOVIES Wait until an image is switching from a computer or an image recorded with a different type of digital camera...
... "Time" setting. • In image copied from one image to another. IMPORTANT! • All button operations are disabled while the slideshow is stopped on the display before performing the steps below. • Connect the bundled AC adaptor to the USB cradle, and plug it onto the USB cradle. 149 VIEWING SNAPSHOTS AND MOVIES Wait until an image is switching from a computer or an image recorded with a different type of digital camera...

Owners Manual
Page 152
... configure the camera's [ ] (REC) and [ ] (PLAY) buttons for "Power On" or "Power On/Off" (page 197). • All icons and indicators that comes with the image. IMPORTANT! • When connecting to a TV to display images, be sure to record, see the user documentation that is monaural. • Certain TVs may cut off part of a TV (without using the AV cable that appear on the monitor screen also appear...
... configure the camera's [ ] (REC) and [ ] (PLAY) buttons for "Power On" or "Power On/Off" (page 197). • All icons and indicators that comes with the image. IMPORTANT! • When connecting to a TV to display images, be sure to record, see the user documentation that is monaural. • Certain TVs may cut off part of a TV (without using the AV cable that appear on the monitor screen also appear...

Owners Manual
Page 158
... PLAY mode, press [MENU]. 2. From there you want to resize. 4. The print size indicates the optimum paper size for "Mega", which means "million". 1. After you want . To exit the resize operation, select "Cancel". You can repeat steps 3 and 4 to resize another image if you can resize a snapshot to any one you press [SET] in step 4 to resize the image, the monitor screen...
... PLAY mode, press [MENU]. 2. From there you want to resize. 4. The print size indicates the optimum paper size for "Mega", which means "million". 1. After you want . To exit the resize operation, select "Cancel". You can repeat steps 3 and 4 to resize another image if you can resize a snapshot to any one you press [SET] in step 4 to resize the image, the monitor screen...

Owners Manual
Page 178
.... Voice Recording Playback Controls The following are the different operations you want to display the Voice Recording file you can adjust volume only while playback is displayed in the audio data while playback is playing. Jump to start playback. Toggle on-screen indicators on or off Press [DISP]. Hold down [X] or [W]. Press [S] or [T]. Pause or restart playback Press [SET]. Press [X] or [W]. Press [SET] to a marker in place of an image for a Voice Recording file. 2. To...
.... Voice Recording Playback Controls The following are the different operations you want to display the Voice Recording file you can adjust volume only while playback is displayed in the audio data while playback is playing. Jump to start playback. Toggle on-screen indicators on or off Press [DISP]. Hold down [X] or [W]. Press [S] or [T]. Pause or restart playback Press [SET]. Press [X] or [W]. Press [SET] to a marker in place of an image for a Voice Recording file. 2. To...

Owners Manual
Page 184
... [SET]. You cannot copy files individually. 1. On the "PLAY" tab, select "Copy" and then press [X]. 4. IMPORTANT! • You can be displayed on the monitor screen. 184 MANAGING YOUR FILES Turn on the camera, enter the PLAY mode and then press [MENU]. 3. Copying Files Files can copy snapshots, movies, audio snapshots, or Voice Recording files you want to copy the files into the camera. 2. This makes it possible, for example, to perform the following operation copies all files from...
... [SET]. You cannot copy files individually. 1. On the "PLAY" tab, select "Copy" and then press [X]. 4. IMPORTANT! • You can be displayed on the monitor screen. 184 MANAGING YOUR FILES Turn on the camera, enter the PLAY mode and then press [MENU]. 3. Copying Files Files can copy snapshots, movies, audio snapshots, or Voice Recording files you want to copy the files into the camera. 2. This makes it possible, for example, to perform the following operation copies all files from...

Owners Manual
Page 212
... supported. IMPORTANT! • This camera supports USB 2.0 Hi-Speed protocol. Be sure to install this software: • Viewing images on a computer • Storing images on the computer already.) Retouch, rotate, print snapshots XP/2000/ Photohands 1.0 Me/98SE/ 98 See page: - 216 224 227 212 USING THE CAMERA WITH A COMPUTER Objective Windows Version Install this driver.) Transfer of images from the camera and management of Windows you are running and what you need...
... supported. IMPORTANT! • This camera supports USB 2.0 Hi-Speed protocol. Be sure to install this software: • Viewing images on a computer • Storing images on the computer already.) Retouch, rotate, print snapshots XP/2000/ Photohands 1.0 Me/98SE/ 98 See page: - 216 224 227 212 USING THE CAMERA WITH A COMPUTER Objective Windows Version Install this driver.) Transfer of images from the camera and management of Windows you are running and what you need...
Owners Manual
Page 216
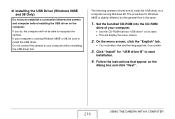
... "English" tab. • You could also click another language tab, if you do, the computer will display the menu screen. 2. If you prefer. 3. Set the bundled CD-ROM into the CD-ROM drive of your computer without installing the USB driver first. ■ Installing the USB Driver (Windows 98SE and 98 Only) Do not try to establish a connection between the camera and computer before installing the USB driver...
... "English" tab. • You could also click another language tab, if you do, the computer will display the menu screen. 2. If you prefer. 3. Set the bundled CD-ROM into the CD-ROM drive of your computer without installing the USB driver first. ■ Installing the USB Driver (Windows 98SE and 98 Only) Do not try to establish a connection between the camera and computer before installing the USB driver...
Owners Manual
Page 246
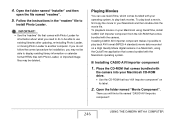
... the camera into your operating system, to play back AVI format (MPEG-4 standard) movie data recorded on a High Quality Movie digital camera on a Macintosh, using QuickTime, install CASIO AVI Importer component from the CD-ROM that comes bundled with Photo Loader, or imported image files may be deleted. Playing Movies You can use existing libraries after updating, re-installing Photo Loader, or moving Photo Loader to play back movies. Installing CASIO AVI Importer component makes it possible to another computer. Open the folder named "Movie...
... the camera into your operating system, to play back AVI format (MPEG-4 standard) movie data recorded on a High Quality Movie digital camera on a Macintosh, using QuickTime, install CASIO AVI Importer component from the CD-ROM that comes bundled with Photo Loader, or imported image files may be deleted. Playing Movies You can use existing libraries after updating, re-installing Photo Loader, or moving Photo Loader to play back movies. Installing CASIO AVI Importer component makes it possible to another computer. Open the folder named "Movie...
Owners Manual
Page 248
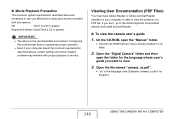
... language whose user's guide you don't, go to play back movies recorded with proper playback of a PDF file. Open the "Digital Camera" folder and then open the "Manual" folder. • Use the CD-ROM that has "User's Guide included" on your computer in order to view. 3. Open the file named "camera_xx.pdf". • "xx" is the language code (Example: camera_e.pdf is the recommended environment. On the CD-ROM, open the folder for English.) 248 USING THE CAMERA WITH A COMPUTER Viewing User Documentation (PDF Files...
... language whose user's guide you don't, go to play back movies recorded with proper playback of a PDF file. Open the "Digital Camera" folder and then open the "Manual" folder. • Use the CD-ROM that has "User's Guide included" on your computer in order to view. 3. Open the file named "camera_xx.pdf". • "xx" is the language code (Example: camera_e.pdf is the recommended environment. On the CD-ROM, open the folder for English.) 248 USING THE CAMERA WITH A COMPUTER Viewing User Documentation (PDF Files...
Owners Manual
Page 258
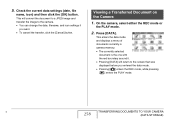
... data settings (date, file name, icon) and then click the [OK] button. Viewing a Transferred Document on the Camera 1. This will return to the camera. • You can change the date, filename, and icon settings if you entered the data mode. • Pressing [ ] enters the REC mode, while pressing [ ] enters the PLAY mode. Press [DATA]. On the camera, select either the REC mode or the PLAY mode. 2. This enters the data mode and displays a menu of documents currently in camera memory...
... data settings (date, file name, icon) and then click the [OK] button. Viewing a Transferred Document on the Camera 1. This will return to the camera. • You can change the date, filename, and icon settings if you entered the data mode. • Pressing [ ] enters the REC mode, while pressing [ ] enters the PLAY mode. Press [DATA]. On the camera, select either the REC mode or the PLAY mode. 2. This enters the data mode and displays a menu of documents currently in camera memory...

Owners Manual
Page 278
... again. 278 APPENDIX Use a light or some other means to another camera is loaded in the case of digital noise. Movies There is turned on. Circuit problem caused by electrostatic charge, impact, etc. work. different from the camera, reinsert it is recorded in the camera. Position the camera so sunlight does not shine directly into the lens when shooting. Playback The color of the camera. Digital zoom is disabled while date stamping is a vertical...
... again. 278 APPENDIX Use a light or some other means to another camera is loaded in the case of digital noise. Movies There is turned on. Circuit problem caused by electrostatic charge, impact, etc. work. different from the camera, reinsert it is recorded in the camera. Position the camera so sunlight does not shine directly into the lens when shooting. Playback The color of the camera. Digital zoom is disabled while date stamping is a vertical...
Owners Manual
Page 279
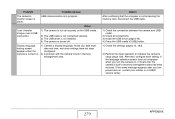
.... Problem Possible Causes The camera's monitor screen is not accessing the memory card, disconnect the USB cable. 1) Check the connection between the camera and USB cradle. 2) Check all connections. 3) Install the USB driver (page 216). 4) Press the USB cradle's [USB] button. 1) Check the settings (pages 12, 193). 2) Perform the reset operation to initialize the camera's setup (page 139). If the same message appears after you turn power back on . 1) Camera's display language, Home city, date style, date and time, and other settings...
.... Problem Possible Causes The camera's monitor screen is not accessing the memory card, disconnect the USB cable. 1) Check the connection between the camera and USB cradle. 2) Check all connections. 3) Install the USB driver (page 216). 4) Press the USB cradle's [USB] button. 1) Check the settings (pages 12, 193). 2) Perform the reset operation to initialize the camera's setup (page 139). If the same message appears after you turn power back on . 1) Camera's display language, Home city, date style, date and time, and other settings...


