Owners Manual
Page 3
... Lens 12 Other 13 14 QUICK START GUIDE Getting Ready 14 Configuring Display Language and Clock Settings ... 15 To record an image 15 To view a recorded image 16 To delete an image 16 17 GETTING READY General Guide 17 Camera 17 USB Cradle 18 Using the Controller 19 Monitor Screen Contents 20 Indicator Lamps 22 Attaching the Strap 22 Power Requirements 23 To load the battery 23 To charge the battery 24 Power Supply Precautions 28 Turning...
... Lens 12 Other 13 14 QUICK START GUIDE Getting Ready 14 Configuring Display Language and Clock Settings ... 15 To record an image 15 To view a recorded image 16 To delete an image 16 17 GETTING READY General Guide 17 Camera 17 USB Cradle 18 Using the Controller 19 Monitor Screen Contents 20 Indicator Lamps 22 Attaching the Strap 22 Power Requirements 23 To load the battery 23 To charge the battery 24 Power Supply Precautions 28 Turning...
Owners Manual
Page 4
... 42 Adjusting the White Balance 43 Adjusting White Balance Manually 44 Using the Best Shot Mode 45 Using the Movie Mode 46 Recording Audio (EX-M2 Only 48 Adding Audio to a Snapshot 48 Recording Your Voice 49 REC Mode Camera Settings 51 Turning the Monitor Screen On and Off 51 Turning Image Review On and Off 51 Assigning Functions to the Controller 52 Specifying Power On Default Settings 53 54 PLAYBACK Basic Playback Operation 54 Playing an Audio Snapshot (EX-M2 Only) 55 Zooming the Displayed Image...
... 42 Adjusting the White Balance 43 Adjusting White Balance Manually 44 Using the Best Shot Mode 45 Using the Movie Mode 46 Recording Audio (EX-M2 Only 48 Adding Audio to a Snapshot 48 Recording Your Voice 49 REC Mode Camera Settings 51 Turning the Monitor Screen On and Off 51 Turning Image Review On and Off 51 Assigning Functions to the Controller 52 Specifying Power On Default Settings 53 54 PLAYBACK Basic Playback Operation 54 Playing an Audio Snapshot (EX-M2 Only) 55 Zooming the Displayed Image...
Owners Manual
Page 5
... Print 69 Using the FAVORITE Folder 70 To copy a file to the FAVORITE folder 70 To display a file in the FAVORITE folder 71 To delete a file from the FAVORITE folder 71 72 OTHER SETTINGS Turning the Key Tone On and Off 72 Specifying an Image for the Startup Screen 72 Changing the Date and Time Setting 73 Changing the Date Format 74 Changing the Display Language 74 Formatting Built-in Memory 75 5 76 USING A MEMORY CARD Using a Memory Card 77 To insert a memory card into the camera...
... Print 69 Using the FAVORITE Folder 70 To copy a file to the FAVORITE folder 70 To display a file in the FAVORITE folder 71 To delete a file from the FAVORITE folder 71 72 OTHER SETTINGS Turning the Key Tone On and Off 72 Specifying an Image for the Startup Screen 72 Changing the Date and Time Setting 73 Changing the Date Format 74 Changing the Display Language 74 Formatting Built-in Memory 75 5 76 USING A MEMORY CARD Using a Memory Card 77 To insert a memory card into the camera...
Owners Manual
Page 6
... Memory Card Precautions 95 96 PLAYING AN AUDIO FILE (EX-M2 Only) Transferring Audio Files to the Camera 96 Preparing the Camera for Audio Player Operation ... 97 Using the Camera as an Audio Player 98 General Guide 98 Basic Remote Controller Operations 100 Specifying the Audio Playback Mode 101 Selecting a Specify Track for Playback 101 Specifying the Track Playback Sequence 102 Disabling Remote Controller Button Operations 104 LCD Remote Control Error Messages 105 Audio Playback Precautions 105 106 APPENDIX Menu Reference 106 Indicator...
... Memory Card Precautions 95 96 PLAYING AN AUDIO FILE (EX-M2 Only) Transferring Audio Files to the Camera 96 Preparing the Camera for Audio Player Operation ... 97 Using the Camera as an Audio Player 98 General Guide 98 Basic Remote Controller Operations 100 Specifying the Audio Playback Mode 101 Selecting a Specify Track for Playback 101 Specifying the Track Playback Sequence 102 Disabling Remote Controller Button Operations 104 LCD Remote Control Error Messages 105 Audio Playback Precautions 105 106 APPENDIX Menu Reference 106 Indicator...
Owners Manual
Page 7
... and other media to protect against its loss. • The SD logo is a registered trademark. • Windows, Internet Explorer, and DirectX are the property of Adobe Systems Incorporated. • The USB driver (mass storage) uses Phoenix Technologies Ltd. puter, Inc. • MultiMediaCard is a registered trademark of the EX-S2/EX-M2. • CASIO COMPUTER CO., LTD. Compatibility Software Copyright C 1997 Phoenix...
... and other media to protect against its loss. • The SD logo is a registered trademark. • Windows, Internet Explorer, and DirectX are the property of Adobe Systems Incorporated. • The USB driver (mass storage) uses Phoenix Technologies Ltd. puter, Inc. • MultiMediaCard is a registered trademark of the EX-S2/EX-M2. • CASIO COMPUTER CO., LTD. Compatibility Software Copyright C 1997 Phoenix...
Owners Manual
Page 8
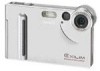
... print services. • PRINT Image Matching II Compatible Images include PRINT Image Matching II data (mode setting and other camera setup information). INTRODUCTION Features • 2.0 million Effective Pixels A high-resolution megapixel CCD provides 2.0 million effective pixels (2.11 million total pixels) for images that print beautifully. • Fixed focus lens for quick operation Fixed focus eliminates the need for lens movement, which shortens startup time and shooting time. • 1.6-inch TFT color LCD monitor screen • 4X digital zoom • 12MB flash memory Images...
... print services. • PRINT Image Matching II Compatible Images include PRINT Image Matching II data (mode setting and other camera setup information). INTRODUCTION Features • 2.0 million Effective Pixels A high-resolution megapixel CCD provides 2.0 million effective pixels (2.11 million total pixels) for images that print beautifully. • Fixed focus lens for quick operation Fixed focus eliminates the need for lens movement, which shortens startup time and shooting time. • 1.6-inch TFT color LCD monitor screen • 4X digital zoom • 12MB flash memory Images...
Owners Manual
Page 9
... repair work up to CASIO authorized service center. • Never look at the sun or any other small parts and accessories of this camera" and "the camera" refer to the CASIO EX-S2/EX-M2 Digital Camera. • Never try to open the case of electric shock when exposed. INTRODUCTION * EX-M2 Only • Snapshot + Audio Mode Adds audio to a snapshot. • Movie + Audio Mode • Voice Recording Quick and easy recording...
... repair work up to CASIO authorized service center. • Never look at the sun or any other small parts and accessories of this camera" and "the camera" refer to the CASIO EX-S2/EX-M2 Digital Camera. • Never try to open the case of electric shock when exposed. INTRODUCTION * EX-M2 Only • Snapshot + Audio Mode Adds audio to a snapshot. • Movie + Audio Mode • Voice Recording Quick and easy recording...
Owners Manual
Page 10
... fire the flash while it to your nearest CASIO authorized service center for repair. After making sure there is fired too close to rough treatment, immediately turn power off , unplug the AC adaptor power cord from the power outlet. When using the flash, the camera should ever become cracked due to be at the seashore or beach, in camera memory. 10 Using the camera under these conditions...
... fire the flash while it to your nearest CASIO authorized service center for repair. After making sure there is fired too close to rough treatment, immediately turn power off , unplug the AC adaptor power cord from the power outlet. When using the flash, the camera should ever become cracked due to be at the seashore or beach, in camera memory. 10 Using the camera under these conditions...
Owners Manual
Page 11
... - INTRODUCTION Data Error Precautions • Your digital camera is still flashing after you turn off the camera. - Follow the instructions provided by the message to 40°C. • Do not use in camera memory. - Any of data in temperatures ranging from the USB cradle while a data communication operation is being performed. - Removing the battery, removing the memory card, or placing the camera onto the USB cradle while the operation/flash charge lamp is manufactured using precision digital components.
... - INTRODUCTION Data Error Precautions • Your digital camera is still flashing after you turn off the camera. - Follow the instructions provided by the message to 40°C. • Do not use in camera memory. - Any of data in temperatures ranging from the USB cradle while a data communication operation is being performed. - Removing the battery, removing the memory card, or placing the camera onto the USB cradle while the operation/flash charge lamp is manufactured using precision digital components.
Owners Manual
Page 18
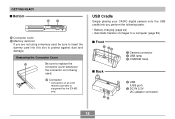
... your CASIO digital camera onto the USB cradle lets you are not using a memory card, be sure to insert the dummy card into this slot to replace the connector cover whenever the connector is supported by the EX-M2 only. GETTING READY s Bottom FG F Connector cover G Memory card slot If you perform the following tasks. • Battery charging (page 24) • Automatic transfer of an LCD remote controller is...
... your CASIO digital camera onto the USB cradle lets you are not using a memory card, be sure to insert the dummy card into this slot to replace the connector cover whenever the connector is supported by the EX-M2 only. GETTING READY s Bottom FG F Connector cover G Memory card slot If you perform the following tasks. • Battery charging (page 24) • Automatic transfer of an LCD remote controller is...
Owners Manual
Page 21
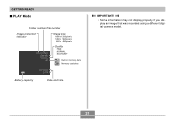
GETTING READY s PLAY Mode Folder number/File number Image protection indicator Image size 1600 x1200 pixels 1280 x 960 pixels 640 x 480 pixels Quality FINE NORMAL ECONOMY Built-in memory data Memory card data Battery capacity Date and time IMPORTANT! • Some information may not display properly if you display an image that was recorded using a different digital camera model. 21
GETTING READY s PLAY Mode Folder number/File number Image protection indicator Image size 1600 x1200 pixels 1280 x 960 pixels 640 x 480 pixels Quality FINE NORMAL ECONOMY Built-in memory data Memory card data Battery capacity Date and time IMPORTANT! • Some information may not display properly if you display an image that was recorded using a different digital camera model. 21
Owners Manual
Page 26
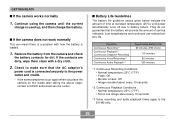
... how the battery is a problem with a dry cloth. 2. They do not guarantee that the AC adaptor's power cord is used up, and then charge the battery. s If the camera does not work normally This can mean there is loaded. 1. s Battery Life Guidelines The battery life guideline values given below indicate the amount of service indicated. Operation Continuous Recording*1 Continuous Playback*2 (Continuous Snapshot Recording) Continuous Voice Recording*3 Continuous Audio Playback*3 Approximate Battery Life 65 minutes (390 shots) 110...
... how the battery is a problem with a dry cloth. 2. They do not guarantee that the AC adaptor's power cord is used up, and then charge the battery. s If the camera does not work normally This can mean there is loaded. 1. s Battery Life Guidelines The battery life guideline values given below indicate the amount of service indicated. Operation Continuous Recording*1 Continuous Playback*2 (Continuous Snapshot Recording) Continuous Voice Recording*3 Continuous Audio Playback*3 Approximate Battery Life 65 minutes (390 shots) 110...
Owners Manual
Page 35
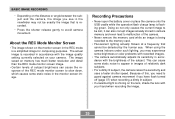
... light is shining on the lens, shade the lens with your camera. Because of this, you need to slow down, which causes some static noise in the monitor screen image. Recording Precautions • Never open the battery cover or place the camera onto the USB cradle while the operation/flash charge lamp is recorded in accordance with the image quality setting currently selected on your hand when recording the image...
... light is shining on the lens, shade the lens with your camera. Because of this, you need to slow down, which causes some static noise in the monitor screen image. Recording Precautions • Never open the battery cover or place the camera onto the USB cradle while the operation/flash charge lamp is recorded in accordance with the image quality setting currently selected on your hand when recording the image...
Owners Manual
Page 39
... the coloring of the recorded image. Rock the controller up or down to the right. 4. BASIC IMAGE RECORDING • When the red-eye reduction mode ( ) is being used , flash intensity is performed about 10 seconds after you press the shutter release button. 1. The flash may not fire at all when the subject is brightly lit. • White balance is fixed while the flash is being used , so sunlight, fluorescent lighting...
... the coloring of the recorded image. Rock the controller up or down to the right. 4. BASIC IMAGE RECORDING • When the red-eye reduction mode ( ) is being used , flash intensity is performed about 10 seconds after you press the shutter release button. 1. The flash may not fire at all when the subject is brightly lit. • White balance is fixed while the flash is being used , so sunlight, fluorescent lighting...
Owners Manual
Page 45
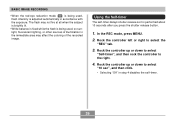
... camera at a white piece of paper or similar object under the lighting conditions for recording a similar type of scene that was selected when you want to appear on the monitor screen. • Pressing the shutter release button at this point records the image using the camera setup of image. 1. OTHER RECORDING FUNCTIONS 2. In the REC mode, press MENU. 2. Point the camera at a dark colored object can cause white balance to take a long time...
... camera at a white piece of paper or similar object under the lighting conditions for recording a similar type of scene that was selected when you want to appear on the monitor screen. • Pressing the shutter release button at this point records the image using the camera setup of image. 1. OTHER RECORDING FUNCTIONS 2. In the REC mode, press MENU. 2. Point the camera at a dark colored object can cause white balance to take a long time...
Owners Manual
Page 48
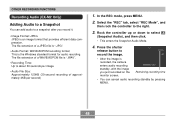
... file extension of a WAVE/ADPCM file is recorded, the camera enters audio recording standby, with the image you record it. • Image Format: JPEG JPEG is the Windows standard format for audio recording. Remaining recording time • You can add audio to a snapshot after you just recorded on the monitor screen. In the REC mode, press MENU. 2. Press the shutter release button to record the image. • After the image is ".WAV". • Recording Time...
... file extension of a WAVE/ADPCM file is recorded, the camera enters audio recording standby, with the image you record it. • Image Format: JPEG JPEG is the Windows standard format for audio recording. Remaining recording time • You can add audio to a snapshot after you just recorded on the monitor screen. In the REC mode, press MENU. 2. Press the shutter release button to record the image. • After the image is ".WAV". • Recording Time...
Owners Manual
Page 50
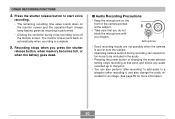
... power button or changing the mode selector setting stops recording at the subject. • Take care that point. • You can also perform "after-recording" to add audio to start voice recording. • The remaining recording time value counts down on the monitor screen and the operation/flash charge lamp flashes green as recording is too far from the subject. • Operating camera buttons during voice recording turns off the monitor screen. Press the shutter release button...
... power button or changing the mode selector setting stops recording at the subject. • Take care that point. • You can also perform "after-recording" to add audio to start voice recording. • The remaining recording time value counts down on the monitor screen and the operation/flash charge lamp flashes green as recording is too far from the subject. • Operating camera buttons during voice recording turns off the monitor screen. Press the shutter release button...
Owners Manual
Page 51
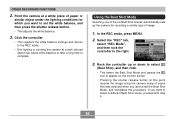
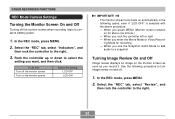
... do this: Turn off the monitor screen Turn on the monitor screen Select this setting: LCD-OFF LCD-ON IMPORTANT! • The monitor screen turns back on automatically in the following procedure to turn image review on and off the monitor screen when recording helps to conserve battery power. 1. Rock the controller up or down to a snapshot Turning Image Review On and Off Image review displays an image on for recording - In the REC mode, press MENU. 2. Select the...
... do this: Turn off the monitor screen Turn on the monitor screen Select this setting: LCD-OFF LCD-ON IMPORTANT! • The monitor screen turns back on automatically in the following procedure to turn image review on and off the monitor screen when recording helps to conserve battery power. 1. Rock the controller up or down to a snapshot Turning Image Review On and Off Image review displays an image on for recording - In the REC mode, press MENU. 2. Select the...
Owners Manual
Page 60
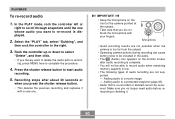
... the shutter release button. • This deletes the previous recording and replaces it . 60 PLAYBACK To re-record audio 1. ing, press MENU here to the right. 3. Make sure you do not block the microphone with re-record- Select the "PLAY" tab, select "Dubbing", and then rock the controller to complete the procedure. 4. Press the shutter release button to a movie image - Adding audio to start audio recording. 5. Rock the controller...
... the shutter release button. • This deletes the previous recording and replaces it . 60 PLAYBACK To re-record audio 1. ing, press MENU here to the right. 3. Make sure you do not block the microphone with re-record- Select the "PLAY" tab, select "Dubbing", and then rock the controller to complete the procedure. 4. Press the shutter release button to a movie image - Adding audio to start audio recording. 5. Rock the controller...
Owners Manual
Page 61
... 97) instead of audio recorded with on it) you have the LCD remote controller connected to the camera, audio is paused. • When you want to play . 2. Press MENU. 61 IMPORTANT! • Audio volume can perform the following steps to play back a voice recording file. 1. Rock the controller up or down. PLAYBACK Playing Back a Voice Recording File (EX-M2 Only) Perform the following operations while audio is playing. To do this...
... 97) instead of audio recorded with on it) you have the LCD remote controller connected to the camera, audio is paused. • When you want to play . 2. Press MENU. 61 IMPORTANT! • Audio volume can perform the following steps to play back a voice recording file. 1. Rock the controller up or down. PLAYBACK Playing Back a Voice Recording File (EX-M2 Only) Perform the following operations while audio is playing. To do this...


