
User Guide
Page 1
E CW-K85 User's Guide • We recommend that you record anything on it can cause the data to use of this manual on a disc that CASIO COMPUTER CO., LTD. RCA502991-001V01 shall not be held liable for any loss or corruption of data on discs arising through the use the printer for future reference. Be sure to read the Safety Precautions contained in this manual before you print on a disc* before trying to become corrupted. • Note that already has data recorded on it . Printing on hand for the first time, and always keep this printer. * CD-R, CD-RW, DVD-R, etc.
E CW-K85 User's Guide • We recommend that you record anything on it can cause the data to use of this manual on a disc that CASIO COMPUTER CO., LTD. RCA502991-001V01 shall not be held liable for any loss or corruption of data on discs arising through the use the printer for future reference. Be sure to read the Safety Precautions contained in this manual before you print on a disc* before trying to become corrupted. • Note that already has data recorded on it . Printing on hand for the first time, and always keep this printer. * CD-R, CD-RW, DVD-R, etc.
User Guide
Page 2
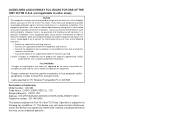
... Conformity Model Number: CW-K85 Trade Name: CASIO COMPUTER CO., LTD. Responsible party: CASIO, INC. However, there is encouraged to try to correct the interference by CASIO could void the user's authority to Part 15 of the FCC Rules. These limits are designed to other areas). This equipment generates, uses and can be used in order to operate the product. FCC WARNING Changes...
... Conformity Model Number: CW-K85 Trade Name: CASIO COMPUTER CO., LTD. Responsible party: CASIO, INC. However, there is encouraged to try to correct the interference by CASIO could void the user's authority to Part 15 of the FCC Rules. These limits are designed to other areas). This equipment generates, uses and can be used in order to operate the product. FCC WARNING Changes...

User Guide
Page 7
... changes, and temperature extremes. Contents Safety Precautions 1 Operating Precautions 5 CW-K85 Printer Features 7 General Guide 8 Power Requirements 9 Using the AC Adaptor 9 Using batteries 10 Initializing Printer Memory 12 To initialize printer memory 12 Data Error 12 Powering Up and Selecting a Printing Mode 12 To turn power on and off 12 Auto Power Off 13 Mode Selection Basics 14 Loading and Removing an Ink Ribbon Cassette 15 To load the ink ribbon cassette 15 To remove the ink ribbon cassette 16 Using...
... changes, and temperature extremes. Contents Safety Precautions 1 Operating Precautions 5 CW-K85 Printer Features 7 General Guide 8 Power Requirements 9 Using the AC Adaptor 9 Using batteries 10 Initializing Printer Memory 12 To initialize printer memory 12 Data Error 12 Powering Up and Selecting a Printing Mode 12 To turn power on and off 12 Auto Power Off 13 Mode Selection Basics 14 Loading and Removing an Ink Ribbon Cassette 15 To load the ink ribbon cassette 15 To remove the ink ribbon cassette 16 Using...

User Guide
Page 8
... just input 42 Using STYLE Menu Attributes 42 Saving, Recalling and Deleting Labels 44 To save a label 44 To recall a label 44 To delete a label 44 Configuring the Printer Setup 45 Demo Printing 45 Reference 46 Caring for the Printer 46 Troubleshooting 47 Error Messages 49 Illustrations 52 Symbols, Dingbats, and Special Characters 52 Frames 53 Label Formats 54 Specifications 56
... just input 42 Using STYLE Menu Attributes 42 Saving, Recalling and Deleting Labels 44 To save a label 44 To recall a label 44 To delete a label 44 Configuring the Printer Setup 45 Demo Printing 45 Reference 46 Caring for the Printer 46 Troubleshooting 47 Error Messages 49 Illustrations 52 Symbols, Dingbats, and Special Characters 52 Frames 53 Label Formats 54 Specifications 56

User Guide
Page 9
CW-K85 Printer Features The CW-K85 makes it possible to print on discs without connecting to a computer or installing any special software. A selection of illustrations and fonts makes labels stylish and informative. 7 E
CW-K85 Printer Features The CW-K85 makes it possible to print on discs without connecting to a computer or installing any special software. A selection of illustrations and fonts makes labels stylish and informative. 7 E
User Guide
Page 10
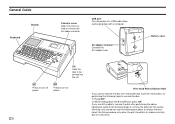
... load or remove the ink ribbon cassette. AC adaptor terminal Connect the AC adaptor here. Battery cover Slit Slide the disc to remove the disc. 1 Press OFF. 2 While holding down the D and H keys, press ON. Press to turn off power. USB port For connection of a USB cable when exchanging data with a computer. Press to turn on power. E 8 Print Head Release Button Hole If you cannot remove the disc from the printer. General Guide Display Keyboard Cassette cover Open...
... load or remove the ink ribbon cassette. AC adaptor terminal Connect the AC adaptor here. Battery cover Slit Slide the disc to remove the disc. 1 Press OFF. 2 While holding down the D and H keys, press ON. Press to turn off power. USB port For connection of a USB cable when exchanging data with a computer. Press to turn on power. E 8 Print Head Release Button Hole If you cannot remove the disc from the printer. General Guide Display Keyboard Cassette cover Open...
User Guide
Page 11
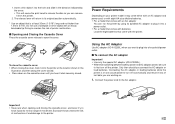
... your printer model it into a household power outlet. ■ To connect the AC adaptor Important! • Use only the special AC adaptor (AD-A12280L). • Whenever switching between battery power and AC adaptor power, be sure to first turn off automatically and result in the direction indicated by using its bundled AC adaptor to its normal range of text data you are working...
... your printer model it into a household power outlet. ■ To connect the AC adaptor Important! • Use only the special AC adaptor (AD-A12280L). • Whenever switching between battery power and AC adaptor power, be sure to first turn off automatically and result in the direction indicated by using its bundled AC adaptor to its normal range of text data you are working...

User Guide
Page 12
... are working on . Turn over the printer and remove the bat- Load a set of eight new batteries. • Make sure the positive g and negative h poles of the cord. Any of the conditions mentioned above can run on either end of printer malfunction. 2 1 2. Connect the AC adaptor plug to use alkaline batteries only. 1. Also, make sure that you have stored in printer memory. 1. tery cover. •...
... are working on . Turn over the printer and remove the bat- Load a set of eight new batteries. • Make sure the positive g and negative h poles of the cord. Any of the conditions mentioned above can run on either end of printer malfunction. 2 1 2. Connect the AC adaptor plug to use alkaline batteries only. 1. Also, make sure that you have stored in printer memory. 1. tery cover. •...

User Guide
Page 13
... disc. * When printing text or graphics that the display is below 10˚C(50˚F). Also, make sure that contain large areas of black, and printing under cold temperatures can shorten battery life for label printing. • Be sure to replace batteries at the wrong time can cause power to keep separate backup copies of text you are working on . Important! • The printer...
... disc. * When printing text or graphics that the display is below 10˚C(50˚F). Also, make sure that contain large areas of black, and printing under cold temperatures can shorten battery life for label printing. • Be sure to replace batteries at the wrong time can cause power to keep separate backup copies of text you are working on . Important! • The printer...

User Guide
Page 14
Initializing printer memory clears its memory and functions. Release first, but keep PRINT and ESC depressed until power turns on and a confirmation message appears on and off 1. If it finds a serious data problem, it will need to select the type of operation you want to perform. When this message appears, press any key. To turn power on the display. 3. To initialize printer memory 1. Make sure that appears, press SET to abort. In response...
Initializing printer memory clears its memory and functions. Release first, but keep PRINT and ESC depressed until power turns on and a confirmation message appears on and off 1. If it finds a serious data problem, it will need to select the type of operation you want to perform. When this message appears, press any key. To turn power on the display. 3. To initialize printer memory 1. Make sure that appears, press SET to abort. In response...

User Guide
Page 15
... the button. To restore power, press . Note Auto Power Off is disabled while the printer is being powered by the AC adaptor and is connected to perform. • See "Mode Selection Basics" on the type of printing operation you do not perform any key operation for about configuring contrast, print density, and language (English, German, French, Italian, Spanish) settings. • All of the display examples in this User's Guide use English...
... the button. To restore power, press . Note Auto Power Off is disabled while the printer is being powered by the AC adaptor and is connected to perform. • See "Mode Selection Basics" on the type of printing operation you do not perform any key operation for about configuring contrast, print density, and language (English, German, French, Italian, Spanish) settings. • All of the display examples in this User's Guide use English...
User Guide
Page 21
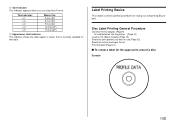
Disc Label Printing General Procedure Connect the AC adaptor (Page 9). Or load batteries into the printer. (Page 10) Load an ink ribbon cassette (Page 15). Label Printing Basics This section contains general procedures for the upper print area of a disc Example 19 E Select the format and input its text. Print the label (Page 21). ■ To create a label for laying out and printing disc labels. q Size indicator This indicator...
Disc Label Printing General Procedure Connect the AC adaptor (Page 9). Or load batteries into the printer. (Page 10) Load an ink ribbon cassette (Page 15). Label Printing Basics This section contains general procedures for the upper print area of a disc Example 19 E Select the format and input its text. Print the label (Page 21). ■ To create a label for laying out and printing disc labels. q Size indicator This indicator...
User Guide
Page 24
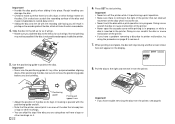
.... • Make sure you start printing. Important! • Never turn off the printer while it . 7. Pull the disc to remove it is performing a print operation. • Make sure there is nothing to remove the positioning guide before you slide the disc to position the disc. Use the positioning guide to the left as far as it from the printer, see page 8. Positioning guide Printing will appear here. • Adjust the...
.... • Make sure you start printing. Important! • Never turn off the printer while it . 7. Pull the disc to remove it is performing a print operation. • Make sure there is nothing to remove the positioning guide before you slide the disc to position the disc. Use the positioning guide to the left as far as it from the printer, see page 8. Positioning guide Printing will appear here. • Adjust the...

User Guide
Page 25
... scratch the disc or cause malfunction of the printer. 4. Rotate the disc and reinsert it without previewing (see below). 3. Upper print area (AREA A) Lower print area (AREA B) Important! • Never use the positioning guide for the upper and lower print areas 1. Note that you print on the display. 5. Remove the disc from the printer. • See step 8 on a single CD-R or a business card size CD-R disc.
... scratch the disc or cause malfunction of the printer. 4. Rotate the disc and reinsert it without previewing (see below). 3. Upper print area (AREA A) Lower print area (AREA B) Important! • Never use the positioning guide for the upper and lower print areas 1. Note that you print on the display. 5. Remove the disc from the printer. • See step 8 on a single CD-R or a business card size CD-R disc.
User Guide
Page 27
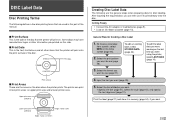
... the text alignment (page 31). The printer can then use (page 27). 4. Getting Ready • Connect the AC adaptor or load batteries (page 9). • Load an ink ribbon cassette (page 15). Select the print pattern you want to print directly onto the disc. Input the text you want (page 33). 5. DISC Label Data Disc Printing Terms The following are the general steps when preparing data for Creating a Disc Label 1. Some discs may have...
... the text alignment (page 31). The printer can then use (page 27). 4. Getting Ready • Connect the AC adaptor or load batteries (page 9). • Load an ink ribbon cassette (page 15). Select the print pattern you want to print directly onto the disc. Input the text you want (page 33). 5. DISC Label Data Disc Printing Terms The following are the general steps when preparing data for Creating a Disc Label 1. Some discs may have...
User Guide
Page 48
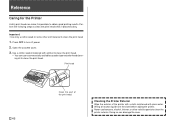
... all excess liquid from the cloth before wiping the printer. Open the cassette cover. 3. Use a cotton swab moistened with plain water. Press OFF to obtain good printing results. Cleaning the Printer Exterior Wipe the exterior of the print head. Reference Caring for the Printer A dirty print head can make it becomes dirty. Perform the following steps to clean the print head when it impossible to turn off power. 2.
... all excess liquid from the cloth before wiping the printer. Open the cassette cover. 3. Use a cotton swab moistened with plain water. Press OFF to obtain good printing results. Cleaning the Printer Exterior Wipe the exterior of the print head. Reference Caring for the Printer A dirty print head can make it becomes dirty. Perform the following steps to clean the print head when it impossible to turn off power. 2.
User Guide
Page 49
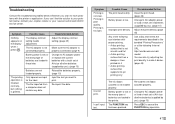
... low or the wrong type of batteries (supplied by you). (page 10) Adjust the print density. (page 45) Use a disc that supports ink jet printing only Recommended Action Clean the print head. (page 46) Change to AC adaptor power or load a fresh set of batteries are loaded in the printer. Improper print density Any of AA-size alkaline batteries (supplied by you). (page 10) Press ESC to your nearest authorized CASIO service center. Battery power is properly connected. (page 9) Change...
... low or the wrong type of batteries (supplied by you). (page 10) Adjust the print density. (page 45) Use a disc that supports ink jet printing only Recommended Action Clean the print head. (page 46) Change to AC adaptor power or load a fresh set of batteries are loaded in the printer. Improper print density Any of AA-size alkaline batteries (supplied by you). (page 10) Press ESC to your nearest authorized CASIO service center. Battery power is properly connected. (page 9) Change...

User Guide
Page 50
... the COMPUTER LINK button to turn on the printer. Try using a different USB port on . The printed color is printed. Though the USB driver is installed correctly, data communication is low or the wrong type of batteries are printing on your computer, or try using a lighter color disc or a darker color ink ribbon. The disc stops part way through printing. I can't get a connection between the print head and roller, Remove the disc from the ink ribbon color. Printing will go. Battery power is not possible...
... the COMPUTER LINK button to turn on the printer. Try using a different USB port on . The printed color is printed. Though the USB driver is installed correctly, data communication is low or the wrong type of batteries are printing on your computer, or try using a lighter color disc or a darker color ink ribbon. The disc stops part way through printing. I can't get a connection between the print head and roller, Remove the disc from the ink ribbon color. Printing will go. Battery power is not possible...
User Guide
Page 52
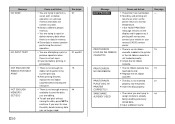
... 21 44 NO INK RIBBON! NOT ENOUGH INK RIBBON FOR NEXT PRINT NOT ENOUGH MEMORY! PRINT ERROR! PLACE DISC IN PRINTER CORRECTLY! Message NO DATA! LOAD AN INK RIBBON CASSETTE! Cause and Action • The printer has overheated. ➜ Stand by and printing will resume as soon as if printing will not resume, contact your retailer or your nearest CASIO service center. • There is no longer need.
... 21 44 NO INK RIBBON! NOT ENOUGH INK RIBBON FOR NEXT PRINT NOT ENOUGH MEMORY! PRINT ERROR! PLACE DISC IN PRINTER CORRECTLY! Message NO DATA! LOAD AN INK RIBBON CASSETTE! Cause and Action • The printer has overheated. ➜ Stand by and printing will resume as soon as if printing will not resume, contact your retailer or your nearest CASIO service center. • There is no longer need.

User Guide
Page 58
... adaptor power and when printer is connected to 95° F) Specifications Model : CW-K85 Input Keyboard Layout : Typewriter (QWERTY) Character Types Alpha : 52 (A to Z, a to z); 99 etc.) Numbers : 10 Greek : 48 Russian : 66 Symbols : 281 Illustrations: 124 User : Memory for storage of four characters Display Type : Liquid crystal display (96 × 64 dots, 12 columns × 4 lines) Input Area : 12 columns × 1 line Printing Resolution : 200dpi Print System : Thermal transfer...
... adaptor power and when printer is connected to 95° F) Specifications Model : CW-K85 Input Keyboard Layout : Typewriter (QWERTY) Character Types Alpha : 52 (A to Z, a to z); 99 etc.) Numbers : 10 Greek : 48 Russian : 66 Symbols : 281 Illustrations: 124 User : Memory for storage of four characters Display Type : Liquid crystal display (96 × 64 dots, 12 columns × 4 lines) Input Area : 12 columns × 1 line Printing Resolution : 200dpi Print System : Thermal transfer...


