
Photo Application Guide(Mac)
Page 4
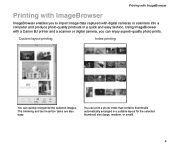
... layout for the selected thumbnail size (large, medium, or small). 4 Printing with ImageBrowser Printing with ImageBrowser ImageBrowser enables you to import image data captured with a Canon BJ printer and a scanner or digital camera, you can enjoy superb-quality photo prints.
... layout for the selected thumbnail size (large, medium, or small). 4 Printing with ImageBrowser Printing with ImageBrowser ImageBrowser enables you to import image data captured with a Canon BJ printer and a scanner or digital camera, you can enjoy superb-quality photo prints.

Photo Application Guide(Mac)
Page 5
You can print images with no space between them (available with ImageBrowser Tiled photo printing (Borderless printing) You can print images in the specified photo size. Fixed photo size printing Printing with BJ printers that a single image is printed borderless along the paper edges and multiple images are arranged like tiles with no margins around each image, so that support the borderless printing feature). 5
You can print images with no space between them (available with ImageBrowser Tiled photo printing (Borderless printing) You can print images in the specified photo size. Fixed photo size printing Printing with BJ printers that a single image is printed borderless along the paper edges and multiple images are arranged like tiles with no margins around each image, so that support the borderless printing feature). 5

Photo Application Guide(Mac)
Page 11
Borderless printing is also supported. * Some features and paper sizes may not be printed on the models of printers. 11 5 Printing The images can be supported depending on Canon perforated paper (such as Photo Paper Pro or Glossy Photo Cards ).
Borderless printing is also supported. * Some features and paper sizes may not be printed on the models of printers. 11 5 Printing The images can be supported depending on Canon perforated paper (such as Photo Paper Pro or Glossy Photo Cards ).
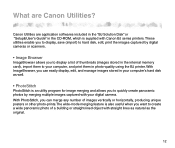
Photo Application Guide(Mac)
Page 12
These utilities enable you to display, save (import) to hard disk, edit, print the images captured by merging multiple images captured with Canon BJ series printers. What are application softwares included in the "BJ Solution Disk" or "Setup&User's Guide" in the CD-ROM, which is an utility program for image ... object with straight lines as natural as well. • PhotoStitch PhotoStitch is supplied with your computer, and print them in photo-quality using the BJ printer. With PhotoStitch, you to your digital camera. Canon Utilities are Canon Utilities?
These utilities enable you to display, save (import) to hard disk, edit, print the images captured by merging multiple images captured with Canon BJ series printers. What are application softwares included in the "BJ Solution Disk" or "Setup&User's Guide" in the CD-ROM, which is an utility program for image ... object with straight lines as natural as well. • PhotoStitch PhotoStitch is supplied with your computer, and print them in photo-quality using the BJ printer. With PhotoStitch, you to your digital camera. Canon Utilities are Canon Utilities?

Photo Application Guide(Mac)
Page 72
3 Click the Page setup button. Select the Borderless Printing check box to print images with no margins. Specify the paper size and orientation. Custom layout printing 72 The Page Setup dialog box for the printer selected in the Chooser appears.
3 Click the Page setup button. Select the Borderless Printing check box to print images with no margins. Specify the paper size and orientation. Custom layout printing 72 The Page Setup dialog box for the printer selected in the Chooser appears.
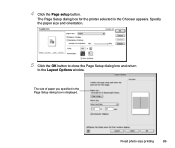
Photo Application Guide(Mac)
Page 86
The Page Setup dialog box for the printer selected in the Page Setup dialog box is displayed. Specify the paper size and orientation. 5 Click the OK button to close the Page Setup dialog box and return to the Layout Options window. The size of paper you specified in the Chooser appears. Fixed photo size printing 86 4 Click the Page setup button.
The Page Setup dialog box for the printer selected in the Page Setup dialog box is displayed. Specify the paper size and orientation. 5 Click the OK button to close the Page Setup dialog box and return to the Layout Options window. The size of paper you specified in the Chooser appears. Fixed photo size printing 86 4 Click the Page setup button.
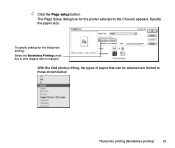
Photo Application Guide(Mac)
Page 91
With the tiled photo printing, the types of paper that can be selected are limited to print images with no margins. To specify settings for the printer selected in the Chooser appears. The Page Setup dialog box for the tiled photo printing: Select the Borderless Printing check box to those shown below: Tiled photo printing (Borderless printing) 91 Specify the paper size. 4 Click the Page setup button.
With the tiled photo printing, the types of paper that can be selected are limited to print images with no margins. To specify settings for the printer selected in the Chooser appears. The Page Setup dialog box for the tiled photo printing: Select the Borderless Printing check box to those shown below: Tiled photo printing (Borderless printing) 91 Specify the paper size. 4 Click the Page setup button.
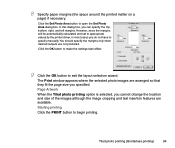
Photo Application Guide(Mac)
Page 94
... Set Photo Area button to exit the layout selection wizard. However, since the margins will be automatically calculated and set to appropriate values by the printer driver, in most cases you specified. Starting printing Click the PRINT button to specify manually. In this dialog box, you cannot change the...
... Set Photo Area button to exit the layout selection wizard. However, since the margins will be automatically calculated and set to appropriate values by the printer driver, in most cases you specified. Starting printing Click the PRINT button to specify manually. In this dialog box, you cannot change the...

Photo Application Guide(Mac)
Page 95
See your printer manuals for more information. Note ➤ Some printer models may not support the printing on Canon perforated paper. Canon perforated paper printing • Selecting a layout • Starting printing The Canon perforated paper printing feature allows you to About Canon perforated paper for more information on the types of Canon perforated paper. Canon perforated paper printing 95 Refer to quickly print images on Canon perforated paper.
See your printer manuals for more information. Note ➤ Some printer models may not support the printing on Canon perforated paper. Canon perforated paper printing • Selecting a layout • Starting printing The Canon perforated paper printing feature allows you to About Canon perforated paper for more information on the types of Canon perforated paper. Canon perforated paper printing 95 Refer to quickly print images on Canon perforated paper.
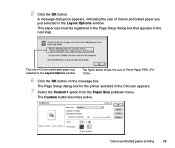
Photo Application Guide(Mac)
Page 98
... in the Layout Options window. The size of Canon perforated paper you just selected in the Chooser appears. 7 Select the Custom1 option from the Paper Size pulldown menu. The figure above shows the size of Canon perforated paper you selected in the next step. ...The Custom button becomes active. Canon perforated paper printing 98 The Page Setup dialog box for the printer selected in the Layout Options window. 5 Click the OK button....
... in the Layout Options window. The size of Canon perforated paper you just selected in the Chooser appears. 7 Select the Custom1 option from the Paper Size pulldown menu. The figure above shows the size of Canon perforated paper you selected in the next step. ...The Custom button becomes active. Canon perforated paper printing 98 The Page Setup dialog box for the printer selected in the Layout Options window. 5 Click the OK button....

Photo Application Guide(Mac)
Page 103
The Print dialog box of the printer selected in the Chooser appears. Starting printing 103 Steps 1 Click the PRINT button. Starting printing Once you have completed all necessary steps for the page layout, follow the steps below to start printing.
The Print dialog box of the printer selected in the Chooser appears. Starting printing 103 Steps 1 Click the PRINT button. Starting printing Once you have completed all necessary steps for the page layout, follow the steps below to start printing.
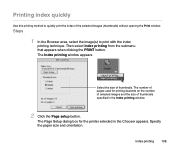
Photo Application Guide(Mac)
Page 108
... in the Chooser appears. Specify the paper size and orientation. The number of thumbnails. Index printing 108 Select the size of pages used for the printer selected in the Index printing window. 2 Click the Page setup button. The Index printing window appears. Then select Index printing from the submenu that appears...
... in the Chooser appears. Specify the paper size and orientation. The number of thumbnails. Index printing 108 Select the size of pages used for the printer selected in the Index printing window. 2 Click the Page setup button. The Index printing window appears. Then select Index printing from the submenu that appears...

Photo Application Guide(Mac)
Page 112
The size of paper you specified in the Chooser appears. 4 Click the Page setup button. Specify the paper size and orientation. 5 Click the OK button to close the Page Setup dialog box and return to the Layout Options window. The Page Setup dialog box for the printer selected in the Page Setup dialog box is displayed. Index printing 112
The size of paper you specified in the Chooser appears. 4 Click the Page setup button. Specify the paper size and orientation. 5 Click the OK button to close the Page Setup dialog box and return to the Layout Options window. The Page Setup dialog box for the printer selected in the Page Setup dialog box is displayed. Index printing 112
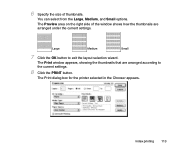
Photo Application Guide(Mac)
Page 113
The Print window appears, showing the thumbnails that are arranged under the current settings. 6 Specify the size of the window shows how the thumbnails are arranged according to exit the layout selection wizard. You can select from the Large, Medium, and Small options. Large Medium Small 7 Click the OK button to the current settings. 8 Click the PRINT button. The Print dialog box for the printer selected in the Chooser appears. Index printing 113 The Preview area on the right side of thumbnails.
The Print window appears, showing the thumbnails that are arranged under the current settings. 6 Specify the size of the window shows how the thumbnails are arranged according to exit the layout selection wizard. You can select from the Large, Medium, and Small options. Large Medium Small 7 Click the OK button to the current settings. 8 Click the PRINT button. The Print dialog box for the printer selected in the Chooser appears. Index printing 113 The Preview area on the right side of thumbnails.

S820D User's Guide
Page 2
...Use This Manual 6 Safety Precautions 8 Printer Driver Functions (Windows 15 Opening the Printer Properties Dialog Box 16 Printer Properties Dialog Box Description 18 BJ Status Monitor Functions 32 Cancelling a Print Job 35 Uninstalling Printer Drivers 36 Printer Driver Functions (Macintosh 37 Description of ...Print Settings 38 BJ Print Monitor 55 Cancelling a Print Job 57 Using the Printer with a Network 58 Uninstalling Printer Drivers 62 Using the Memory Card Startup...
...Use This Manual 6 Safety Precautions 8 Printer Driver Functions (Windows 15 Opening the Printer Properties Dialog Box 16 Printer Properties Dialog Box Description 18 BJ Status Monitor Functions 32 Cancelling a Print Job 35 Uninstalling Printer Drivers 36 Printer Driver Functions (Macintosh 37 Description of ...Print Settings 38 BJ Print Monitor 55 Cancelling a Print Job 57 Using the Printer with a Network 58 Uninstalling Printer Drivers 62 Using the Memory Card Startup...

S820D User's Guide
Page 3
... Head 84 Replacing an Ink Tank 85 Printing the Nozzle Check Pattern 90 Print Head Cleaning 94 Print Head Deep Cleaning 97 Cleaning the Printer 99 Transporting the Printer 101 Printing Media 105 Compatible Media Types 106 Envelopes 108 High Resolution Paper HR-101N 112 Glossy Photo Paper GP-301/GP-301N...
... Head 84 Replacing an Ink Tank 85 Printing the Nozzle Check Pattern 90 Print Head Cleaning 94 Print Head Deep Cleaning 97 Cleaning the Printer 99 Transporting the Printer 101 Printing Media 105 Compatible Media Types 106 Envelopes 108 High Resolution Paper HR-101N 112 Glossy Photo Paper GP-301/GP-301N...
S820D User's Guide
Page 4
Table of Contents Troubleshooting 132 Cannot Install the Printer Driver 133 Print Quality is Poor or Contains Errors 135 Printer Does Not Start or Stops During Print Jobs 152 Paper Does Not Feed Properly or Paper Jams 158 The POWER Lamp Flashes Orange 161 An Error Message is Displayed on the Screen 164 Problems Unique to Windows 173 Problems Unique to the Macintosh 176 Specifications 179 Index ...191 4
Table of Contents Troubleshooting 132 Cannot Install the Printer Driver 133 Print Quality is Poor or Contains Errors 135 Printer Does Not Start or Stops During Print Jobs 152 Paper Does Not Feed Properly or Paper Jams 158 The POWER Lamp Flashes Orange 161 An Error Message is Displayed on the Screen 164 Problems Unique to Windows 173 Problems Unique to the Macintosh 176 Specifications 179 Index ...191 4
S820D User's Guide
Page 5
... that , if ignored, could result in death or serious personal injury caused by incorrect operation of the printer. Introduction Introduction Thank you for safe operation. Must be observed for purchasing the Canon S820D Bubble Jet Printer. Must be observed for Windows users only. This User's Guide provides complete explanations of the features and functions...
... that , if ignored, could result in death or serious personal injury caused by incorrect operation of the printer. Introduction Introduction Thank you for safe operation. Must be observed for purchasing the Canon S820D Bubble Jet Printer. Must be observed for Windows users only. This User's Guide provides complete explanations of the features and functions...
S820D User's Guide
Page 8
s Choosing a location Do not place the printer close to plug in or unplug the printer from the power supply when your hands are wet. Do not place heavy objects on the power cord. 8 s Power supply Never attempt to flammable ...solvents such as alcohol or thinners. Always push the plug all the way into the power outlet. Do not attempt to use the printer safely. Never damage, modify, stretch or excessively bend or twist the power cord. Safety Precautions Safety Precautions Please read the safety warnings and cautions provided...
s Choosing a location Do not place the printer close to plug in or unplug the printer from the power supply when your hands are wet. Do not place heavy objects on the power cord. 8 s Power supply Never attempt to flammable ...solvents such as alcohol or thinners. Always push the plug all the way into the power outlet. Do not attempt to use the printer safely. Never damage, modify, stretch or excessively bend or twist the power cord. Safety Precautions Safety Precautions Please read the safety warnings and cautions provided...
S820D User's Guide
Page 9
... in contact with other equipment (extension lead, double adapter, etc.). Never plug the printer into a power socket that is shared with electrical components inside the printer, it , you detect smoke, unusual smells or strange noises around the printer, immediately unplug the printer at a location exposed to a lot of dust, smoke, or high humidity, the...
... in contact with other equipment (extension lead, double adapter, etc.). Never plug the printer into a power socket that is shared with electrical components inside the printer, it , you detect smoke, unusual smells or strange noises around the printer, immediately unplug the printer at a location exposed to a lot of dust, smoke, or high humidity, the...


