Quick Start Guide
Page 1
BUBBLE JET PRINTER Quick Start Guide Table of Contents Preface 1 Shipping Materials 1 Introduction 1 Setting Up 2 Preparing the Printer 2 Connecting the Printer to the Computer 2 Installing the Print Head 4 Loading Paper 7 Installing the Printer Driver 8 Aligning the Print Head 14 Basic Operations 18 Printing with Windows 18 Printing with Macintosh 20 Print Head Maintenance 22 Notes on Handling the USB Interface (for Windows Users) 23 For Further Details... 23 BE QA7-2692-V01
BUBBLE JET PRINTER Quick Start Guide Table of Contents Preface 1 Shipping Materials 1 Introduction 1 Setting Up 2 Preparing the Printer 2 Connecting the Printer to the Computer 2 Installing the Print Head 4 Loading Paper 7 Installing the Printer Driver 8 Aligning the Print Head 14 Basic Operations 18 Printing with Windows 18 Printing with Macintosh 20 Print Head Maintenance 22 Notes on Handling the USB Interface (for Windows Users) 23 For Further Details... 23 BE QA7-2692-V01
Quick Start Guide
Page 3
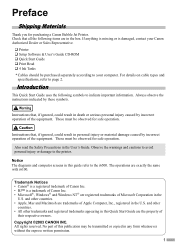
... on cable types and specifications, refer to your Canon Authorized Dealer or Sales Representative. ‰ Printer ‰ Setup Software & User's Guide CD-ROM ‰ Quick Start Guide ‰ Print Head ‰ 4 Ink Tanks * Cables should be transmitted or copied in any form whatsoever without the express written permission. 1 These must be observed for purchasing a Canon Bubble Jet Printer. Copyright ©2003 CANON INC. If anything is missing or is a trademark of Canon Inc...
... on cable types and specifications, refer to your Canon Authorized Dealer or Sales Representative. ‰ Printer ‰ Setup Software & User's Guide CD-ROM ‰ Quick Start Guide ‰ Print Head ‰ 4 Ink Tanks * Cables should be transmitted or copied in any form whatsoever without the express written permission. 1 These must be observed for purchasing a Canon Bubble Jet Printer. Copyright ©2003 CANON INC. If anything is missing or is a trademark of Canon Inc...
Quick Start Guide
Page 5
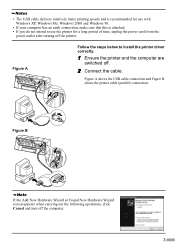
... printer driver correctly. 1 Ensure the printer and the computer are switched off. 2 Connect the cable. Figure A Follow the steps below to use with Windows XP, Windows Me, Windows 2000 and Windows 98. • If your computer has an earth connection, make sure that this is recommended for use the printer for a long period of time, unplug the power cord from the power outlet after turning off the computer. 3 Figure A shows the USB cable connection...
... printer driver correctly. 1 Ensure the printer and the computer are switched off. 2 Connect the cable. Figure A Follow the steps below to use with Windows XP, Windows Me, Windows 2000 and Windows 98. • If your computer has an earth connection, make sure that this is recommended for use the printer for a long period of time, unplug the power cord from the power outlet after turning off the computer. 3 Figure A shows the USB cable connection...
Quick Start Guide
Page 6
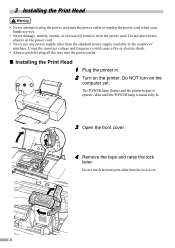
... bend or twist the power cord. The POWER lamp flashes and the printer begins to plug the power cord into the power outlet. „ Installing the Print Head 1 Plug the printer in the country of purchase. Do NOT turn on the computer yet. Wait until the POWER lamp remains fully lit. 3 Open the front cover. 4 Remove the tape and raise the lock lever. 3 Installing the Print Head • Never attempt to...
... bend or twist the power cord. The POWER lamp flashes and the printer begins to plug the power cord into the power outlet. „ Installing the Print Head 1 Plug the printer in the country of purchase. Do NOT turn on the computer yet. Wait until the POWER lamp remains fully lit. 3 Open the front cover. 4 Remove the tape and raise the lock lever. 3 Installing the Print Head • Never attempt to...
Quick Start Guide
Page 7
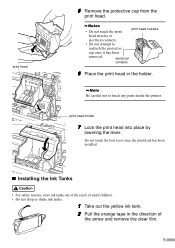
... ink tank. 2 Pull the orange tape in the holder. electrical contacts 6 Place the print head in the direction of the arrow and remove the clear film. 5 Be careful not to reattach the protective cap once it has been removed. print head holder 7 Lock the print head into place by lowering the lever. print head 5 Remove the protective cap from the print head. • Do not touch the print print head nozzles head nozzles...
... ink tank. 2 Pull the orange tape in the holder. electrical contacts 6 Place the print head in the direction of the arrow and remove the clear film. 5 Be careful not to reattach the protective cap once it has been removed. print head holder 7 Lock the print head into place by lowering the lever. print head 5 Remove the protective cap from the print head. • Do not touch the print print head nozzles head nozzles...
Quick Start Guide
Page 9
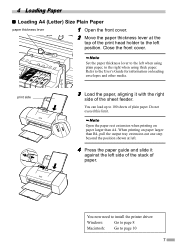
... the top of the print head holder to page 10 7 You now need to install the printer driver: Windows: Go to page 8 Macintosh: Go to the left position. 4 Loading Paper „ Loading A4 (Letter) Size Plain Paper paper thickness lever 1 Open the front cover. 2 Move the paper thickness lever at left. 4 Press the paper guide and slide it with the right side of plain paper. You can load up to the User's Guide for information on paper larger than A4...
... the top of the print head holder to page 10 7 You now need to install the printer driver: Windows: Go to page 8 Macintosh: Go to the left position. 4 Loading Paper „ Loading A4 (Letter) Size Plain Paper paper thickness lever 1 Open the front cover. 2 Move the paper thickness lever at left. 4 Press the paper guide and slide it with the right side of plain paper. You can load up to the User's Guide for information on paper larger than A4...
Quick Start Guide
Page 10
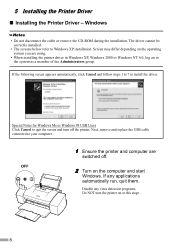
... the following screen appears automatically, click Cancel and follow steps 1 to 7 to Windows XP installation. The driver cannot be correctly installed. • The screens below refer to install the driver. Next, remove and replace the USB cable connected to your computer. 1 Ensure the printer and computer are using. • When installing the printer driver in Windows XP, Windows 2000 or Windows NT 4.0, log on to quit the screen and turn the printer on the computer and start Windows.
... the following screen appears automatically, click Cancel and follow steps 1 to 7 to Windows XP installation. The driver cannot be correctly installed. • The screens below refer to install the driver. Next, remove and replace the USB cable connected to your computer. 1 Ensure the printer and computer are using. • When installing the printer driver in Windows XP, Windows 2000 or Windows NT 4.0, log on to quit the screen and turn the printer on the computer and start Windows.
Quick Start Guide
Page 11
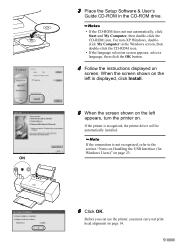
... the printer is displayed, click Install. 5 When the screen shown on the left is recognized, the printer driver will be automatically installed. ON 6 Click OK. When the screen shown on the left appears, turn the printer on screen. If the connection is not recognized, refer to the section "Notes on Handling the USB Interface (for Windows Users)" on page 14. 9 3 Place the Setup Software & User's Guide CD-ROM in the Windows screen, then double...
... the printer is displayed, click Install. 5 When the screen shown on the left is recognized, the printer driver will be automatically installed. ON 6 Click OK. When the screen shown on the left appears, turn the printer on screen. If the connection is not recognized, refer to the section "Notes on Handling the USB Interface (for Windows Users)" on page 14. 9 3 Place the Setup Software & User's Guide CD-ROM in the Windows screen, then double...
Quick Start Guide
Page 12
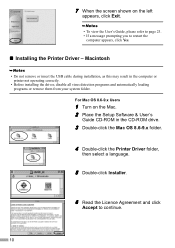
... drive. 3 Double-click the Mac OS 8.6-9.x folder. 4 Double-click the Printer Driver folder, then select a language. 5 Double-click Installer. 6 Read the Licence Agreement and click Accept to restart the computer appears, click Yes. „ Installing the Printer Driver - 7 When the screen shown on the Mac. 2 Place the Setup Software & User's Guide CD-ROM in the computer or printer not operating correctly. • Before installing the driver, disable all virus detection programs and automatically loading...
... drive. 3 Double-click the Mac OS 8.6-9.x folder. 4 Double-click the Printer Driver folder, then select a language. 5 Double-click Installer. 6 Read the Licence Agreement and click Accept to restart the computer appears, click Yes. „ Installing the Printer Driver - 7 When the screen shown on the Mac. 2 Place the Setup Software & User's Guide CD-ROM in the computer or printer not operating correctly. • Before installing the driver, disable all virus detection programs and automatically loading...
Quick Start Guide
Page 13
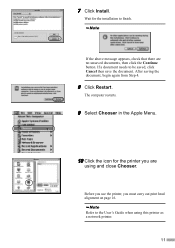
... a document needs to the User's Guide when using and close Chooser. The computer restarts. 9 Select Chooser in the Apple Menu. 10 Click the icon for the installation to finish. Refer to be saved, click Cancel then save the document. Before you use the printer, you are no unsaved documents, then click the Continue button. 7 Click Install. Wait for the printer you must carry out print head alignment...
... a document needs to the User's Guide when using and close Chooser. The computer restarts. 9 Select Chooser in the Apple Menu. 10 Click the icon for the installation to finish. Refer to be saved, click Cancel then save the document. Before you use the printer, you are no unsaved documents, then click the Continue button. 7 Click Install. Wait for the printer you must carry out print head alignment...
Quick Start Guide
Page 15
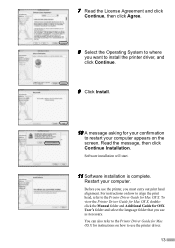
... start. 11 Software installation is complete. Before you use the printer driver. 13 To view the Printer Driver Guide for Mac OS X, doubleclick the Manual folder and Additional Guide for Mac OS X. Restart your computer appears on the screen. For instructions on how to use the printer, you must carry out print head alignment. You can also refer to the Printer Driver Guide for Mac OS X for instructions on how to align the print head, refer to the Printer Driver Guide...
... start. 11 Software installation is complete. Before you use the printer driver. 13 To view the Printer Driver Guide for Mac OS X, doubleclick the Manual folder and Additional Guide for Mac OS X. Restart your computer appears on the screen. For instructions on how to use the printer, you must carry out print head alignment. You can also refer to the Printer Driver Guide for Mac OS X for instructions on how to align the print head, refer to the Printer Driver Guide...
Quick Start Guide
Page 16
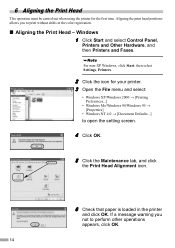
... Windows 1 Click Start and select Control Panel, Printers and Other Hardware, and then Printers and Faxes. 6 Aligning the Print Head This operation must be carried out when using the printer for your printer. 3 Open the File menu and select: • Windows XP/Windows 2000 → [Printing Preferences...] • Windows Me/Windows 98/Windows 95 → [Properties] • Windows NT 4.0 → [Document Defaults...] to open the setting screen. 4 Click OK. 5 Click the Maintenance tab, and click the Print Head Alignment icon. 6 Check that paper...
... Windows 1 Click Start and select Control Panel, Printers and Other Hardware, and then Printers and Faxes. 6 Aligning the Print Head This operation must be carried out when using the printer for your printer. 3 Open the File menu and select: • Windows XP/Windows 2000 → [Printing Preferences...] • Windows Me/Windows 98/Windows 95 → [Properties] • Windows NT 4.0 → [Document Defaults...] to open the setting screen. 4 Click OK. 5 Click the Maintenance tab, and click the Print Head Alignment icon. 6 Check that paper...
Quick Start Guide
Page 18
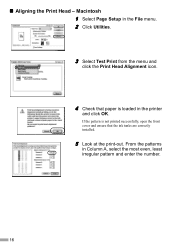
From the patterns in the printer and click OK. „ Aligning the Print Head - Macintosh 1 Select Page Setup in the File menu. 2 Click Utilities. 3 Select Test Print from the menu and click the Print Head Alignment icon. 4 Check that the ink tanks are correctly installed. 5 Look at the print-out. If the pattern is not printed successfully, open the front cover and ensure that paper is loaded in Column A, select the most even, least irregular pattern and enter the number. 16
From the patterns in the printer and click OK. „ Aligning the Print Head - Macintosh 1 Select Page Setup in the File menu. 2 Click Utilities. 3 Select Test Print from the menu and click the Print Head Alignment icon. 4 Check that the ink tanks are correctly installed. 5 Look at the print-out. If the pattern is not printed successfully, open the front cover and ensure that paper is loaded in Column A, select the most even, least irregular pattern and enter the number. 16
Quick Start Guide
Page 20
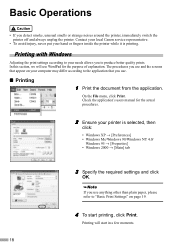
...; Windows 2000 → [Main] tab 3 Specify the required settings and click OK. Basic Operations • If you to produce better quality prints. Check the application's users manual for the purpose of explanation. Contact your local Canon service representative. • To avoid injury, never put your needs allows you detect smoke, unusual smells or strange noises around the printer, immediately switch the printer off...
...; Windows 2000 → [Main] tab 3 Specify the required settings and click OK. Basic Operations • If you to produce better quality prints. Check the application's users manual for the purpose of explanation. Contact your local Canon service representative. • To avoid injury, never put your needs allows you detect smoke, unusual smells or strange noises around the printer, immediately switch the printer off...
Quick Start Guide
Page 21
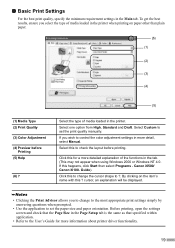
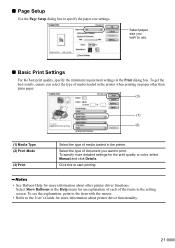
...; Use the application to control the color adjustment settings in the tab. (This may not appear when using Windows 2000 or Windows NT 4.0. „ Basic Print Settings For the best print quality, specify the minimum requirement settings in the printer. To get the best results, ensure you to change the cursor shape to set the paper size and paper orientation. Select this ? Before printing, open the settings screen and check that the Page Size in the Page Setup...
...; Use the application to control the color adjustment settings in the tab. (This may not appear when using Windows 2000 or Windows NT 4.0. „ Basic Print Settings For the best print quality, specify the minimum requirement settings in the printer. To get the best results, ensure you to change the cursor shape to set the paper size and paper orientation. Select this ? Before printing, open the settings screen and check that the Page Size in the Page Setup...
Quick Start Guide
Page 22
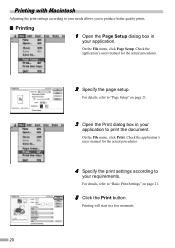
... page setup. Printing will start in your application to your requirements. Check the application's users manual for the actual procedures. 4 Specify the print settings according to print the document. For details, refer to produce better quality prints. „ Printing 1 Open the Page Setup dialog box in your application. On the File menu, click Page Setup. On the File menu, click Print. Printing with Macintosh Adjusting the print settings according to your needs allows you to "Basic Print Settings" on page 21. 3 Open the Print...
... page setup. Printing will start in your application to your requirements. Check the application's users manual for the actual procedures. 4 Specify the print settings according to print the document. For details, refer to produce better quality prints. „ Printing 1 Open the Page Setup dialog box in your application. On the File menu, click Page Setup. On the File menu, click Print. Printing with Macintosh Adjusting the print settings according to your needs allows you to "Basic Print Settings" on page 21. 3 Open the Print...
Quick Start Guide
Page 23
... User's Guide for more detailed settings for the print quality or color, select Manual and click Details. Select paper size you want to start printing. • See Balloon Help for an explanation of each of document you wish to specify the paper size settings. Click this to print. To get the best results, ensure you select the type of media loaded in the setting screen. Select Show Balloons in the printer when printing on paper...
... User's Guide for more detailed settings for the print quality or color, select Manual and click Details. Select paper size you want to start printing. • See Balloon Help for an explanation of each of document you wish to specify the paper size settings. Click this to print. To get the best results, ensure you select the type of media loaded in the setting screen. Select Show Balloons in the printer when printing on paper...
Quick Start Guide
Page 24
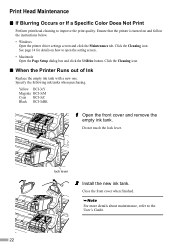
... a Specific Color Does Not Print Perform print head cleaning to the User's Guide. 22 For more details about maintenance, refer to improve the print quality. lock lever 2 Install the new ink tank. Close the front cover when finished. Click the Cleaning icon. „ When the Printer Runs out of Ink Replace the empty ink tank with a new one. Specify the following ink tanks when purchasing. Ensure that the printer is turned on how to open the setting screen. • Macintosh Open the Page Setup...
... a Specific Color Does Not Print Perform print head cleaning to the User's Guide. 22 For more details about maintenance, refer to improve the print quality. lock lever 2 Install the new ink tank. Close the front cover when finished. Click the Cleaning icon. „ When the Printer Runs out of Ink Replace the empty ink tank with a new one. Specify the following ink tanks when purchasing. Ensure that the printer is turned on how to open the setting screen. • Macintosh Open the Page Setup...
Quick Start Guide
Page 25
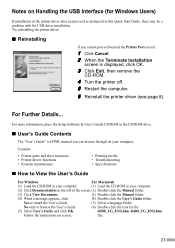
... printer driver (see page 8). Yes-to browse the User's Guide (6) Double-click the icon for Windows Users) If installation of the screen. (2) Double-click the Manual folder. (3) Click View Documents. (3) Double-click the Manual folder. (4) When a message appears, click (4) Double-click the User's Guide folder. For more information, place the Setup Software & User's Guide CD-ROM in this Quick Start Guide, there may be a problem with the USB driver installation. For Further Details... No-only to install the User's Guide (5) Select a language folder. file...
... printer driver (see page 8). Yes-to browse the User's Guide (6) Double-click the icon for Windows Users) If installation of the screen. (2) Double-click the Manual folder. (3) Click View Documents. (3) Double-click the Manual folder. (4) When a message appears, click (4) Double-click the User's Guide folder. For more information, place the Setup Software & User's Guide CD-ROM in this Quick Start Guide, there may be a problem with the USB driver installation. For Further Details... No-only to install the User's Guide (5) Select a language folder. file...
Quick Start Guide
Page 26
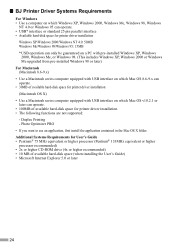
... higher CD-ROM drive (4x or higher recommended) • 10 MB of available hard-disk space for printer driver installation (Macintosh OS X) • Use a Macintosh series computer equipped with USB interface on which Mac OS 8.6-9.x can operate. • 30MB of available hard-disk space for printer driver installation. • The following functions are not supported: - Photo Optimizer PRO • If you want to use an application, first...
... higher CD-ROM drive (4x or higher recommended) • 10 MB of available hard-disk space for printer driver installation (Macintosh OS X) • Use a Macintosh series computer equipped with USB interface on which Mac OS 8.6-9.x can operate. • 30MB of available hard-disk space for printer driver installation. • The following functions are not supported: - Photo Optimizer PRO • If you want to use an application, first...


