
Service Manual
Page 5
...resolve problems of the unit. ABOUT THIS MANUAL This manual is divided into five parts containing the information required for servicing the BJC-6500 printer. It includes precautions and details for disassembling and assembling the BJC-6500 printer. Please also refer to use the service... SPECIFICATIONS OPERATION I It is divided into two sections: "Troubleshooting by Errors" and "Troubleshooting by Symptoms." This manual does not contain complete information required for disassembly and assembly, and adjustments required when assembling. Part 2: MAINTENANCE This...
...resolve problems of the unit. ABOUT THIS MANUAL This manual is divided into five parts containing the information required for servicing the BJC-6500 printer. It includes precautions and details for disassembling and assembling the BJC-6500 printer. Please also refer to use the service... SPECIFICATIONS OPERATION I It is divided into two sections: "Troubleshooting by Errors" and "Troubleshooting by Symptoms." This manual does not contain complete information required for disassembly and assembly, and adjustments required when assembling. Part 2: MAINTENANCE This...
Service Manual
Page 17
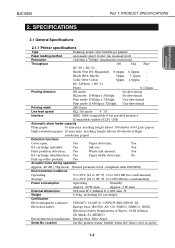
... manual feed) Resolution 1440dpi x 720dpi (maximum resolution) Throughput HS HQ Fine BC-30 + BC-31 Black Text (PC Magazine) 8.0ppm 6.5ppm ... SPECIFICATIONS 2.1 General Specifications 2.1.1 Printer specifications Type Desktop serial color bubble-jet printer Paper feeding method Automatic sheet feeder (no condensation) Power consumption Operating Standby Approx. 30 W max. Black (New Black) 9ppm 7.1ppm ... BJC-6500 Part...
... manual feed) Resolution 1440dpi x 720dpi (maximum resolution) Throughput HS HQ Fine BC-30 + BC-31 Black Text (PC Magazine) 8.0ppm 6.5ppm ... SPECIFICATIONS 2.1 General Specifications 2.1.1 Printer specifications Type Desktop serial color bubble-jet printer Paper feeding method Automatic sheet feeder (no condensation) Power consumption Operating Standby Approx. 30 W max. Black (New Black) 9ppm 7.1ppm ... BJC-6500 Part...
Service Manual
Page 34
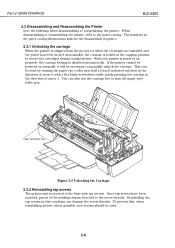
...have been removed, pieces of the molding remain attached to manually unlock the carriage. The numbers in the parts catalog illustrations indicate the disassembly sequence. 2.3.1 Unlocking the carriage When the printer is shipped from the factory (or when the cartridges ...or reassembling the printer, refer to secure the cartridges during transportation. When the printer is powered on normally, it will be necessary to the screw threads. Part 2: MAINTENANCE BJC-6500 2.3 Disassembling and Reassembling the Printer Note the following when disassembling or reassembling the printer. You can...
...have been removed, pieces of the molding remain attached to manually unlock the carriage. The numbers in the parts catalog illustrations indicate the disassembly sequence. 2.3.1 Unlocking the carriage When the printer is shipped from the factory (or when the cartridges ...or reassembling the printer, refer to secure the cartridges during transportation. When the printer is powered on normally, it will be necessary to the screw threads. Part 2: MAINTENANCE BJC-6500 2.3 Disassembling and Reassembling the Printer Note the following when disassembling or reassembling the printer. You can...
Service Manual
Page 47
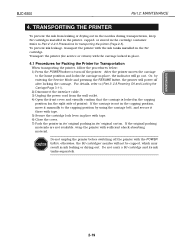
... manually to (Part 3: 2.8 Powering Off and Locking the Carriage Page 3-11). 2) Disconnect the interface cable. 3) Unplug the power cord from leaking or drying out in the nozzles during transportation, keep BJ cartridges installed in the printer,...printer with the carriage locked in the capping position (on the right side of printer). If the carriage is locked in place. 4.1 Procedures for Packing the Printer for Transportation When transporting the printer, follow the procedures below: 1) Press the POWER button to Part 2: 2.2.3 Precautions for transporting the printer (Page 2-5). BJC-6500...
... manually to (Part 3: 2.8 Powering Off and Locking the Carriage Page 3-11). 2) Disconnect the interface cable. 3) Unplug the power cord from leaking or drying out in the nozzles during transportation, keep BJ cartridges installed in the printer,...printer with the carriage locked in the capping position (on the right side of printer). If the carriage is locked in place. 4.1 Procedures for Packing the Printer for Transportation When transporting the printer, follow the procedures below: 1) Press the POWER button to Part 2: 2.2.3 Precautions for transporting the printer (Page 2-5). BJC-6500...
Service Manual
Page 55
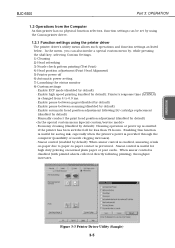
...). · Smear control (enabled by using the Canon printer driver. 1.2.1 Function settings using the printer driver The printer driver's utility menu allows such operations and function settings... collected directly following BJ cartridge replacement (disabled by default) · Manually conduct the print head position adjustment (disabled by default) · Economy ... speed printing (enabled by default): Printer's response time (ACKNLG) is changed from 4 to -paper contact is prevented. OPERATION Figure 3-3 Printer Driver Utility (Sample) 3-5 BJC-6500 Part 3: OPERATION 1.2 Operations from...
...). · Smear control (enabled by using the Canon printer driver. 1.2.1 Function settings using the printer driver The printer driver's utility menu allows such operations and function settings... collected directly following BJ cartridge replacement (disabled by default) · Manually conduct the print head position adjustment (disabled by default) · Economy ... speed printing (enabled by default): Printer's response time (ACKNLG) is changed from 4 to -paper contact is prevented. OPERATION Figure 3-3 Printer Driver Utility (Sample) 3-5 BJC-6500 Part 3: OPERATION 1.2 Operations from...
Service Manual
Page 109
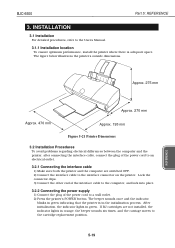
... carriage moves to the User's Manual. 3.1.1 Installation location To ensure optimum performance, install the printer where there is in the initialization process. After initialization, the indicator lights in green indicating that the printer is adequate space. BJC-6500 Part 5: REFERENCE 3. Approx. 275... mm REFERENCE Approx. 270 mm Approx. 470 mm Approx. 195 mm Figure 5-21 Printer Dimensions 3.2 Installation Procedures To avoid problems regarding electrical...
... carriage moves to the User's Manual. 3.1.1 Installation location To ensure optimum performance, install the printer where there is in the initialization process. After initialization, the indicator lights in green indicating that the printer is adequate space. BJC-6500 Part 5: REFERENCE 3. Approx. 275... mm REFERENCE Approx. 270 mm Approx. 470 mm Approx. 195 mm Figure 5-21 Printer Dimensions 3.2 Installation Procedures To avoid problems regarding electrical...


