
ZR Instruction Manual
Page 1
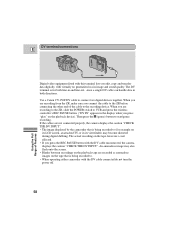
... any interference received, including interference that interference will not occur in a residential installation. One Canon Plaza, Lake Success, NY 11042, U.S.A. Digital Video Camcorder, ZR This device complies with Part 15 of the FCC Rules. REFER SERVICING TO QUALIFIED SERVICE PERSONNEL. The exclamation point, within an equilateral triangle, is connected. • Consult the dealer or an experienced radio/TV technician for class...
... any interference received, including interference that interference will not occur in a residential installation. One Canon Plaza, Lake Success, NY 11042, U.S.A. Digital Video Camcorder, ZR This device complies with Part 15 of the FCC Rules. REFER SERVICING TO QUALIFIED SERVICE PERSONNEL. The exclamation point, within an equilateral triangle, is connected. • Consult the dealer or an experienced radio/TV technician for class...

ZR Instruction Manual
Page 2
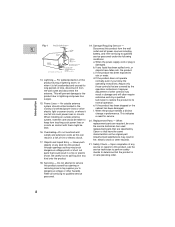
... items placed upon or against voltage surges and built-up static charges. Do not use this manual. The CA-600A "product" refers to grounding electrodes, and requirements for future reference. Read Instructions - Follow Instructions - This is grounded so as they are not sure of the type of antenna discharge unit, connection to the Canon Digital Video Camcorder ZR and all its accessories.
... items placed upon or against voltage surges and built-up static charges. Do not use this manual. The CA-600A "product" refers to grounding electrodes, and requirements for future reference. Read Instructions - Follow Instructions - This is grounded so as they are not sure of the type of antenna discharge unit, connection to the Canon Digital Video Camcorder ZR and all its accessories.
ZR Instruction Manual
Page 3
... Check - Unauthorized substitutions may expose you follow the operating instructions. E Disconnect this product yourself as contact with them might be sure the service technician has used replacement parts that are covered by the operation instructions. PART H) conditions: a. When replacement parts are required, be fatal. 20. Do not attempt to qualified CLAMP service personnel under the following ELECTRIC SERVICE EQUIPMENT NEC - When the power-supply cord or plug...
... Check - Unauthorized substitutions may expose you follow the operating instructions. E Disconnect this product yourself as contact with them might be sure the service technician has used replacement parts that are covered by the operation instructions. PART H) conditions: a. When replacement parts are required, be fatal. 20. Do not attempt to qualified CLAMP service personnel under the following ELECTRIC SERVICE EQUIPMENT NEC - When the power-supply cord or plug...

ZR Instruction Manual
Page 4
...2 Using the Digital Effects 40 Important Safety Instructions 3 Audio Recording 44 Thank you for Choosing a Canon ......... 6 Setting the Self-Timer 46 Introducing the ZR 7 Mastering the Basics ~ When Making Manual Adjustments ...~ Adjusting Exposure Manually 47 Adjusting Focus Manually 49 Powering Your Camcorder 8 Setting the White Balance 50 Loading a Cassette 11 Basic Recording 13 Zooming 16 Using the LCD Screen 17 Playing back a Cassette 19 Connections for Playback on a TV Screen 22 Tips for Making Better Videos 26 ~ For Playback ...~ Displaying Data Code 52 Setting...
...2 Using the Digital Effects 40 Important Safety Instructions 3 Audio Recording 44 Thank you for Choosing a Canon ......... 6 Setting the Self-Timer 46 Introducing the ZR 7 Mastering the Basics ~ When Making Manual Adjustments ...~ Adjusting Exposure Manually 47 Adjusting Focus Manually 49 Powering Your Camcorder 8 Setting the White Balance 50 Loading a Cassette 11 Basic Recording 13 Zooming 16 Using the LCD Screen 17 Playing back a Cassette 19 Connections for Playback on a TV Screen 22 Tips for Making Better Videos 26 ~ For Playback ...~ Displaying Data Code 52 Setting...
ZR Instruction Manual
Page 5
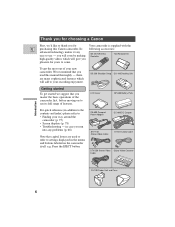
... the EJECT button. CA-600 Compact Power Adapter DC-600 DC Coupler STV-150 Stereo Video Cable S-150 S-video Cable STV-250 Stereo Video Digital Video Cassette Cable FU-100 Finder Unit and Case 6 SS-200 Shoulder Strap DU-100 Docking Unit Getting started we 'd like to come. in the menus and buttons labeled on to your way around the camcorder (p. 75) • Screen displays (p. 78) • Troubleshooting...
... the EJECT button. CA-600 Compact Power Adapter DC-600 DC Coupler STV-150 Stereo Video Cable S-150 S-video Cable STV-250 Stereo Video Digital Video Cassette Cable FU-100 Finder Unit and Case 6 SS-200 Shoulder Strap DU-100 Docking Unit Getting started we 'd like to come. in the menus and buttons labeled on to your way around the camcorder (p. 75) • Screen displays (p. 78) • Troubleshooting...
ZR Instruction Manual
Page 7
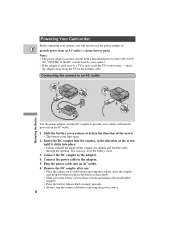
... AC outlet. 1. You can now close the battery cover. 3. Connect the power cable to the adapter. 4. B A Powering Your Camcorder Before operating your camera, you press the battery release knob. • Slide across the battery cover release switch (and replace the small rubber stopper). • Press the battery release knob (orange) upwards. • Always turn the camera off before removing the coupler, since the coupler may cause the...
... AC outlet. 1. You can now close the battery cover. 3. Connect the power cable to the adapter. 4. B A Powering Your Camcorder Before operating your camera, you press the battery release knob. • Slide across the battery cover release switch (and replace the small rubber stopper). • Press the battery release knob (orange) upwards. • Always turn the camera off before removing the coupler, since the coupler may cause the...
ZR Instruction Manual
Page 8
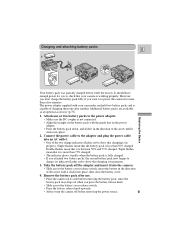
... in progress. Connect the power cable to check that charging is in progress. 3. Double flashes mean that the battery pack is capable of charging them one or two battery packs to show that your camcorder can hold two battery packs and is less than 50% charged. Attach one after use. • Place the camera on its side before removing the battery pack, since the battery pack may...
... in progress. Connect the power cable to check that charging is in progress. 3. Double flashes mean that the battery pack is capable of charging them one or two battery packs to show that your camcorder can hold two battery packs and is less than 50% charged. Attach one after use. • Place the camera on its side before removing the battery pack, since the battery pack may...
ZR Instruction Manual
Page 13
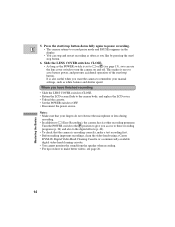
... long as the POWER switch is recording correctly, make a test recording first. • Before making important recordings, clean the video heads using a Canon DVM-CL Digital Video Head Cleaning Cassette or a commercially available digital video head cleaning cassette. • You cannot monitor the sound from the speaker when recording. • For tips on and off. E • The camera returns to record pause mode and PAUSE reappears in the display. • You can use the lens cover switch to turn the camera on how to...
... long as the POWER switch is recording correctly, make a test recording first. • Before making important recordings, clean the video heads using a Canon DVM-CL Digital Video Head Cleaning Cassette or a commercially available digital video head cleaning cassette. • You cannot monitor the sound from the speaker when recording. • For tips on and off. E • The camera returns to record pause mode and PAUSE reappears in the display. • You can use the lens cover switch to turn the camera on how to...
ZR Instruction Manual
Page 15
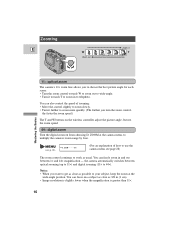
... explanation of how to use the camera menu see page 28) The zoom control continues to work as usual. You can focus on from choosing D. Notes: • When you turn the zoom control, the faster the zoom speed.) The T and W buttons on the wireless controller adjust the picture angle, but not the zoom speed. 44× digital zoom Turn the digital zoom on a subject as close as 3/8 in (1 cm). • Image resolution is slightly...
... explanation of how to use the camera menu see page 28) The zoom control continues to work as usual. You can focus on from choosing D. Notes: • When you turn the zoom control, the faster the zoom speed.) The T and W buttons on the wireless controller adjust the picture angle, but not the zoom speed. 44× digital zoom Turn the digital zoom on a subject as close as 3/8 in (1 cm). • Image resolution is slightly...
ZR Instruction Manual
Page 17
... use the wireless controller. No Cassette is loaded Exposure Adjustment Manual focus AF OFF 18 REC REC PAUSE EJECT STOP The tape has reached the end Condensation warning The battery pack is unaffected. Notes: • While recording in mirror mode you cannot operate the menu. • You can start/stop the self-timer during recording or let your subject monitor recording. Only certain displays are reversed (mirror mode) and the time code and remaining tape...
... use the wireless controller. No Cassette is loaded Exposure Adjustment Manual focus AF OFF 18 REC REC PAUSE EJECT STOP The tape has reached the end Condensation warning The battery pack is unaffected. Notes: • While recording in mirror mode you cannot operate the menu. • You can start/stop the self-timer during recording or let your subject monitor recording. Only certain displays are reversed (mirror mode) and the time code and remaining tape...
ZR Instruction Manual
Page 32
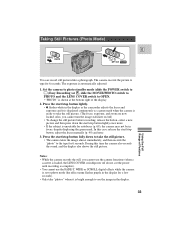
... start/stop button lightly. • flashes white in the display. 33 Set the camera to photo standby mode (slide the POWER switch to [ (Easy Recording) or P , slide the MOVIE/PHOTO switch to PHOTO and the LENS COVER switch to OPEN. • "PHOTO" is unsuitable for 6 seconds. Notes: • While the camera records the still, you cannot turn the image stabilizer on /off do not cut the power until recording is complete). • You cannot use the camera functions (when a cassette is...
... start/stop button lightly. • flashes white in the display. 33 Set the camera to photo standby mode (slide the POWER switch to [ (Easy Recording) or P , slide the MOVIE/PHOTO switch to PHOTO and the LENS COVER switch to OPEN. • "PHOTO" is unsuitable for 6 seconds. Notes: • While the camera records the still, you cannot turn the image stabilizer on /off do not cut the power until recording is complete). • You cannot use the camera functions (when a cassette is...
ZR Instruction Manual
Page 50
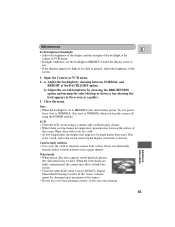
...; Turn the digital zoom off (if neccessary) to set a more accurate white balance. • If the lighting conditions change, reset the white balance by certain types of Features 51 Close-ups In rapidly changing lighting conditions In places lit by first returning to the AUTO setting, and then reselecting SET. • Try to record with studio/video lighting, use the (indoor) mode. • During normal outdoor shooting, setting to AUTO will probably work better than auto white balance when shooting...
...; Turn the digital zoom off (if neccessary) to set a more accurate white balance. • If the lighting conditions change, reset the white balance by certain types of Features 51 Close-ups In rapidly changing lighting conditions In places lit by first returning to the AUTO setting, and then reselecting SET. • Try to record with studio/video lighting, use the (indoor) mode. • During normal outdoor shooting, setting to AUTO will probably work better than auto white balance when shooting...
ZR Instruction Manual
Page 54
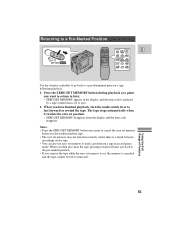
... record pause mode. Returning to a Pre-Marked Position OFF VCR POWER W T 2 WIRELESS CONTROLLER WL-D67 MENU ZERO SET MEMORY TV SCREEN DATA CODE SEARCH SELECT PAUSEa REW PLAYe FF STOP3 E Use the wireless controller to go back to zero. 2. Notes: • Press the ZERO SET MEMORY button once more to cancel the zero set , the memory is set position. • ZERO SET MEMORY disappears from the display and the time code reappears. Press the ZERO SET MEMORY button during playback...
... record pause mode. Returning to a Pre-Marked Position OFF VCR POWER W T 2 WIRELESS CONTROLLER WL-D67 MENU ZERO SET MEMORY TV SCREEN DATA CODE SEARCH SELECT PAUSEa REW PLAYe FF STOP3 E Use the wireless controller to go back to zero. 2. Notes: • Press the ZERO SET MEMORY button once more to cancel the zero set , the memory is set position. • ZERO SET MEMORY disappears from the display and the time code reappears. Press the ZERO SET MEMORY button during playback...
ZR Instruction Manual
Page 55
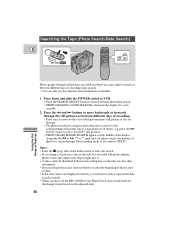
... only use this function from the Remote Controller. 1. Press the and buttons to move backwards or forwards through the still pictures or between different days of recording. • Press once to a maximum of 10 times), e.g. The recording mode is shown in the middle of the display alongside the or /" or ^ mark and, for a few seconds. 2. Searching the Tape (Photo Search/Date Search) E OFF VCR POWER W T 2 WIRELESS CONTROLLER...
... only use this function from the Remote Controller. 1. Press the and buttons to move backwards or forwards through the still pictures or between different days of recording. • Press once to a maximum of 10 times), e.g. The recording mode is shown in the middle of the display alongside the or /" or ^ mark and, for a few seconds. 2. Searching the Tape (Photo Search/Date Search) E OFF VCR POWER W T 2 WIRELESS CONTROLLER...

ZR Instruction Manual
Page 56
... remove unwanted scenes - Editing to a VCR Playback the tape on the VCR. Slide the camera's POWER switch to VCR, and load your edited recording is complete. Repeat steps 1 to copy, then stop playback on p. 22. 2. S-150 S-video Cable STV-150 Stereo Video Cable V L R S INPUT S-VIDEO E VIDEO AUDIO L R Record the scenes you want to 4 until your recorded cassette. Start to play it to the video channel, or set the TV/VIDEO selector to LINE. Prepare the TV and VCR. • Turn...
... remove unwanted scenes - Editing to a VCR Playback the tape on the VCR. Slide the camera's POWER switch to VCR, and load your edited recording is complete. Repeat steps 1 to copy, then stop playback on p. 22. 2. S-150 S-video Cable STV-150 Stereo Video Cable V L R S INPUT S-VIDEO E VIDEO AUDIO L R Record the scenes you want to 4 until your recorded cassette. Start to play it to the video channel, or set the TV/VIDEO selector to LINE. Prepare the TV and VCR. • Turn...
ZR Instruction Manual
Page 57
... flash onto the screen. • Blanks between recordings on the playback tape are not connected properly, the camera displays the caution "CHECK THE DV INPUT". • The image displayed by the camcorder that is for example on the tape, however, is being recorded to. • When operating either camcorder with the DV cable connected do not turn the power off. 58 Using the Full Range of the cable to VCR and press the wireless controller's REC PAUSE button...
... flash onto the screen. • Blanks between recordings on the playback tape are not connected properly, the camera displays the caution "CHECK THE DV INPUT". • The image displayed by the camcorder that is for example on the tape, however, is being recorded to. • When operating either camcorder with the DV cable connected do not turn the power off. 58 Using the Full Range of the cable to VCR and press the wireless controller's REC PAUSE button...
ZR Instruction Manual
Page 64
... the menu. Open the Camera or VCR menu. 2. b) Adjust the overall brightness by choosing between NORMAL and BRIGHT at the camera or VCR menu. • In bright conditions, set the backlight to BRIGHT to make the display easier to be dirty. To save power, leave it uses more battery power. Video heads • When mosaic-like noise appears on the playback picture, the video heads may form on the surface of the screen. Camera...
... the menu. Open the Camera or VCR menu. 2. b) Adjust the overall brightness by choosing between NORMAL and BRIGHT at the camera or VCR menu. • In bright conditions, set the backlight to BRIGHT to make the display easier to be dirty. To save power, leave it uses more battery power. Video heads • When mosaic-like noise appears on the playback picture, the video heads may form on the surface of the screen. Camera...
ZR Instruction Manual
Page 70
... replace the power source. • If the camera still does not operate properly, press the RESET button (on the camera body behind the LCD panel) using the tip of a ball point pen (or similar): camera functions return to their default setting. • Remove the cable and then reconnect it • The remote sensor is not a malfunction. • The back-up battery needs recharging (p. 62). • During playback, the recording...
... replace the power source. • If the camera still does not operate properly, press the RESET button (on the camera body behind the LCD panel) using the tip of a ball point pen (or similar): camera functions return to their default setting. • Remove the cable and then reconnect it • The remote sensor is not a malfunction. • The back-up battery needs recharging (p. 62). • During playback, the recording...
ZR Instruction Manual
Page 81
Additional Information 82 Specifications ZR E Power Supply (rated): 7.2 V DC Recommended illumination: Power Consumption (while recording More than 3 coupled device) 470,000 pixels kohms, unbalanced (304,000 effective pixels) Operating temperature range: Tape format: Videocassettes bearing 32-104 °F (0-40 °C) the Mini mark. Minimum illumination: 4.0 lx (using the Low Light program) Canon is a trademark of Canon Inc. * Using the DU-100 Docking Unit (supplied). cassette) Battery capacity: 750...
Additional Information 82 Specifications ZR E Power Supply (rated): 7.2 V DC Recommended illumination: Power Consumption (while recording More than 3 coupled device) 470,000 pixels kohms, unbalanced (304,000 effective pixels) Operating temperature range: Tape format: Videocassettes bearing 32-104 °F (0-40 °C) the Mini mark. Minimum illumination: 4.0 lx (using the Low Light program) Canon is a trademark of Canon Inc. * Using the DU-100 Docking Unit (supplied). cassette) Battery capacity: 750...
ZR Instruction Manual
Page 83
P E Pause, Record, 13 Photo Mode, 33 Photo Search, 56 Playback, 19 Playback Connection, 22 Playback pause, 20 Portrait, 38 Power Adapter, 8 Powering your camcoder, 8 Pre-Marked Position, 55 Preparing the Camera, 60 Problems, 68 R Recharging the Battery Pack, 61 Recording, 13 Recording Programs, 36 Record Pause Mode, 13 Record Review, 34 Record Search, 34 Remote Control, 31 Remote Sensor, 31 Rewind, 20 S Sand & Snow, 39 Screen Displays, 78 Scroll, 40 Self-Timer, 46 Sepia, 41 Shoulder Strap, 60 16:9, 43...
P E Pause, Record, 13 Photo Mode, 33 Photo Search, 56 Playback, 19 Playback Connection, 22 Playback pause, 20 Portrait, 38 Power Adapter, 8 Powering your camcoder, 8 Pre-Marked Position, 55 Preparing the Camera, 60 Problems, 68 R Recharging the Battery Pack, 61 Recording, 13 Recording Programs, 36 Record Pause Mode, 13 Record Review, 34 Record Search, 34 Remote Control, 31 Remote Sensor, 31 Rewind, 20 S Sand & Snow, 39 Screen Displays, 78 Scroll, 40 Self-Timer, 46 Sepia, 41 Shoulder Strap, 60 16:9, 43...


