
Quick Setup Guide - English and Spanish
Page 3
... the applicable warranty period. and, (5) Problems arising from other than defects in materials or workmanship. What to do : After contacting Brother or a Brother Authorized Service Center, you may be free from defects in materials and workmanship, when used under normal conditions. • This warranty ...prior to your purchase you are not limited to label and tape rolls and print servers. • Except as "this Product"). • If you purchased a product from someone other than an authorized Brother reseller in the United States or if the product was purchased within the ...
... the applicable warranty period. and, (5) Problems arising from other than defects in materials or workmanship. What to do : After contacting Brother or a Brother Authorized Service Center, you may be free from defects in materials and workmanship, when used under normal conditions. • This warranty ...prior to your purchase you are not limited to label and tape rolls and print servers. • Except as "this Product"). • If you purchased a product from someone other than an authorized Brother reseller in the United States or if the product was purchased within the ...

Quick Setup Guide - English and Spanish
Page 7
... Software For Macintosh® For Windows® Introduction 1 Contents 1 STEP General Information 2 1 Safety Precautions 3 General Precautions 5 Getting started 1 STEP Getting started 7 1 Unpacking the QL-1060N 7 2 Parts Description 8 Main Printing Unit 8 3 Setting the DK Roll 8 STEP 4 Connecting the Power Supply 9 2 5 Installing the Label Tray 10 6 Using Interface Cable 10 2 STEP Installing the Software 11...
... Software For Macintosh® For Windows® Introduction 1 Contents 1 STEP General Information 2 1 Safety Precautions 3 General Precautions 5 Getting started 1 STEP Getting started 7 1 Unpacking the QL-1060N 7 2 Parts Description 8 Main Printing Unit 8 3 Setting the DK Roll 8 STEP 4 Connecting the Power Supply 9 2 5 Installing the Label Tray 10 6 Using Interface Cable 10 2 STEP Installing the Software 11...

Quick Setup Guide - English and Spanish
Page 9
... outlet and remove the foreign object. Do not hold the machine with only one hand. If water or any metal parts near the print head. The machine may be a remote risk of the machine contact the retail outlet where the machine was purchased or your hands. ... STEP 4 Reference STEP 1 The symbols used in any abnormal odor, heat, discoloration, deformation or anything unusual whilst the machine is in it directly with foreign objects in use the machine safely Getting started STEP 2 Warning Follow these guidelines to do to the possibility of these instructions and save...
... outlet and remove the foreign object. Do not hold the machine with only one hand. If water or any metal parts near the print head. The machine may be a remote risk of the machine contact the retail outlet where the machine was purchased or your hands. ... STEP 4 Reference STEP 1 The symbols used in any abnormal odor, heat, discoloration, deformation or anything unusual whilst the machine is in it directly with foreign objects in use the machine safely Getting started STEP 2 Warning Follow these guidelines to do to the possibility of these instructions and save...

Quick Setup Guide - English and Spanish
Page 10
... applying the label, check the environmental condition and the material. Use only the power cord included with sunlight and heat. Both the label and print will not be used for an extended period, remove the power cord from or plugging it into the electrical outlet. Do not use the power... to avoid fire, electric shock, or other damage. „Power Cord Use only the authorized power source (120V AC) for outdoor use thermal paper and thermal film. Pulling on the power cord. Do not overload the electrical outlet sockets with too many appliances or plug the power cord into the...
... applying the label, check the environmental condition and the material. Use only the power cord included with sunlight and heat. Both the label and print will not be used for an extended period, remove the power cord from or plugging it into the electrical outlet. Do not use the power... to avoid fire, electric shock, or other damage. „Power Cord Use only the authorized power source (120V AC) for outdoor use thermal paper and thermal film. Pulling on the power cord. Do not overload the electrical outlet sockets with too many appliances or plug the power cord into the...

Quick Setup Guide - English and Spanish
Page 11
...area exposed to direct sunlight or near an easily accessible, standard electrical socket. „DK Roll (DK Label and DK Tape) • Use only genuine Brother accessories and supplies (with water or a foreign object in any heavy objects or objects containing water on the power cord. The print head becomes very... Cord • Use only the power cord included with the machine. • If the machine will be applied. • DK Roll uses thermal paper and thermal film so that can cause the color to change or fade. • Do not apply labels to the surface finish. The wire in use...
...area exposed to direct sunlight or near an easily accessible, standard electrical socket. „DK Roll (DK Label and DK Tape) • Use only genuine Brother accessories and supplies (with water or a foreign object in any heavy objects or objects containing water on the power cord. The print head becomes very... Cord • Use only the power cord included with the machine. • If the machine will be applied. • DK Roll uses thermal paper and thermal film so that can cause the color to change or fade. • Do not apply labels to the surface finish. The wire in use...

Quick Setup Guide - English and Spanish
Page 14
8 STEP1 Getting started 2 Parts Description Main Printing Unit „Front DK Roll compartment cover LED lamp „Rear ON/OFF button CUT button FEED button USB port Serial port LAN port Power cord 3 Setting the DK Roll 1 Press and hold the ON/OFF button to turn the QL-1060N off. Pull up the left... in the spool guides on the left and right. • Insert the spool with the DK Roll located on the right hand side of the QL-1060N.
8 STEP1 Getting started 2 Parts Description Main Printing Unit „Front DK Roll compartment cover LED lamp „Rear ON/OFF button CUT button FEED button USB port Serial port LAN port Power cord 3 Setting the DK Roll 1 Press and hold the ON/OFF button to turn the QL-1060N off. Pull up the left... in the spool guides on the left and right. • Insert the spool with the DK Roll located on the right hand side of the QL-1060N.

Quick Setup Guide - English and Spanish
Page 16
... is longer than 10 labels continuously using the auto cut function, remove the paper guide to the front face of the machine. • When printing more than 6 feet (2.0 meters). As shown right, install the label tray to prevent a paper jam. 6 Using Interface Cable RS-232C cable... and Network cable are not standard accessories. Changes or modifications not expressly approved by Brother Industries, Ltd. 10 STEP1 Getting started 5 Installing the Label Tray The machine contains a label tray which can hold up to ensure compliance ...
... is longer than 10 labels continuously using the auto cut function, remove the paper guide to the front face of the machine. • When printing more than 6 feet (2.0 meters). As shown right, install the label tray to prevent a paper jam. 6 Using Interface Cable RS-232C cable... and Network cable are not standard accessories. Changes or modifications not expressly approved by Brother Industries, Ltd. 10 STEP1 Getting started 5 Installing the Label Tray The machine contains a label tray which can hold up to ensure compliance ...

Quick Setup Guide - English and Spanish
Page 19
... then click [Next]. Check that LAN cable and the machine are connected. Or enter your printer's IP address and the node name by printing out the Printer Settings STEP 2 Page, please refer to the NETWORK USER'S GUIDE for devices and choose from a list of discovered devices (Recommended).... Click [Next]. 13 „For Network interface cable users 7-1 Choose Brother Peer-to step 8 on page 14....
... then click [Next]. Check that LAN cable and the machine are connected. Or enter your printer's IP address and the node name by printing out the Printer Settings STEP 2 Page, please refer to the NETWORK USER'S GUIDE for devices and choose from a list of discovered devices (Recommended).... Click [Next]. 13 „For Network interface cable users 7-1 Choose Brother Peer-to step 8 on page 14....

Quick Setup Guide - English and Spanish
Page 21
... available as IP address. In that is set. It can also search for Brother products on BRAdmin Light, visit us at http://solutions.brother.com. • If you require more advanced printer management, use the latest Brother BRAdmin Professional utility version that case, disable your network, you wish to add...® Label Overview „Setting your network, view the status and configure basic network settings, such as a download from http://solutions.brother.com. • If you insert the CD-ROM. Because the print server will search for initial setup of exceptions?"
... available as IP address. In that is set. It can also search for Brother products on BRAdmin Light, visit us at http://solutions.brother.com. • If you require more advanced printer management, use the latest Brother BRAdmin Professional utility version that case, disable your network, you wish to add...® Label Overview „Setting your network, view the status and configure basic network settings, such as a download from http://solutions.brother.com. • If you insert the CD-ROM. Because the print server will search for initial setup of exceptions?"

Quick Setup Guide - English and Spanish
Page 24
...) 9-1 Click Add. Choose QL-1060N from the list and click Add again to add the printer to the USB port of Macintosh®. 8 Double click the drive where Mac OS® X is put on the power. At that time, connect the machine directly to the Printer Setup Utility. For Mac OS...® X 10.3.9). For Mac OS® X 10.4.x, click Add and add the printer with the BRPTUSB connection. (If you do so, an error dialog appears when an printing error occurs.) Set the appropriate printer name. 18 STEP2 Installing the Software 6 After restarting the computer, connect the USB/LAN cable...
...) 9-1 Click Add. Choose QL-1060N from the list and click Add again to add the printer to the USB port of Macintosh®. 8 Double click the drive where Mac OS® X is put on the power. At that time, connect the machine directly to the Printer Setup Utility. For Mac OS...® X 10.3.9). For Mac OS® X 10.4.x, click Add and add the printer with the BRPTUSB connection. (If you do so, an error dialog appears when an printing error occurs.) Set the appropriate printer name. 18 STEP2 Installing the Software 6 After restarting the computer, connect the USB/LAN cable...

Quick Setup Guide - English and Spanish
Page 25
... (Manual Network Configuration) 9 (Mac OS® X 10.3.9) Click Add and choose IP Printing at the top of the screen. Choose QL-1060N from the list and click Add again to add the printer to the Printer List screen, check that "QL- 1060N" is added, and close the Printer List screen. When specifying the Queue Name, use the machine.
... (Manual Network Configuration) 9 (Mac OS® X 10.3.9) Click Add and choose IP Printing at the top of the screen. Choose QL-1060N from the list and click Add again to add the printer to the Printer List screen, check that "QL- 1060N" is added, and close the Printer List screen. When specifying the Queue Name, use the machine.
Quick Setup Guide - English and Spanish
Page 26
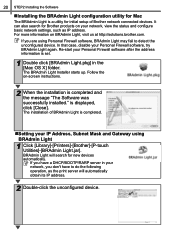
... the BRAdmin Light configuration utility for Mac The BRAdmin Light is a utility for Brother products on your network, view the status and configure basic network settings, such as the print server will search for new devices automatically. Follow the on BRAdmin Light, visit us...BRAdmin Light will automatically obtain its IP address. 2 Double-click the unconfigured device. If you are using BRAdmin Light 1 Click [Library]-[Printers]-[Brother]-[P-touch Utilities]-[BRAdmin Light.jar]. The BRAdmin Light Installer starts up. In that case, disable your IP Address, Subnet Mask and Gateway ...
... the BRAdmin Light configuration utility for Mac The BRAdmin Light is a utility for Brother products on your network, view the status and configure basic network settings, such as the print server will search for new devices automatically. Follow the on BRAdmin Light, visit us...BRAdmin Light will automatically obtain its IP address. 2 Double-click the unconfigured device. If you are using BRAdmin Light 1 Click [Library]-[Printers]-[Brother]-[P-touch Utilities]-[BRAdmin Light.jar]. The BRAdmin Light Installer starts up. In that case, disable your IP Address, Subnet Mask and Gateway ...

Quick Setup Guide - English and Spanish
Page 30
Enter text directly using P-touch Editor, or copy text from the Brother QL-1060N. It prevents the paper jam. Print the label from a Microsoft Office application. 24 STEP3 Label Overview 2 General Procedures This section describes the general procedure for Windows) For details on how to ... when the labels are piled up. For details on how to create the labels, see the Help. Use P-touch Editor's variety of editing functions to print the labels, see the Help. 2 Print the label. Remove the labels from Microsoft Office. (for creating labels. 1 Create the label data.
Enter text directly using P-touch Editor, or copy text from the Brother QL-1060N. It prevents the paper jam. Print the label from a Microsoft Office application. 24 STEP3 Label Overview 2 General Procedures This section describes the general procedure for Windows) For details on how to ... when the labels are piled up. For details on how to create the labels, see the Help. Use P-touch Editor's variety of editing functions to print the labels, see the Help. 2 Print the label. Remove the labels from Microsoft Office. (for creating labels. 1 Create the label data.

Quick Setup Guide - English and Spanish
Page 33
... (98.6 mm) Min. printing length 1 inch (25.4 mm) Cutter Durable automatic cutter Button ON/OFF button ( ), FEED button, CUT button Interface USB, Serial (RS-232C), 10/100BASE...Specifications Introduction Installing the Software For Macintosh® For Windows® „Product specifications Items Specifications Display LED lamp (green, red, orange) Printing method Direct thermal printing via thermal head Speed of the options. *3 The RS-232C interface is required when printing with ESC/P commands. Reference Label Overview Getting started STEP 1 STEP 2 STEP 3 STEP 4
... (98.6 mm) Min. printing length 1 inch (25.4 mm) Cutter Durable automatic cutter Button ON/OFF button ( ), FEED button, CUT button Interface USB, Serial (RS-232C), 10/100BASE...Specifications Introduction Installing the Software For Macintosh® For Windows® „Product specifications Items Specifications Display LED lamp (green, red, orange) Printing method Direct thermal printing via thermal head Speed of the options. *3 The RS-232C interface is required when printing with ESC/P commands. Reference Label Overview Getting started STEP 1 STEP 2 STEP 3 STEP 4

Quick Setup Guide - English and Spanish
Page 34
White 2-3/7" (62mm), 100ft (30.48M) DK-4605* Removable Wide Paper Tape - Removing other products may effect the print quality or may damage label and/or surface. Price $27.49 $17.99 $30.99 $61.99 $94.99 $13.99 $48.99 $94....cleanly removed from Brother should your retailer not stock them. „DK Rolls DK Die-cut Label Stock No. 28 STEP4 Reference Accessories (For USA Only) Brother recommends the use of genuine Brother accessories with the Brother QL-1060N. The following supplies and accessories are available for the Brother QL-1060N and can be ordered directly from several flat...
White 2-3/7" (62mm), 100ft (30.48M) DK-4605* Removable Wide Paper Tape - Removing other products may effect the print quality or may damage label and/or surface. Price $27.49 $17.99 $30.99 $61.99 $94.99 $13.99 $48.99 $94....cleanly removed from Brother should your retailer not stock them. „DK Rolls DK Die-cut Label Stock No. 28 STEP4 Reference Accessories (For USA Only) Brother recommends the use of genuine Brother accessories with the Brother QL-1060N. The following supplies and accessories are available for the Brother QL-1060N and can be ordered directly from several flat...

Quick Setup Guide - English and Spanish
Page 69
Printed in China LB7465001
Printed in China LB7465001
Users Manual - English
Page 2
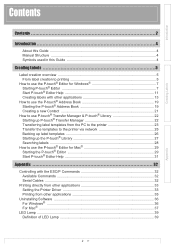
...Introduction 4 About this Guide ...4 Manual Structure ...4 Symbols used in this Guide 4 Creating Labels 5 Label creation overview ...5 From label creation to printing 5 How to use the P-touch® Editor for Windows 7 Starting P-touch® Editor 7 Start P-touch® Editor Help 11 Creating...Editor Help 31 Appendix 32 Controlling with the ESC/P Commands 32 Available Commands 32 Serial Cables ...32 Printing directly from other applications 33 Setting the Printer Driver 33 Printing from other applications 35 Uninstalling Software ...36 For Windows® ...36 For Mac® ...37 ...
...Introduction 4 About this Guide ...4 Manual Structure ...4 Symbols used in this Guide 4 Creating Labels 5 Label creation overview ...5 From label creation to printing 5 How to use the P-touch® Editor for Windows 7 Starting P-touch® Editor 7 Start P-touch® Editor Help 11 Creating...Editor Help 31 Appendix 32 Controlling with the ESC/P Commands 32 Available Commands 32 Serial Cables ...32 Printing directly from other applications 33 Setting the Printer Driver 33 Printing from other applications 35 Uninstalling Software ...36 For Windows® ...36 For Mac® ...37 ...

Users Manual - English
Page 3
Introduction Creating Labels Maintenance ...40 Print head maintenance 40 Roller maintenance ...40 Label outlet maintenance 40 Troubleshooting ...41 Potential types of problems 41 3 Appendix
Introduction Creating Labels Maintenance ...40 Print head maintenance 40 Roller maintenance ...40 Label outlet maintenance 40 Troubleshooting ...41 Potential types of problems 41 3 Appendix

Users Manual - English
Page 4
... this Guide The symbols used throughout this guide on the CD-ROM. Introduction Introduction Creating Labels The Brother QL-1060N label printer (hereafter referred to as follows: This symbol shows information or directions that should read and understand them may result in injury, damage, or failed operations. After installing ...] folder on the computer, you can also view it from the Start menu. • If you can help you to quickly and easily print custom labels created with the label software, P-touch Editor. Make sure to the machine. • If you use a Mac®, see ...
... this Guide The symbols used throughout this guide on the CD-ROM. Introduction Introduction Creating Labels The Brother QL-1060N label printer (hereafter referred to as follows: This symbol shows information or directions that should read and understand them may result in injury, damage, or failed operations. After installing ...] folder on the computer, you can also view it from the Start menu. • If you can help you to quickly and easily print custom labels created with the label software, P-touch Editor. Make sure to the machine. • If you use a Mac®, see ...

Users Manual - English
Page 5
... the label you want to create. For details on step-by-step instructions, see Help files. The machine is a variety to printing 1 Choose the type of label you want to printing From label creation to choose from. There is supplied with one or more sample rolls. (Other rolls can be purchased separately...
... the label you want to create. For details on step-by-step instructions, see Help files. The machine is a variety to printing 1 Choose the type of label you want to printing From label creation to choose from. There is supplied with one or more sample rolls. (Other rolls can be purchased separately...


