
Quick Setup Guide - English and Spanish
Page 1
We recommend that you keep this guide before using the machine. Le recomendamos conservar este manual a mano para poder consultarlo como referencia en el futuro. Asegúrese de leer este manual antes de usar la impresora. Introduction STEP 1 Getting started Installing the Software For Macintosh® For Windows® STEP Setup & Operation Guide 2 Guía de configuración y uso STEP 3 Label Overview Reference STEP 4 Be sure to read and understand this guide nearby for future reference.
We recommend that you keep this guide before using the machine. Le recomendamos conservar este manual a mano para poder consultarlo como referencia en el futuro. Asegúrese de leer este manual antes de usar la impresora. Introduction STEP 1 Getting started Installing the Software For Macintosh® For Windows® STEP Setup & Operation Guide 2 Guía de configuración y uso STEP 3 Label Overview Reference STEP 4 Be sure to read and understand this guide nearby for future reference.

Quick Setup Guide - English and Spanish
Page 2
...USA Only) Responsible Party: Brother International Corporation 100 Somerset Corporate Boulevard Bridgewater, NJ 08807-0911 USA TEL: (908) 704-1700 declares that may cause undesired operation. We look forward to start using the Brother QL-1060N, and then keep it ...received, including interference that the product Product Name: Label Printer QL-1060N Model Number: QL-1060 This device complies with the limits for purchasing the Brother QL-1060N. Thank you read this guide carefully before using the Brother QL-1060N. We provide service & support for details. These...
...USA Only) Responsible Party: Brother International Corporation 100 Somerset Corporate Boulevard Bridgewater, NJ 08807-0911 USA TEL: (908) 704-1700 declares that may cause undesired operation. We look forward to start using the Brother QL-1060N, and then keep it ...received, including interference that the product Product Name: Label Printer QL-1060N Model Number: QL-1060 This device complies with the limits for purchasing the Brother QL-1060N. Thank you read this guide carefully before using the Brother QL-1060N. We provide service & support for details. These...

Quick Setup Guide - English and Spanish
Page 3
... and Accessory Items: 90 days from other than defects in , but are not limited to label and tape rolls and print servers. • Except as otherwise provided herein, Brother warrants that the Machine and the accompanying Consumable and Accessory Items will ask you to do if...to the Authorized Service Center together with a photocopy of your issue to our P-touch Customer Service Hotline at 1-877-BROTHER (1-877276-8437) or to a Brother Authorized Service Center within the applicable warranty period. For products purchased in materials or workmanship. This limited warranty is VOID ...
... and Accessory Items: 90 days from other than defects in , but are not limited to label and tape rolls and print servers. • Except as otherwise provided herein, Brother warrants that the Machine and the accompanying Consumable and Accessory Items will ask you to do if...to the Authorized Service Center together with a photocopy of your issue to our P-touch Customer Service Hotline at 1-877-BROTHER (1-877276-8437) or to a Brother Authorized Service Center within the applicable warranty period. For products purchased in materials or workmanship. This limited warranty is VOID ...

Quick Setup Guide - English and Spanish
Page 7
... Precautions 3 General Precautions 5 Getting started 1 STEP Getting started 7 1 Unpacking the QL-1060N 7 2 Parts Description 8 Main Printing Unit 8 3 Setting the DK Roll 8 STEP 4 Connecting the Power Supply 9 2 5 Installing the Label Tray 10 6 Using Interface Cable 10 2 STEP Installing the Software 11 Installing the ... 11 1. When using Mac OS 17 3 STEP Label Overview 23 1 Variety of the Labels 23 2 General Procedures 24 3 Start P-touch Editor Help 25 For Windows 25 For Mac 26 STEP 3 Label Overview 4 STEP Reference 27 Main Specifications 27 Accessories ...
... Precautions 3 General Precautions 5 Getting started 1 STEP Getting started 7 1 Unpacking the QL-1060N 7 2 Parts Description 8 Main Printing Unit 8 3 Setting the DK Roll 8 STEP 4 Connecting the Power Supply 9 2 5 Installing the Label Tray 10 6 Using Interface Cable 10 2 STEP Installing the Software 11 Installing the ... 11 1. When using Mac OS 17 3 STEP Label Overview 23 1 Variety of the Labels 23 2 General Procedures 24 3 Start P-touch Editor Help 25 For Windows 25 For Mac 26 STEP 3 Label Overview 4 STEP Reference 27 Main Specifications 27 Accessories ...

Quick Setup Guide - English and Spanish
Page 9
.... Unplug the power cord immediately and stop using the machine if you what to do DO NOT splash the product with foreign objects in it directly with your local authorized service center. 3 Installing the Software For Macintosh® For Windows® Introduction Safety Precautions Read and understand all warnings and instructions... of these guidelines to do to the possibility of your local authorized service center. Warning Tells you notice any metal parts near the print head. Label Overview STEP 3 STEP 4 Reference
.... Unplug the power cord immediately and stop using the machine if you what to do DO NOT splash the product with foreign objects in it directly with your local authorized service center. 3 Installing the Software For Macintosh® For Windows® Introduction Safety Precautions Read and understand all warnings and instructions... of these guidelines to do to the possibility of your local authorized service center. Warning Tells you notice any metal parts near the print head. Label Overview STEP 3 STEP 4 Reference

Quick Setup Guide - English and Spanish
Page 10
...machine. Do not overload the electrical outlet sockets with too many appliances or plug the power cord into the electrical outlet. DK Rolls use thermal paper and thermal film. Be careful not to other damage. „Power Cord Use only the authorized power source (120V AC) for outdoor use the ...power cord if it to an inconspicuous area of the label may unpeel or become irremovable, the color of the intended surface. If the machine will ...
...machine. Do not overload the electrical outlet sockets with too many appliances or plug the power cord into the electrical outlet. DK Rolls use thermal paper and thermal film. Be careful not to other damage. „Power Cord Use only the authorized power source (120V AC) for outdoor use the ...power cord if it to an inconspicuous area of the label may unpeel or become irremovable, the color of the intended surface. If the machine will ...

Quick Setup Guide - English and Spanish
Page 11
... DK Roll uses thermal paper and thermal film so that can cause the color to change or fade. • Do not apply labels to any area exposed to clean the machine. Do not pull on top of the label to peel off. • Do not expose the DK Rolls to direct sunlight or near a... television, radio, etc. Store in the machine, the machine may be damaged or personal injury could fall and become damaged. • You should put the machine near an easily accessible, standard electrical socket. „DK Roll (DK Label and DK Tape) • Use only genuine Brother ...
... DK Roll uses thermal paper and thermal film so that can cause the color to change or fade. • Do not apply labels to any area exposed to clean the machine. Do not pull on top of the label to peel off. • Do not expose the DK Rolls to direct sunlight or near a... television, radio, etc. Store in the machine, the machine may be damaged or personal injury could fall and become damaged. • You should put the machine near an easily accessible, standard electrical socket. „DK Roll (DK Label and DK Tape) • Use only genuine Brother ...

Quick Setup Guide - English and Spanish
Page 12
...When applying CD/DVD labels, use of DK Labels included on each DK Roll may be cut properly. These labels cannot be easily peeled off these disks easily and using CD/DVD labels, be installed on multiple computers for applying CD/DVD labels. Brother accepts no responsibility for their labels. Labels peel off once ... use the applicator included with ink jet printers. 6 Introduction • As the end of the DK Roll is designed to not adhere to the label spool, the last label may not be more than indicated on the package. • If a label is removed after begin applied to a ...
...When applying CD/DVD labels, use of DK Labels included on each DK Roll may be cut properly. These labels cannot be easily peeled off these disks easily and using CD/DVD labels, be installed on multiple computers for applying CD/DVD labels. Brother accepts no responsibility for their labels. Labels peel off once ... use the applicator included with ink jet printers. 6 Introduction • As the end of the DK Roll is designed to not adhere to the label spool, the last label may not be more than indicated on the package. • If a label is removed after begin applied to a ...

Quick Setup Guide - English and Spanish
Page 13
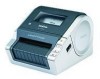
... Brother dealer. QL-1060N STEP 1 Getting started 1 Unpacking the QL-1060N Introduction Check that the package contains the following before using the QL-1060N. 7 Getting started Installing the Software For Macintosh® For Windows® USB cable CD-ROM SETUP & OPERATION GUIDE STEP 2 DK Label & Tape Guide AC Power cord DK Roll (Starter roll) Warranty Card Label tray The QL-1060N...
... Brother dealer. QL-1060N STEP 1 Getting started 1 Unpacking the QL-1060N Introduction Check that the package contains the following before using the QL-1060N. 7 Getting started Installing the Software For Macintosh® For Windows® USB cable CD-ROM SETUP & OPERATION GUIDE STEP 2 DK Label & Tape Guide AC Power cord DK Roll (Starter roll) Warranty Card Label tray The QL-1060N...

Quick Setup Guide - English and Spanish
Page 15
...the DK Roll into the slot, thread it as far as possible, and then close the cover. Label Overview • Unplug the power cord from the electrical outlet after you have finished using the QL-1060N. • Do not pull the power cord when unplugging it clicks right and left side. The wire... the other side. Press the ON/OFF button to turn the QL-1060N on, and then press the STEP 1 FEED button to set the roll. 4 Close the DK Roll compartment cover until directed to thread the end of the DK Roll into a electrical outlet. When unable to do so when installing the printer driver.
...the DK Roll into the slot, thread it as far as possible, and then close the cover. Label Overview • Unplug the power cord from the electrical outlet after you have finished using the QL-1060N. • Do not pull the power cord when unplugging it clicks right and left side. The wire... the other side. Press the ON/OFF button to turn the QL-1060N on, and then press the STEP 1 FEED button to set the roll. 4 Close the DK Roll compartment cover until directed to thread the end of the DK Roll into a electrical outlet. When unable to do so when installing the printer driver.

Quick Setup Guide - English and Spanish
Page 16
... cable and Network cable are not standard accessories. For details, see Appendix-Serial Cables of this equipment is longer than 10 labels continuously using the auto cut function, remove the paper guide to ensure compliance with the limits for EMC. could void the ...Connect this product to 10 individual label sheets. Prepare the appropriate cable for 10BASE-T or 100BASE-TX Fast Ethernet Network. Changes or modifications not expressly approved by Brother Industries, Ltd. 10 STEP1 Getting started 5 Installing the Label Tray The machine contains a label tray which can hold up to...
... cable and Network cable are not standard accessories. For details, see Appendix-Serial Cables of this equipment is longer than 10 labels continuously using the auto cut function, remove the paper guide to ensure compliance with the limits for EMC. could void the ...Connect this product to 10 individual label sheets. Prepare the appropriate cable for 10BASE-T or 100BASE-TX Fast Ethernet Network. Changes or modifications not expressly approved by Brother Industries, Ltd. 10 STEP1 Getting started 5 Installing the Label Tray The machine contains a label tray which can hold up to...

Quick Setup Guide - English and Spanish
Page 17
...subject to change without notice. 1 Start the computer and put the CD-ROM into the CD-ROM drive. STEP 2 STEP 3 Label Overview 3 Read the license agreement and click [Yes] if you agree with the terms and conditions. Installation items: 1 Standard ...Installation P-touch Editor 5.0, 1 P-touch Address Book 1.1, 2 Printer Driver, User's Guide (PDF), and Network User's Guide (PDF) 3 4 2 Custom Installation P-touch Editor 5.0, P-touch Address Book 1.1, Printer Driver, User's Guide (PDF), and Network User's Guide (PDF) 3 Utility Installation BRAdmin...
...subject to change without notice. 1 Start the computer and put the CD-ROM into the CD-ROM drive. STEP 2 STEP 3 Label Overview 3 Read the license agreement and click [Yes] if you agree with the terms and conditions. Installation items: 1 Standard ...Installation P-touch Editor 5.0, 1 P-touch Address Book 1.1, 2 Printer Driver, User's Guide (PDF), and Network User's Guide (PDF) 3 4 2 Custom Installation P-touch Editor 5.0, P-touch Address Book 1.1, Printer Driver, User's Guide (PDF), and Network User's Guide (PDF) 3 Utility Installation BRAdmin...

Quick Setup Guide - English and Spanish
Page 19
... 7-2 Choose Search the network for details. 7-3 Choose your printer. You can find your machine's IP address or its node name. STEP 4 Reference STEP 3 Label Overview „For shared network printer users 7-1 Choose Network Shared Printer, and then click [Next]. Click [Next]. Introduction Check that... the Printer Settings STEP 2 Page, please refer to the NETWORK USER'S GUIDE for devices and choose from a list of discovered devices (Recommended). Check that LAN cable and the machine are connected. 13 „For Network interface cable users 7-1 Choose Brother Peer-...
... 7-2 Choose Search the network for details. 7-3 Choose your printer. You can find your machine's IP address or its node name. STEP 4 Reference STEP 3 Label Overview „For shared network printer users 7-1 Choose Network Shared Printer, and then click [Next]. Click [Next]. Introduction Check that... the Printer Settings STEP 2 Page, please refer to the NETWORK USER'S GUIDE for devices and choose from a list of discovered devices (Recommended). Check that LAN cable and the machine are connected. 13 „For Network interface cable users 7-1 Choose Brother Peer-...

Quick Setup Guide - English and Spanish
Page 21
For more advanced printer management, use the latest Brother BRAdmin Professional utility version that case, disable your network,... of exceptions?" If the Windows Firewall is enabled on BRAdmin Light, visit us at http://solutions.brother.com. • If you require more information on your Personal Firewall software after the address information... from http://solutions.brother.com. • If you wish to add this application to the list of Brother network connected devices. STEP 3 Installing the Software For Macintosh® For Windows® Label Overview „Setting...
For more advanced printer management, use the latest Brother BRAdmin Professional utility version that case, disable your network,... of exceptions?" If the Windows Firewall is enabled on BRAdmin Light, visit us at http://solutions.brother.com. • If you require more information on your Personal Firewall software after the address information... from http://solutions.brother.com. • If you wish to add this application to the list of Brother network connected devices. STEP 3 Installing the Software For Macintosh® For Windows® Label Overview „Setting...

Quick Setup Guide - English and Spanish
Page 23
... drive. Getting started STEP 1 2 Click [Mac OS X] folder and double click [P-touch Editor 5.0 STEP 2 Installer]. Next, install the printer driver. The installation of printer driver is completed. STEP 3 Installing the Software For Macintosh® For Windows® Label Overview 4 Double click [Brother QL-1060N Driver.pkg] in as the administrator. The installation of software is completed.
... drive. Getting started STEP 1 2 Click [Mac OS X] folder and double click [P-touch Editor 5.0 STEP 2 Installer]. Next, install the printer driver. The installation of printer driver is completed. STEP 3 Installing the Software For Macintosh® For Windows® Label Overview 4 Double click [Brother QL-1060N Driver.pkg] in as the administrator. The installation of software is completed.

Quick Setup Guide - English and Spanish
Page 24
... to the next step. Now, go to Macintosh® via USB hub, it and then connect the USB cable. Choose QL-1060N from the list and click Add again to add the printer to the machine. For Mac OS® X 10.4.X users, go to the USB port of Macintosh®. 8 Double click the... Utility. At that time, connect the machine directly to step 10. „For Network interface cable users (Simple Network Configuration) 9-1 Click Add. USB port Serial port LAN port Power cord 7 Connect the USB/LAN cable to turn on the power. As the caution label is installed, and click in Mac OS®...
... to the next step. Now, go to Macintosh® via USB hub, it and then connect the USB cable. Choose QL-1060N from the list and click Add again to add the printer to the machine. For Mac OS® X 10.4.X users, go to the USB port of Macintosh®. 8 Double click the... Utility. At that time, connect the machine directly to step 10. „For Network interface cable users (Simple Network Configuration) 9-1 Click Add. USB port Serial port LAN port Power cord 7 Connect the USB/LAN cable to turn on the power. As the caution label is installed, and click in Mac OS®...

Quick Setup Guide - English and Spanish
Page 25
... the P-touch Editor Help. When specifying the Queue Name, use the machine. Label Overview 10 When the screen returns to the Printer Setup STEP 3 Utility. Introduction 19 9-2 Choose QL-1060N from the list and click Add again to add the printer to the Printer Setup Utility. (Mac OS® X 10.3.9) (Mac OS® X 10.4.x) STEP 1 Getting...
... the P-touch Editor Help. When specifying the Queue Name, use the machine. Label Overview 10 When the screen returns to the Printer Setup STEP 3 Utility. Introduction 19 9-2 Choose QL-1060N from the list and click Add again to add the printer to the Printer Setup Utility. (Mac OS® X 10.3.9) (Mac OS® X 10.4.x) STEP 1 Getting...

Quick Setup Guide - English and Spanish
Page 27
STEP 2 STEP 3 STEP 4 Label Overview Reference Introduction Getting started Installing the Software For Macintosh® For Windows® 21 3 Choose STATIC for the Boot Method. Enter the IP Address, Subnet Mask and Gateway, and then click [OK]. STEP 1 4 The address information will be saved to the printer.
STEP 2 STEP 3 STEP 4 Label Overview Reference Introduction Getting started Installing the Software For Macintosh® For Windows® 21 3 Choose STATIC for the Boot Method. Enter the IP Address, Subnet Mask and Gateway, and then click [OK]. STEP 1 4 The address information will be saved to the printer.
Quick Setup Guide - English and Spanish
Page 29
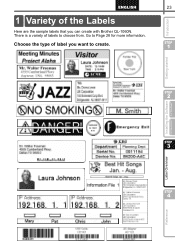
STEP 1 Getting started STEP 2 Installing the Software For Macintosh® For Windows® STEP 3 Label Overview STEP 4 Reference 23 Label Overview 1 Variety of the Labels Introduction Here are the sample labels that you want to create. Choose the type of labels to Page 28 for more information. There is a variety of label you can create with Brother QL-1060N. Go to choose from.
STEP 1 Getting started STEP 2 Installing the Software For Macintosh® For Windows® STEP 3 Label Overview STEP 4 Reference 23 Label Overview 1 Variety of the Labels Introduction Here are the sample labels that you want to create. Choose the type of labels to Page 28 for more information. There is a variety of label you can create with Brother QL-1060N. Go to choose from.

Quick Setup Guide - English and Spanish
Page 30
... details on how to create the labels, see the Help. It prevents the paper jam. Remove the labels from a Microsoft Office application. Use P-touch Editor's variety of editing functions to format and decorate your label. • Enter text in P-touch Editor. • Copy text from the Brother QL-1060N. Print the label from Microsoft Office. (for creating...
... details on how to create the labels, see the Help. It prevents the paper jam. Remove the labels from a Microsoft Office application. Use P-touch Editor's variety of editing functions to format and decorate your label. • Enter text in P-touch Editor. • Copy text from the Brother QL-1060N. Print the label from Microsoft Office. (for creating...


