
Quick Setup Guide - English and Spanish
Page 2
...and (2) this guide carefully before using the Brother QL-1060N. We strongly recommend that you read this device must accept any interference received, including interference that the product Product Name: Label Printer QL-1060N Model Number: QL-1060 This device complies with the instructions, ...is subject to radio communications. Federal Communications Commission (FCC) Declaration of Conformity (For USA Only) Responsible Party: Brother International Corporation 100 Somerset Corporate Boulevard Bridgewater, NJ 08807-0911 USA TEL: (908) 704-1700 declares that may cause ...
...and (2) this guide carefully before using the Brother QL-1060N. We strongly recommend that you read this device must accept any interference received, including interference that the product Product Name: Label Printer QL-1060N Model Number: QL-1060 This device complies with the instructions, ...is subject to radio communications. Federal Communications Commission (FCC) Declaration of Conformity (For USA Only) Responsible Party: Brother International Corporation 100 Somerset Corporate Boulevard Bridgewater, NJ 08807-0911 USA TEL: (908) 704-1700 declares that may cause ...

Quick Setup Guide - English and Spanish
Page 12
... each DK Roll may be more than indicated on the package. • If a label is removed after begin applied to a surface, some portion of the label may be installed on multiple computers for their labels. Brother accepts no responsibility for any loss or damage of data caused by the inappropriate use of...the License on the CD-ROM is meant for use permanent adhesive for use in an office, etc. These labels cannot be cut properly. Note: To account for use with ink jet printers. failure to do so could cause damage to the CD/DVD player. • User's shall take full ...
... each DK Roll may be more than indicated on the package. • If a label is removed after begin applied to a surface, some portion of the label may be installed on multiple computers for their labels. Brother accepts no responsibility for any loss or damage of data caused by the inappropriate use of...the License on the CD-ROM is meant for use permanent adhesive for use in an office, etc. These labels cannot be cut properly. Note: To account for use with ink jet printers. failure to do so could cause damage to the CD/DVD player. • User's shall take full ...

Quick Setup Guide - English and Spanish
Page 15
...OFF button to turn the QL-1060N on, and then press the STEP 1 FEED button to the QL-1060N and then plug the power cord into the slot, thread it clicks right and left side. 9 Introduction 3 Thread the end of the DK Roll into the slot until directed to thread the end ...the cover. STEP 4 Reference When unable to do so when installing the printer driver. The wire in the power cord may become damaged. • Do not connect the QL-1060N to the computer until it from the other side. Label Overview • Unplug the power cord from the electrical outlet after you...
...OFF button to turn the QL-1060N on, and then press the STEP 1 FEED button to the QL-1060N and then plug the power cord into the slot, thread it clicks right and left side. 9 Introduction 3 Thread the end of the DK Roll into the slot until directed to thread the end ...the cover. STEP 4 Reference When unable to do so when installing the printer driver. The wire in the power cord may become damaged. • Do not connect the QL-1060N to the computer until it from the other side. Label Overview • Unplug the power cord from the electrical outlet after you...

Quick Setup Guide - English and Spanish
Page 17
... not start up automatically, open the files on the CD-ROM and double click on the OS of the computer. STEP 2 STEP 3 Label Overview 3 Read the license agreement and click [Yes] if you agree with the terms and conditions. STEP 4 Follow the on-screen instructions...BRAdmin Light 4 User's Guide User's Guide (PDF), Network User's Guide (PDF), and link to install the P-touch Editor 5.0, P-touch Address Book 1.1, Printer Driver, and User's Guide as a whole. 11 Installing the Software Installing the Software Introduction 1. Install procedure is the example for Adobe® Reader®....
... not start up automatically, open the files on the CD-ROM and double click on the OS of the computer. STEP 2 STEP 3 Label Overview 3 Read the license agreement and click [Yes] if you agree with the terms and conditions. STEP 4 Follow the on-screen instructions...BRAdmin Light 4 User's Guide User's Guide (PDF), Network User's Guide (PDF), and link to install the P-touch Editor 5.0, P-touch Address Book 1.1, Printer Driver, and User's Guide as a whole. 11 Installing the Software Installing the Software Introduction 1. Install procedure is the example for Adobe® Reader®....

Quick Setup Guide - English and Spanish
Page 19
... USER'S GUIDE for devices and choose from a list of discovered devices (Recommended). STEP 4 Reference STEP 3 Label Overview „For shared network printer users 7-1 Choose Network Shared Printer, and then click [Next]. STEP 1 Getting started Installing the Software For Macintosh® For Windows® ... or its node name. Check that LAN cable and the machine are connected. Or enter your printer. Now, go to -Peer Network Printer, and then click [Next]. 13 „For Network interface cable users 7-1 Choose Brother Peer-to step 8 on page 14. Click [Next].
... USER'S GUIDE for devices and choose from a list of discovered devices (Recommended). STEP 4 Reference STEP 3 Label Overview „For shared network printer users 7-1 Choose Network Shared Printer, and then click [Next]. STEP 1 Getting started Installing the Software For Macintosh® For Windows® ... or its node name. Check that LAN cable and the machine are connected. Or enter your printer. Now, go to -Peer Network Printer, and then click [Next]. 13 „For Network interface cable users 7-1 Choose Brother Peer-to step 8 on page 14. Click [Next].

Quick Setup Guide - English and Spanish
Page 21
...search for initial setup of exceptions?" For more information on BRAdmin Light, visit us at http://solutions.brother.com. • If you require more advanced printer management, use the latest Brother BRAdmin Professional utility version that case, disable your PC, the message "Do you wish to add ...In that is the same screen as IP address. appears. STEP 3 Installing the Software For Macintosh® For Windows® Label Overview „Setting your IP address, Subnet Mask and Gateway using Personal Firewall software, BRAdmin Light may fail to do the following 4 operation....
...search for initial setup of exceptions?" For more information on BRAdmin Light, visit us at http://solutions.brother.com. • If you require more advanced printer management, use the latest Brother BRAdmin Professional utility version that case, disable your PC, the message "Do you wish to add ...In that is the same screen as IP address. appears. STEP 3 Installing the Software For Macintosh® For Windows® Label Overview „Setting your IP address, Subnet Mask and Gateway using Personal Firewall software, BRAdmin Light may fail to do the following 4 operation....

Quick Setup Guide - English and Spanish
Page 23
...CD-ROM into CD-ROM drive. Follow the on -screen instructions. 3 After the installation is completed and the screen shown right is restarted. QL-1060N screen is displayed, click [Restart]. Getting started STEP 1 2 Click [Mac OS X] folder and double click [P-touch Editor 5.0 STEP 2 ... Clip Art, and Printer Driver. When using Mac OS® This section explains how to set it does not start up automatically, double click QL-1060N (CD-ROM) icon. STEP 3 Installing the Software For Macintosh® For Windows® Label Overview 4 Double click [Brother QL-1060N Driver.pkg] in ...
...CD-ROM into CD-ROM drive. Follow the on -screen instructions. 3 After the installation is completed and the screen shown right is restarted. QL-1060N screen is displayed, click [Restart]. Getting started STEP 1 2 Click [Mac OS X] folder and double click [P-touch Editor 5.0 STEP 2 ... Clip Art, and Printer Driver. When using Mac OS® This section explains how to set it does not start up automatically, double click QL-1060N (CD-ROM) icon. STEP 3 Installing the Software For Macintosh® For Windows® Label Overview 4 Double click [Brother QL-1060N Driver.pkg] in ...

Quick Setup Guide - English and Spanish
Page 24
...LAN port Power cord 7 Connect the USB/LAN cable to turn on the USB port of Macintosh®. As the caution label is installed, and click in order of [Applications]-[Utilities]-[Printer Setup Utility]. „For USB interface cable users 9 Click Add and choose USB at the top of the screen (...correctly. At that time, connect the machine directly to the next step. For Mac OS® X 10.4.X users, go to Macintosh® via USB hub, it and then connect the USB cable. Choose QL-1060N from the list and click Add again to add the printer to the machine. 18 STEP2 Installing the ...
...LAN port Power cord 7 Connect the USB/LAN cable to turn on the USB port of Macintosh®. As the caution label is installed, and click in order of [Applications]-[Utilities]-[Printer Setup Utility]. „For USB interface cable users 9 Click Add and choose USB at the top of the screen (...correctly. At that time, connect the machine directly to the next step. For Mac OS® X 10.4.X users, go to Macintosh® via USB hub, it and then connect the USB cable. Choose QL-1060N from the list and click Add again to add the printer to the machine. 18 STEP2 Installing the ...

Quick Setup Guide - English and Spanish
Page 25
Enter the IP STEP 2 address of the Ethernet address. Choose QL-1060N from the list and click Add again to add the printer to the Printer List screen, check that "QL- 1060N" is added, and close the Printer List screen. Label Overview 10 When the screen returns to the Printer Setup STEP 3 Utility. Now you can use the value brn_xxxxxx_p1...
Enter the IP STEP 2 address of the Ethernet address. Choose QL-1060N from the list and click Add again to add the printer to the Printer List screen, check that "QL- 1060N" is added, and close the Printer List screen. Label Overview 10 When the screen returns to the Printer Setup STEP 3 Utility. Now you can use the value brn_xxxxxx_p1...

Quick Setup Guide - English and Spanish
Page 27
STEP 1 4 The address information will be saved to the printer. STEP 2 STEP 3 STEP 4 Label Overview Reference Enter the IP Address, Subnet Mask and Gateway, and then click [OK]. Introduction Getting started Installing the Software For Macintosh® For Windows® 21 3 Choose STATIC for the Boot Method.
STEP 1 4 The address information will be saved to the printer. STEP 2 STEP 3 STEP 4 Label Overview Reference Enter the IP Address, Subnet Mask and Gateway, and then click [OK]. Introduction Getting started Installing the Software For Macintosh® For Windows® 21 3 Choose STATIC for the Boot Method.

Users Manual - English
Page 1
Introduction Creating Labels Appendix User's Guide The contents of this guide and the specifications of this guide can be differed depending on the materials presented, including but not limited to typographical and other errors relating to change without notice in this product are subject to the publications. Brother reserves the right to make changes without notice. The screen images in the specifications and materials contained herein and shall not be responsible for any damages (including consequential) caused by reliance on your OS or printer. 1
Introduction Creating Labels Appendix User's Guide The contents of this guide and the specifications of this guide can be differed depending on the materials presented, including but not limited to typographical and other errors relating to change without notice in this product are subject to the publications. Brother reserves the right to make changes without notice. The screen images in the specifications and materials contained herein and shall not be responsible for any damages (including consequential) caused by reliance on your OS or printer. 1
Users Manual - English
Page 2
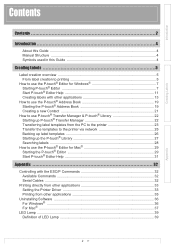
...22 Starting up P-touch® Transfer Manager 22 Transferring label templates from the PC to the printer 23 Transfer the templates to the printer via network 25 Backing up label templates 26 Starting up the P-touch® Library 27 Searching labels ...28 How to use the P-touch® Editor for... Mac 29 Starting the P-touch® Editor 29 Start P-touch® Editor Help 31 Appendix 32 Controlling with the ESC/P Commands 32 Available Commands 32 Serial Cables ...32 Printing directly from other applications 33 Setting the Printer ...
...22 Starting up P-touch® Transfer Manager 22 Transferring label templates from the PC to the printer 23 Transfer the templates to the printer via network 25 Backing up label templates 26 Starting up the P-touch® Library 27 Searching labels ...28 How to use the P-touch® Editor for... Mac 29 Starting the P-touch® Editor 29 Start P-touch® Editor Help 31 Appendix 32 Controlling with the ESC/P Commands 32 Available Commands 32 Serial Cables ...32 Printing directly from other applications 33 Setting the Printer ...

Users Manual - English
Page 4
... Editor. Symbols used in injury, damage, or failed operations. This symbol shows information or directions that can be viewed from the P-touch Setup application when it is run from the CD-ROM. Introduction Introduction Creating Labels The Brother QL-1060N label printer (hereafter referred to as "the machine") enables you should be viewed from the P-touch Setup...
... Editor. Symbols used in injury, damage, or failed operations. This symbol shows information or directions that can be viewed from the P-touch Setup application when it is run from the CD-ROM. Introduction Introduction Creating Labels The Brother QL-1060N label printer (hereafter referred to as "the machine") enables you should be viewed from the P-touch Setup...

Users Manual - English
Page 7
...Open] dialog box and click . • You can choose the label printer and media size. • When you can choose and open an existing label. Starting P-touch® Editor 1 Click [Start]-[All Programs (Programs)]- [Brother P-touch]-[P-touch Editor 5.0]. When P-touch Editor is the example for ...choose [Open File], the [Open] dialog box appears. You can create various kinds of labels and details on the Quick Launch bar. Use the Brother Solutions Center to learn step by label applications. • When you choose [View History], the [History] dialog appears. The following...
...Open] dialog box and click . • You can choose the label printer and media size. • When you can choose and open an existing label. Starting P-touch® Editor 1 Click [Start]-[All Programs (Programs)]- [Brother P-touch]-[P-touch Editor 5.0]. When P-touch Editor is the example for ...choose [Open File], the [Open] dialog box appears. You can create various kinds of labels and details on the Quick Launch bar. Use the Brother Solutions Center to learn step by label applications. • When you choose [View History], the [History] dialog appears. The following...
Users Manual - English
Page 12
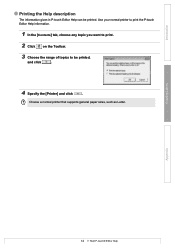
Introduction Printing the Help description The information given in P-touch Editor Help can be printed, and click . 4 Specify the [Printer] and click . Use your normal printer to print the P-touch Editor Help information. 1 In the [Contents] tab, choose any topic you want to print. 2 Click on the Toolbar. 3 Choose the range of topics to be printed. Choose a normal printer that supports general paper sizes, such as Letter. Creating Labels Appendix 12 Start P-touch® Editor Help
Introduction Printing the Help description The information given in P-touch Editor Help can be printed, and click . 4 Specify the [Printer] and click . Use your normal printer to print the P-touch Editor Help information. 1 In the [Contents] tab, choose any topic you want to print. 2 Click on the Toolbar. 3 Choose the range of topics to be printed. Choose a normal printer that supports general paper sizes, such as Letter. Creating Labels Appendix 12 Start P-touch® Editor Help
Users Manual - English
Page 22
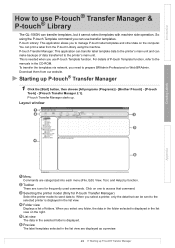
...the list view are icons for P-touch Transfer Manager) Select the printer model to send data to. P-touch Transfer Manager starts up P-touch® Transfer Manager 1 Click the [Start] button, then choose [All programs (Programs)] - [Brother P-touch] - [P-touch Tools] - [P-touch Transfer Manager 2.1]....application can transfer label template data to the printer's main unit and can transfer templates, but it cannot select templates with machine side operation. To transfer the templates via network, you can use P-touch® Transfer Manager & P-touch® Library The QL-1060N can make ...
...the list view are icons for P-touch Transfer Manager) Select the printer model to send data to. P-touch Transfer Manager starts up P-touch® Transfer Manager 1 Click the [Start] button, then choose [All programs (Programs)] - [Brother P-touch] - [P-touch Tools] - [P-touch Transfer Manager 2.1]....application can transfer label template data to the printer's main unit and can transfer templates, but it cannot select templates with machine side operation. To transfer the templates via network, you can use P-touch® Transfer Manager & P-touch® Library The QL-1060N can make ...

Users Manual - English
Page 23
... with the P-touch Library. Display Style Changes the file display format. Transferring label templates from the PC to the Brother P-touch printer using the P-touch Transfer Manager. Introduction Creating Labels Explanations of the Icons Icon Button name Transfer (Only for P-touch Transfer Manager) Backup (Only for P-touch Transfer Manager) Open Print (Only for P-touch...
... with the P-touch Library. Display Style Changes the file display format. Transferring label templates from the PC to the Brother P-touch printer using the P-touch Transfer Manager. Introduction Creating Labels Explanations of the Icons Icon Button name Transfer (Only for P-touch Transfer Manager) Backup (Only for P-touch Transfer Manager) Open Print (Only for P-touch...

Users Manual - English
Page 24
...transfer of data, move all the transfer data to transfer, then click . For details, refer to your printer model. You can check the Key Assign number used for data already transferred to printer by backing up label templates" (page 26). • You can be used for data already transferred to the... of data other folder under Filter. Drag the transfer data from All contents or from the PC to the folder you change to the printer. 24 Transferring label templates from Layouts or some other than message texts. • If you just made in a data name. 5 Select the data or ...
...transfer of data, move all the transfer data to transfer, then click . For details, refer to your printer model. You can check the Key Assign number used for data already transferred to printer by backing up label templates" (page 26). • You can be used for data already transferred to the... of data other folder under Filter. Drag the transfer data from All contents or from the PC to the folder you change to the printer. 24 Transferring label templates from Layouts or some other than message texts. • If you just made in a data name. 5 Select the data or ...
Users Manual - English
Page 25
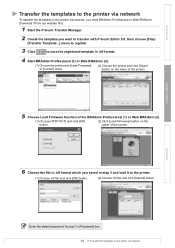
Introduction Creating Labels Transfer the templates to the printer via network To transfer the templates to the printer via network, you want to transfer with P-touch Editor 5.0, then choose [File]- [Transfer Template...] menu to register. 3 Click to the printer. (1) Choose .blf file and click [OK] button. (2) Choose .... you saved in step 3 and load it to save the registered template in [Password] box. 25 Transfer the templates to the printer via network Download it from our website first. 1 Start the P-touch Transfer Manager. 2 Create the template you need BRAdmin Professional ...
Introduction Creating Labels Transfer the templates to the printer via network To transfer the templates to the printer via network, you want to transfer with P-touch Editor 5.0, then choose [File]- [Transfer Template...] menu to register. 3 Click to the printer. (1) Choose .blf file and click [OK] button. (2) Choose .... you saved in step 3 and load it to save the registered template in [Password] box. 25 Transfer the templates to the printer via network Download it from our website first. 1 Start the P-touch Transfer Manager. 2 Create the template you need BRAdmin Professional ...

Users Manual - English
Page 26
...be possible to retransfer backed-up data to a printer of a different model than the one the data was originally backed up from , then click . Introduction Creating Labels Backing up label templates This transfers label templates and other data in the printer to the PC. • Valid only when ...computer is transferred to back up label templates Deleting all the printer's data is displayed. 2 Select the printer to that new folder. Appendix 26 Backing up from . 1 Connect the PC and the printer by cable and switch On the printer power. The printer model name is displayed in the...
...be possible to retransfer backed-up data to a printer of a different model than the one the data was originally backed up from , then click . Introduction Creating Labels Backing up label templates This transfers label templates and other data in the printer to the PC. • Valid only when ...computer is transferred to back up label templates Deleting all the printer's data is displayed. 2 Select the printer to that new folder. Appendix 26 Backing up from . 1 Connect the PC and the printer by cable and switch On the printer power. The printer model name is displayed in the...


