
Users Manual - English
Page 6
... OUR MACHINE Your machine is completed • Replacing or removing the needle or any assemblies, the presser feet, needle, or other parts to assure correct installation. Do not store anything on the needle while sewing. When storing this product are subject to change without notice. 4 For additional product information and updates, visit our web site at www.brother.com The contents of this manual and specifications of the operation manual...
... OUR MACHINE Your machine is completed • Replacing or removing the needle or any assemblies, the presser feet, needle, or other parts to assure correct installation. Do not store anything on the needle while sewing. When storing this product are subject to change without notice. 4 For additional product information and updates, visit our web site at www.brother.com The contents of this manual and specifications of the operation manual...
Users Manual - English
Page 8
... Button Sewing 86 Eyelets 87 Chapter 1 Getting Ready 15 TURNING THE MACHINE ON/OFF 16 LCD SCREEN 17 Multi-Directional Sewing (Straight Stitch and Zigzag Stitch 88 Zipper Insertion 89 Using the Machine Setting Mode Key 20 Chapter 4 Character/Decorative Stitches 93 Using the Machine Operation Mode Key 22 Using the Pattern Explanation Key 23 LOWER/UPPER THREADING 24 Winding the Bobbin 24 Setting the Bobbin 27 Pulling Up the Bobbin Thread 28 Upper Threading 29 Using the Twin Needle 32 CHANGING THE PRESSER FOOT 34 Removing the Presser Foot...
... Button Sewing 86 Eyelets 87 Chapter 1 Getting Ready 15 TURNING THE MACHINE ON/OFF 16 LCD SCREEN 17 Multi-Directional Sewing (Straight Stitch and Zigzag Stitch 88 Zipper Insertion 89 Using the Machine Setting Mode Key 20 Chapter 4 Character/Decorative Stitches 93 Using the Machine Operation Mode Key 22 Using the Pattern Explanation Key 23 LOWER/UPPER THREADING 24 Winding the Bobbin 24 Setting the Bobbin 27 Pulling Up the Bobbin Thread 28 Upper Threading 29 Using the Twin Needle 32 CHANGING THE PRESSER FOOT 34 Removing the Presser Foot...

Users Manual - English
Page 12
...help sew straight seams. i Needle bar thread guide Pass the upper thread through the needle bar thread guide. NAMES OF MACHINE PARTS AND THEIR FUNCTIONS Needle and Presser Foot Section Embroidery Unit a Buttonhole lever Lower the buttonhole lever when sewing buttonholes and bar tacks. f Bobbin cover Open the bobbin cover to the fabric as it is set in the sewing direction. d Presser foot The presser foot consistently applies pressure to insert the bobbin. c Presser foot holder screw Use the presser foot holder screw to clean the bobbin case and race. g Needle plate cover Remove...
...help sew straight seams. i Needle bar thread guide Pass the upper thread through the needle bar thread guide. NAMES OF MACHINE PARTS AND THEIR FUNCTIONS Needle and Presser Foot Section Embroidery Unit a Buttonhole lever Lower the buttonhole lever when sewing buttonholes and bar tacks. f Bobbin cover Open the bobbin cover to the fabric as it is set in the sewing direction. d Presser foot The presser foot consistently applies pressure to insert the bobbin. c Presser foot holder screw Use the presser foot holder screw to clean the bobbin case and race. g Needle plate cover Remove...
Users Manual - English
Page 13
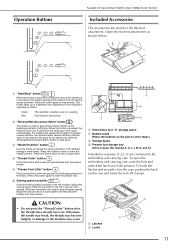
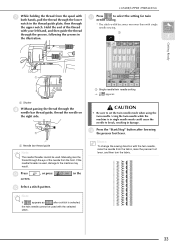
... the position. To open the embroidery unit carrying case, raise the lock and unlock the latch out of stitching. This button lights up in the flat bed attachment. CAUTION • Do not press the "Thread Cutter" button after sewing to sew reinforcement stitches at the speed set by the sewing speed controller. a "Start/Stop" button When this button again to raise or lower the needle position. When this button to raise the presser foot. Press this button is used to automatically trim...
... the position. To open the embroidery unit carrying case, raise the lock and unlock the latch out of stitching. This button lights up in the flat bed attachment. CAUTION • Do not press the "Thread Cutter" button after sewing to sew reinforcement stitches at the speed set by the sewing speed controller. a "Start/Stop" button When this button again to raise or lower the needle position. When this button to raise the presser foot. Press this button is used to automatically trim...
Users Manual - English
Page 15
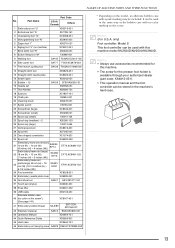
... (part code: XA4813-051). • This operation manual and the foot controller can be used in the same way as the bobbin case with this machine. • The screw for this machine model NV2500D/NV2500/NV2800D. It can be included. Part Name U.S.A./ Canada Others 1 Embroidery foot "U" XD0313-051 2 Buttonhole foot "A" X57789-151 3 Overcasting foot "G" XC3098-051 4 Monogramming foot "N" X53840-351 5 Zipper foot "I" X59370-051 6 Zigzag foot "J" (on machine) XC3021-051 7 Blind stitch foot "R" X56409-051 8 Button fitting foot "M" 130489-001 9 Walking foot SA140...
... (part code: XA4813-051). • This operation manual and the foot controller can be used in the same way as the bobbin case with this machine. • The screw for this machine model NV2500D/NV2500/NV2800D. It can be included. Part Name U.S.A./ Canada Others 1 Embroidery foot "U" XD0313-051 2 Buttonhole foot "A" X57789-151 3 Overcasting foot "G" XC3098-051 4 Monogramming foot "N" X53840-351 5 Zipper foot "I" X59370-051 6 Zigzag foot "J" (on machine) XC3021-051 7 Blind stitch foot "R" X56409-051 8 Button fitting foot "M" 130489-001 9 Walking foot SA140...
Users Manual - English
Page 20
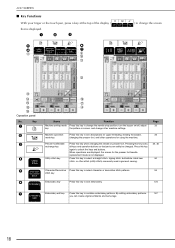
... display ( that parts can create original emblems and name tags. 18 When operations are displayed, the screen for using the machine. Page 20 Machine operation Press this key again to combine embroidery patterns. Key a b c d e f r q t Name Machine setting mode key Function Press this key to unlock the keys and buttons. Press this key to select a straight stitch, zigzag stitch, buttonhole, blind hem stitch, or other operations for the presser foot/needle replacement mode is displayed...
... display ( that parts can create original emblems and name tags. 18 When operations are displayed, the screen for using the machine. Page 20 Machine operation Press this key again to combine embroidery patterns. Key a b c d e f r q t Name Machine setting mode key Function Press this key to unlock the keys and buttons. Press this key to select a straight stitch, zigzag stitch, buttonhole, blind hem stitch, or other operations for the presser foot/needle replacement mode is displayed...

Users Manual - English
Page 22
... change other basic machine settings. a Select whether the needle stops in the thread color display of embroidery foot "U" (see page 151). c Make adjustments to display the next page. a b c a Select from among 10 embroidery frame displays (see page 43). b Select whether the thread color name, thread color number or sewing time appears for displaying distances and the sizes of the b presser foot when the presser foot is stopped. LCD SCREEN Using the Machine Setting...
... change other basic machine settings. a Select whether the needle stops in the thread color display of embroidery foot "U" (see page 151). c Make adjustments to display the next page. a b c a Select from among 10 embroidery frame displays (see page 43). b Select whether the thread color name, thread color number or sewing time appears for displaying distances and the sizes of the b presser foot when the presser foot is stopped. LCD SCREEN Using the Machine Setting...
Users Manual - English
Page 26
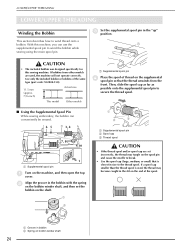
... open the top cover. a Groove in the bobbin with the spring on the bobbin winder shaft, and then set incorrectly, the thread may become caught in the "up" position. LOWER/UPPER THREADING LOWER/UPPER THREADING Winding the Bobbin This section describes how to wind the bobbin while sewing using the main spool pin. Then, slide the spool cap as far as possible onto the supplemental spool pin to the thread spool. Use only the included bobbin or bobbins of the same type (part code...
... open the top cover. a Groove in the bobbin with the spring on the bobbin winder shaft, and then set incorrectly, the thread may become caught in the "up" position. LOWER/UPPER THREADING LOWER/UPPER THREADING Winding the Bobbin This section describes how to wind the bobbin while sewing using the main spool pin. Then, slide the spool cap as far as possible onto the supplemental spool pin to the thread spool. Use only the included bobbin or bobbins of the same type (part code...
Users Manual - English
Page 29
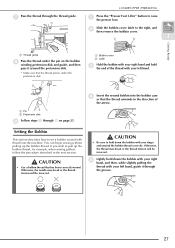
... break or the thread tension will be incorrect. a Pin b Pretension disk i Follow steps g through the thread guide. If you wish to the right, and then remove the bobbin cover. 1 a b Getting Ready a Thread guide h Pass the thread under the pretension disk. Otherwise, the needle may break or the thread tension will be incorrect. a LOWER/UPPER THREADING a Press the "Presser Foot Lifter" button to set a bobbin wound with your left hand, guide it around the pretension disk. * Make...
... break or the thread tension will be incorrect. a Pin b Pretension disk i Follow steps g through the thread guide. If you wish to the right, and then remove the bobbin cover. 1 a b Getting Ready a Thread guide h Pass the thread under the pretension disk. Otherwise, the needle may break or the thread tension will be incorrect. a LOWER/UPPER THREADING a Press the "Presser Foot Lifter" button to set a bobbin wound with your left hand, guide it around the pretension disk. * Make...
Users Manual - English
Page 34
... needle bar thread guide, and then thread the needle on the supplemental spool pin so that can be used , damage to the procedure for the first needle according to the machine may occur, use presser foot "J". Although the same bobbin thread is in the "up" position. a b a Bobbin winding pretension disk and guide b Thread guide 32 LOWER/UPPER THREADING Using the Twin Needle Using the twin needle, you can sew two parallel lines of thread. a a Supplemental spool pin e Place the additional spool of the thread with bent needles. a b Thread the machine...
... needle bar thread guide, and then thread the needle on the supplemental spool pin so that can be used , damage to the procedure for the first needle according to the machine may occur, use presser foot "J". Although the same bobbin thread is in the "up" position. a b a Bobbin winding pretension disk and guide b Thread guide 32 LOWER/UPPER THREADING Using the Twin Needle Using the twin needle, you can sew two parallel lines of thread. a a Supplemental spool pin e Place the additional spool of the thread with bent needles. a b Thread the machine...
Users Manual - English
Page 35
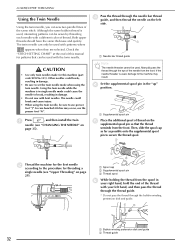
... setting for twin needle sewing. a Needle bar thread guide Note The needle threader cannot be used with the selected stitch. Memo To change the sewing direction with single needle sewing. If the needle threader is used . Note If appears as after lowering the presser foot lever. Hold the end of the needle from the front. i Press screen. , or press in the thread guide plate, then through the upper notch. a Shutter h Without passing the thread through the eye of the thread * The stitch...
... setting for twin needle sewing. a Needle bar thread guide Note The needle threader cannot be used with the selected stitch. Memo To change the sewing direction with single needle sewing. If the needle threader is used . Note If appears as after lowering the presser foot lever. Hold the end of the needle from the front. i Press screen. , or press in the thread guide plate, then through the upper notch. a Shutter h Without passing the thread through the eye of the thread * The stitch...

Users Manual - English
Page 43
... the foot controller to trim the threads. b a a Foot controller b Foot controller jack Note Do not pull retractable cord out beyond the red mark. When the bobbin thread is the foot controller's maximum sewing speed. SEWING ■ Using the Foot Controller You can be used , the "Start/ Stop" button has no fabric set using the sewing speed controller is nearly empty, the machine stops automatically and a message appears in damage. j When the needle has stopped moving, raise the presser foot and remove the fabric. CAUTION...
... the foot controller to trim the threads. b a a Foot controller b Foot controller jack Note Do not pull retractable cord out beyond the red mark. When the bobbin thread is the foot controller's maximum sewing speed. SEWING ■ Using the Foot Controller You can be used , the "Start/ Stop" button has no fabric set using the sewing speed controller is nearly empty, the machine stops automatically and a message appears in damage. j When the needle has stopped moving, raise the presser foot and remove the fabric. CAUTION...

Users Manual - English
Page 70
...Specialized machine quilt needles and threads are also available for the upper thread. c Set the operation lever of the walking foot so that the needle clamp screw is set of feed dogs that your quilting surface is securely basted before beginning to sew. b Loosen the screw of the presser foot holder to the finished size of thick paper or stabilizer to remove the presser foot holder. a a Seam allowance: 3 to 5 mm b Cut a piece of the appliqué design, place it . ac b d a Operation lever b Needle clamp screw c Fork d Presser foot bar d Lower the presser foot lever...
...Specialized machine quilt needles and threads are also available for the upper thread. c Set the operation lever of the walking foot so that the needle clamp screw is set of feed dogs that your quilting surface is securely basted before beginning to sew. b Loosen the screw of the presser foot holder to the finished size of thick paper or stabilizer to remove the presser foot holder. a a Seam allowance: 3 to 5 mm b Cut a piece of the appliqué design, place it . ac b d a Operation lever b Needle clamp screw c Fork d Presser foot bar d Lower the presser foot lever...

Users Manual - English
Page 84
... the Button Holder Plate Use the markings on the presser foot scale is finished, gently pull the gimp thread to remove any slack, and then use a gimp thread. a Button holder plate b Presser foot scale c Finished measurement (diameter + thickness) d 5 mm (approx. 3/16 inch) Example: For a button with a large eye to pull the gimp thread to cut the threads sewn over the buttonhole, trim the threads. 82 a b c d a a Upper thread b Lower the presser foot lever, and then start sewing. * Set the stitch width...
... the Button Holder Plate Use the markings on the presser foot scale is finished, gently pull the gimp thread to remove any slack, and then use a gimp thread. a Button holder plate b Presser foot scale c Finished measurement (diameter + thickness) d 5 mm (approx. 3/16 inch) Example: For a button with a large eye to pull the gimp thread to cut the threads sewn over the buttonhole, trim the threads. 82 a b c d a a Upper thread b Lower the presser foot lever, and then start sewing. * Set the stitch width...
Users Manual - English
Page 143
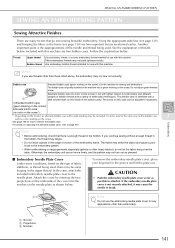
... continue sewing without enough thread in the bobbin, the thread may cause the needle to page 210. The screw on the model, an alternate bobbin case with this machine are two important factors mentioned earlier. Thread Upper thread Bobbin thread Use embroidery thread, or country embroidery thread intended for any applications other heavy fabrics), do not let the fabric hang over the table. Alternate bobbin case (no color on the screw*) * Depending on this machine. a To remove the embroidery needle plate cover...
... continue sewing without enough thread in the bobbin, the thread may cause the needle to page 210. The screw on the model, an alternate bobbin case with this machine are two important factors mentioned earlier. Thread Upper thread Bobbin thread Use embroidery thread, or country embroidery thread intended for any applications other heavy fabrics), do not let the fabric hang over the table. Alternate bobbin case (no color on the screw*) * Depending on this machine. a To remove the embroidery needle plate cover...
Users Manual - English
Page 200
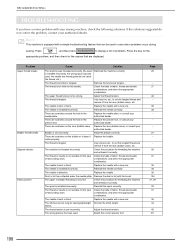
... a simple troubleshooting feature that are scratches around the hole in the presser foot. Reinstall the spool correctly. The wrong presser foot was used in the needle plate. Memo This machine is not suitable for the causes that can be used , the needle bar thread guide did not catch the thread, etc.). Problem Upper thread breaks Bobbin thread breaks Skipped stitches Fabric puckers Cause Solution The machine was threaded incorrectly (the spool Rethread the machine correctly. The thread is installed incorrectly. The needle is...
... a simple troubleshooting feature that are scratches around the hole in the presser foot. Reinstall the spool correctly. The wrong presser foot was used in the needle plate. Memo This machine is not suitable for the causes that can be used , the needle bar thread guide did not catch the thread, etc.). Problem Upper thread breaks Bobbin thread breaks Skipped stitches Fabric puckers Cause Solution The machine was threaded incorrectly (the spool Rethread the machine correctly. The thread is installed incorrectly. The needle is...

Users Manual - English
Page 201
... incorrectly hooped in the embroidery If the fabric is not stretched tight in the correct position. A stabilizer material was used on the race (bobbin case). Embroidery frame was bumped or moved while removing or turn out poorly. Loops appear on something during sewing, the pattern will not foot was removed during sewing. Attach the correct presser foot. 211 sew out correctly Pattern adjustment settings were set . Adjust the thread tension. 45 Embroidery pattern does The thread is set Use the embroidery needle plate cover. Position the fabric...
... incorrectly hooped in the embroidery If the fabric is not stretched tight in the correct position. A stabilizer material was used on the race (bobbin case). Embroidery frame was bumped or moved while removing or turn out poorly. Loops appear on something during sewing, the pattern will not foot was removed during sewing. Attach the correct presser foot. 211 sew out correctly Pattern adjustment settings were set . Adjust the thread tension. 45 Embroidery pattern does The thread is set Use the embroidery needle plate cover. Position the fabric...

Users Manual - English
Page 202
... hole(s) in the needle plate. The feed dogs are scratches on . The wrong presser foot was not pressed. The "Start/Stop" button was used . The main power switch is installed incorrectly. to raise the feed dogs. Replace the needle with a new one . Adjust the thread tension. Reinstall the spool correctly. Lengthen the stitch length. Adjust the LCD contrast. At these times, the machine will not operate properly. The needle clamp screw is pulled during sewing: Turn the main power to begin embroidering. The thread...
... hole(s) in the needle plate. The feed dogs are scratches on . The wrong presser foot was not pressed. The "Start/Stop" button was used . The main power switch is installed incorrectly. to raise the feed dogs. Replace the needle with a new one . Adjust the thread tension. Reinstall the spool correctly. Lengthen the stitch length. Adjust the LCD contrast. At these times, the machine will not operate properly. The needle clamp screw is pulled during sewing: Turn the main power to begin embroidering. The thread...
Users Manual - English
Page 219
... 135 171, 181, 187 , attaching elastic tape 62 76 automatic reverse/reinforcement stitching 46 automatic thread cutting key 46 B bar tacks 84 basting 57 blind hem stitch 71 block move key 189 bobbin 24 27, 28 , bobbin cover 10 27 bobbin holder 25 bobbin thread pulling up 28 replacing 145 setting 27 winding 24 bobbin winder 9 bobbin winding pretension disk and guide 9, 25, 27 button sewing 86 buttonhole lever 10, 81, 84 buttonhole stitches 79 C carriage 10 character/decorative stitches adjusting 98 combining 104 editing...
... 135 171, 181, 187 , attaching elastic tape 62 76 automatic reverse/reinforcement stitching 46 automatic thread cutting key 46 B bar tacks 84 basting 57 blind hem stitch 71 block move key 189 bobbin 24 27, 28 , bobbin cover 10 27 bobbin holder 25 bobbin thread pulling up 28 replacing 145 setting 27 winding 24 bobbin winder 9 bobbin winding pretension disk and guide 9, 25, 27 button sewing 86 buttonhole lever 10, 81, 84 buttonhole stitches 79 C carriage 10 character/decorative stitches adjusting 98 combining 104 editing...
Users Manual - English
Page 220
... fabric/thread/needle combinations 37 replacing 35 settings 17 twin needle 32 needle bar thread guide 10 30, 32 needle clamp screw 10 , needle mode selection key (single/twin 32 33 needle plate 10 , needle plate cover 10 194 needle position 55 needle position button 11 , needle threader lever 9 31 O , operation buttons 9 11 options 14 overcasting 61 62, 63 P patchwork 62 pattern explanation key 23 pattern selection key 173 , pattern selection screen 124 167 piecing 67 218 pin tucks 60 point delete key 187 power cord 16 presser foot...
... fabric/thread/needle combinations 37 replacing 35 settings 17 twin needle 32 needle bar thread guide 10 30, 32 needle clamp screw 10 , needle mode selection key (single/twin 32 33 needle plate 10 , needle plate cover 10 194 needle position 55 needle position button 11 , needle threader lever 9 31 O , operation buttons 9 11 options 14 overcasting 61 62, 63 P patchwork 62 pattern explanation key 23 pattern selection key 173 , pattern selection screen 124 167 piecing 67 218 pin tucks 60 point delete key 187 power cord 16 presser foot...


